The System Settings menu contains configuration details for major system components, including authenticators, mail and authentication servers, databases and more. Correct configuration of these settings is essential for successful operation of the platform.
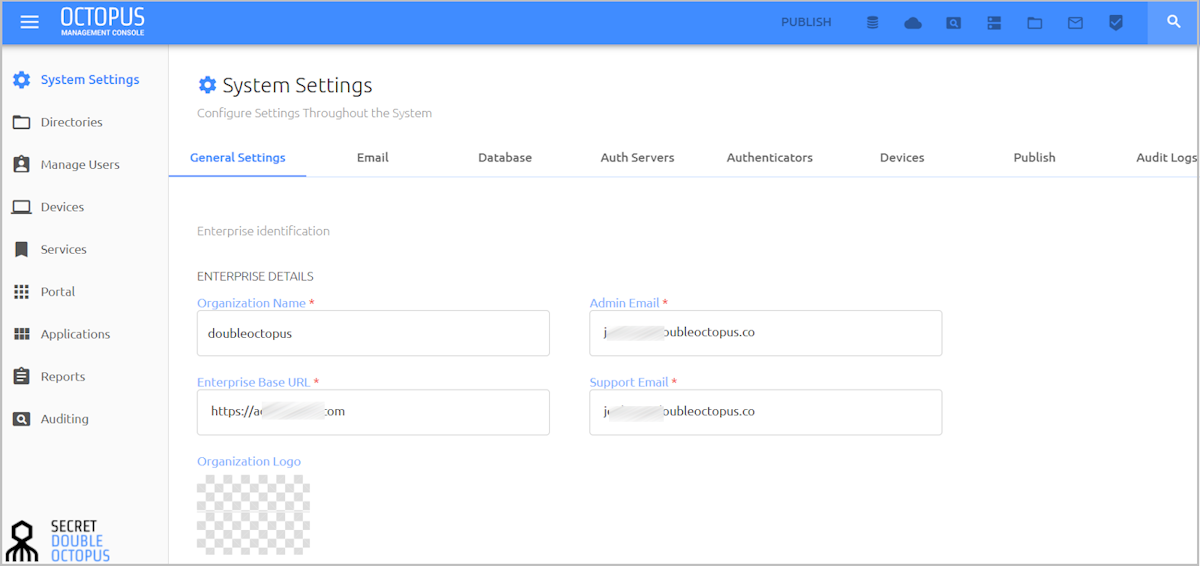
The currently selected tab of the System Settings menu is indicated by a blue line beneath the tab name. The tabs are:
General Settings: Contains organization details, license information and timeout parameters for Management Console sessions.
Email: Sets SMTP server information details and parameters for managing enrollment emails.
Database: Sets parameters for the database connection to the Management Console.
Auth Servers: Sets configuration parameters for one or more Authentication Servers.
Authenticators: Contains a list of integrated authenticators and allows you to add customized third-party authenticators.
Devices: Contains settings that control handling of communications between the Authentication Server and user workstations.
Publish: Contains elements and features that manage and control the publishing process.
Audit Logs: Displays data about the amount of accumulated log records and enables configuration of the log retention period.
The General Settings tab contains details about your organization as well as some other global parameters. To open the tab, select System Settings > General Settings. After updating any of the settings, click Save.
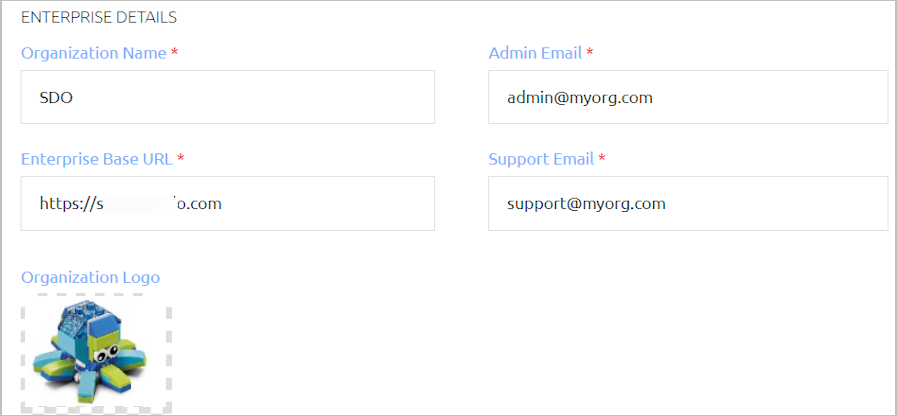
The settings are described in the table below.
Setting | Description / Notes |
|---|---|
Organization Name | The name of your company. By default, the name is the one entered during installation of the Octopus Authentication Server. The name specified here is is displayed to users in the Octopus Authenticator mobile app. |
Enterprise Base URL | The value should be the address of the Octopus Authentication Server or the address of the load balancer (for distributed deployments). This address is used by all services to configure access to the Authentication Server. Note that the field is mandatory - the system cannot function without this value. |
Organization Logo | This logo is displayed to users in the Octopus Authenticator mobile app. By default, the setting is empty. To upload a logo, hover over the area, click Upload File and select the PNG or JPG file of your choice. Supported image size is 128x128 pixels. |
Admin Email | The email address associated with your organization's Admin user. Notifications about network issues (e.g., an offline server) will be sent to this address. |
Support Email | The email address to which requests for technical assistance should be sent. |
License Information
The License section of the General Settings tab shows the status of your organization's license, including license consumption details and expiration date.
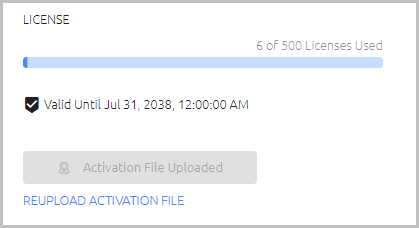
The Reupload Activation File feature enables you to upload a new license file.
The lower portion of the tab contains other various general parameters. Always click Save after updating these settings.
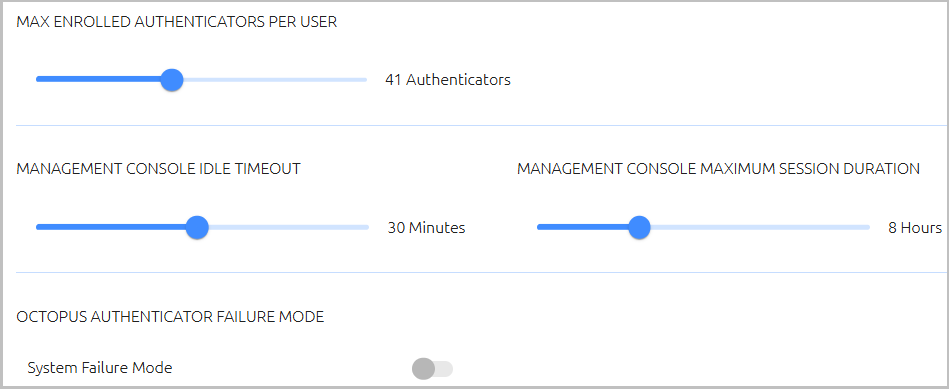
The settings are:
Max Enrolled Authenticators Per User: The maximum number of mobile and FIDO devices that can be enrolled in the system for each user. Valid values can range from 1-99. Drag the slider to adjust the value.
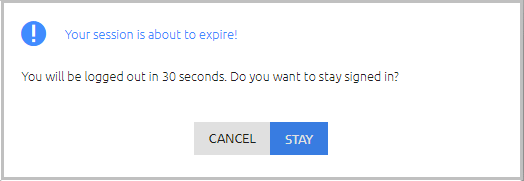
Management Console Idle Timeout: The length of time (in minutes) during which no actions are performed in the Octopus Management Console before the session is automatically ended. Values can range from 2-60 (default is 10).
Just before the timeout is reached, a warning popup opens, prompting the user to extend the session. If the user does not respond, the session ends automatically.
Management Console Maximum Session Duration: The length of time (in hours) for which a user can continuously remain logged into the Octopus Management Console. Values can range from 1-24 (default is 3).
When the maximum session duration is reached, the session is automatically ended, regardless of user activity. A warning popup opens one minute before the automatic logout.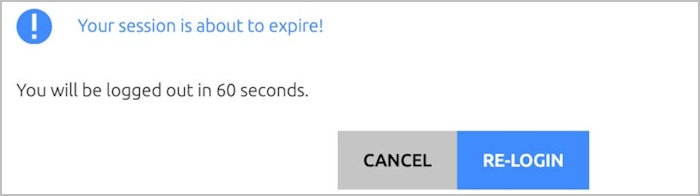
Octopus Authenticator Failure Mode: This setting determines the behavior of the system in situations of network failure or unavailability of the Octopus Authentication Server. When System Failure Mode is enabled, authentication for all services is done with a username and password in the event of system failure.
The Email tab allows you to set up mail server configuration and manage the content of invitation (enrollment) emails sent to users. To open the tab, select System Settings > Email.
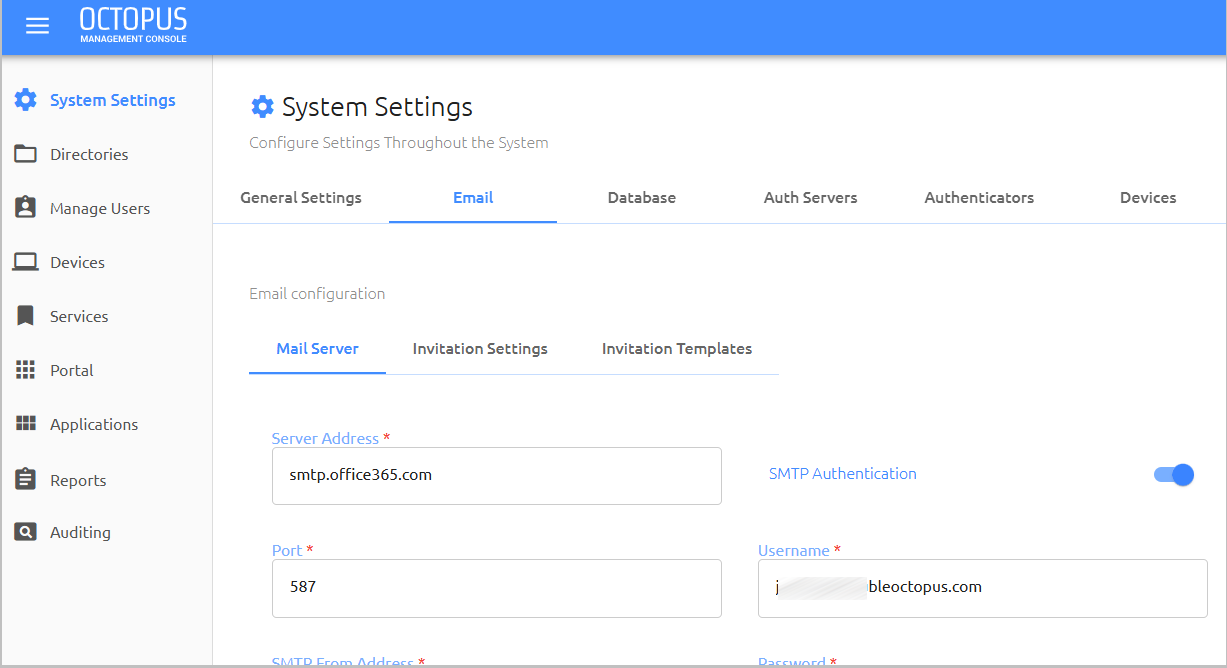
The Mail Server sub-tab contains SMTP server information and other required email parameters.
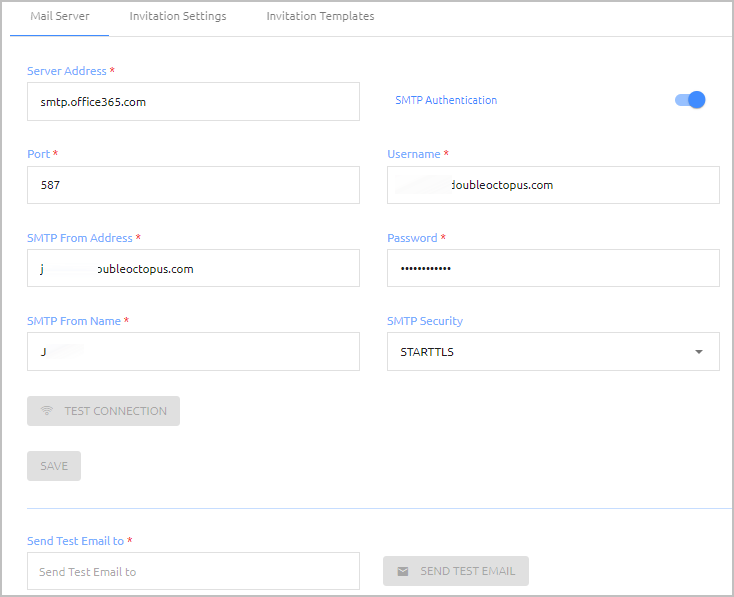
To set up SMTP server details:
Enter the following parameters in the appropriate fields:
Server Address: IP address or hostname of the SMTP server
Port: Port number for SMTP connection
SMTP From Address: The From email address that appears in system-generated emails
SMTP From Name: The name of the sender that appears in system-generated emails
Select the appropriate SMTP Security method: SSL/TLS or STARTTLS
If you want to use SMTP authentication, click the toggle button at the upper right corner of the tab (by default authentication is inactivated), and enter the authentication username and password.
Click Test Connection.
Following the test, a confirmation message is displayed at the bottom of the page.
Click Save. Then, from the toolbar at the top of the page, click PUBLISH and publish your changes.
To verify expected performance, enter a valid email address in the Send Test Email To field and click Send Test Email. Then, check that an email message was sent and received correctly.
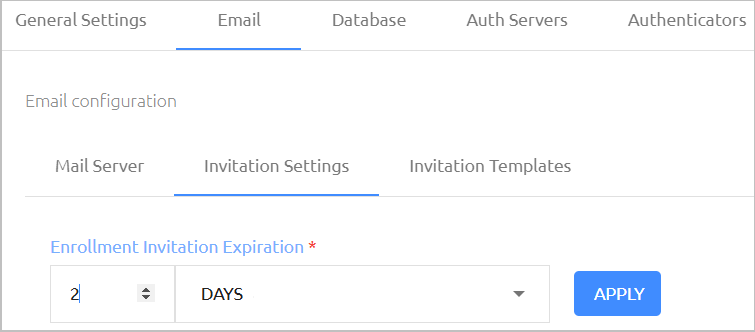
The Invitation Settings sub-tab contains the Enrollment Token Expiration setting, which determines the maximum period of time for which an invitation email is valid. If a user does not use the invitation to enroll within this time period, the invitation is deleted from the system and a new email needs to be sent.
The Enrollment Token Expiration can range from 1 hour to 3 weeks (default setting is 3 days). To update the setting, specify the desired timeframe and then click Apply.
The Invitation Templates sub-tab supports creation of customized content for invitation emails. You can upload your own logo, change the default texts, use the language of your choice, and more.
To create customized invitation email templates:
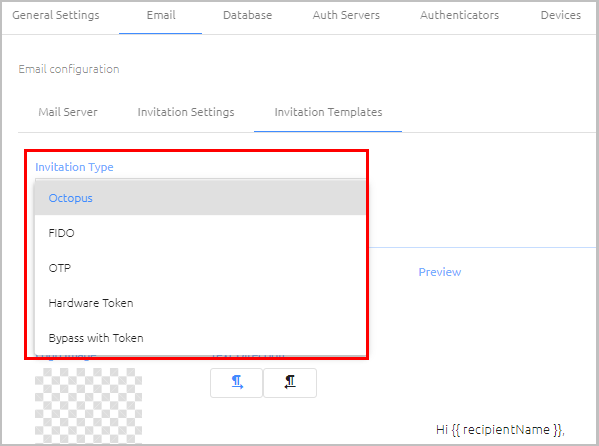
- At the top of the Invitation Templates tab, select the relevant email template from the Invitation Type dropdown list.
- Make changes to the email content, using the tools and fields provided on the left side of the page.
Mail Subject, Logo Image and Text Direction are common to all invitation types. The other fields may vary slightly according to the type.
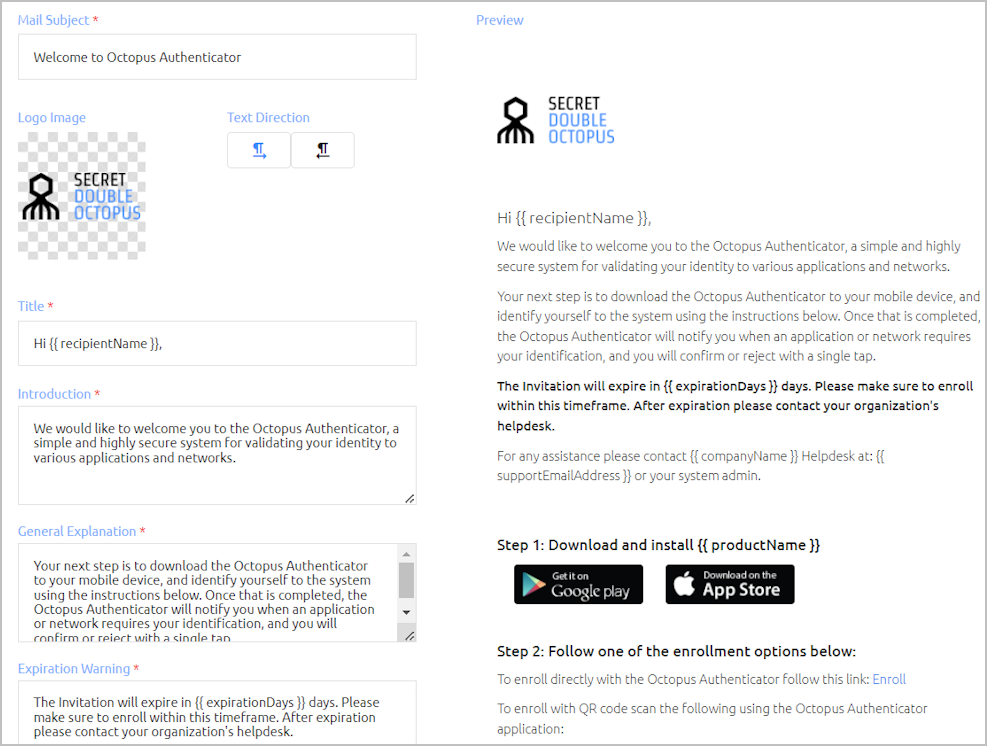
Check how your changes are presented in the Preview, on the right side of the page.
IMPORTANT: Updates for a given field are displayed in the Preview only once you complete changes in that field and select another field.When your updates are complete, at the bottom of the page, click Save. Then, in the confirmation popup, click Save.
Repeat Steps 1-4 for additional invitation types.
Several action buttons at the bottom of the Invitation Templates tab are provided to help you as you customize the template.
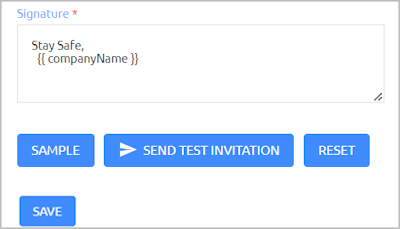
The options include:
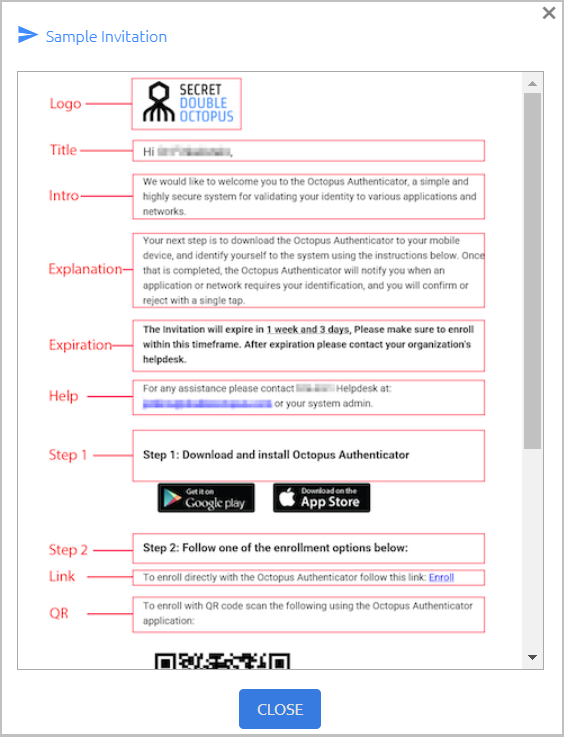
- Sample: Opens a popup window that matches the field titles (on the left side of the page) with the corresponding sections of the invitation email. For example:
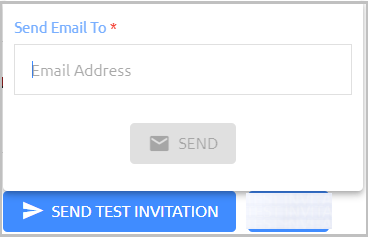
Send Test Invitation: Sends the invitation email to the recipient of your choice, so it can be viewed within an actual email client. After clicking Send Test Invitation, enter the relevant email address in the field and click Send.
Reset: Changes all settings in the invitation template back to the original default values.
The database stores all user details and service settings. The Database tab of the System Settings menu allows you to set and update parameters for the database connection to the Octopus Management Console.
When an All-In-One installation is performed, a database is created and initialized as part of the installation. When a different installation type is done, or if the installer chooses not to create the default database, the database connection needs to be created manually from the Database tab, as described below (see Configuring Database Settings).
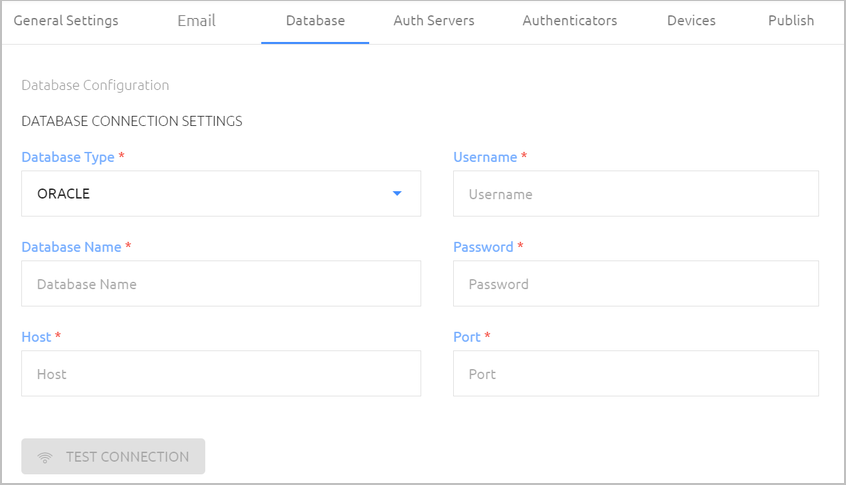
Configuring Database Settings
The supported database types and versions are listed in the following table. The PostgreSQL type is created automatically as part of the All-In-One installation.
| Database Type | Minimum Version | Maximum Version |
|---|---|---|
| PostgreSQL | PostgreSQL 9 | PostgreSQL 15 |
| MS SQL | SQL Server 2012 SP4 | SQL Server 2022 |
| Oracle | Oracle Database 12c | Oracle Database 19c |
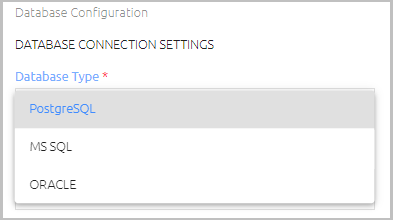
When you set or update database settings, make sure that you specify the database type you are working with by selecting the relevant type from the Database Type dropdown list.
To configure database settings:
At the upper left corner of the Database tab, verify that the correct database type (PostgreSQL, MS SQL or ORACLE) is selected from the Database Type dropdown list.
Specify the following settings by entering the relevant values in the appropriate fields:
Database Name: Name of the database
Host and Port: IP address (or URL) and port of the database
Username and Password: Credentials of the database administrator
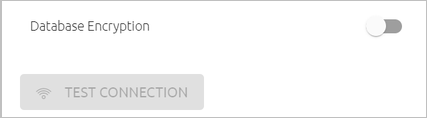
For MS SQL database types only: If the connection to the database is encrypted, enable the Database Encryption toggle button.
For PostgreSQL database types only: To enable SSL communication between the Octopus Authentication Server and an external database, enable the SSL Connection toggle button.
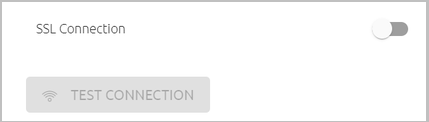
To check for validity of your settings, click Test Connection.
To save the settings, click Save and then publish your changes.
Creating a Replica Database
When there are over 10,000 users in the Octopus platform, a warning icon appears in the toolbar at the top of the Management Console, prompting you to create a replica database. The read-only replica, which prevents excessive load on the database, is required for continued support of report generation.

To create a replica database:
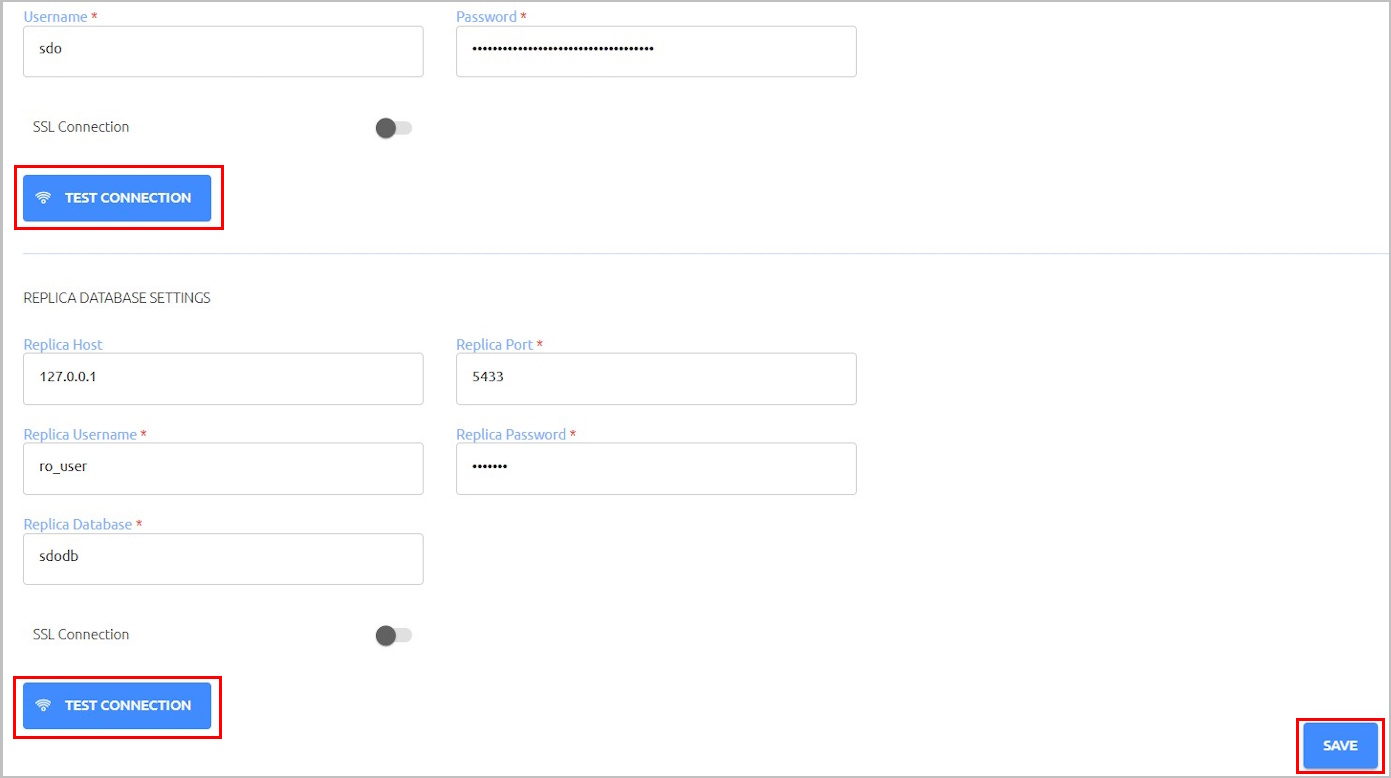
- Click the warning icon to open the Database tab. (Alternatively, from the System Settings menu, select the Database tab.) Then, scroll down to the Replica Database Settings section.
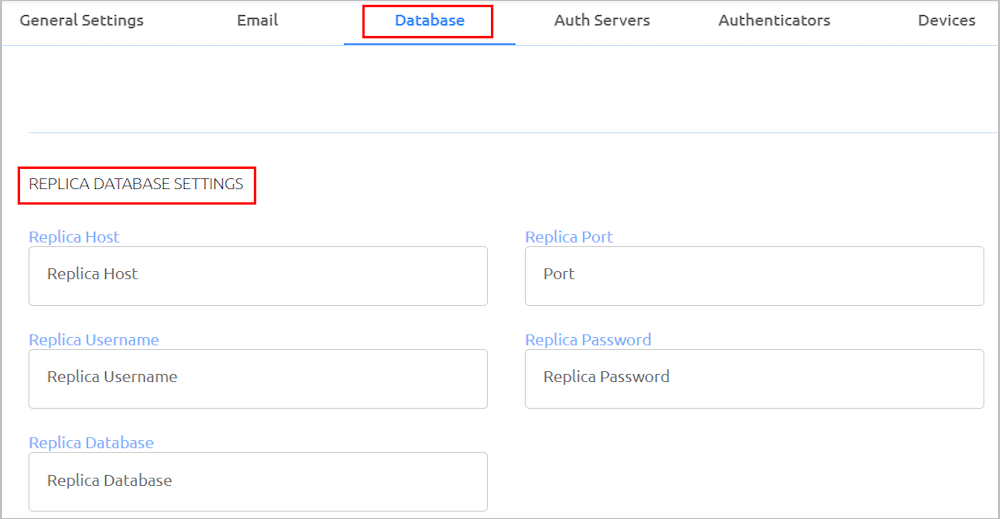
- Complete the settings for the replica, according to your database details. Then, in the section above, enter the Password for your database.
NOTE: The Save button is not enabled until the database password is entered.
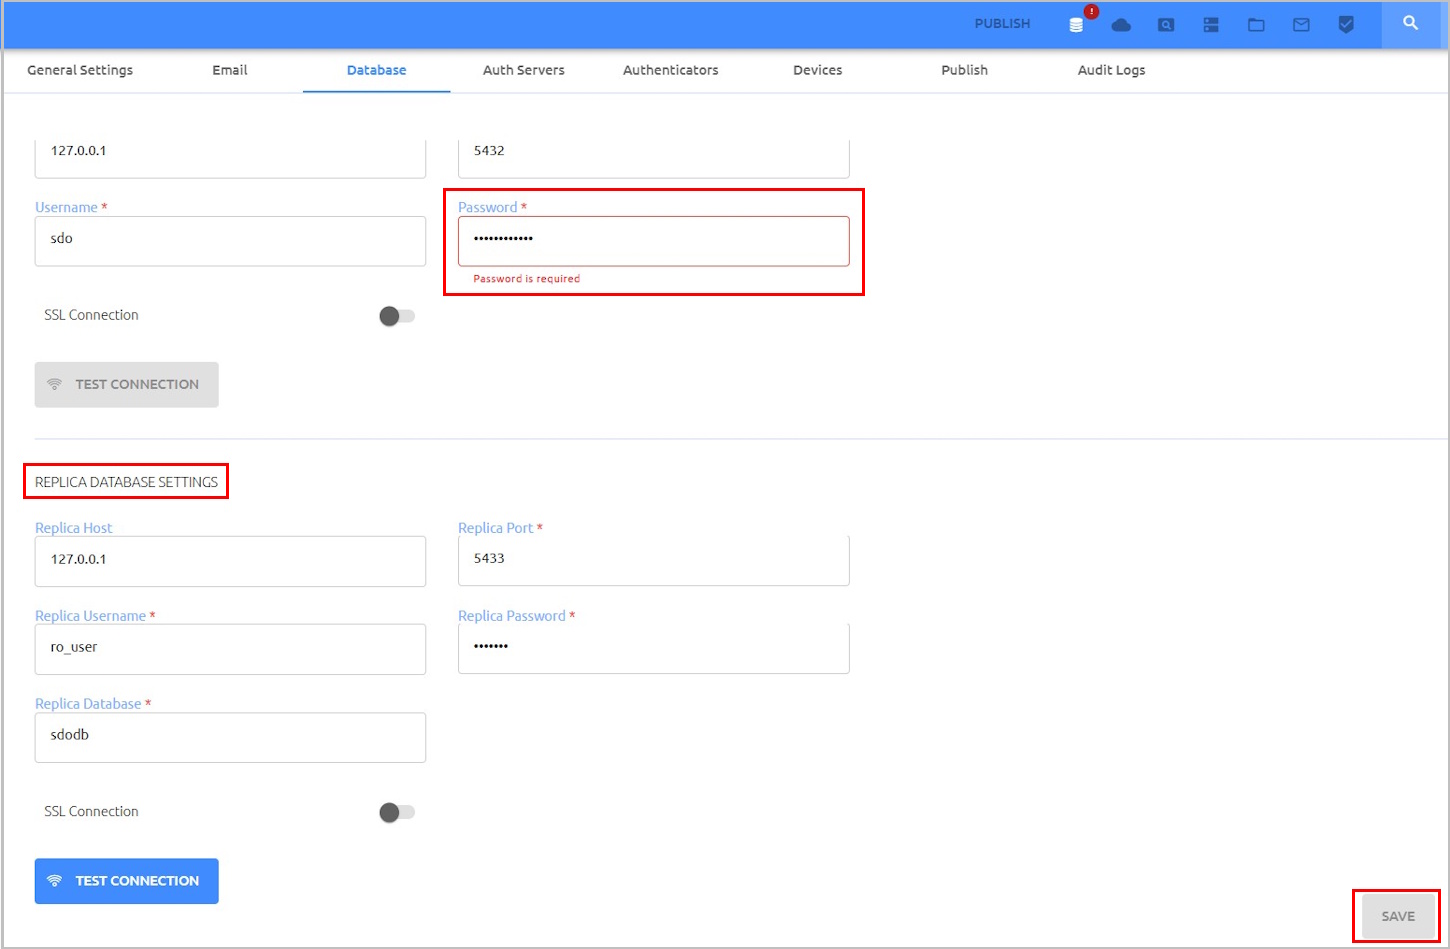
Perform a validity check by clicking Test Connection. (It is recommended to test both the database and the replica.) Then, click Save.
In the confirmation popup, click Save.
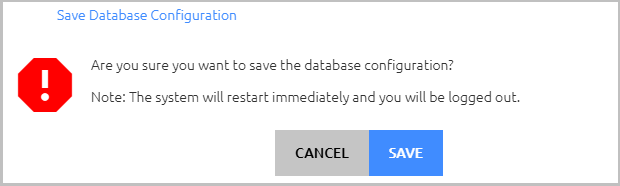
Your Management Console session will end while the system restarts. You may log back in immediately to perform report generation or any other required administrative action.
Authentication Server Management
The Octopus Management Console can communicate with as many Authentication Servers as your organization requires. Each installed Authentication Server needs to be added to the Management Console, in order to create and maintain the necessary connections.
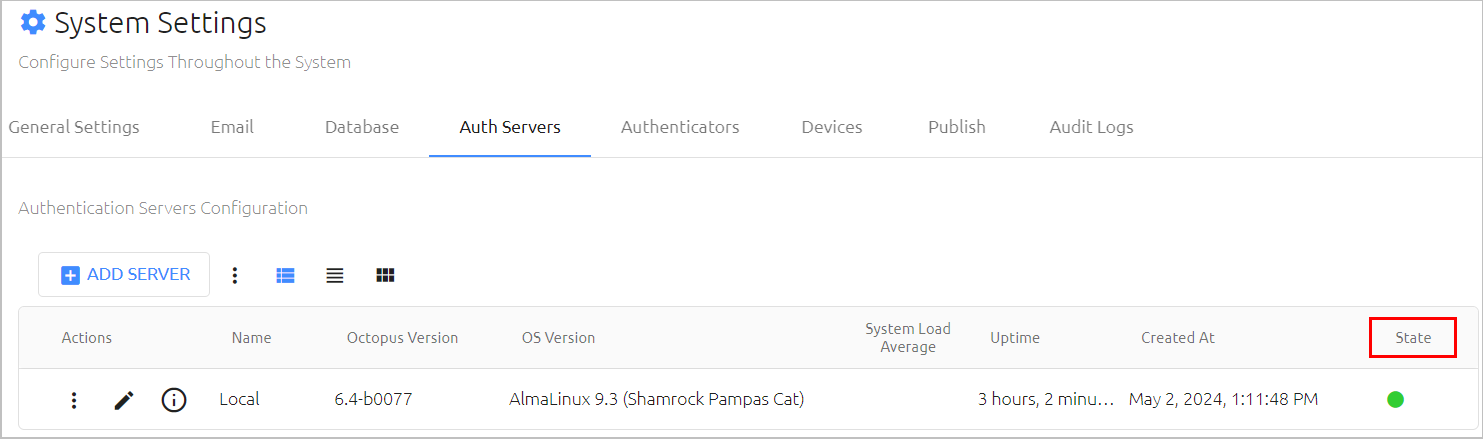
The Auth Servers tab of the System Settings menu displays general information about each configured Authentication Server. The State indicator (red or green) reflects the Server's current connectivity status.
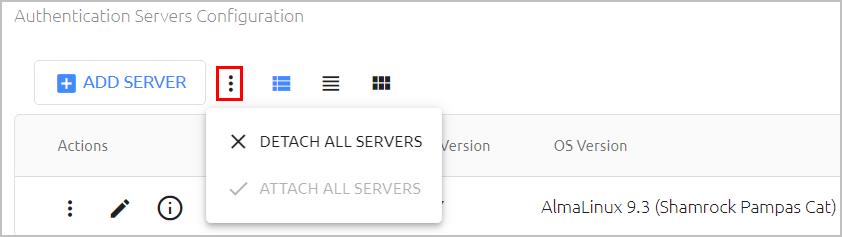
The Actions icon to the right of the Add Server button allows you to detach (and reattach) all Authentication Servers from the Management Console in a single bulk action. This feature lets you easily perform administrative operations, such as system upgrades, without having to delete and recreate each Server.
Clicking  opens a popup displaying the following additional details about the Server:
Last Updated: Period of time since the last data update from the Server
Octopus Version: Installed version of Octopus Authentication Server
OS Version: Server operating system version number
System Load Average: The average number of tasks waiting to be processed in the run queue. The three values represent averages for the past one, five, and fifteen minutes of system operation.
CPU Cores: Number of CPU cores available on the Server
Uptime: Period of time for which the Server has been up and available (since the last restart)
Disk Usage: Amount of disk space used from the total amount of disk space configured for the Server.
Memory Usage: Amount of occupied memory from the total amount of memory allocated for the Server.
NGINX Cert. Expiration: Period of time remaining until expiration of the certificate. Once the certificate is expired the Server will stop working.
Last Publish: Period of time elapsed since the most recent publish on the server.
IP Addresses: IP address of the Server.
Machine ID: Random unique identifier for the machine, created during installation.
dmz: If the Authentication Server has a corresponding DMZ Server, data about the DMZ Server is displayed here.
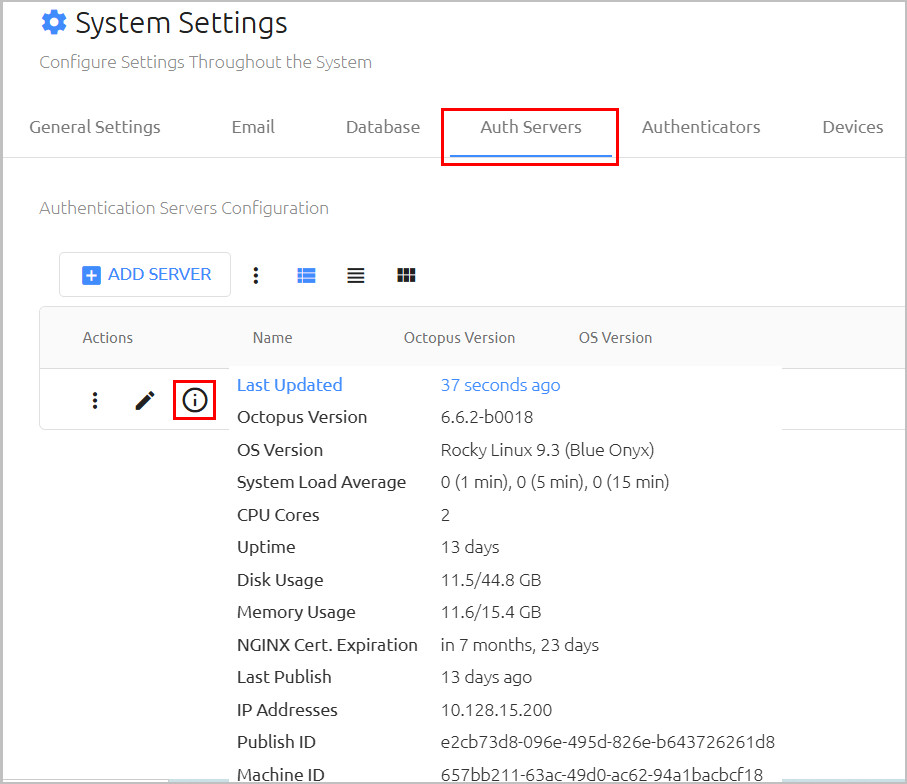
IMPORTANT: It is recommended to regularly monitor the Disk Usage, Memory Usage and NGINX Cert. Expiration values. In the event of full disk space/ memory or certificate expiration, the Authentication Server will stop operating.
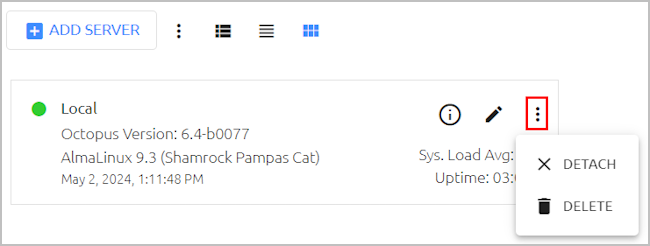
Clicking  in the tile or row of an Authentication Server opens an actions menu from which you can perform various operations on the Server. The options are:
Detach: Temporarily disconnects the Server from the Management Console. While the Server is detached, the action changes to Attach, allowing you to reconnect the Server.
Delete: Allows you to remove an an Authentication Server that is no longer in use.
Adding Authentication Servers
Adding a server to the list of Authentication Servers requires providing the server key to the Management Console.
To add an Authentication Server:
At the top of the Auth Servers tab, click Add Server.
The Add Authentication Server dialog opens.
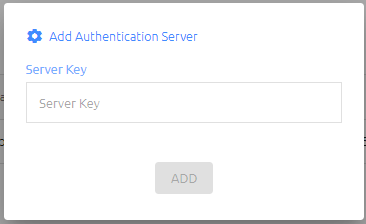
Paste the server key into the field, and click Add.
The server is added to the Authentication Servers list.
Changing the Name of an Authentication Server
The Details page of an Authentication Server displays the server's public key and allows you to change the server's name. To open this page, click  in the tile or row of the relevant server.
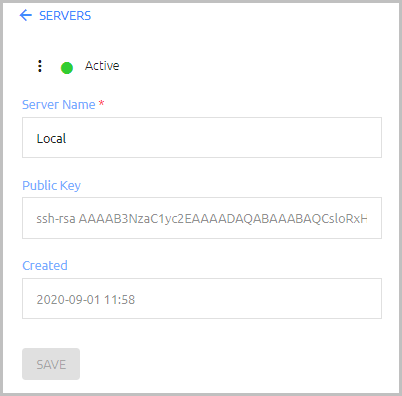
Server Name is the only editable parameter on the Details page. After updating the name, click Save.
Secret Double Octopus supports the ability to authenticate to Windows, Mac and the User Portal through a primary authenticator other than Octopus Authenticator. These third-party authenticators are added by means of plugins, enabling external developers to expand built-in behavior by adding new plugins or modifying existing ones.
The following sections present details about managing authenticators:
Authenticator Plugins: Overview
Authenticator plugins, which determine the authentications method(s) and behavior of third-party authenticators, are made up of two required parts:
The Authenticator schema, also known as the template, is a JSON file that is uploaded to the Octopus Management Console. (For details, refer to Managing Authenticator Templates.)
The Authenticator code is a JS file that needs to be manually uploaded to each Authentication Server. It is recommended to store the file in a dedicated directory, so system upgrades will not interfere with existing custom authenticators.
The names of the two plugin files (JSON and JS) must be identical. In addition, the file name needs to be unique, since it serves as the identifier of the template in the system.
The Authenticators tab of the System Settings menu allows you to add, update and manage third-party authenticators, as well as upload new templates. Each authenticator you add must be based on one of the uploaded templates.
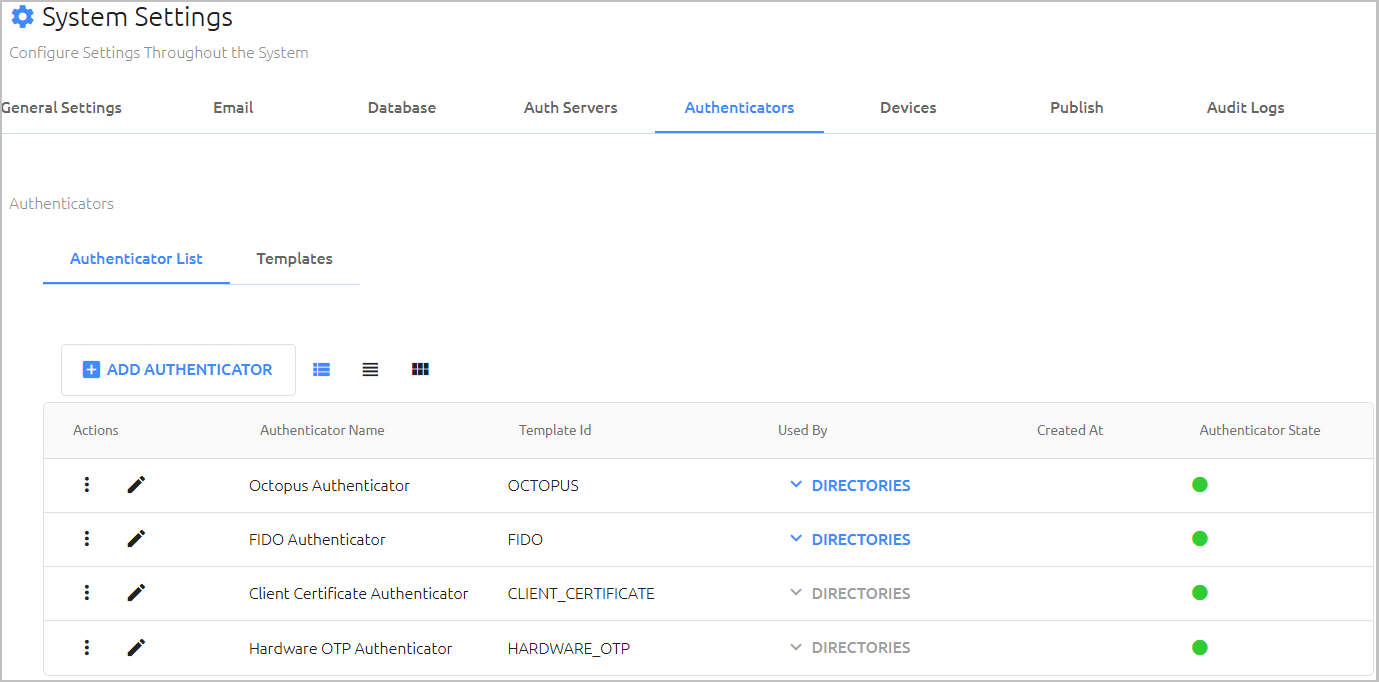
Selection of the primary mobile authenticator is done at the directory level. For more information, refer to the Configuring Directory Authentication Options and Settings section of the Directory Integration chapter.
Third-party plugins currently provided out-of-the-box are:
Plugin Name | Authentication Method(s) | Function / Description |
|---|---|---|
duo | Authenticator and/or OTP Validator | Enables users working in the Duo environment to authenticate by approving an authentication request on the Duo mobile app (delivered by push notification), or by providing the one-time password required by the service, which is validated by the Duo server. |
forgerock | Authenticator and/or OTP Validator | Enables users working in the ForgeRock environment to authenticate by approving an authentication request on the ForgeRock mobile app (delivered by push notification), or by providing the one-time password required by the service, which is validated by the ForgeRock server. |
okta | Authenticator and/or OTP Validator and/or Two-step authentication | Enables users working in the Okta environment to authenticate by approving an authentication request on the Okta mobile app (delivered by push notification), or by providing the one-time password required by the service, which is validated by the Okta server. When the Two-step option is selected, Okta users are able to log into Windows and the Octopus User Portal with voice, SMS, passphrase or strong authentication. Users provide the code or passphrase after completing the first step of entering username and password. The okta_v2 template features the additional capability of supporting Okta push notifications to two mobile devices simultaneously. This template can be used when multi-factor operation is enabled in the Okta platform. |
| ping | Authenticator and/or OTP Validator | Enables users working in the Ping Identity environment to authenticate by approving an authentication request on the PingID mobile app (delivered by push notification), or by providing the one-time password required by the service, which is validated by the PingFederate server. |
| Reporting Plugin | Authenticator and/or OTP Validator and/or Reporting | A Reporting authenticator is dedicated to receiving workstation authentication event logs, so log reports can be viewed in the third-party platform. To enable third-party event reporting, the relevant Reporting authenticator needs to be specified in the Authenticators tab of the directory settings. |
| Password Sync Plugin | Authenticator and/or OTP Validator and/or Reporting and/or Password Sync | This plugin enables update of the AD password in specified external directories every time the Octopus Authentication Server performs password rotation. To enable password sync, the relevant Password Sync authenticator needs to be specified in the Authenticators tab of the directory settings. |
rsa-am | OTP Validator | Enables users working with the RSA On Premise server to authenticate by providing the one-time password required by the service. |
rsa | Authenticator and/or OTP Validator | Enables users working in the RSA environment to authenticate by approving an authentication request on the RSA mobile app (delivered by push notification), or by providing the one-time password required by the service, which is validated by the RSA server. |
twilio_v1 | Two-step OTP authenticator | Enables users to complete authentication by providing a validation code that is sent to them by either SMS or email. The code is sent after the user has completed the first step of entering username and password. |
| twilio_v2 | Two-step OTP Authenticator and/or Pincode Authenticator | Supports the two-step verification methods provided by the twilio_v1 plugin (SMS and email), as well as voice call and WhatsApp verification methods. The Pincode Authenticator enables users without smartphones to perform passwordless authentication by entering a PIN code during a voice call received during the login process. |
thales | Authenticator | Enables users who choose MobilePASS as the authenticator to approve push authentication requests with a single tap and generate secure one-time passcodes together with fingerprint or facial recognition. |
yubico | OTP Validator | Enables users working with their own Yubikey OTP server to authenticate via OTP verification. Instead of entering the OTP, users need to simply touch the key. This automatically generates the code and sends it to the server. |
Viewing the Authenticator List
The Authenticator List shows all configured authenticators and displays the name, source template, creation time (if relevant) and current connectivity status (red or green indicator) of each one. The Octopus, FIDO, Client Certificate and Hardware OTP Authenticators are preconfigured and automatically available. Other third party authenticators need to be added, using the templates provided (Adding a New Authenticator).
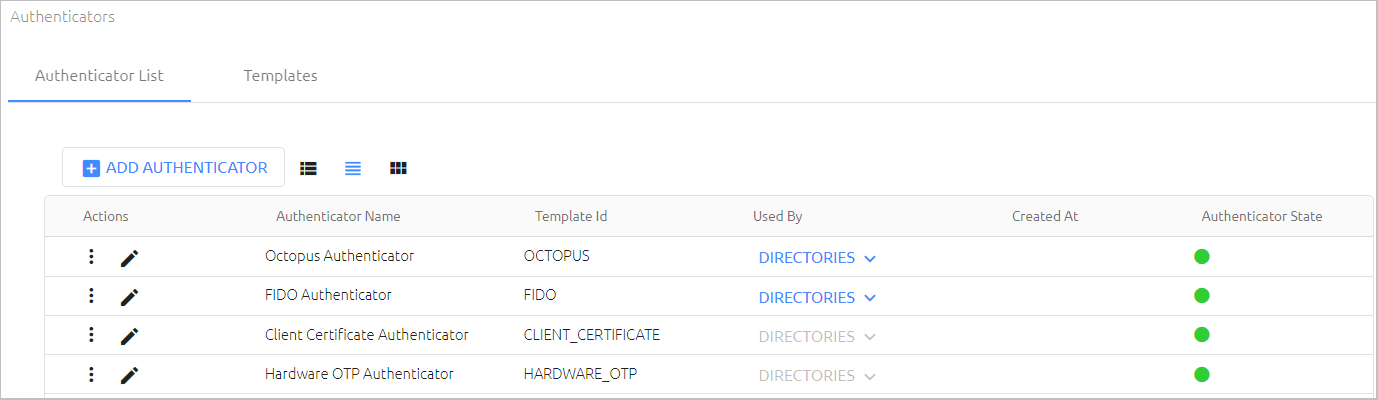
If an authenticator is used in one or more directories, the DIRECTORIES list is enabled. To view the directories to which an authenticator is assigned, click to open the list. Clicking a directory name opens the settings of that directory.
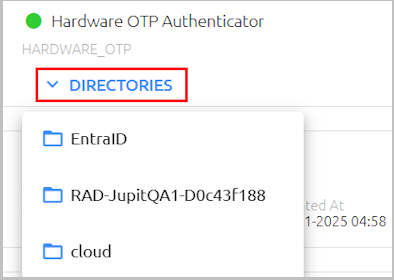
Working with Authenticators
The options in the Actions column allow you to perform various administrative operations on authenticators. Clicking opens a list with the following actions:
Disable: Inactivates the authenticator.
Delete: Removes the authenticator from the Management Console. An authenticator can be deleted only if it is NOT currently assigned to any directories.
IMPORTANT: Out-of-the-box authenticators cannot be deleted.
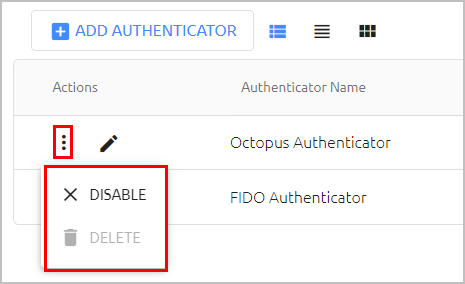
Clicking  opens a page on which you can view and update authenticator details. When updating settings for an authenticator, keep the following in mind:
The template cannot be changed.
Details for the FIDO Authenticator and Client Certificate Authenticator are not editable.
The authentication methods (Authenticator and OTP Validator) can be updated only if the authenticator is NOT currently assigned to any directories. When an authenticator is assigned, the Methods settings are disabled.
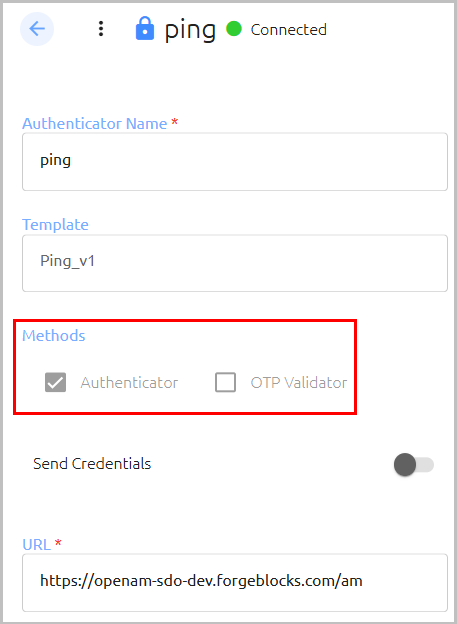
After updating authenticator details or settings, click Save.
Octopus Authenticator details (name and methods) are not editable, but several settings related to security mechanisms and management of credentials in the mobile app are configurable for this authenticator.
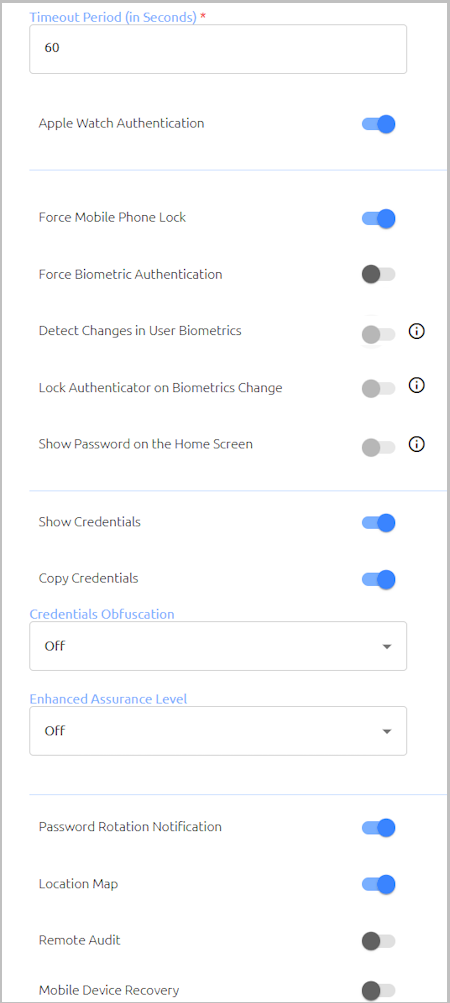
The settings are:
Setting | Description | Default |
|---|---|---|
| Timeout Period | The length of time allotted for the mobile device to acknowledge receipt of a push notification from the Octopus Authentication Server. The supported timeout range is 5-60 seconds. If the Server does not receive a confirmation message from the mobile within the specified time period, BLE mode authentication is initiated. If BLE has not been activated for the Octopus Agent, the authentication request fails. | 60 seconds |
Apple Watch Authentication | When enabled, users are allowed to authenticate on the watch. When disabled, users must authenticate on their mobile devices. | Enabled |
Force Mobile Phone Lock | When enabled, users are required to use the locking feature on their mobile devices. | Enabled |
Force Biometric Authentication | When enabled, users must provide a biometric factor (fingerprint, face recognition, etc.) to successfully authenticate. This toggle is available only when the Force Mobile Phone Lock setting is enabled. | Disabled |
| Detect Changes in User Biometrics | When enabled, the Octopus app checks for changes in biometric data with every authentication request. If a change is detected (e.g., Face ID added), it is recorded as an auditing event. This toggle is available only when the Force Biometric Authentication setting is enabled. | Disabled |
| Lock Authenticator on Biometrics Change | When a change in biometric data is detected and this setting is enabled, the mobile app blocks authentication and sends a message to the Octopus Authentication Server to disable the mobile authenticator. Users are presented with an error message, prompting them to contact their IT team. The phone can be re-enabled by the system admin in the Authenticators tab of the user details. This toggle is available only when the Detect Changes in User Biometrics setting is enabled. | Disabled |
| Show Password on the Home Screen | When enabled, users can view the AD password directly from the Home screen of the Octopus mobile app. This setting works in conjunction with OTP verification and biometric authentication. For more information, refer to Configuring Support for Credentials Access from the Home Screen (below). | Disabled |
Show Credentials | When enabled, the AD password is displayed to users in the Octopus Authenticator mobile app. | Enabled |
Copy Credentials | When enabled, users are able to copy the password displayed in the Octopus Authenticator app to the clipboard of the mobile device. | Enabled |
Credentials Obfuscation | When this feature is activated, the mobile app is unable to decrypt the AD password, as the Authentication Server sends it to the app encrypted with the workstation's public key. (As a result, the Show Credentials and Copy Credentials settings must be disabled when using this feature.) Credentials Obfuscation can be set to ONE of the following states:
Note: This feature is not currently available for Mac workstations. | Off |
Enhanced Assurance Level | When this feature is activated, an extra layer of security is added to the authentication flow by requiring a BLE challenge between the app and the workstation after the user approves the push request. This challenge ensures that the user's mobile device is in close proximity to the workstation. Enhanced Assurance Level can be set to ONE of the following states:
Note: This feature is not currently available for Mac workstations. | Off |
| Password Rotation Notification | When enabled, a notification message is displayed in the mobile app when the user's AD password has been rotated. | Enabled |
| Location Map | When enabled, authentication requests include a map of the target device's location. | Enabled |
| Remote Audit | When enabled, audit records are sent from the mobile app to the Octopus Authentication Server. | Disabled |
| Mobile Device Recovery | When enabled, account recovery after migration to a new mobile device is supported. Note: Previous configuration of this feature in the prod.json file will NOT be saved upon upgrade. The setting needs to be configured in the Management Console after upgrade. | Disabled |
| Device Filtering | Enables specification of mobile devices on which Octopus Authenticator can be used. For details, refer to Defining Supported Devices for Octopus Authentication (below). | Disabled |
Configuring Support for Credentials Access from the Home Screen
The Show Password on the Home Screen feature allows users to view the AD password directly from the Home screen of the mobile app. Since this feature is most useful for OTP authentication (which requires copying both the password and the verification code), it is available only for users who have completed OTP enrollment.
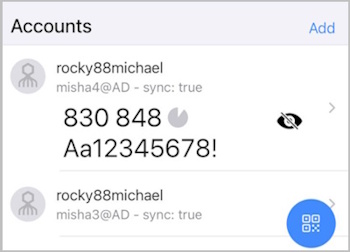
When the feature is enabled, the OTP code and the password are continuously displayed on the Home screen in masked characters. Tapping the visibility icon generates an authentication request.
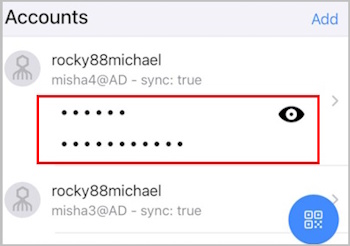
Following successful biometric authentication, the OTP code and password are shown in cleartext.
For successful use of this feature, verify that:
- Software OTP authentication is enabled as an authenticator in the relevant directory. (In the Authenticators tab of the directory settings, activate the Enable Online OTP toggle.)
- Users have been sent enrollment invitations for both the Octopus Authenticator and the OTP Authenticator.
- The following Octopus Authenticator settings are enabled:
- Force Biometric Authentication
- Show Password on the Home Screen
- Show Credentials
Defining Supported Devices for Octopus Authentication
The Device Filtering feature enables you to specify mobile devices on which the Octopus Authenticator app is supported. You can create lists of allowed devices, prohibited devices, or both.
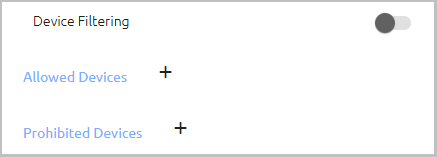
To add a row to the Allowed or Prohibited list, click + and enter data about the relevant device. You can define any combination of OS. Model, Manufacturer and Device Info (one string in each field). It is not necessary for all the fields to be populated.
When you are finished configuring the list(s), click Save.
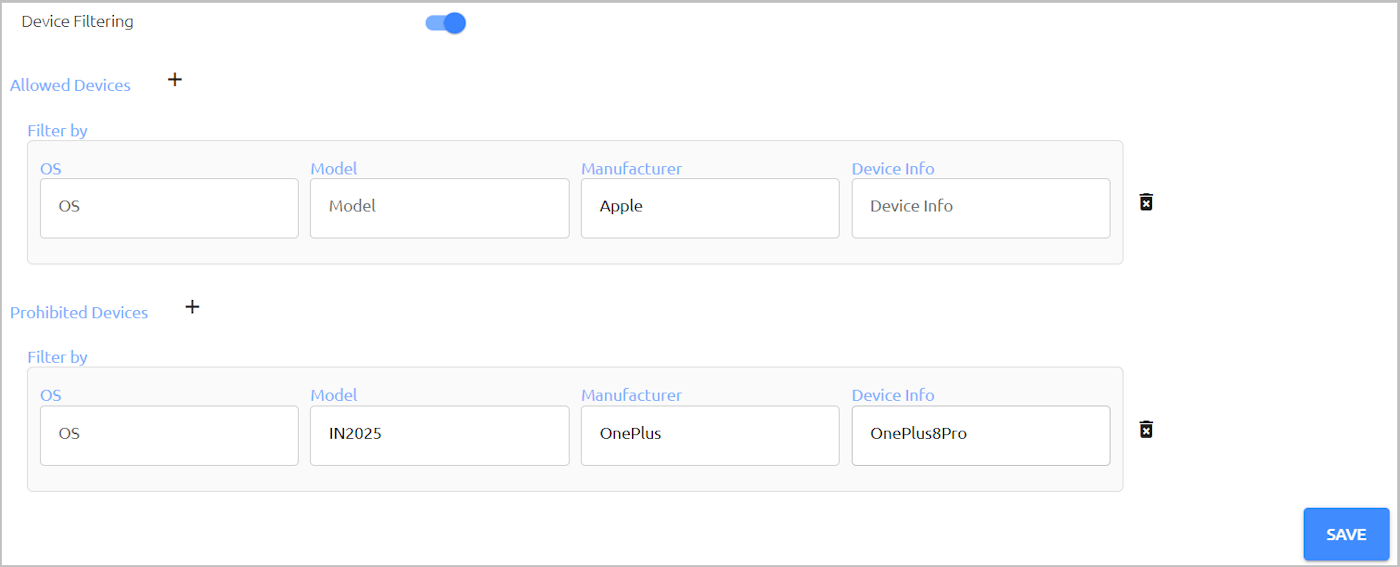
While creating your lists, keep the following guidelines in mind:
- ALL conditions defined in a row must be fulfilled in order for the specified device to be allowed / prohibited.
- In the event of conflicts or opposing conditions, filters defined in the Prohibited Devices list override those defined in the Allowed Devices list.
- Defined filters affect both the enrollment and login processes. For example, if a user successfully enrolls a device that is subsequently defined as prohibited, the user will no longer be able to authenticate on that device.
- The Device Filtering toggle determines whether defined filters are currently being enforced. When the setting is inactive, your filters are preserved, and you can continue modifying the lists while filtering is disabled.
Importing and Managing Hardware OTP Tokens
Secret Double Octopus supports use of HW OTP tokens to authenticate to Windows and the User Portal. In order for users to successfully login with HW OTP tokens, you need to:
- Import a list of tokens from a file (as described in the procedure below).
- Enable support of HW OTP tokens for online and/or offline authentication in the settings of the relevant directory (Authenticators tab).
- Send enrollment invitations to your users. (For details about the registration process, refer to the document Hardware OTP Token Enrollment and Authentication.)
IMPORTANT: Users can enroll with one OTP type only (either hardware or software, but not both).
To import hardware OTP tokens:
- From the Authenticator List, click the Edit (pencil) icon in the card or row of the Hardware OTP Authenticator.
Then, on the page that opens, click Import From File.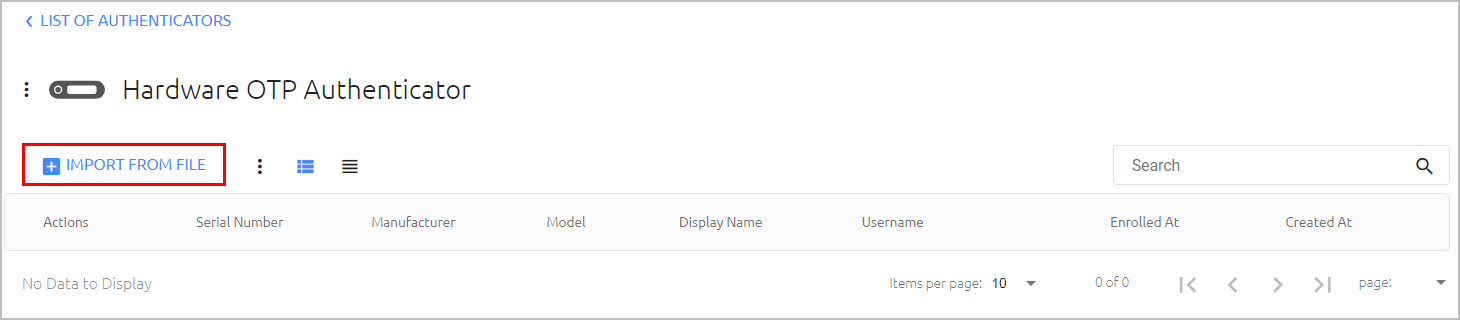
In the popup that opens:
a. Click Upload File. Then, navigate to and select the relevant file.
IMPORTANT: The file must be in PSKC format. Maximum supported file size is 20 MB.b. If the selected file is encrypted, enter the password in the Password field. For example:
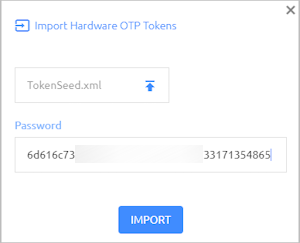
Click Import.
Once the import process is complete, an import summary is displayed. For example: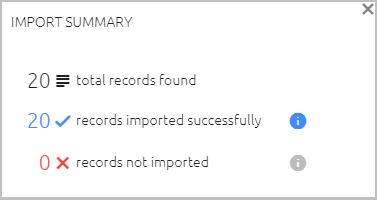
Continue by configuring directory settings and inviting users to enroll.
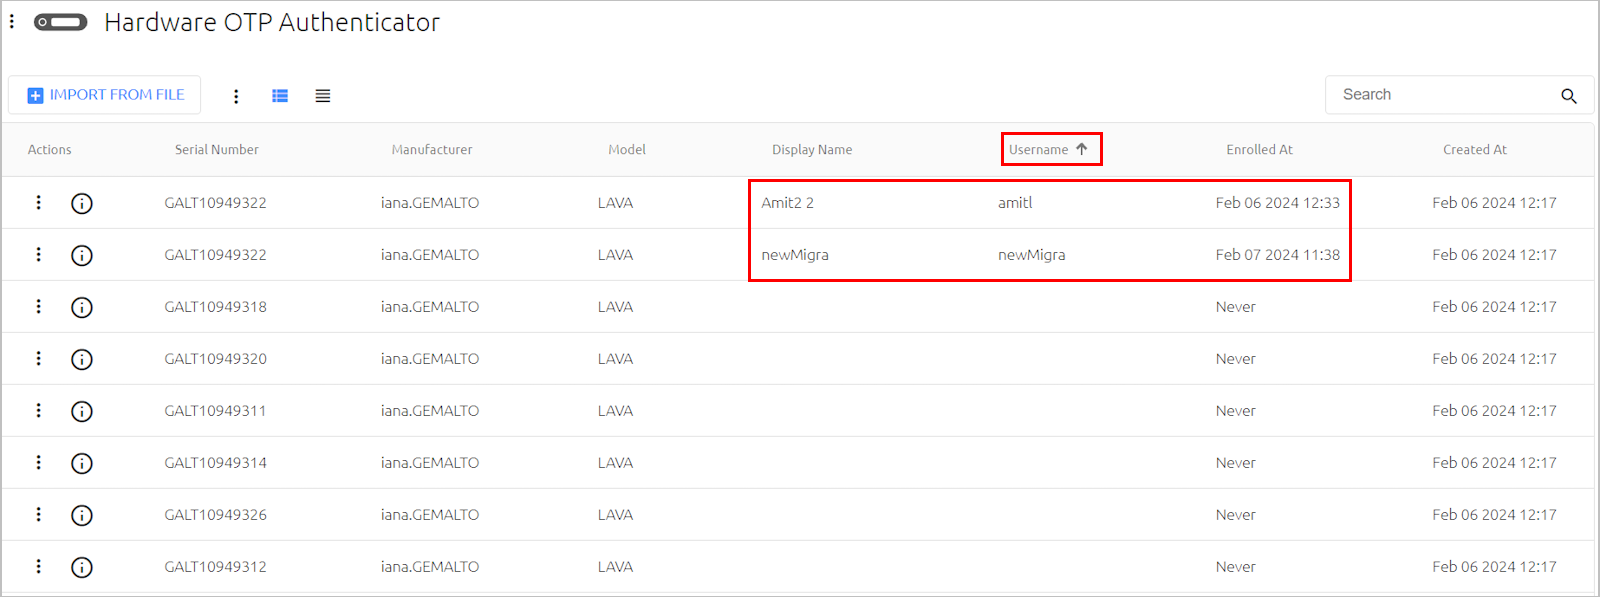
After tokens have been successfully imported, the list of devices appears on the Hardware OTP Authenticator page. Once users have registered, enrollment information is displayed in the relevant columns. In addition, you can sort the list according to Username and perform searches for a specific username.
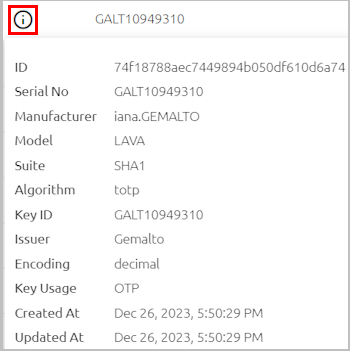
To view additional details about a given device, click in the relevant row or card.
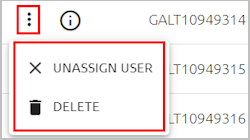
Clicking in the row of a token enables you to perform the following actions on that token:
Unassign user: Reverses user enrollment. Following this action, the user will need to register again with a new enrollment invitation.
Delete: Removes the token from the system. Following this action, the token will need to be reimported.
Note: Users must be unassigned before tokens can be deleted.
Performing Bulk Operations on Hardware OTP Tokens
Clicking theicon to the right of the Import From File button opens an actions menu from which you can enable / disable token selection.
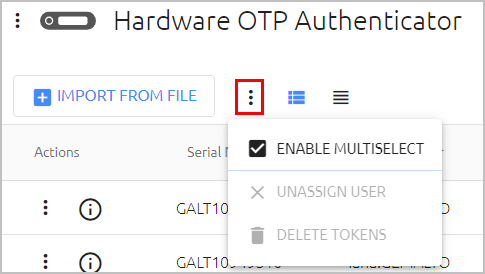
When you click Enable Multiselect, checkboxes appear next to the tokens, allowing you to select multiple tokens. Once tokens are selected, you can unassign users from the tokens, or remove the tokens from the system.
Note: Users must be unassigned before tokens can be deleted.
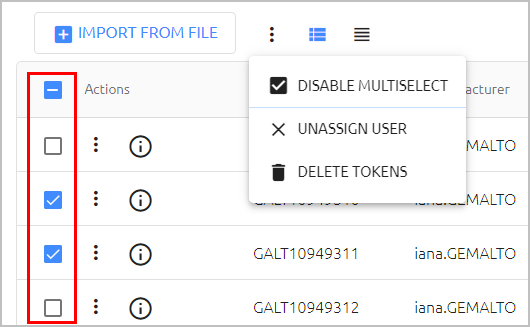
Selecting the checkbox at the top of the Actions column enables you to carry out a bulk action on all tokens on the page, or all tokens on the list.
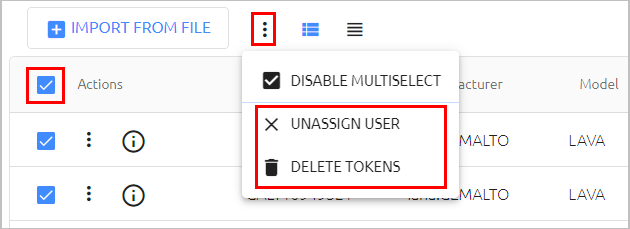
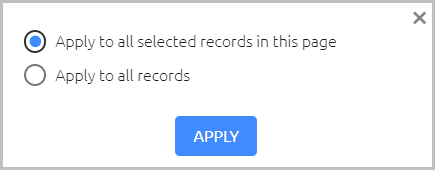
When you select an action (Unassign User or Delete Tokens), you will be prompted to specify whether to apply the operation to all tokens, or only the tokens listed on the current page of the list.
To hide the checkboxes and exit selection mode, click Disable Multiselect.
Adding Third-party Authenticators
All third-party authenticators must use an installed template. When creating a new authenticator, you will be prompted to select the template on which it is based. The Management Console features several built-in templates and also supports the ability to upload customized templates.
You can create multiple authenticators using the same template, according to your organizational needs. For example, you might want to have a separate authenticator dedicated to OTP authentication. The following sections explain how to add various authenticators using different template types:
Duo, ForgeRock, Okta, Ping and RSA: Function as push notification authenticators, OTP validators, or both
RSA AM and Yubico: Function as OTP validators only
Thales: Used for push notification authentication
Okta Two-Step: Supported validation methods are voice message, SMS. Okta Verify app and Okta passphrase
Twilio Two-Steo: Supported validation methods are SMS, email, voice call and WhatsApp
Twilio Pincode: Enables passwordless authentication using a personal PIN for identification
Each of these plugins can be used for push notification authentication, OTP validation, or both.
Note: The Okta template can also be configured as a Two-step authenticator. For details, refer to Okta Two-Step.
To add a third-party authenticator (Duo, ForgeRock, Okta, Ping or RSA):
In the upper left corner of the Authenticators tab, click Add Authenticator.
The Add 3rd Party Authenticator dialog opens.
In the Authenticator Name field, enter a friendly descriptive name for the new authenticator.
From the Template dropdown list, select the template on which the authenticator will be based.
IMPORTANT: You will not be able to change the template after you create the authenticator.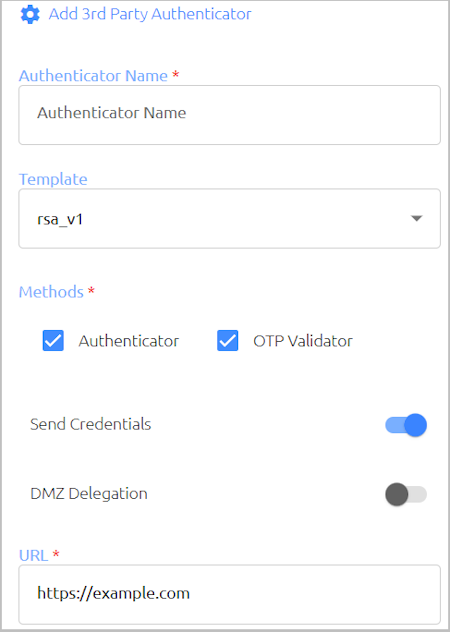
Select one or more Methods for the new authenticator:
Authenticator: The third party-authenticator can be used as an additional means of authentication (primary and/or secondary).
OTP Validator: The third party-authenticator can be used for one time password authentication (online and/or offline).
If you do NOT want to use the new authenticator for a method, clear the relevant checkbox.
Specify whether to send user credentials to the third-party authenticator by enabling or disabling the Send Credentials toggle button.
When credentials are sent (default setting), the third-party authenticator sends back a token for the User Portal, and the Portal opens automatically upon user authentication to Windows or Mac. If credentials are not sent, no token is sent back, and users will need to manually log into the User Portal after being authenticated by the third party.
Enable / Disable the DMZ Delegation toggle as required. When this setting is enabled, Authentication Servers in the DMZ can communicate directly with a server within the internal network.
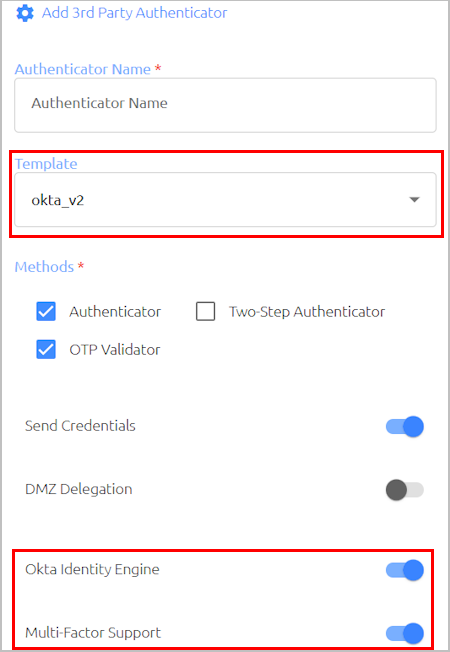
Specify the following settings for authenticators based on Okta and RSA templates:
URL: Your access URL for the third-party authenticator portal
Token (Okta): The API token generated from your Okta portal
API Key (RSA): The API key generated from your RSA portal
If you are using the okta_v2 template and you want to support Okta push notifications to two mobile devices simultaneously, make sure that the Okta Identity Engine and the Multi-Factor Support toggles are enabled. (In addition, verify that multi-factor operation is enabled in your Okta platform.)
Specify the following settings for authenticators based on Duo templates:
API hostname: The access URL for your Duo platform
Integration key: The API key (ikey) generated from your Duo Admin Panel
Secret key: The secret key (skey) generated from your Duo Admin Panel
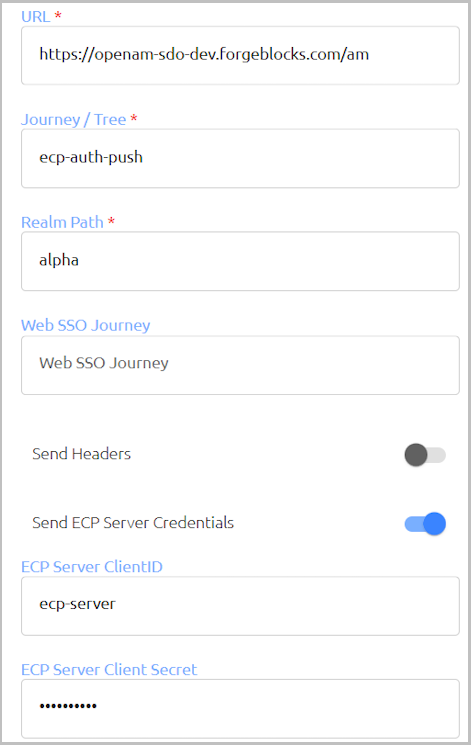
Specify the following settings for authenticators based on Ping templates:
URL: The access URL for your Ping Identity Platform
Journey / Tree: Name of the relevant authentication journey
Realm Path: Name of the realm in which the journey is located
Web SSO Journey: URL of the winsso journey.
Send Headers: When the toggle is enabled, HTML headers (IP, User-Agent, Primary-Auth-Type) are sent to Ping Identity.
Send ECP Server Credentials: When the toggle is enabled, Agent + Token authentication is supported. In the fields below, enter the Agent ID and password defined in your Ping environment.
Specify the following settings for authenticators based on ForgeRock templates:
URL: The access URL for your ForgeRock identity platform
Chain / Tree: Name of the relevant node in the Authentication Tree
Realm Path: Name of the relevant realm in the AM console
Web SSO Tree: URL of the winsso tree in your ForgeRock OpenAM. This tree enables automatic launching of the user’s dashboard upon user login to a Windows or Mac workstation.
Send Headers: When the toggle is enabled (default setting), HTML headers (IP, User-Agent, Primary-Auth-Type) are sent to the ForgeRock directory.
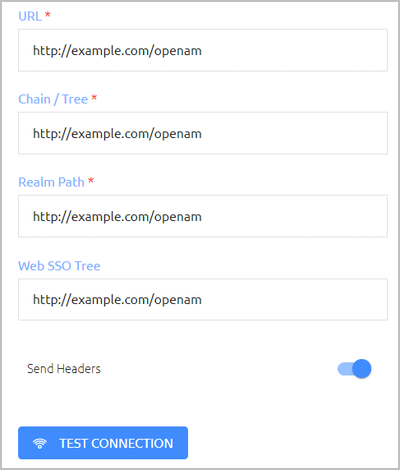
To check the validity of your settings, click Test Connection.
Click Add.
The dialog closes, and the new authenticator is added to the Authenticator List.
These plugins can be used as OTP validators only.
To add a third-party authenticator (Yubico or RSA AM):
In the upper left corner of the Authenticators tab, click Add Authenticator.
The Add 3rd Party Authenticator dialog opens.
In the Authenticator Name field, enter a friendly descriptive name for the new authenticator.
From the Template dropdown list, select yubico or rsa-am.
IMPORTANT: You will not be able to change the template after you create the authenticator.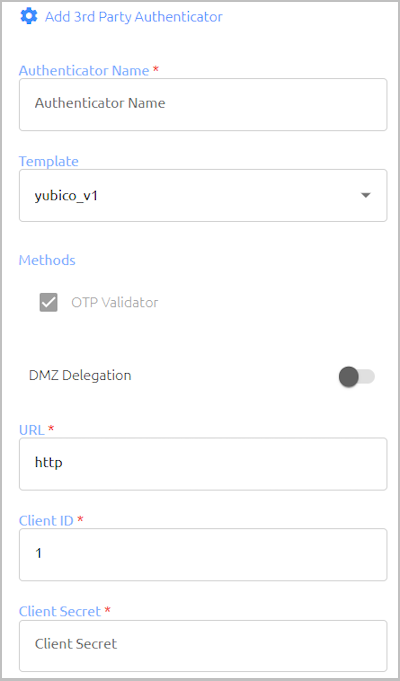
Enable / Disable the DMZ Delegation toggle as required. When this setting is enabled, Authentication Servers in the DMZ can communicate directly with a server within the internal network.
Specify the following settings for authenticators based on Yubico templates:
URL: The access URL for your Yubico OTP server.
Client ID and Client Secret: Copy the values generated from your Yubico server.
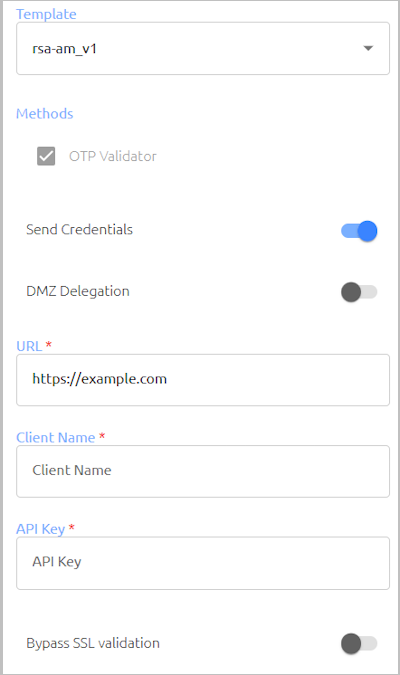
Specify the following settings for authenticators based on RSA-AM templates:
Send Credentials: When this setting is enabled (default), user credentials are sent to the third-party authenticator. The third party then sends back a token for the User Portal, and the Portal opens automatically upon user authentication to Windows or Mac.
URL: The access URL for your RSA server.
Client Name and API Key: Copy the values generated from your RSA server.
Bypass SSL Validation: To bypass validity testing of the certificate on the RSA server, click the toggle to activate the setting. (When Bypass SSL Validation is enabled, you will be able to use a self-signed certificate.)
To check the validity of your settings, click Test Connection.
Click Add.
The dialog closes, and the new authenticator is added to the Authenticator List.
This plugin can be used for push notification authentication to Windows and the User Portal.
To add the Thales third-party authenticator:
In the upper left corner of the Authenticators tab, click Add Authenticator.
The Add 3rd Party Authenticator dialog opens.
In the Authenticator Name field, enter a friendly descriptive name for the new authenticator.
From the Template dropdown list, select thales.
IMPORTANT: You will not be able to change the template after you create the authenticator.
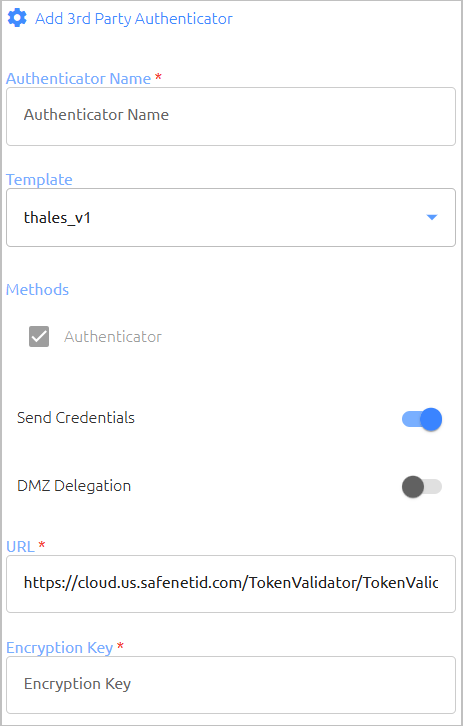
Specify whether to send user credentials to the third-party authenticator by enabling or disabling the Send Credentials toggle button.
When credentials are sent (default setting), the third-party authenticator sends back a token for the User Portal, and the Portal opens automatically upon user authentication to Windows or Mac. If credentials are not sent, no token is sent back, and users will need to manually log into the User Portal after being authenticated by the third party.
Enable / Disable the DMZ Delegation toggle as required. When this setting is enabled, Authentication Servers in the DMZ can communicate directly with a server within the internal network.
Enter the URL and Encryption Key in the appropriate fields. Copy these settings from your Thales Admin Console (Authentication Processsing > Authentication Agent Settings).
To check the validity of your settings, click Test Connection.
Click Add.
The dialog closes, and the new authenticator is added to the Authenticator List.
In a two-step authentication flow, users need to provide an additional validation code after entering their credentials. In the Okta two-step mechanism, the code is sent to the user via voice message, SMS, or the Okta Verify app. Alternatively, users can provide a passphrase that has been configured in Okta.
IMPORTANT: In order for users to be able to log into Windows, Octopus Desk for Windows version 3.6.0 or higher must be installed.
To add an Okta Two-step authenticator:
Before beginning setup in the Octopus Management Console, configure your Okta environment to support the integration.
IMPORTANT: If you plan to use a passphrase for verification, you need to set up a custom security question called Passphrase.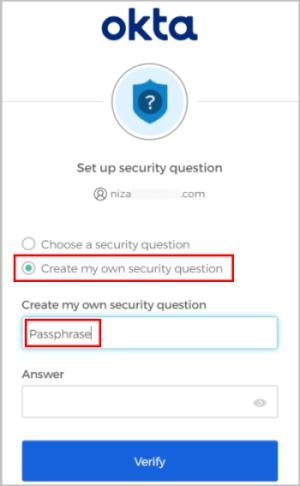
In the upper left corner of the Authenticators tab, click Add Authenticator.
The Add 3rd Party Authenticator dialog opens.
In the Authenticator Name field, enter a friendly descriptive name for the new authenticator.
From the Template dropdown list, select Okta. Then, under Methods, select Two-Step Authenticator and make sure that the Send Credentials toggle is enabled.
Enable / Disable the DMZ Delegation toggle as required. When this setting is enabled, Authentication Servers in the DMZ can communicate directly with a server within the internal network.
Enter the following settings:
URL: Your access URL for the Okta portal
Token: The API token generated from your Okta portal
Security Question: If you plan to use a passphrase for verification, enter Passphrase. (Make sure you have set up the security question as described above.)
To check the validity of your settings, click Test Connection.
Click Add.
The dialog closes, and the new authenticator is added to the Authenticator List.
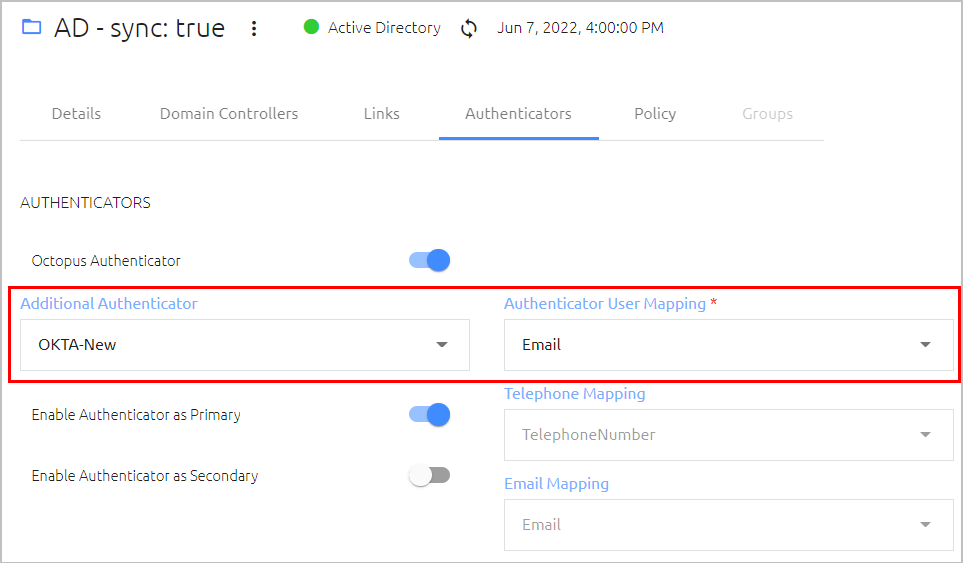
To complete the integration, navigate to the settings of your integrated directory and open the Authenticators tab. Under Additional Authenticator, select the Okta authenticator you created, and under Authenticator User Mapping, select Email. Then, at the bottom of the tab, click Save.
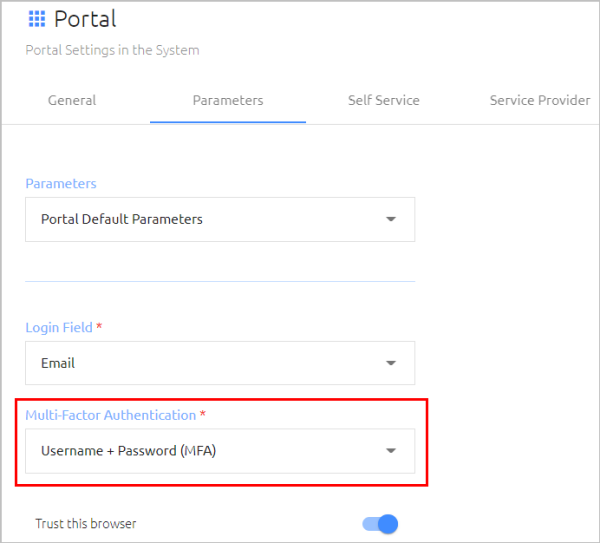
IMPORTANT: To help ensure successful integration, verify that user credentials (username and password) in the AD and in the Okta directory are identical.To set up integration for the User Portal, select the Portal menu and configure the following settings:
In the Parameters tab, under Multi-Factor Authentication, select Username + Password (MFA).
In the Directories and Users tabs, choose the relevant directory, and select groups and users to be given Portal access.
In a two-step authentication flow, users need to provide an additional validation code after entering their credentials. The Octopus platform provides two plugins that support Twilio two-step authentication:
twilio_v1: Supports verification methods of Email and SMS.
twilio_v2: Supports verification methods of Email, SMS, Voice Call and WhatsApp. You can select any combination of methods when creating or updating the authenticator.
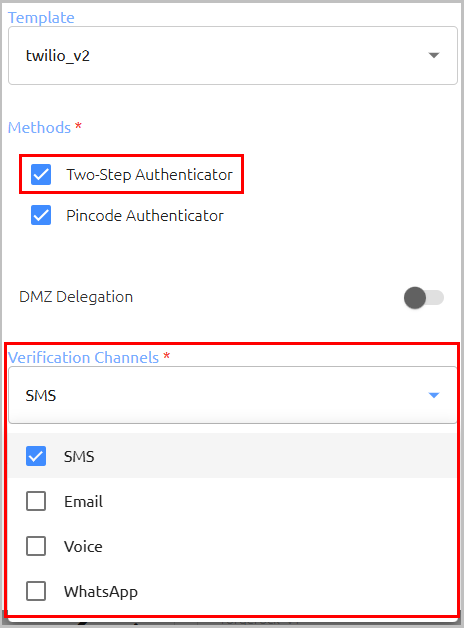
The following procedure describes how to add a twilio_v2 plugin. The twilio_v1 configuration parameters for email and SMS verification are similar.
To add a Twilio Two-step authenticator:
In the upper left corner of the Authenticators tab, click Add Authenticator.
The Add 3rd Party Authenticator dialog opens.
In the Authenticator Name field, enter a friendly descriptive name for the new authenticator.
From the Template dropdown list, select twilio_v2.
IMPORTANT: You will not be able to change the template after you create the authenticator.Then, under Methods, select the Two-Step Authenticator checkbox.
The Verification Channels list appears.
Enable / Disable the DMZ Delegation toggle as required. When this setting is enabled, Authentication Servers in the DMZ can communicate directly with a server within the internal network.
Open the Verification Channels list and select the verification methods to be supported. Then, configure the relevant settings for each selected method, as described in the steps below.
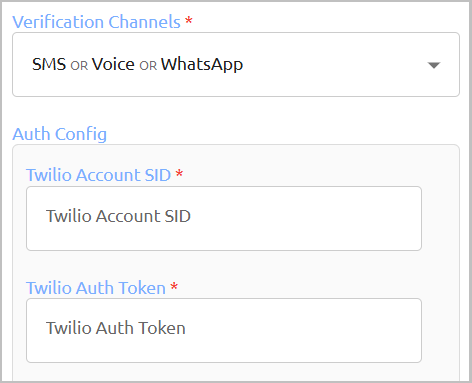
If you selected SMS, Voice and/or WhatsApp, enter the following settings under Auth Config:
Account SID: The username for your Twilio account.
Auth Token: The password for your Twilio account.
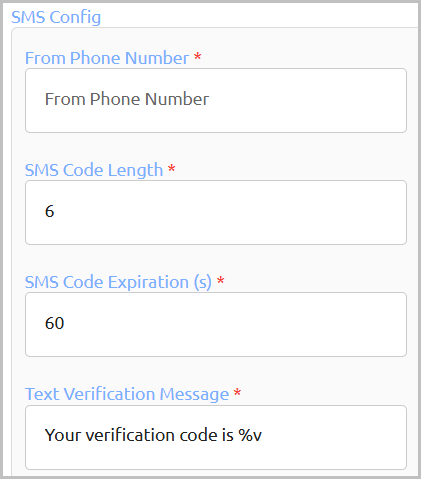
To enable verification codes to be sent by SMS, configure the following settings under SMS Config:
From Phone Number: The Twilio phone number used to send the message.
SMS Code Length: Number of digits in the one-time code.
SMS Code Expiration: Time period (in seconds) for which the code can be used.
Text Verification Message: Content of the message. Use the %v placeholder to show the verification code in the message.
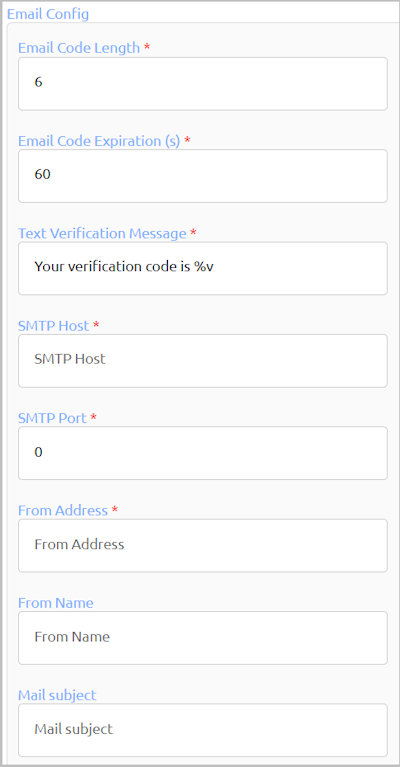
To enable verification codes to be sent by email, configure the following settings under Email Config:
Email Code Length: Number of digits in the one-time code.
Email Code Expiration: Time period (in seconds) for which the code can be used.
Text Verification Message: Content of the message. Use the %v placeholder to show the verification code in the message.
SMTP Host: IP address or hostname of the SMTP server.
SMTP Port: Port number for SMTP connection.
From Address: The From email address that appears in account-generated emails.
From Name: Name of the sender that appears in account-generated emails.
Mail Subject: Subject line that appears in account-generated emails.
SMTP Authentication: To use SMTP authentication, click the toggle button to activate the setting, and then enter the authentication username and password in the fields below.
SMTP Security: Select the appropriate security method: None, SSL/TLS or STARTTLS.
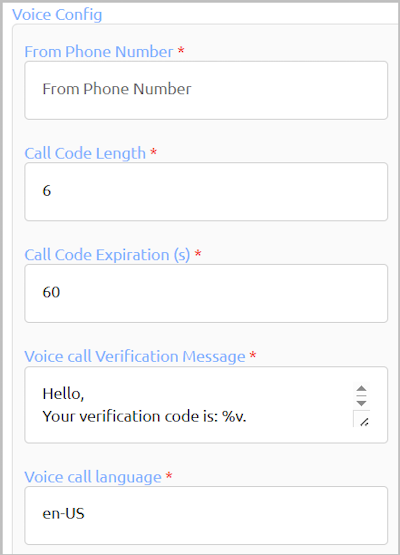
To enable verification codes to be sent by voice call, configure the following settings under Voice Config:
From Phone Number: The Twilio phone number used to make voice calls.
Call Code Length: Number of digits in the one-time code.
Call Code Expiration: Time period (in seconds) for which the code can be used.
Voice call Verification Message: The message played during the call. The message should include a placeholder (%v) for the code.
Voice call language: The language code of the message. For a list of language codes, refer to the TTS article in the Twilio documentation.
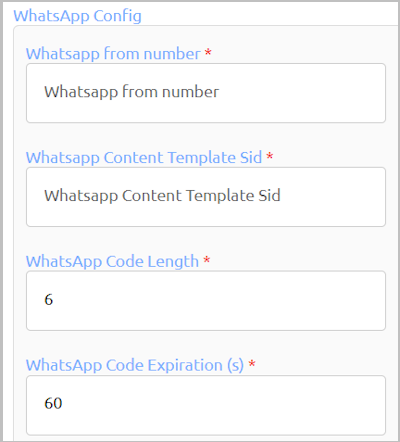
To enable verification codes to be sent by WhatsApp, configure the following settings under WhatsApp Config:
WhatsApp from number: The Twilio WhatsApp phone number used to send or make voice calls.
WhatsApp Content Template Sid: The Twilio template SID for sending pre-approved WhatsApp messages. The plugin will replace the variable {{1}} with the verification code.
WhatsApp Code Length: Number of digits in the one-time code.
WhatsApp Code Expiration: Time period (in seconds) for which the code can be used.
IMPORTANT: The WhatsApp verification method is currently supported for User Portal login only (not Windows).To check the validity of your settings, click Test Connection.
Click Add.
The dialog closes, and the new authenticator is added to the Authenticator List.
The Pincode Authenticator enables users without smartphones to perform passwordless authentication using a personal PIN for identification. On the Login screen, users select the Octopus Authenticator login method, type a username and press <Enter>. They then receive a voice call, during which they enter the PIN that was generated for them in the Octopus Management Console (in the Security tab of the user details).
Upon providing the correct PIN followed by the pound key, users are logged into Windows or the User Portal.
IMPORTANT: For successful creation and integration of the Pincode Authenticator, the Twilio environment needs to be configured to enable storage of user PIN codes. For details, please refer to the document Configuring Twilio for Octopus Pincode Authentication, or contact the Secret Double Octopus support team.
To add a Twilio Pincode Authenticator:
In the upper left corner of the Authenticators tab, click Add Authenticator.
The Add 3rd Party Authenticator dialog opens.
In the Authenticator Name field, enter a friendly descriptive name for the new authenticator.
From the Template dropdown list, select twilio_v2.
IMPORTANT: You will not be able to change the template after you create the authenticator.
Under Methods, select the Pincode Authenticator checkbox. Then, under Auth Config, enter the following settings:
Account SID: The username for your Twilio account.
Auth Token: The password for your Twilio account.
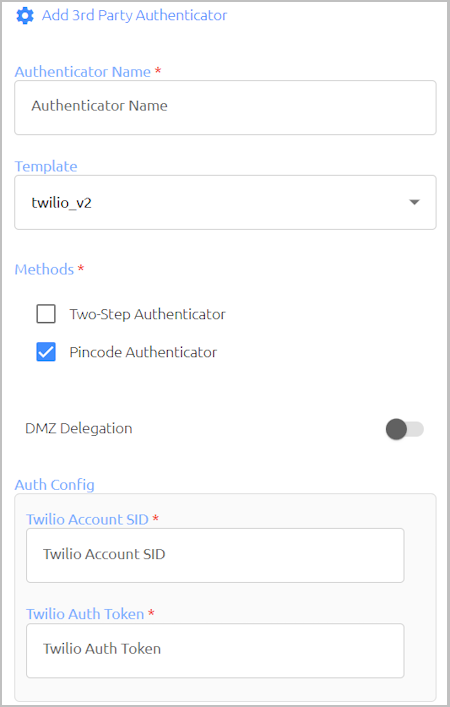
Enable / Disable the DMZ Delegation toggle as required. When this setting is enabled, Authentication Servers in the DMZ can communicate directly with a server within the internal network.
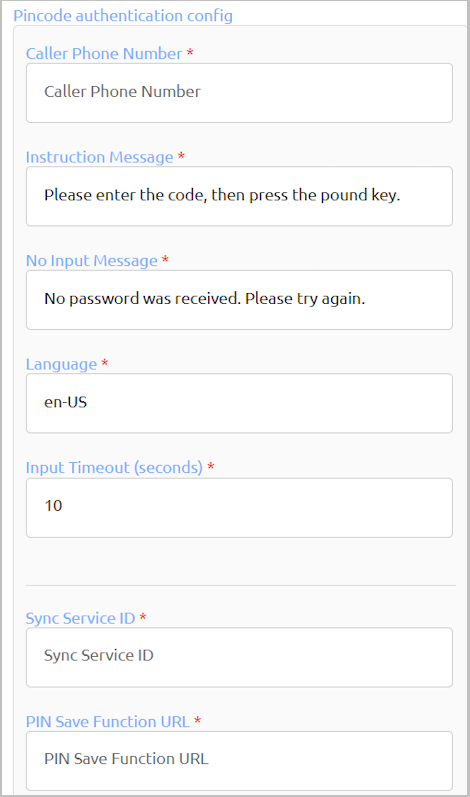
Under Pincode authentication config, configure the following settings:
Caller Phone Number: The source phone number configured in your Twilio account.
Instruction Message: The message that users will hear during the call.
No Input Message: The message that is played when no user response is detected.
Language: The language code of the message. For a list of language codes, refer to the TTS article in the Twilio documentation.
Input Timeout: Duration (in seconds) to wait for input before ending the call.
Sync Service ID: SID of the relevant Sync Service in the Twilio environment.
PIN Save Function URL: The URL of the function created in the Twilio environment to store user-entered PINs.
To check the validity of your settings, click Test Connection.
Click Add.
The dialog closes, and the new authenticator is added to the Authenticator List.
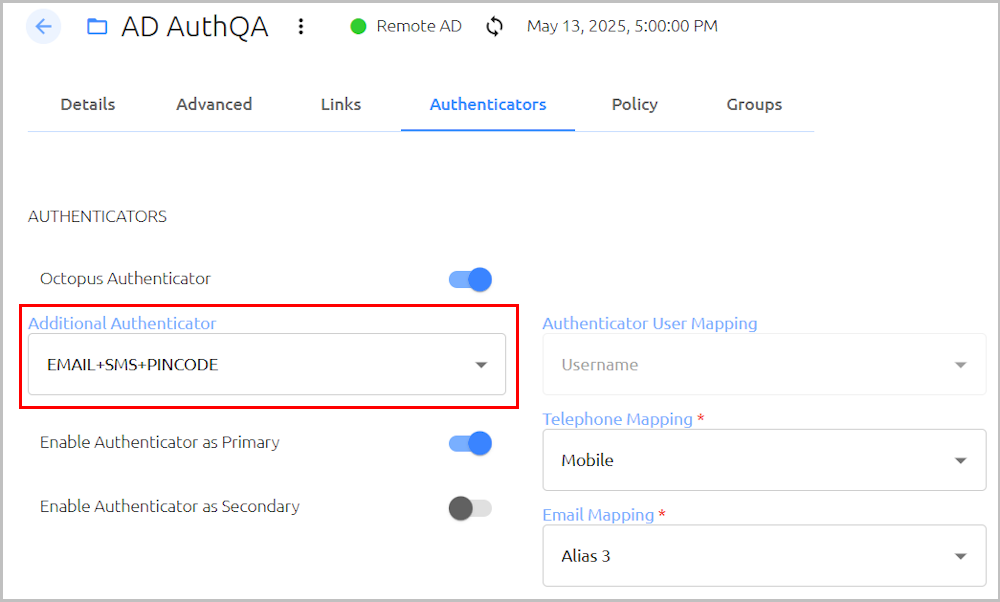
To complete the integration, navigate to the settings of your integrated directory and open the Authenticators tab. Under Additional Authenticator, select the twilio_v2 authenticator you created. Then, at the bottom of the tab, click Save.
To set up integration for the User Portal, open the Portal menu.
In the Directories and Users tabs, choose the relevant directory, and select groups and users to be given Portal access.
Generating User PIN Codes
Follow these steps to generate the PIN that the user provides during pincode authentication:
From the Manage Users menu, expand the required directory. Then, select the relevant user to open the user details.
In the Personal tab, verify that the user's phone number is entered in the Telephone Number / Mobile field. or mapped to an Alias parameter.
Open the Security tab. Under Voicecall Authentication PIN, click Generate PIN.
The generated code is displayed in a popup window.
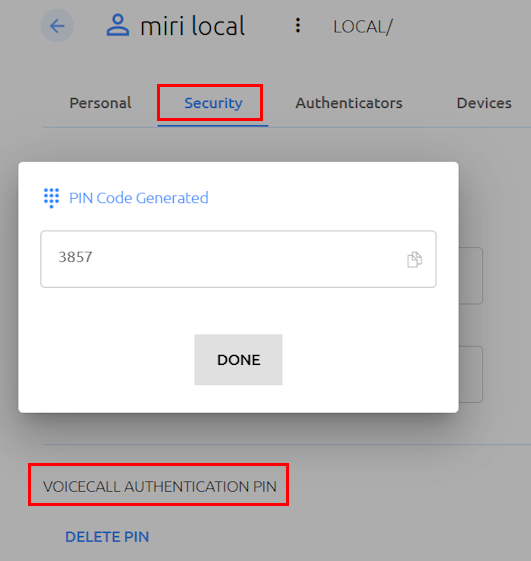
Copy the code and share it with the user.
If you encounter issues while generating the PIN, perform the following troubleshooting techniques and then try again:
Delete any existing authenticators or devices that the user has.
Unenroll the user.
Template files, which are written in JSON format, contain the schema for third-party authenticators used in the system. The Octopus Management Console features several built-in templates and supports the ability to upload customized template files.
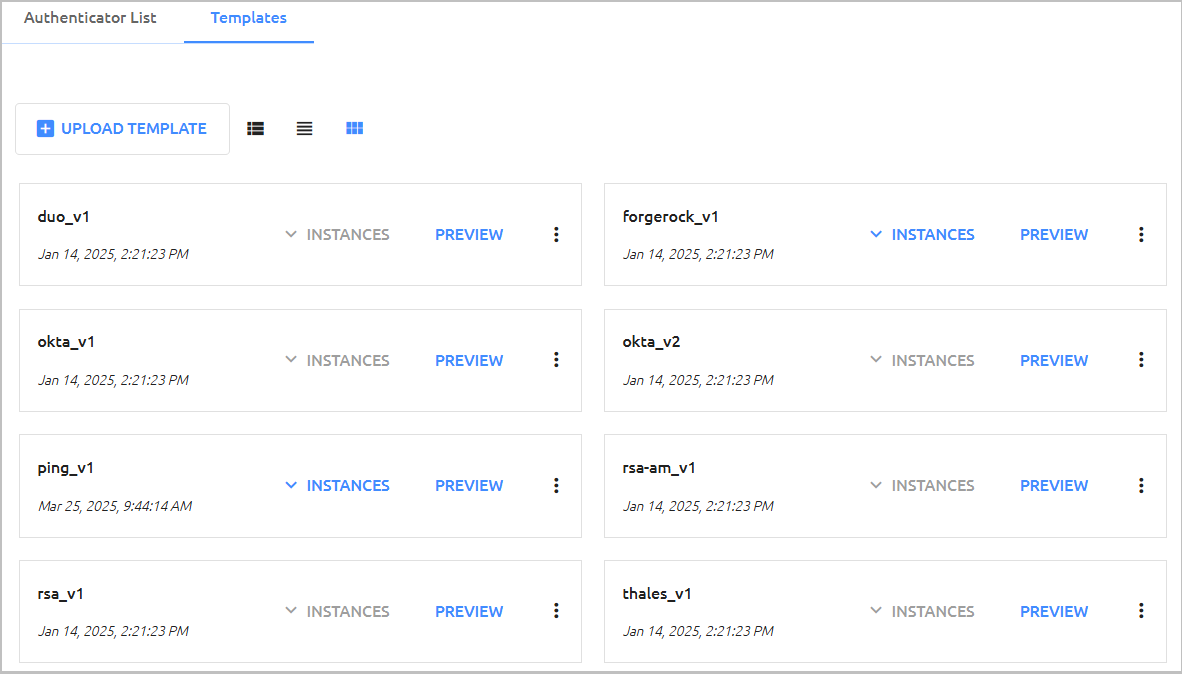
The Templates tab allows you to view and manage existing templates and upload new ones.
Working with the Templates List
Each block or row in the Templates tab shows the file name and creation time of the template. If a template is being used by one or more authenticators, the INSTANCES list is enabled.
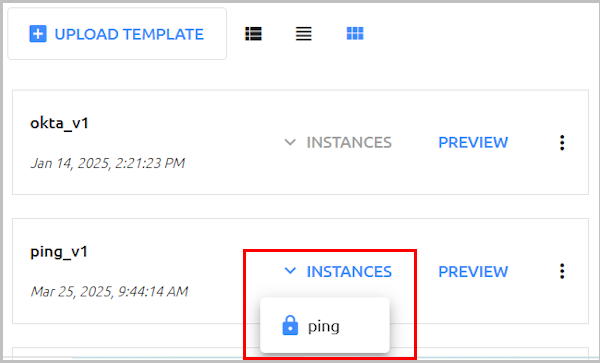
To view the authenticators currently using the template, click to open the list. Clicking an authenticator in the list opens the settings page for that authenticator.
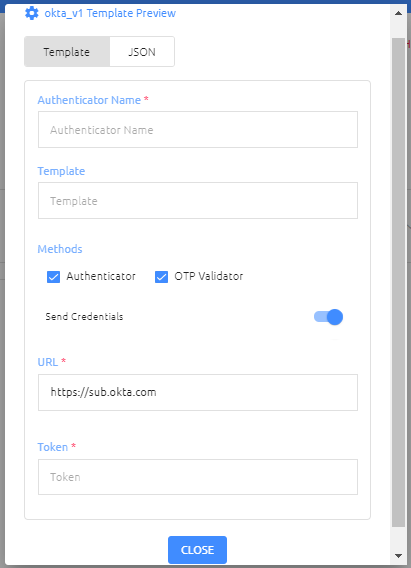
Clicking PREVIEW opens a popup in which you can view the template's fields. The Template Preview popup contains two views:
Template: Shows the fields as they will be displayed in the Octopus Management Console (e.g., when creating a new authenticator based on the template).
JSON: Shows the structure of the JSON file.
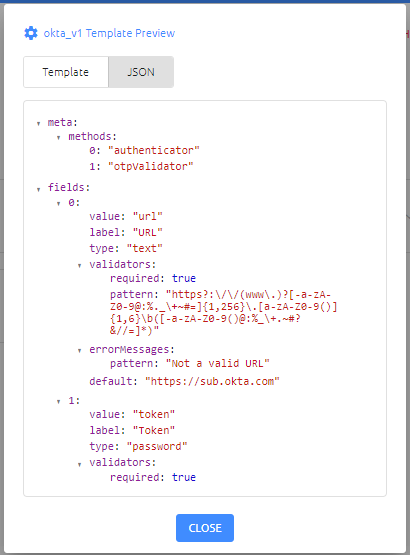
IMPORTANT: Fields in the Template Preview popup are NOT editable.
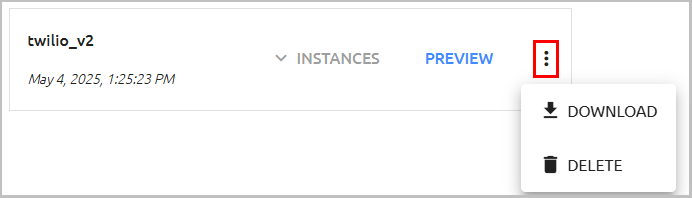
Clicking opens a list with the following actions:
Download: Downloads the JSON file to the user's local machine. Use the Download option for backup and to create new customized files based on a built-in template.
Delete: Removes the template from the Management Console. A template can be deleted only if it is NOT currently being used by an authenticator.
Uploading a Template File
Custom authenticator templates can be imported to the Management Console by uploading the relevant JSON file.
IMPORTANT: Before uploading the file, make sure that the corresponding JS file (containing the authenticator code) has been copied to the Custom Authenticators directory on each Authentication Server. The names of the JSON file and the JS file must be identical.
To upload a template file:
In the upper left corner of the Templates tab, click Upload Template.
The Upload Authenticator Template dialog opens.
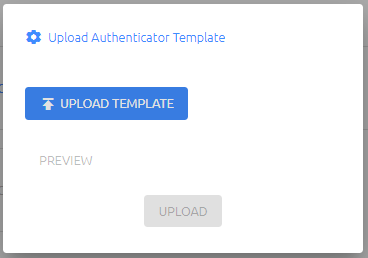
Click Upload Template. Then, navigate to and select the relevant JSON file.
The name of the selected file is displayed.
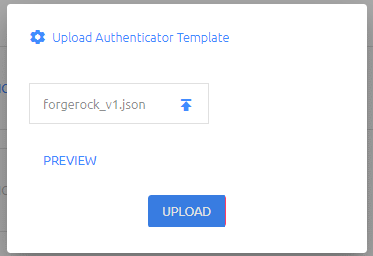
To view the template's fields before uploading the file, click Preview. The Template Preview popup allows you to both view the fields as they will appear in the Management Console interface and review the structure of the JSON file.
Click Upload.
The template is added to the list in the Templates tab.
Modifying a Built-in Plugin
External developers can expand on built-in behavior by modifying an out-of-the-box plugin.
To modify a built-in plugin:
Access the required files:
Export the JSON file from the Octopus Management Console.
Copy the JS file from the Custom Authenticators directory on the Authentication Server.
Modify the two files as required. Verify that all variables used in the code are defined in the schema (JSON file).
Rename the files with the same file name. The name cannot be one that is being used by one of the built-in templates.
Manually upload the modified JS file to the Custom Authenticators directory on each Authentication Server. The new file will override any existing authenticator with the same name.
Upload the JSON file to the Octopus Management Console, using the interface in the Templates tab.
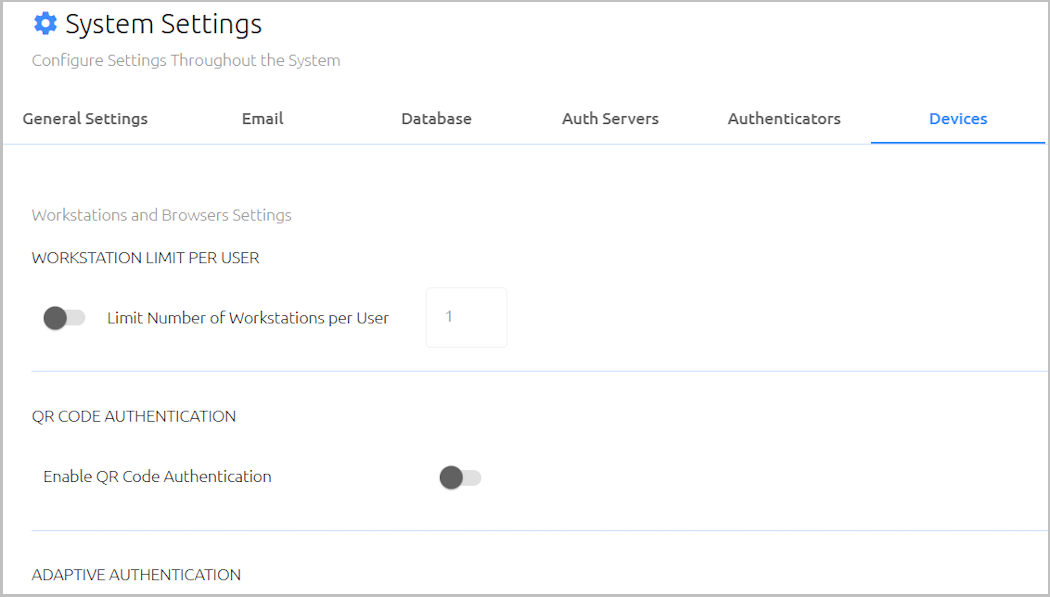
The Devices tab of the System Settings menu allows you to control the following security settings related to the workstations and browsers that are used for authentication:
Workstation Limit: When this setting is enabled, you can restrict the number of workstations to which users can successfully authenticate.
QR Code Authentication: When this setting is enabled, users can log into the User Portal and web applications using a QR code.
Adaptive Authentication: When this feature is enabled, a stronger authentication mechanism is required for users logging in for the first time via a workstation or browser not previously used for Octopus Authentication.
Workstation Push Bombing Protection: When this feature is enabled, automatic protective mechanisms are enforced in the event of a suspected push bombing attack.
Distributed Workstations Vault settings: Allow you to manage security keys, control support of legacy workstations, and exit Compatibility Mode when you are ready to switch to a decentralized vault configuration.
macOS FileVault Password settings: Allow you to configure settings related to the Octopus FileVault password (relevant for Octopus for Mac versions 2.6.1 and above).
Workstation Limit Per User
This setting enables you to define a limit on the number of workstations to which users can authenticate. Once the limit is reached, authentication to any other workstation(s) will fail.
To define the limit, click the toggle to enable the setting. Then specify the permitted number of workstations in the field to the right.
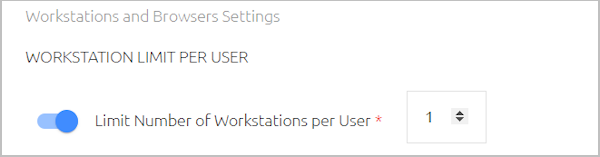
After making your changes, scroll to the bottom of the tab and click Save.
Note: The global limit set here can be overridden for individual users in the user's details (Security tab).
QR Code Authentication
When this setting is enabled, users have the option of authenticating to the User Portal and web services using a QR code displayed on the Login page for the service. The QR code must be scanned with the user's enrolled mobile device.
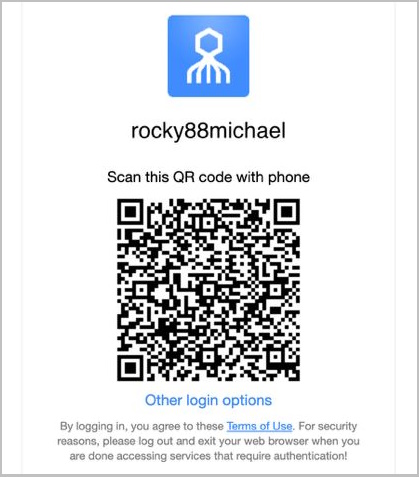
Users who are unable to scan the code (e.g., the phone is not available or the camera is defective) can click the Other login options link to access alternative authentication methods.
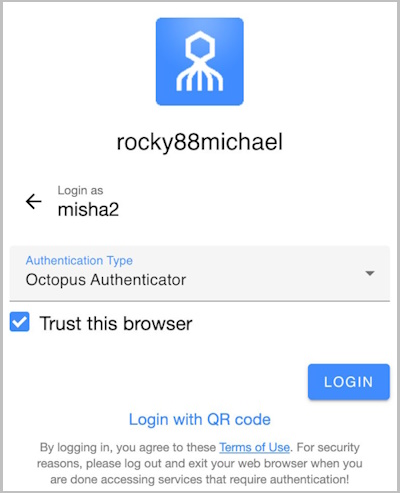
IMPORTANT: Services that support QR code authentication include all SAML services, Entra ID, WS-Fed and OIDC services.
QR code authentication is NOT currently supported for Windows and Mac login.
To activate the setting, click the Enable QR Code Authentication toggle button. Then, click Save.
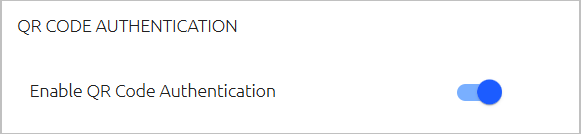
Note: The global setting defined here can be overridden for individual services, in the Devices tab of the service settings.
Adaptive Authentication provides an extra layer of security when authentication is attempted from a workstation or browser not previously used for Octopus Authentication. When Adaptive Authentication is enabled, users authenticating for the first time from a unrecognized device (browser/workstation) are required to enter the verification code that is generated and displayed in the Octopus Authenticator mobile app. Following the first successful authentication, you can either designate the browser or workstation as a Trusted device (strong authentication is no longer required), or you can specify a frequency at which users are required to enter a code again.
To further enhance security, the Adaptive Authentication mechanism enforces the following limitations on login attempts:
Windows login: Users can enter the verification code only once. If the code is incorrect, authentication will fail and the entire authentication process needs to be restarted.
Portal login: Users are allowed multiple attempts to enter the verification code. However, after three incorrect attempts the system will not permit a user to authenticate (regardless of whether the correct code is provided on later attempts) until a new authentication request is initiated.
IMPORTANT: Adaptive Authentication is relevant to the Octopus Authenticator only.
The feature is activated and inactivated by toggling the Adaptive Authentication toggle button.
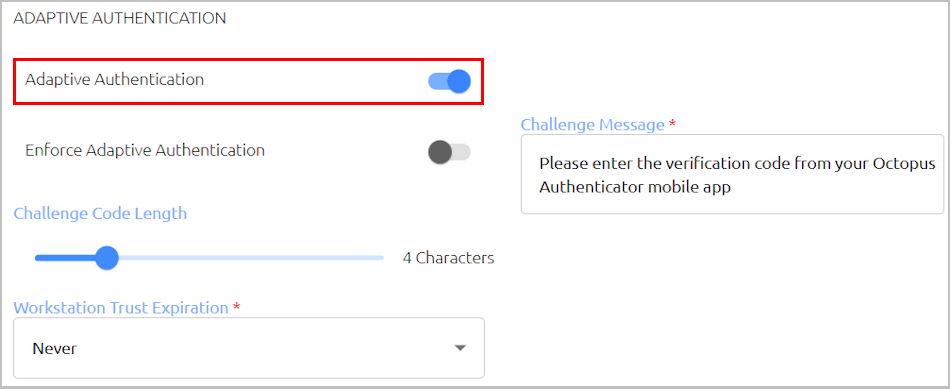
When Adaptive Authentication is active, the following settings are enabled and configurable:
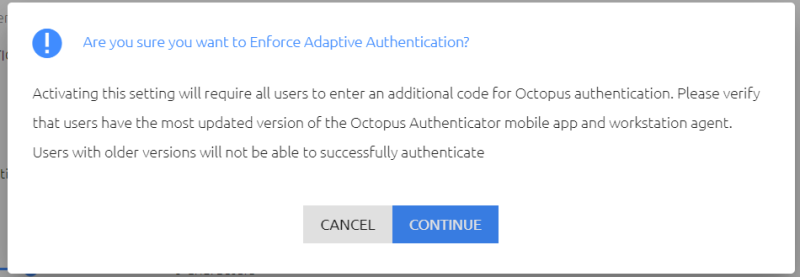
Enforce Adaptive Authentication: This setting determines whether the Adaptive Authentication mechanism will apply to users authenticating with versions of Octopus Authenticator lower than 5.0. When the setting is off, users with previous versions of Windows, Mac or Exchange agent will be able to authenticate from an unrecognized device without entering a challenge code. When the setting is on, authentication will fail, and these users will need to upgrade to the newest version in order to successfully authenticate.
To activate Enforce Adaptive Authentication, click the toggle button and then click Continue in the confirmation popup.
Challenge Code Length: Number of characters in the verification code. Valid values range from 3-8. The default value is 4.
Challenge Message: The message displayed to users prompting them to enter the verification code.
Workstation Trust Expiration: Determines how often Adaptive Authentication is required following the first successful login to a workstation. The options are:
Never: The workstation is a Trusted device and strong authentication is no longer required.
Always: Users receive a verification code with every login to the workstation.
After: Adaptive Authentication is required periodically. When selecting this option, specify the expiration period in the fields to the right.

Note: The Browser Trust Timeout setting is configured in the General tab of the Portal menu.
After updated Adaptive Authentication settings, click Save.
Note: The global settings defined here can be overridden for individual services, in the Devices tab of the service's settings. The option to override the global Workstation Trust Expiration setting is available for Active Directory Authentication services only.
This feature provides an extra layer of protection for workstations targeted for push bombing attacks. When the feature is enabled, mechanisms to protect the workstation are automatically initiated when the system detects a potential push bombing event. These mechanisms are selected by the system admin, and can be configured to become more forceful as the evidence of an attempted attack increases.
Push fatigue protection is activated and disabled by means of the Workstation Push Fatigue Protection toggle button.
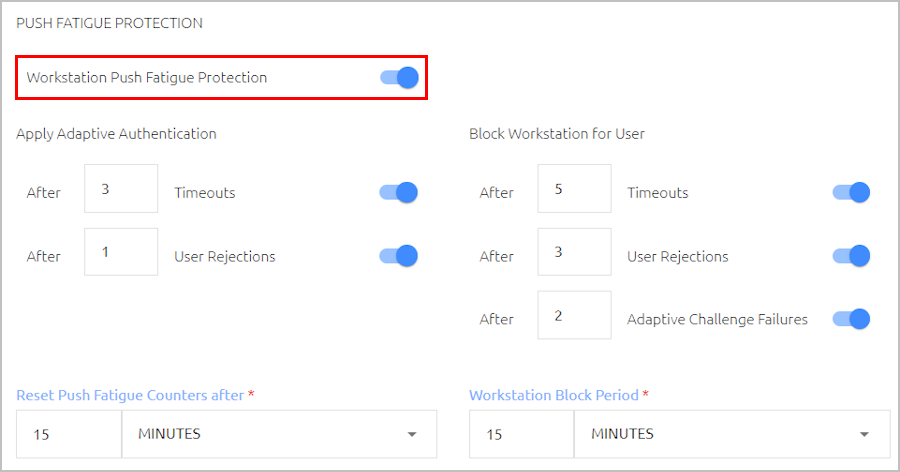
When push fatigue protection is enabled, you can set up one or both of the following protection mechanisms:
Apply Adaptive Authentication: This mechanism works by requiring the user to provide a verification code for successful login (even when the workstation is a known device). Adaptive Authentication is applied after a specified number of timeouts (the user does not respond to the authentication request) and/or a specified number of user rejections (the user denies the authentication request).
IMPORTANT: To use this mechanism, the Adaptive Authentication setting must be enabled.
Block Workstation for User: This mechanism works by preventing the user from accessing the workstation for a configurable period of time. The block is applied after a specified number of timeouts and/or a specified number of user rejections. In addition, if Adaptive Authentication is enabled, workstation access can be denied following a specified number of adaptive challenge failures (the user provides an incorrect verification code).
The following settings are also configurable:
- Reset Push Fatigue Counters: The period of time (starting from the last failed /timed out authentication attempt) after which counters for timeouts, rejections and adaptive challenge failures are reset to zero. The counters are automatically reset upon a successful user login. Supported settings range from 1 minute to 48 hours (default is 15 minutes).
- Workstation Block Period: The period that must elapse (from the time of user lockout) before the user is authorized to log into the workstation. Supported settings range from 1 minute to 48 hours (default is 15 minutes).
After updating Push Fatigue settings, click Save.
IMPORTANT:
- In new installations of Octopus Authentication Server versions 5.4 and higher, push bombing protection is enabled by default.
- When upgrading the system to these versions, the feature is disabled, to avoid interruptions in login flows. After upgrade, you can enable the feature manually.
Following a server upgrade, users must perform a hard refresh to the browser (Ctrl + F5), or clear the browser cache.
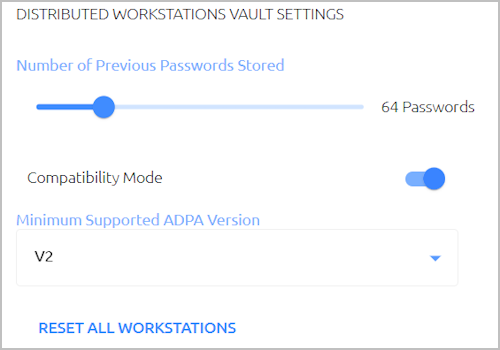
The Distributed Workstations Vault Settings enable you to control how security keys and workstation-server communications are handled. The settings are:
Setting | Description |
|---|---|
Number of Previous Passwords Stored | The number of generated passwords stored by the server for each workstation, for authentication when the user is outside of the network. Valid values range from 16-256 (default = 64). |
Minimum Supported ADPA Version | This setting enables you to choose the version of the Agent-driven Passwordless Authentication protocol used by the platform. The ADPA protocol is used by Octopus agents (Windows, Mac, RADIUS, etc.) to perform authentication queries against the Octopus Authentication Server. The version selected determines the level of security hardening for client-server communication. The options are V1 (legacy workstation Agent support), V2 (new workstation Agent support only) and V3 (ADPA with signed payload only). In Compatibility Mode (default Server mode), older versions of the Octopus Authenticator app and workstation Agents are supported, and any ADPA version can be selected. When Compatibility Mode is OFF, only versions V2 and V3 are supported. If the selected ADPA version is V1 when Compatibility Mode is turned off, the version is automatically updated to V2. (For more details about Compatibility Mode, refer to the section below.) The global setting defined here can be overridden for specific Active Directory Authentication services, in the Devices tab of the service settings. |
Reset All Workstations | This action deletes the history and security keys on all user workstations. (The workstations will then generate a new public key when the users next log in.) The Reset All Workstations option is generally used following a system upgrade to Windows Agent version 3.3 or Mac Agent version 2.3.0. |
Understanding Compatibility Mode
In the newest versions of the Octopus mobile app and Octopus workstation agents, the Octopus Server operates using the decentralized vault concept. In this configuration, the Server continues to encrypt and store the passwords. However, since the corresponding private key is stored on the device / workstation, the Server is not able to decrypt the password. Decryption can occur only on the endpoint itself.
The decentralized vault model provides an extra layer of security, and it is the best practice method of operation. However, by default, the Server works in Compatibility Mode, to support older versions of the mobile app and workstation agents.
The action of turning off Compatibility Mode cannot be reversed. Before exiting Compatibility Mode, it is very important to properly prepare, using the following guidelines:
Make sure that all clients are updated with these versions:
Octopus Desk for Windows 3.6.0 or higher
Octopus Desk for Mac 2.6.1 or higher
Octopus Authenticator App for iOS / Android 5.0 or higher
Verify that you are not using Octopus features that require Compatibility Mode, such as:
LDAP services
Octopus Exchange Agent
Components (e.g., third-party authenticators) that are configured with the Send Credentials option
To turn off Compatibility Mode:
After verifying that you have met all requirements described above, click the Compatibility Mode toggle to inactivate the feature.
A warning popup opens.
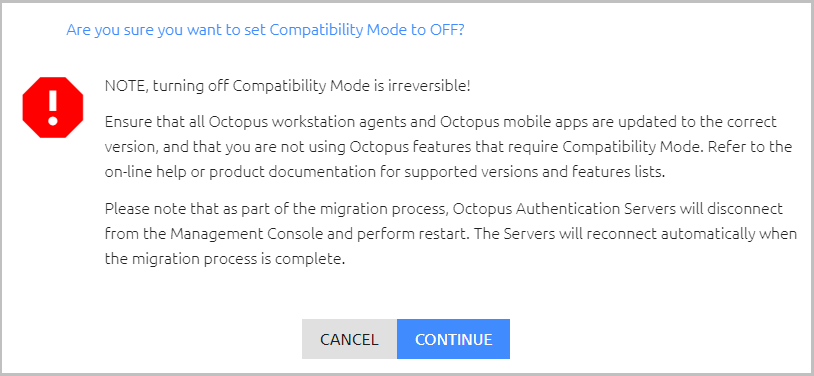
Click Continue.
The Authentication Server(s) will temporarily disconnect during the migration process. Once Compatibility Mode is off, the Reset All Workstations action is disabled.
If you use the Windows Agent and work with the Password Free Experience, follow these steps to enable successful authentication when Compatibility Mode is off:
a. From the Directories menu, open the settings of the relevant directory by clicking the Edit icon.
b. Select the Policy tab. At the top of the page, enable the Password-Free Experience toggle.
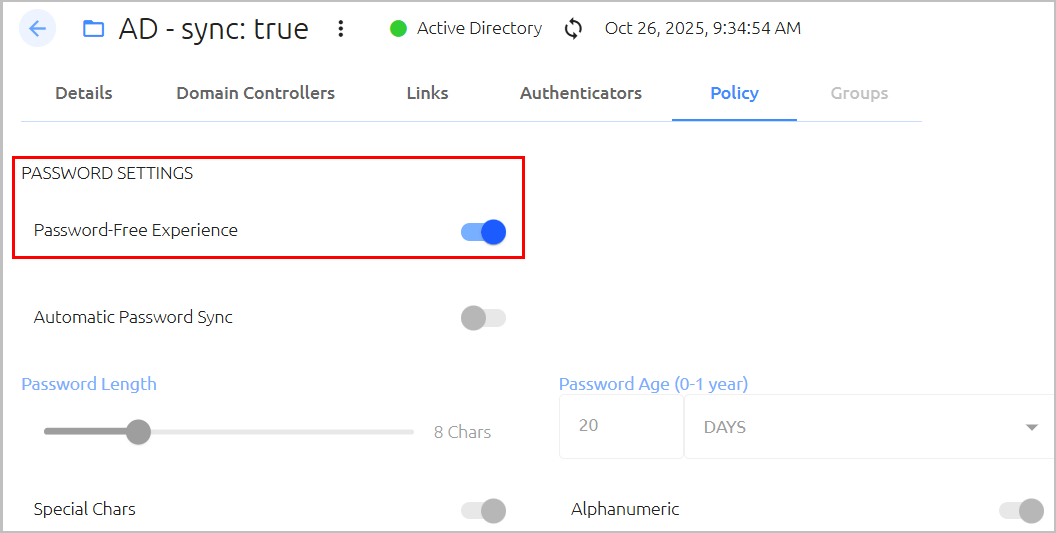
c. Click Save.
Note: When Compatibility Mode is OFF and the Windows Agent is working in MFA mode, the Show Credentials feature of the Octopus mobile app may display password history incorrectly. The last (current) password is still accurate.
macOS FileVault Password Settings
In the latest versions of Octopus Desk for Mac (2.6.1 and above), the FileVault password (which is required for passwordless authentication) is managed by the Octopus Server, instead of by the endpoint. The FileVault Password Settings enable you to manage settings related to this password.
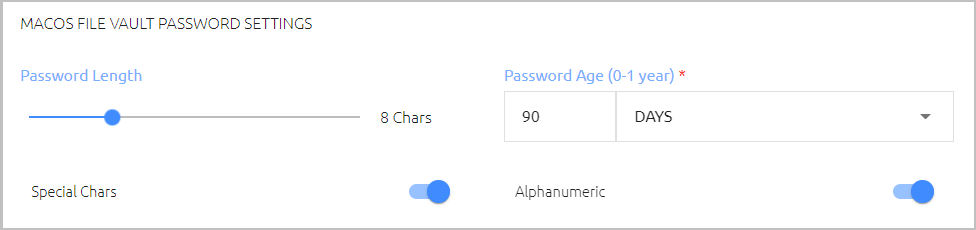
The settings are:
Password Length: Number of characters in the password (4-20).
Password Age: Period of time before the password expires. The maximum supported value is one year. If you enter a value of 0, the system will NOT rotate the password, and the password will never expire on the Octopus Server.
Special Chars: Determines whether the password must include special characters.
Alphanumeric: Determines whether the password must include both letters and numbers.
After updating and saving settings in the Management Console, you need to publish to the database in order to update all servers (in a multiple server setup) with the changes you made. The Management Console offers several elements and features to help you manage and control the publishing process.
The following sections describe:
The PUBLISH element at the top of the Management Console shows the current status of database publication. In its default state, when there are no changes to be published, the element appears as follows:

While you are working in the Management Console you may see the following different states of the PUBLISH element:
State | Description |
|---|---|
 | There are <n> unpublished changes. Publishing will update all servers with the changes. To publish, click the PUBLISH element and then, in the confirmation popup, click Publish. 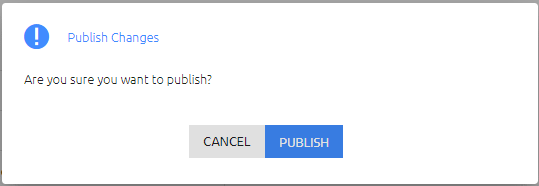 Note: After performing the User Publish action, an alert icon will continue to appear on the PUBLISH element until a full publish is done. |
 | Changes are currently being published. Once changes are successfully published, the PUBLISH element returns to its default state. |
 | The publishing process was unsuccessful. Click the warning icon to open a list of issues that were encountered. |
 | Publishing is disabled. For more information, refer to Working with Publish Settings (below). |
 | The system is in a restored state. For more information, refer to Restoring the System to a Previous State. |
The Publish Settings in the Publish tab of the System Settings menu allow you to force publish (by clicking the PUBLISH button) and disable / enable the publishing operation.
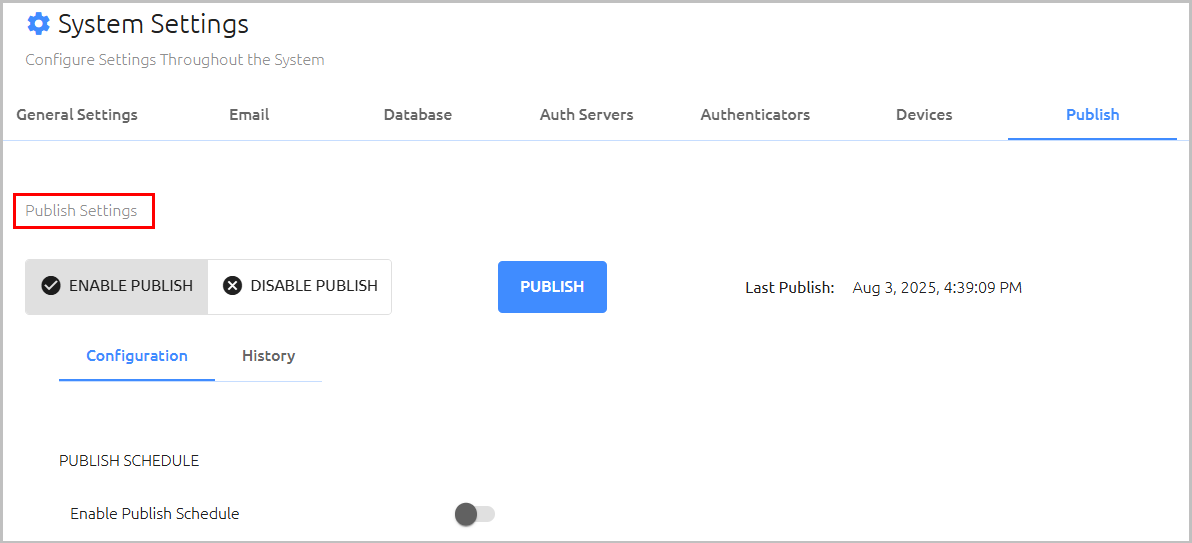
When publishing is disabled, you may continue to update settings in the Management Console, but the changes cannot be published until the publishing operation is reactivated.
To disable publishing:
At the top of the Publish tab, click Disable Publish.
A confirmation popup opens.
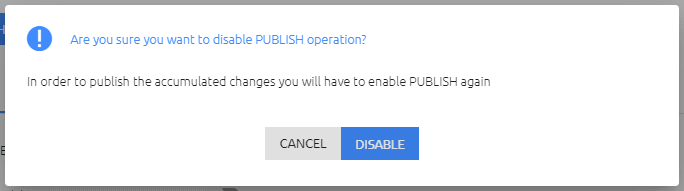
Click Disable.
The PUBLISH button is disabled, and an alert icon appears next to the PUBLISH element in the toolbar.
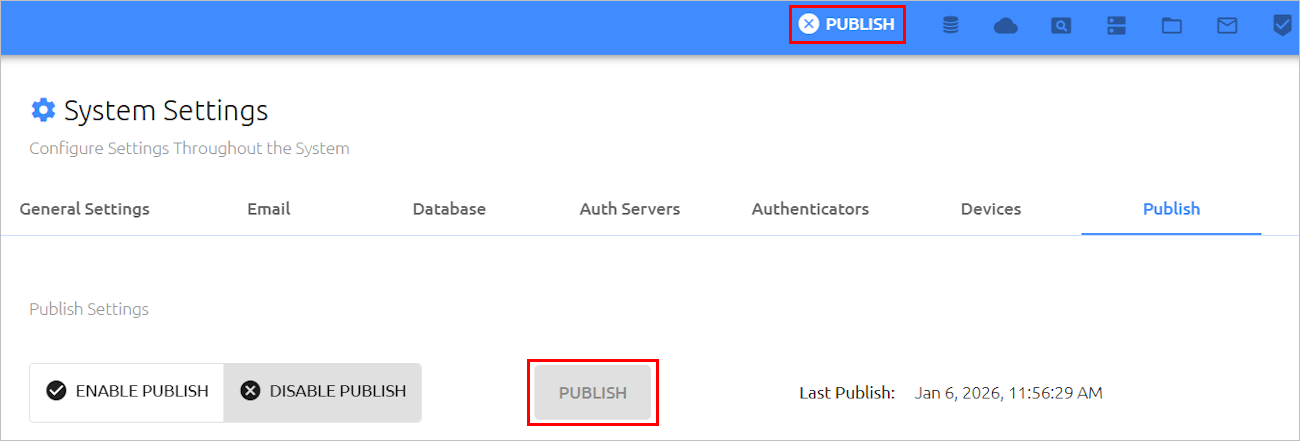
To reactivate the publishing operation, click ENABLE PUBLISH. Then, to publish accumulated changes, click PUBLISH.
The Configuration sub-tab allows you to set a schedule specifying days and times when all changes are automatically published to the database.
To set a publishing schedule:
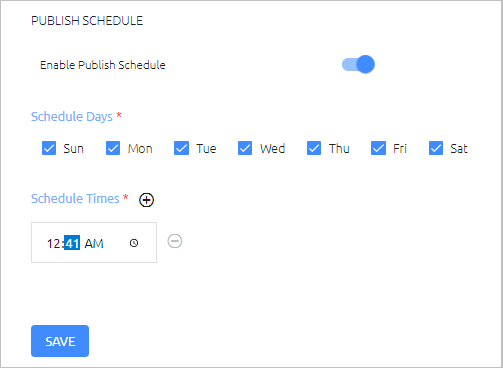
From the Configuration sub-tab of the Publish tab, click the Enable Publish Schedule toggle button.
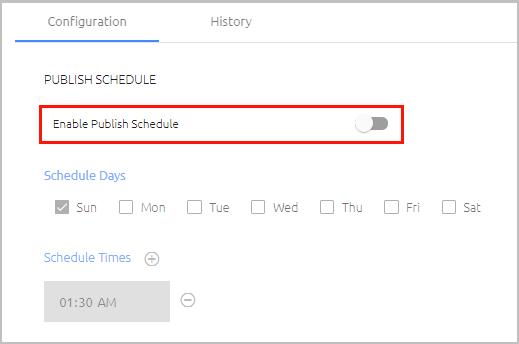
The Schedule options below are enabled.
Specify the day(s) on which you want automatic publishing to take place by selecting the relevant checkbox(es).
Specify the time(s) at which the publish operation will take place:
To add a time, click
 .
.To remove a time, click
 .
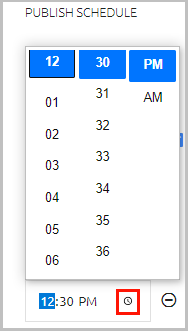
.To edit an existing time, click the hour, minute or AM/PM value and enter a new value.
Alternatively, click the Clock icon and then select a new time from the time picker that opens.
When you are finished setting the schedule, click Save.
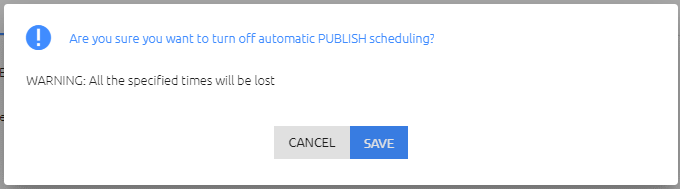
You may discontinue automatic publishing at any time. However, keep in mind that when automatic publishing is stopped, the schedule is not saved and you will need to recreate one if you resume automatic publishing.
The History sub-tab of the Publish tab displays a list of publish operations that have taken place and the initiator of each operation (system, username, etc.). The publish operation that reflects the current state of the database is indicated by a  icon in the Active column.
By default, the Publish Details pane displays a list of all currently unpublished changes. Clicking a row in the Publish History list changes the display to list all changes included in the selected publish operation.
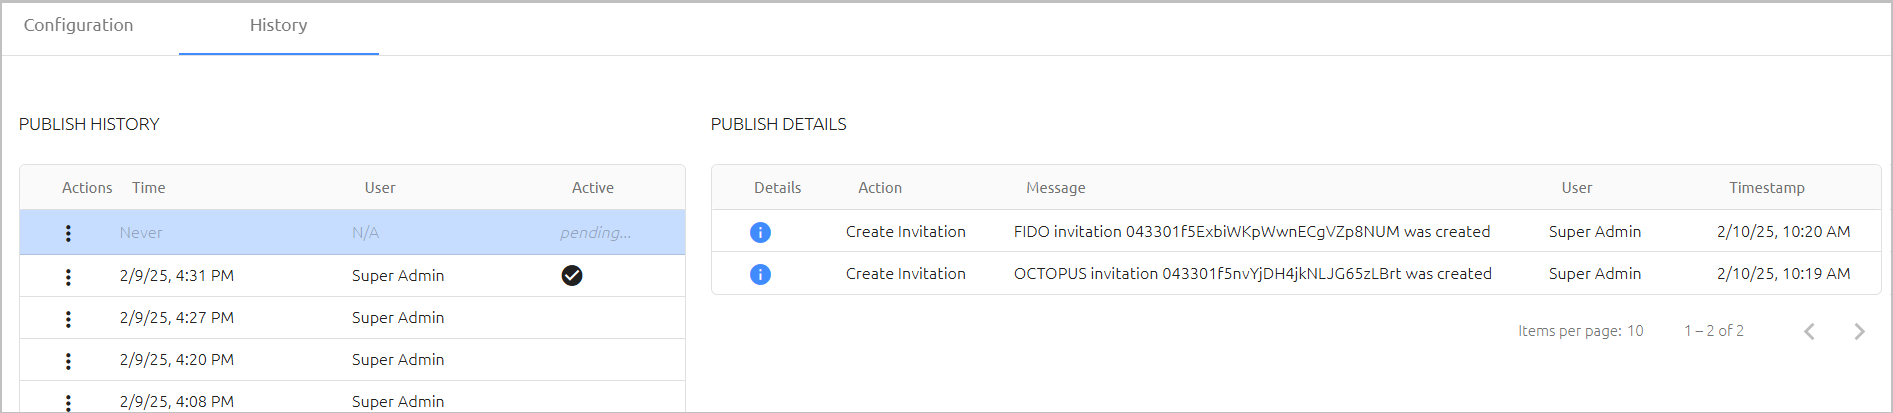
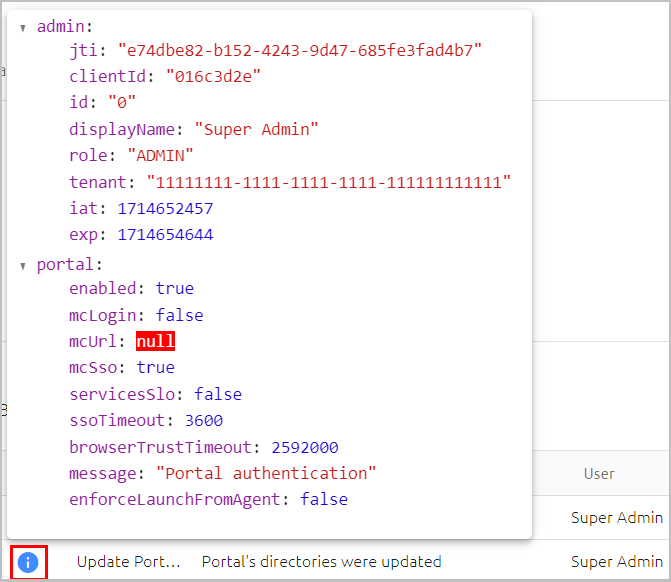
To view more details about an action, click  .
.
Restoring the System to a Previous Publish State
Generally, the most recent publish operation is the one that is currently Active. However, if required (e.g., you inadvertently published unsuitable changes) you can restore a previous publish operation, so the system can continue to operate smoothly.
Keep in mind that restoring a previous publish state changes the content in the database, but it does not reverse any changes made in the Management Console. Therefore, after performing a Restore operation, you need to manually make relevant changes and updates in the Management Console and then publish those changes.
To restore to a previous publish state:
From the Publish History list, in the row of the publish operation that you want to restore, click
and select Restore.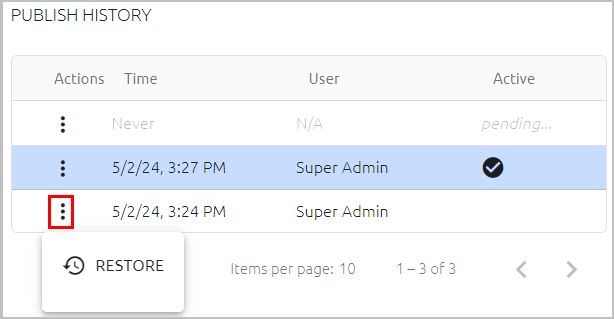
A confirmation popup opens.
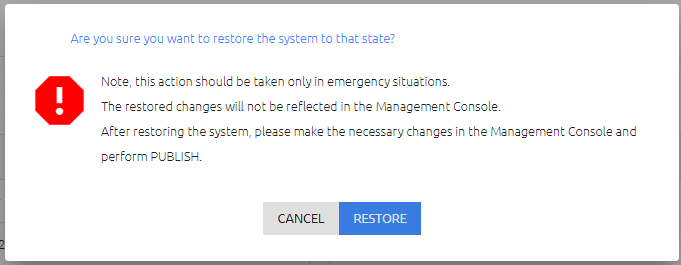
Click Restore.
The selected publish operation is marked as the Active one, and an alert icon appears next to the toolbar PUBLISH element.
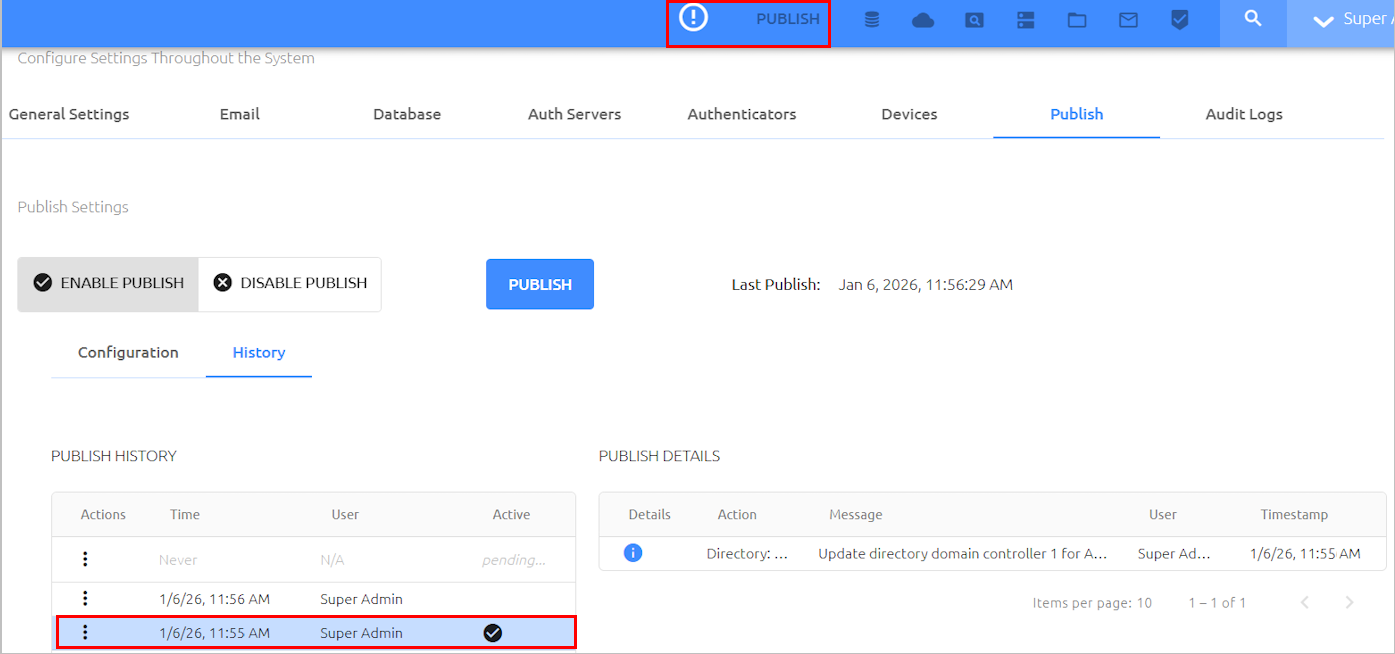
Make the necessary changes in the Management Console. Then, navigate to System Settings > Publish and click the PUBLISH button.
A confirmation popup opens.
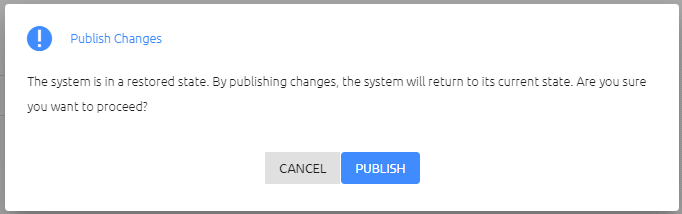
To publish your changes and exit Restore mode, click Publish.
Managing Publish Optimization
By default, the publish operation updates the database only with changes that affect users who are assigned to at least one service. This behavior, which is called publish optimization, significantly reduces publishing time. However, the optimization flow can interfere with smooth enrollment of users who are not yet assigned to any services.
If you prefer not to use publish optimization, you can disable it by editing (or adding) the disablePublishOptimization parameter in the following configuration file: /opt/sdo/mcbackendsql/config/ envs/production.json
Verify that the parameter is set to True. The syntax should be as follows:
"disablePublishOptimization" : "True",
Configuring Audit Logs Settings
The Audit Logs tab provides information about the amount of accumulated records in storage and allows you to set the time period for which logs are retained in the system. To open the tab, select System Settings > Audit Logs.
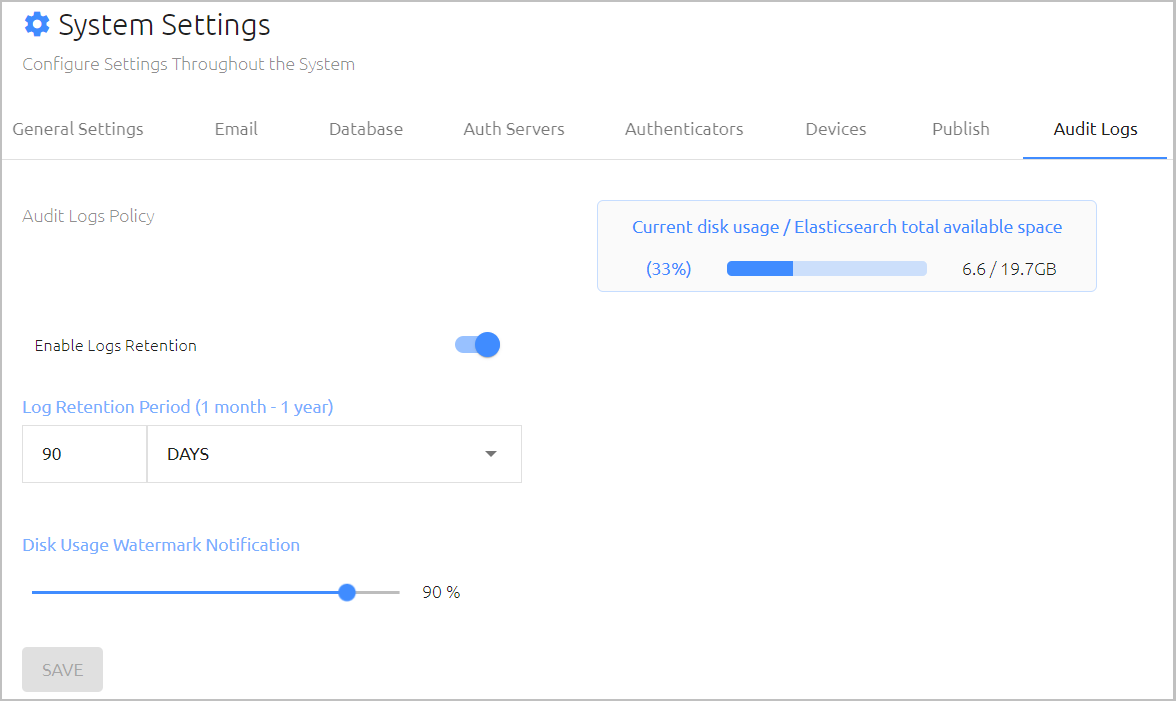
The following features are provided to help you manage storage space on the Elasticsearch disk:
Log Retention: Allows you to specify the period of time (ranging from one month to one year) for which logs are saved. When the time period elapses, older records are automatically deleted to save disk space. For example, if the Log Retention Period is 30 days, only records from the most recent 30 days are saved.
To use the Log Retention feature, verify that the Enable Logs Retention toggle is enabled. Set the Log Retention Period in the fields below, and then click Save.
Disk Usage Watermark Notification: This setting is the storage limit (in percent disk space) at which a notification is automatically emailed to the system admin. For example, if the value is 80, an email is sent when the disk space is 80% full.
To configure the setting, drag the slider to the required value and then click Save.
Elasticsearch Disk Usage: This value, which is calculated daily, is the amount of disc space that is currently occupied. The percentage is based on the amount of space being used relative to the amount of space required to contain data for the entire retention period specified (as displayed on the right side of the bar).