The Secret Double Octopus platform supports integration of a wide variety of applications with the Octopus Authentication Server and the Octopus Windows Agent (version 4.0 and higher). This integration provides Windows users with seamless access to these applications, without the need to manually enter login credentials. When an integrated application is launched, the Windows Agent retrieves the user's credentials and populates the fields of the Login screen, thus enabling successful login.
All integrated applications fall into one of three Credential Type categories, according to where the password is stored. Credential Types are:
AD: The password for the application is synced with the Active Directory.
Vault: The password for the application is stored locally (e.g., on the workstation).
SQL: The password for the application is stored in the application's database. Applications of this type manage password handling via the Octopus SQL Agent, which is installed on an on-premise Windows server or workstation.
Automatic population of the fields of the Login screen is accomplished through defining Desktop SSO elements for the integrated application in the Octopus Management Console. The Desktop SSO tab (in the application's settings) enables the system admin to specify properties and parameters of the Login screen's fields. These parameters are then saved to a configuration file which is deployed to the workstations, allowing the Windows Agent to identify the fields and set user credentials in the appropriate fields.
Most procedures related to setup and configuration of integrated applications are performed from the Applications menu of the Management Console.
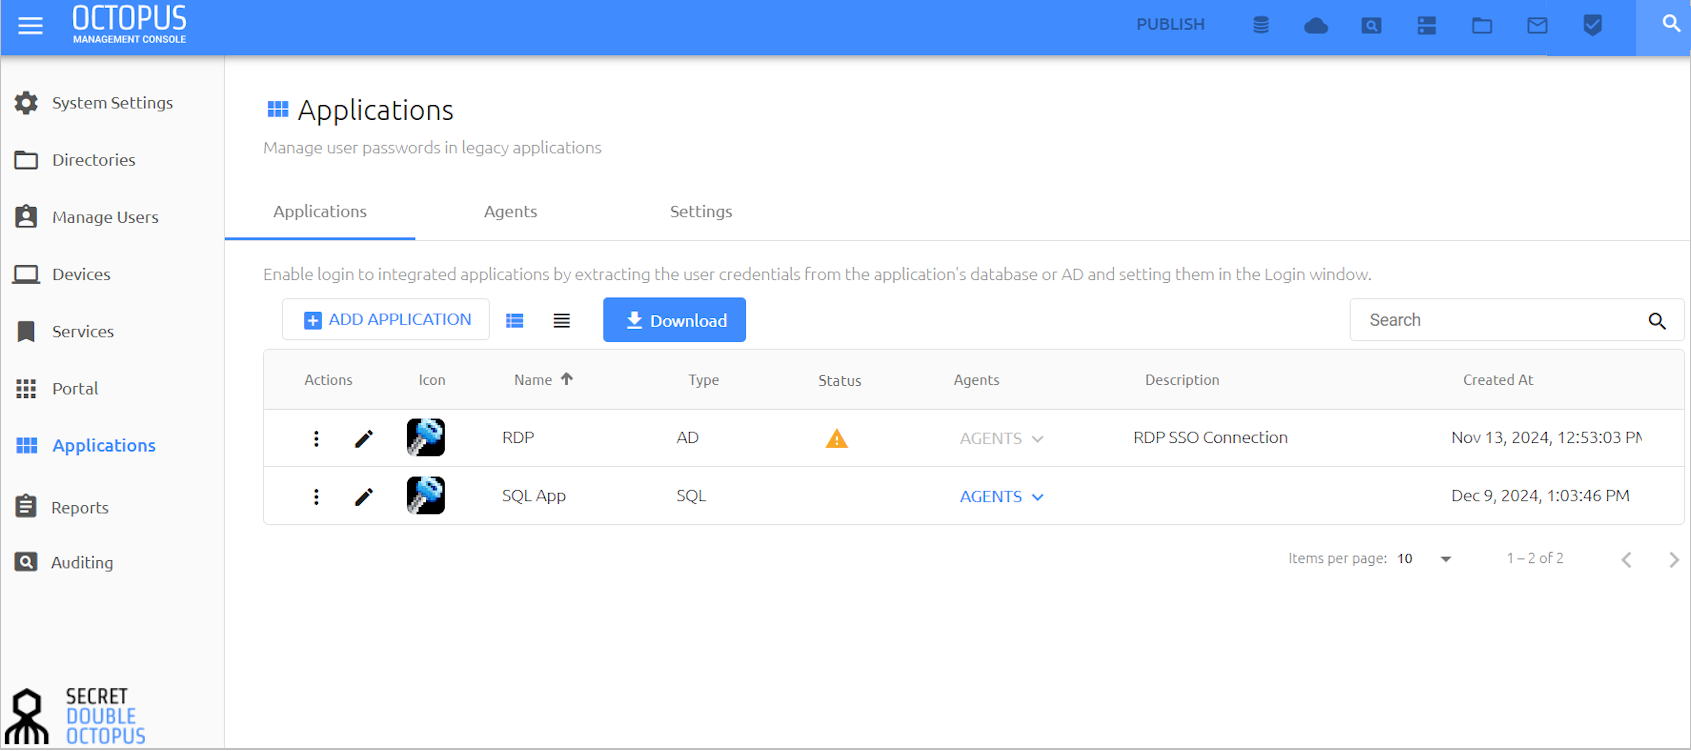
The following topics describe how to create and work with integration applications:
Adding Integrated Applications: Workflow
The process for creating and configuring integrated AD and Vault type applications involves the following stages:
Add a new application to the Management Console and specify the relevant Credential Type (Adding Applications).
Specify general details and parameters for the application.
Select the groups and users who are authorized to use the application.
Configure Desktop SSO elements for identifying the application's Login screen, download the generated JSON file and install it on Windows workstations.
The workflow for creating SQL type applications includes the following additional requirements:
Add an Octopus SQL Agent and install it on an on-premise Windows server or workstation. The Agent must be created BEFORE adding the new application. For more information, refer to the Octopus SQL Agent Installation Guide.
After adding the integrated application, review database details in the Config tab of the application's settings, and update them if necessary.
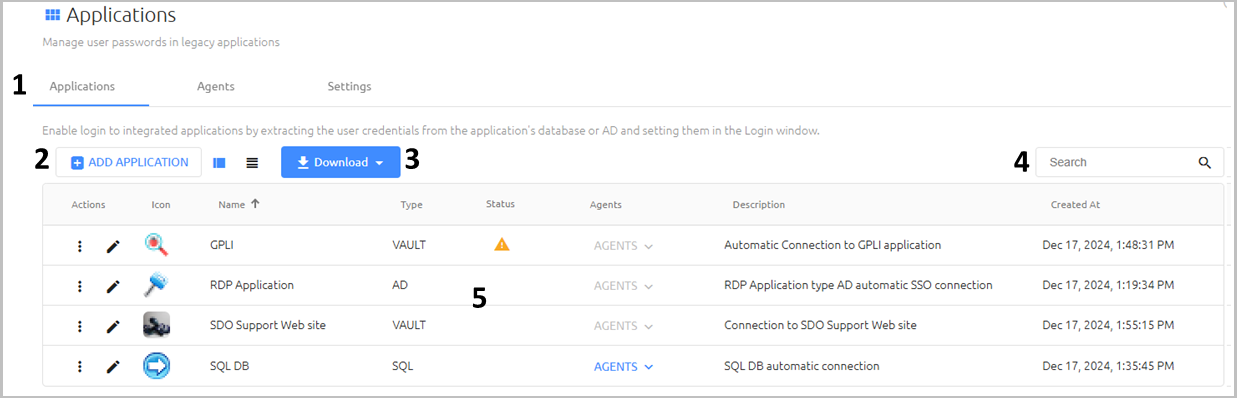
The Applications page lists all added applications and enables you to perform various administrative actions on them. The main portions and features of the page are described in the table below the diagram.
Number | Feature | Description / Notes |
|---|---|---|
1 | Tab selection |
|
2 | Add Application button | Enables you to create a new application. For details, refer to Adding Applications. |
3 | Download button | Downloads the JSON file that is generated in the background when Desktop SSO elements are added or updated. For more information, refer to Configuring Desktop SSO Elements. |
4 | Search tool | To quickly locate a service, type all or part of the service name in the Search field, and click <Enter>. The Applications list is filtered according to your entry. |
5 | Applications list | Displays information about each added application, allows management operations and provides access to application settings. A |

Viewing and Handling Applications
The Applications list provides basic information about each added application, including type, description (if any) and creation date. If an Agent is assigned to an SQL type application, the AGENTS list is enabled. To view the Agent to which the application is assigned, click to open the list. Clicking the Agent name opens the settings of that Agent.
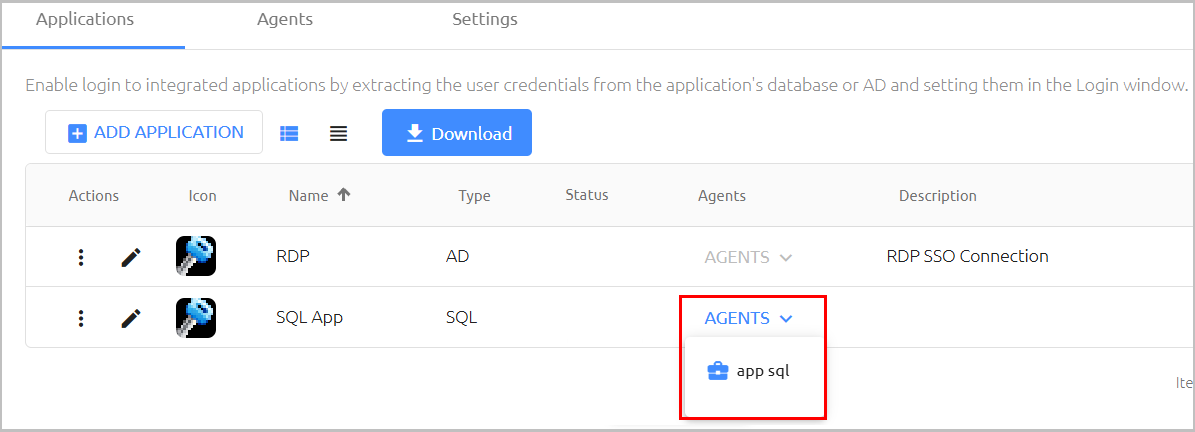
Note: The AGENTS list is always disabled for AD and Vault type applications.
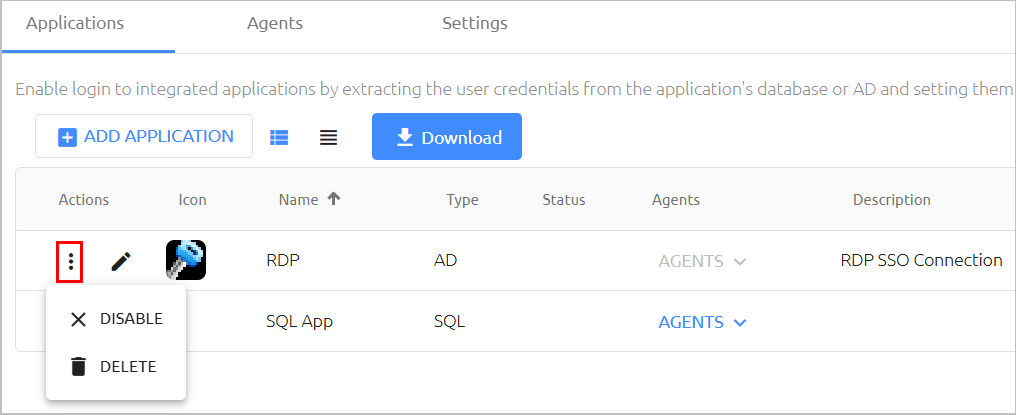
The Actions column provides access to the following administrative operations:
Disable / Enable: Inactivates an application / Reactivates a disabled application.
Delete: Removes an application from the Management Console.
Clicking  in the row of an application enables you to view and update the application's settings.
Adding Applications
Adding a new application involves specifying the application's name and Credentials Type.
To add an application:
At the top of the Applications tab, click Add Application.
The Create New Application dialog opens.
At the top of the dialog, enter a name for the application.
From the Credentials Type dropdown list, select AD, SQL or Vault.
If desired, in the Description field, enter notes or comments about the application.
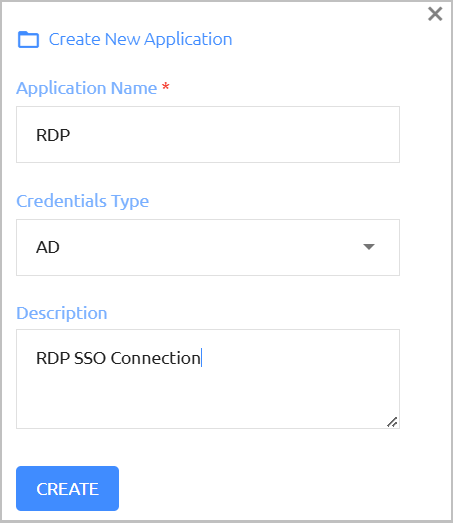
Click Create.
The application is added, and the General tab of the application's settings opens.
The General tab is displayed by default when the application's settings are opened.
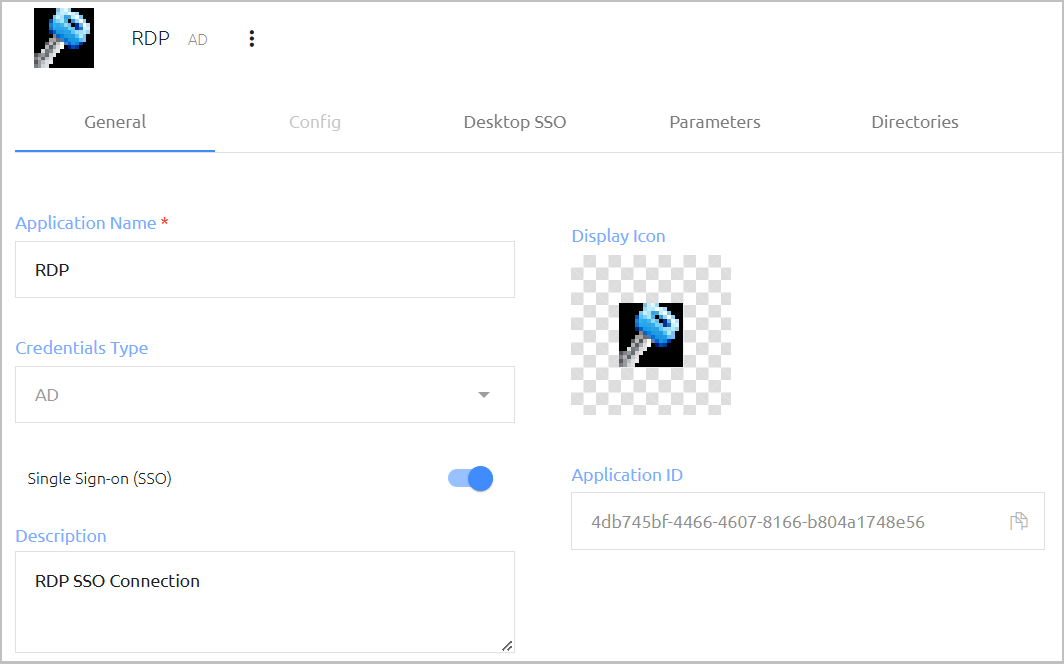
This tab contains the following components:
Component / Setting | Description / Notes |
|---|---|
Application Name | The user-assigned name for the application. |
Credentials Type | AD, SQL or Vault. This setting is not editable. |
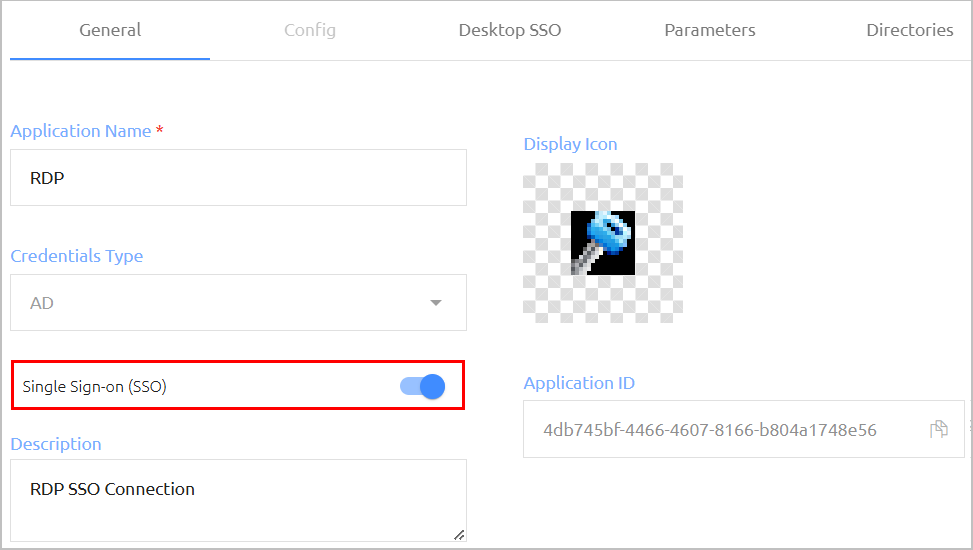
Single Sign-on (SSO) | This toggle determines whether an authentication request is generated when users access the integrated application. When the SSO setting is enabled, users do NOT receive push notifications when logging into the application. For more information about single sign-on, refer to Configuring Application SSO Settings. |
Description | Notes or comments about the application. |
Display Icon | This logo is displayed in the Windows systray. For example: 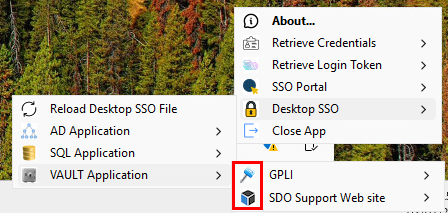 To change the default logo, click it and upload the image of your choice. Recommended logo size is 16x16 pixels. |
Application ID | A system-generated unique identifier for the application. Click the Copy icon to copy the ID. |
After editing settings in the General tab, click Save.
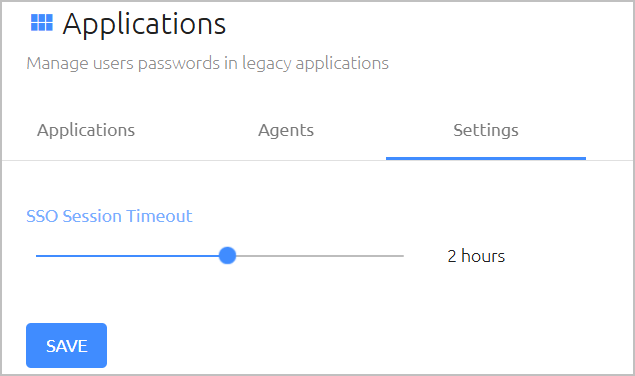
The SSO Session Timeout value, on the Settings tab of the Applications menu, determines the maximum length of an integrated application session. The session timeout can range from 1 minute to 24 hours (default is 1 hour). To update the setting, drag the slider to specify the desired value and then click Save.
Note: The SSO Session Timeout is a global setting for ALL integrated applications.
To support SSO for a specific application, access the General tab of the application's settings, and verify that the Single Sign-on (SSO) toggle is enabled. When SSO is enabled, users are immediately logged into the application, without receiving an authentication request via push notification.
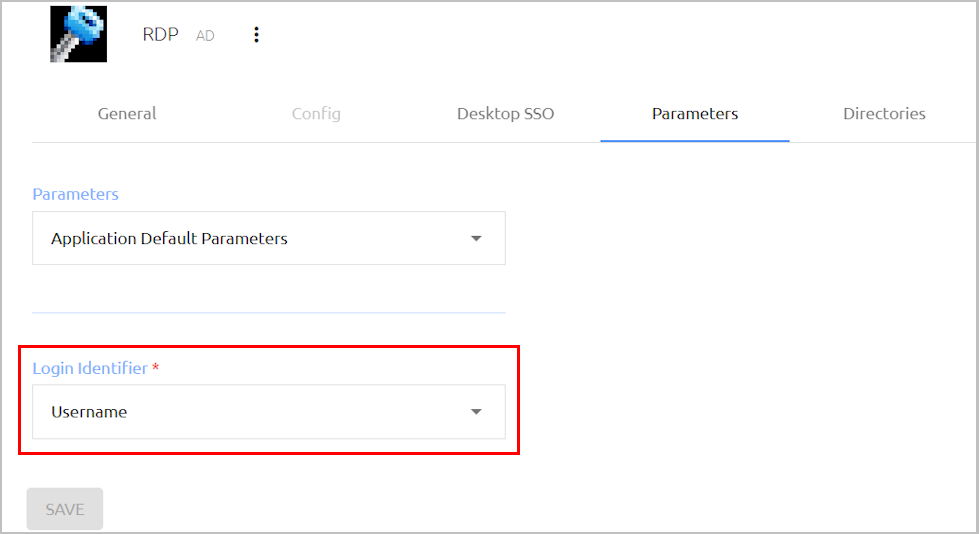
The Parameters tab of an application's settings specifies the user identifier required for authenticating to the application.
For AD and Vault application types, select the Login Identifier. This is the identifier that the user would need to provide (email, username, etc.) in order to authenticate to the application.
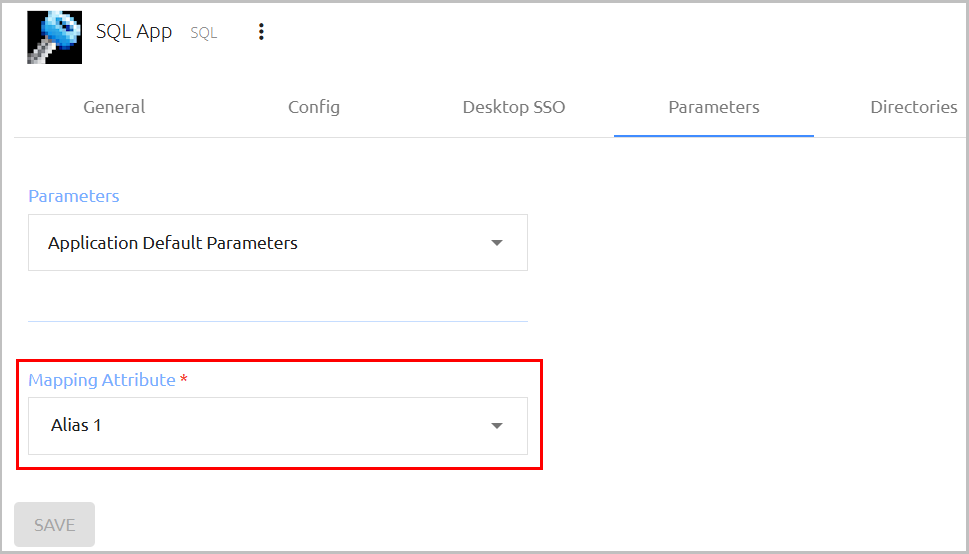
For SQL application types, select the Mapping Attribute. This is the parameter used to identify the user in the application's database. The parameter selected should correspond to the ID Field name specified in the Config tab of the application's settings (Selecting Application Database Configuration Settings).
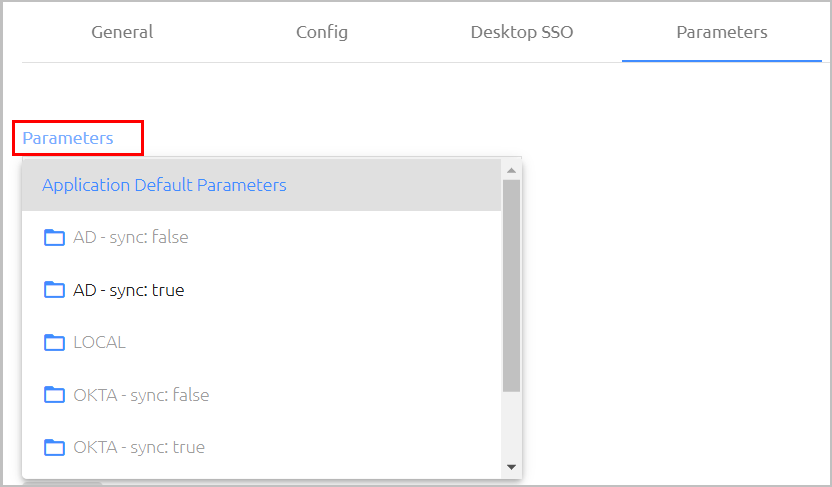
The Parameters dropdown list at the top of the tab enables you to define a directory-specific parameter that overrides the default identifier configured for the application.
The Desktop SSO tab allows you to define unique elements of the application's Login window, thus enabling the Windows Agent to identify the correct window and set user credentials in the appropriate fields. Each time you update elements in the Desktop SSO tab, your changes are automatically saved to a configuration file that can be downloaded and deployed to all Windows workstations in your organization.
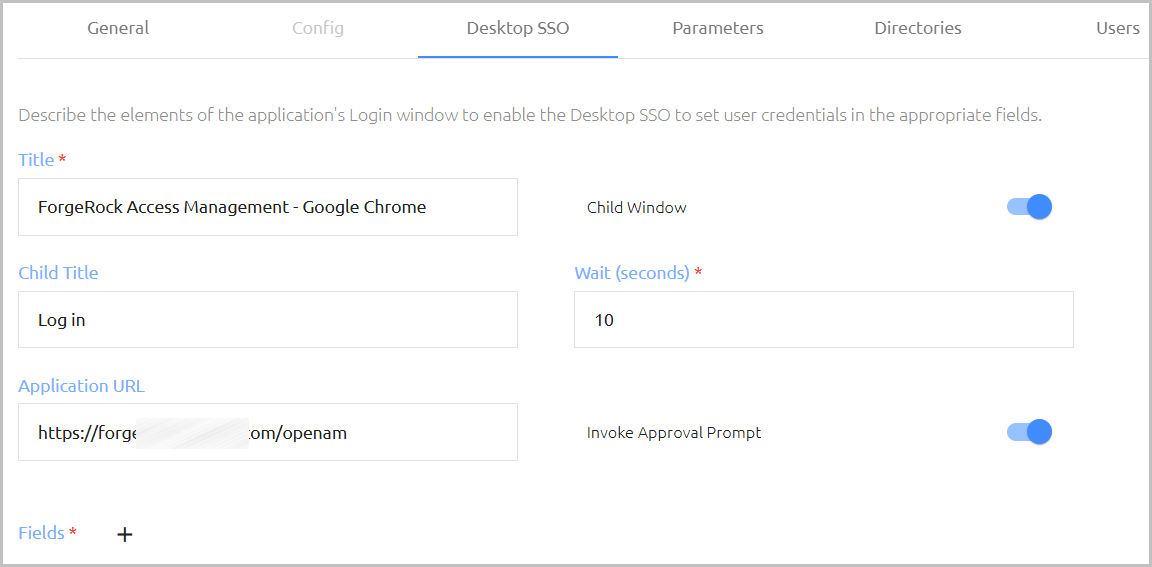
Specifying Login Window Title and Desktop SSO Behaviors
The upper portion of the Desktop SSO tab contains the following settings:
Setting | Description / Notes |
|---|---|
Title | Enter the title of the application's Login window. If the Login window is a child window, enter the title of the parent window. |
Child Window | Enable this setting if the application's Login window is a child of another window. |
Child Title | This setting is relevant when the Login window has a child with a unique title that identifies the window. A common use case is Login screens that have a generic title for multiple applications, as in the example below. In this case, Windows Security is the Title, and Enter your credentials is the Child Title. 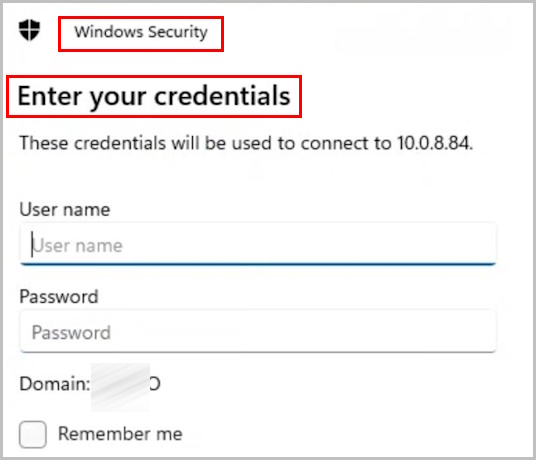 |
| Application URL | This optional setting can be used to enhance the security of Desktop SSO authentication to web applications. When the setting is present, the Windows Agent checks the target website to avoid accessing incorrect or malicious sites. |
Wait | If the value is greater than zero, the Desktop SSO mechanism will wait the specified number of seconds between populating the credentials fields and clicking the OK / Submit button. |
Invoke Approval Prompt | When this setting is enabled, users are presented with a message box prompting them to confirm or reject use of Desktop SSO for the login flow to the application. 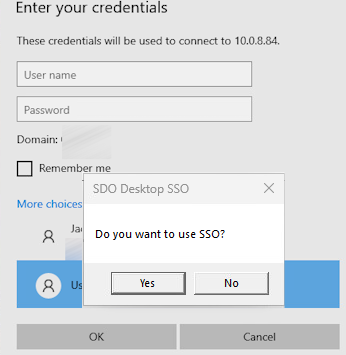 |
Defining Fields in the Login Window
The lower portion of the Desktop SSO tab enables you to describe fields of the application's Login window by specifying their unique attributes. Generally you will need to define only the fields that are required for authentication (usually Username, Password, and OK / Submit).
To define Login window fields:
In the Fields portion of the Desktop SSO tab, click + to add a new field.
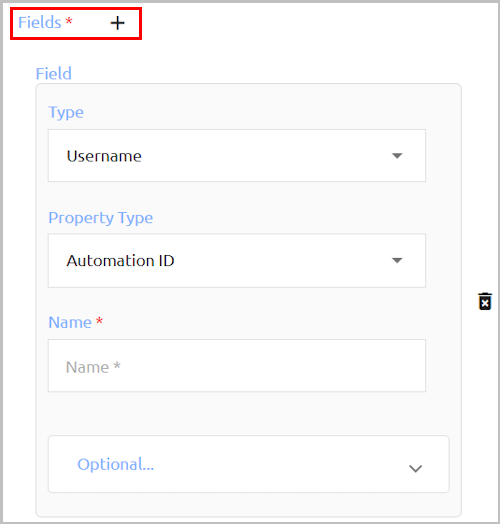
From the Type dropdown list, select the relevant field type.
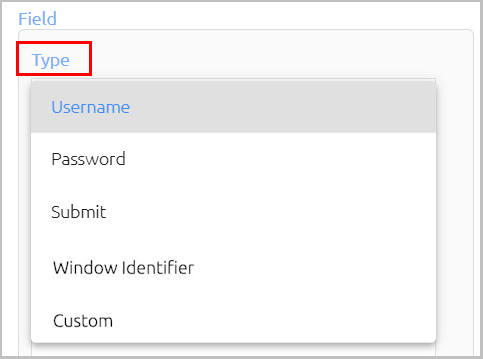
The options are:
Username: A field in which to set the username.
Password: A field in which to set the password.
Submit: The OK or Submit button.
Window Identifier: A field that can be used to positively identify the Login window. The field must be specific to the Login window of this particular application.
Custom: A field in which to set a hard-coded text value. To specify the text to be set in the field, expand the Optional frame and enter the required text in the Value field.
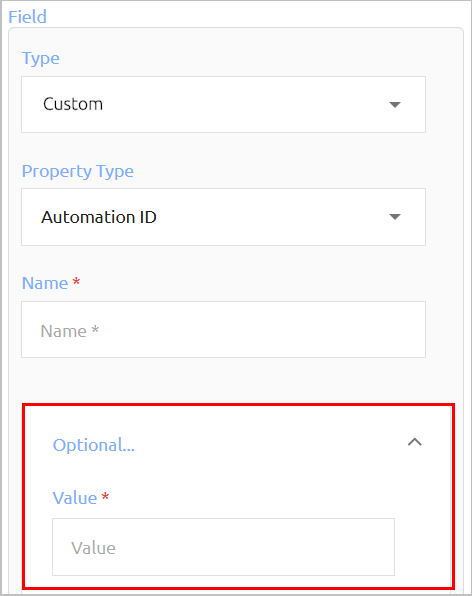
Select the relevant Property Type for the field (Automation ID, Class Name, Name, Control Type or Localized Control Type.
Using the helper tool of your choice, identify the field's name and enter it in the Name field.
Repeat Steps 1-4 for additional target fields.
At the bottom of the Desktop SSO tab, click Save.
Describing Desktop SSO Fields: Example
This section shows an example of defining required elements for Desktop SSO login to a remote workstation. The application's Login screen is shown below.
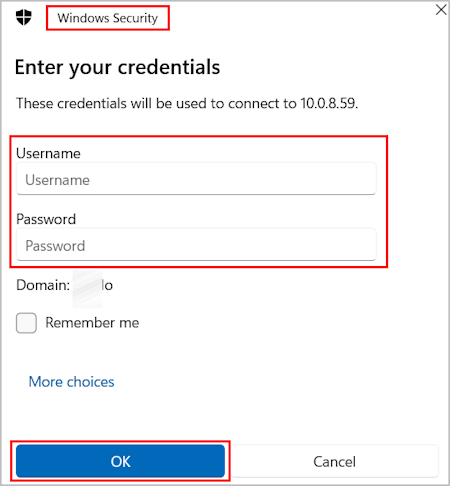
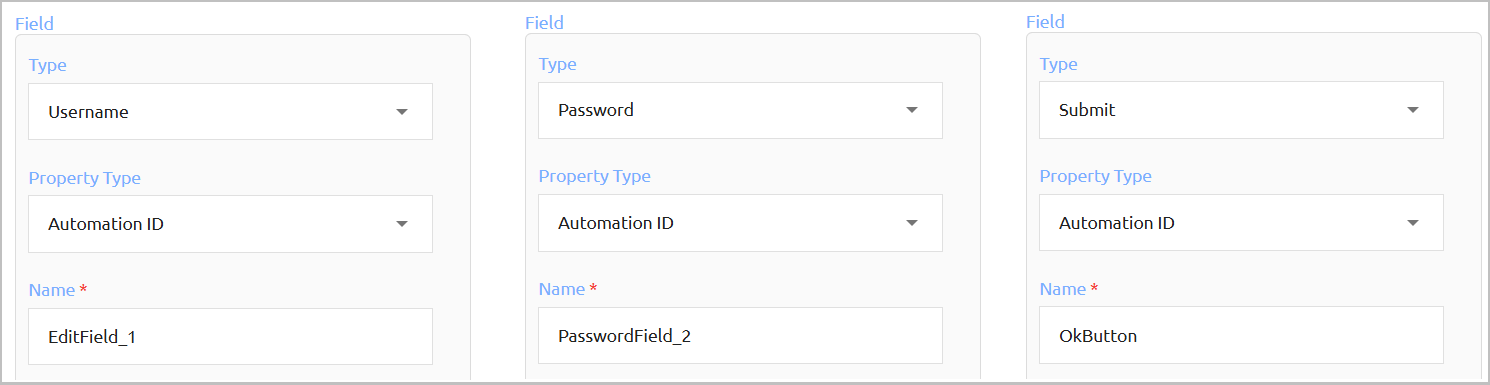
Windows Security should be entered in the Title field at the top of the Desktop SSO tab, and Enter your credentials should be entered in the Child Title field. The three required fields (Username, Password, and the OK button), should then be described as follows:
Downloading and Deploying the Configuration File
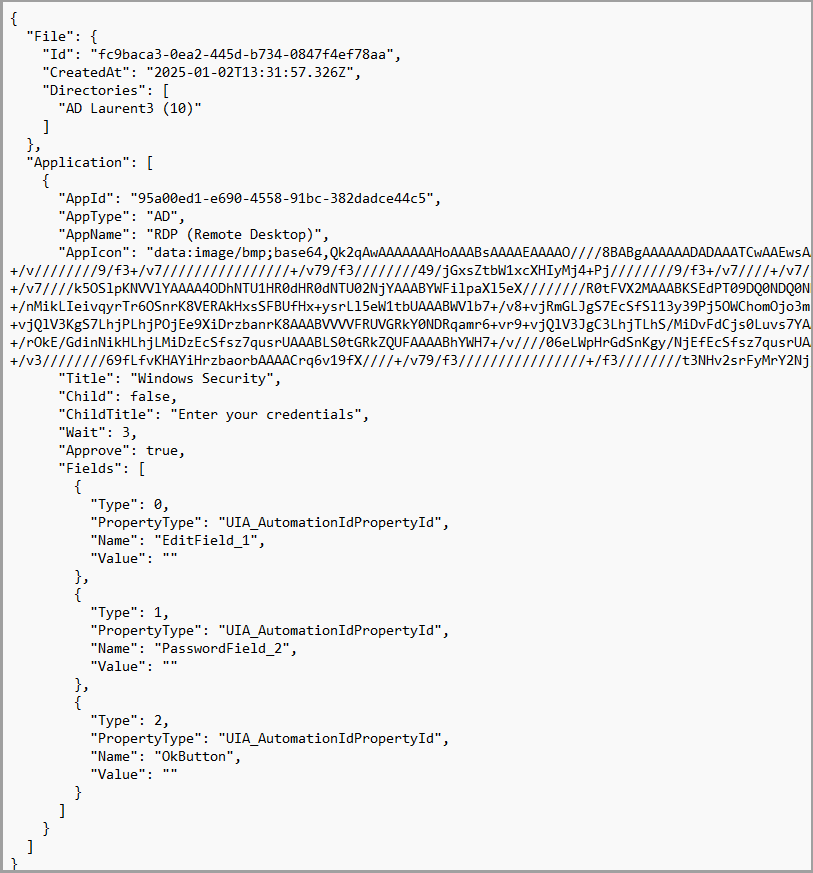
All updates made in the Desktop SSO settings of your integrated applications are automatically added to a configuration file named applications-desktop-sso.json. Each application you add is stored as a separate object in the file. The example below shows the RDP application presented in the section above.
Each time the configuration file is downloaded (as described below), a unique ID and timestamp are automatically generated. This metadata appears at the beginning of the file. The name(s) and unique ID(s) of the directory or directories selected for the download are also listed.
To enable Windows users to work with Desktop SSO, the configuration file needs to be downloaded, copied and deployed to the workstations.
To download and deploy the configuration file:
At the top of the Applications tab, click Download.
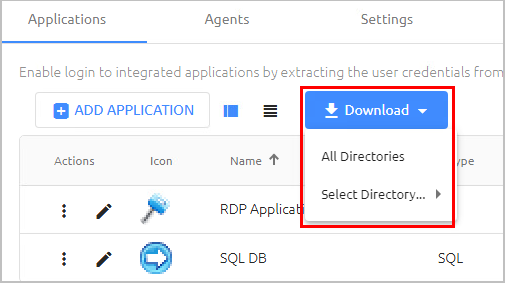
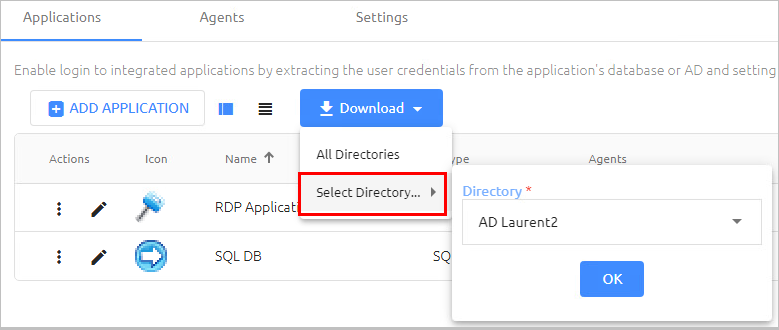
To start the download, select one of the following options:
All Directories: All defined applications are included in the configuration file.
Select Directory: Only applications assigned to a specified directory are included in the configuration file. Choose the relevant directory from the list, and then click OK.
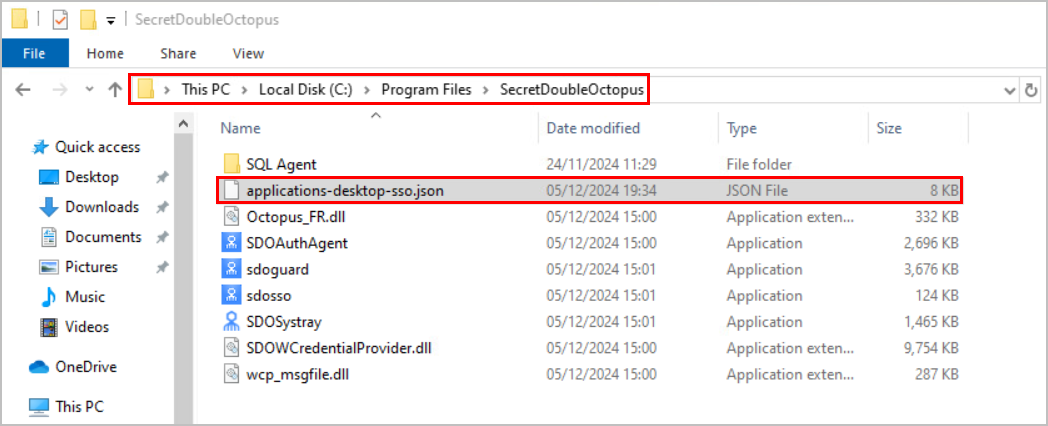
Copy the downloaded file to the SecretDoubleOctopus folder. For example:
Deploy the file to the relevant Windows workstations in your organization.
IMPORTANT: Do NOT change the name of the file.
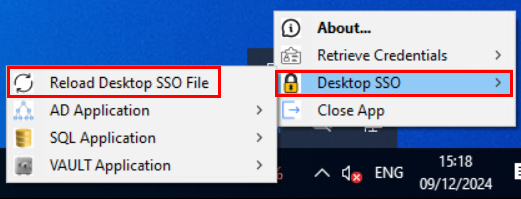
It is recommended to download the configuration file each time you add a new application or update an existing one (instead of editing the file manually). Windows users can obtain the latest changes using the systray options, by selecting Desktop SSO > Reload Desktop SSO File.
In order to work with an integrated application, users need to be assigned access privileges to the application. This is done in the Directories and Users tabs of the application's settings. Any user who is not assigned access privileges will not be able to log into the application through the Octopus Desktop SSO mechanism.
The following procedure explains how to grant access to an application by selecting the appropriate directories, groups and users.
To assign access privileges to an integrated application:
From the Applications tab of the Applications menu, click
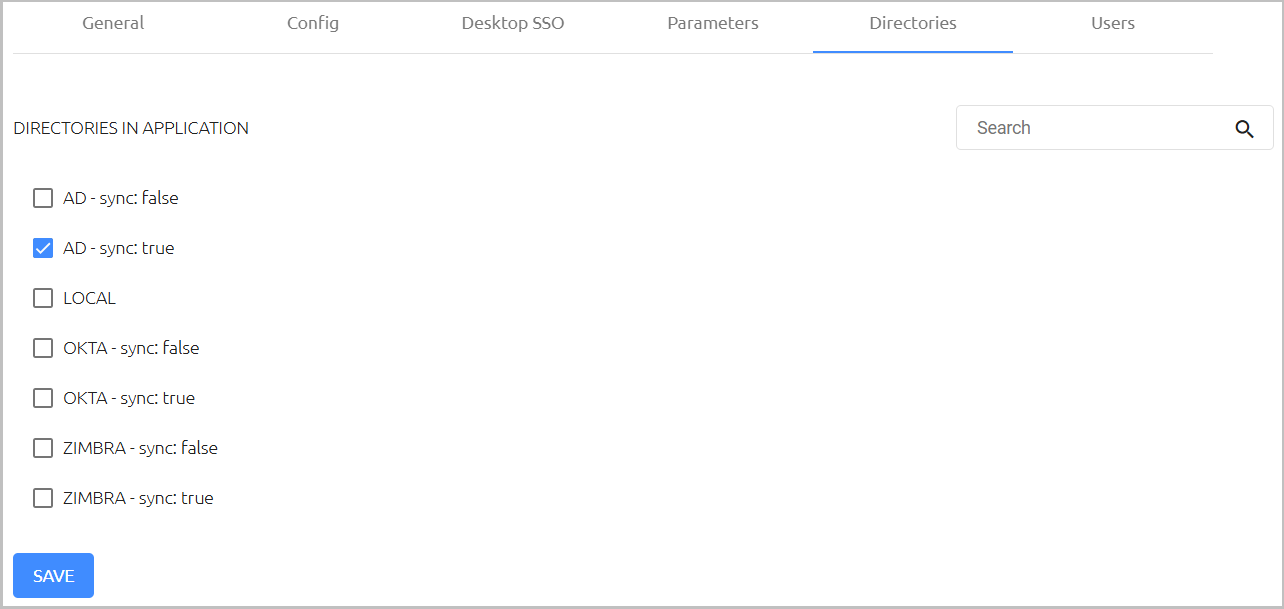
in the row of the relevant application to open the settings.From the Directories tab, select the checkboxes of the directories that you want to integrate with the application, and then click Save. You can filter the Directories list by entering a keyword in the Search field.
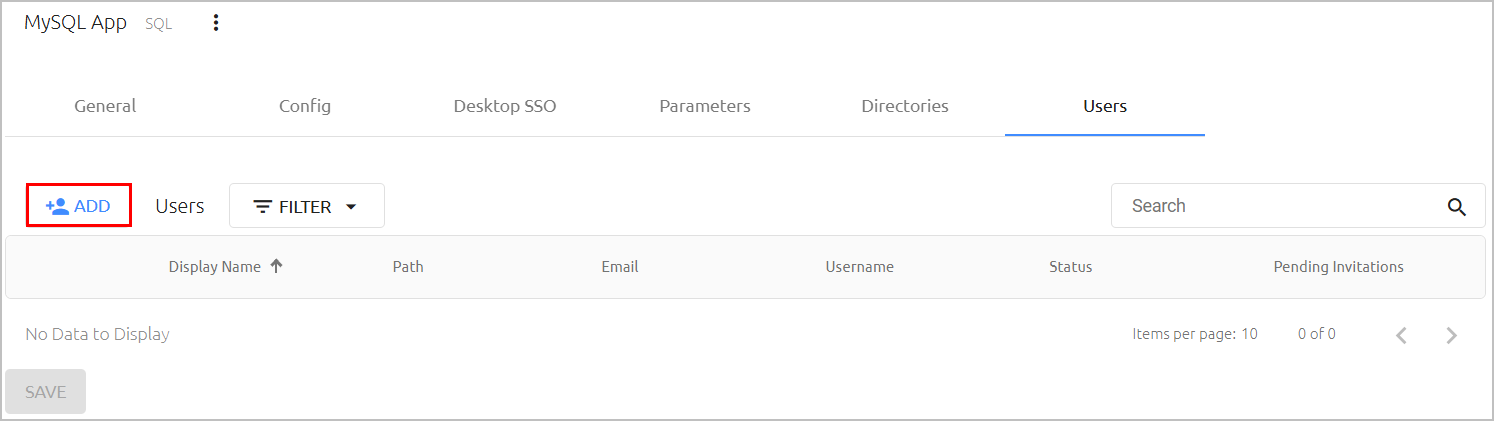
In the upper left corner of the Users tab, click Add.
The Add Users To popup opens. A list of directories integrated with the Management Console appears on the left side of the popup.
Expand the directories tree and select the checkboxes of the users and groups to which you want to grant application access. If a user or group already has access, the checkbox is disabled.
When you have finished making your selections, click SAVE (in the upper right corner of the popup).
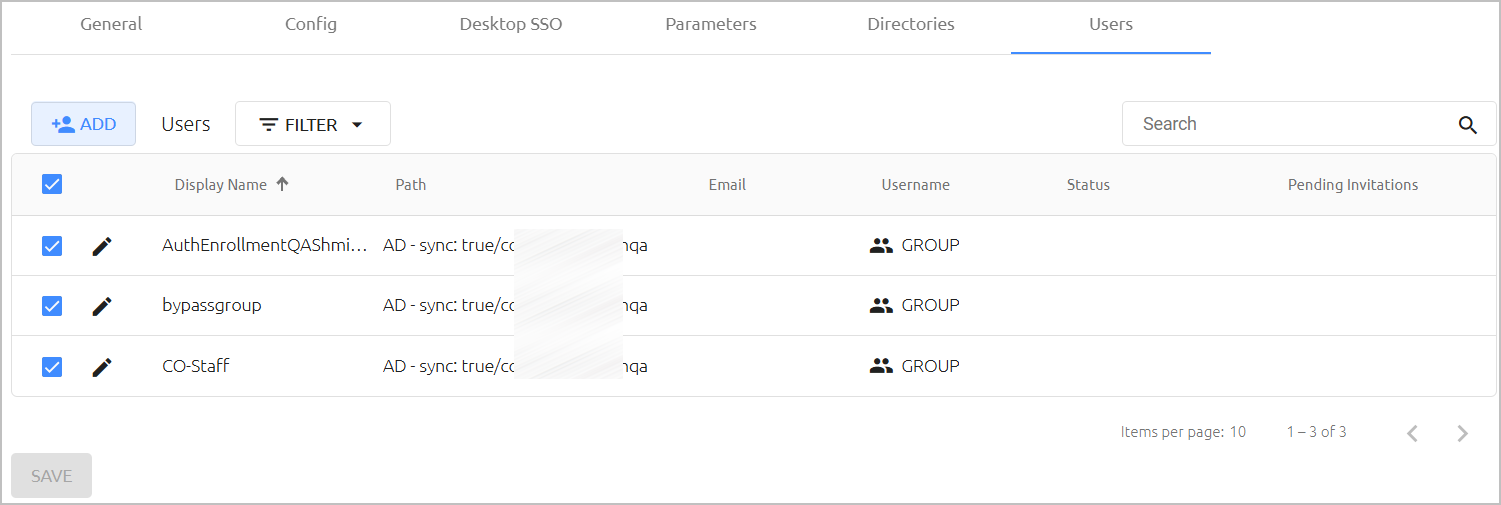
The popup closes, and the selected groups and users are listed in the Users tab.
From the toolbar at the top of the page, click PUBLISH and publish your changes.
After adding users to the list, you can manage them directly from the Users tab. To enable or disable application access for a specific user or group, toggle the checkbox on the left side of the row. Clicking the Edit icon next to the checkbox opens the individual settings for that user/group.
The Octopus SQL Agent is an independent component required for integration of SQL type applications. The SQL Agent acts as an intermediary element between the Octopus Authentication Server and the application that stores the password. The Agent is responsible for setting the password generated by the Authentication Server in the application's database, and retrieving username details from the database. These credentials are then sent to the Windows Agent, via the Authentication Server, so Desktop SSO can be performed. To enable this workflow, the Octopus SQL Agent needs to be installed on a domain-joined Windows server or workstation.
For detailed information about the SQL Agent and the installation process, please refer to the Octopus SQL Agent Installation Guide.
Viewing and Managing SQL Agents
The Agents tab of the Applications menu lists all added SQL Agents (installed and uninstalled) and enables you to perform some administrative operations on them. Basic information, including name, domain, version and installation date (if relevant) is provided about each Agent. The State column indicates the current connectivity status of each Agent:
Green indicator: Agent is installed and connected.
Red indicator: Agent is installed but not currently connected.
Orange indicator: Agent has been created / downloaded but has not yet been installed.
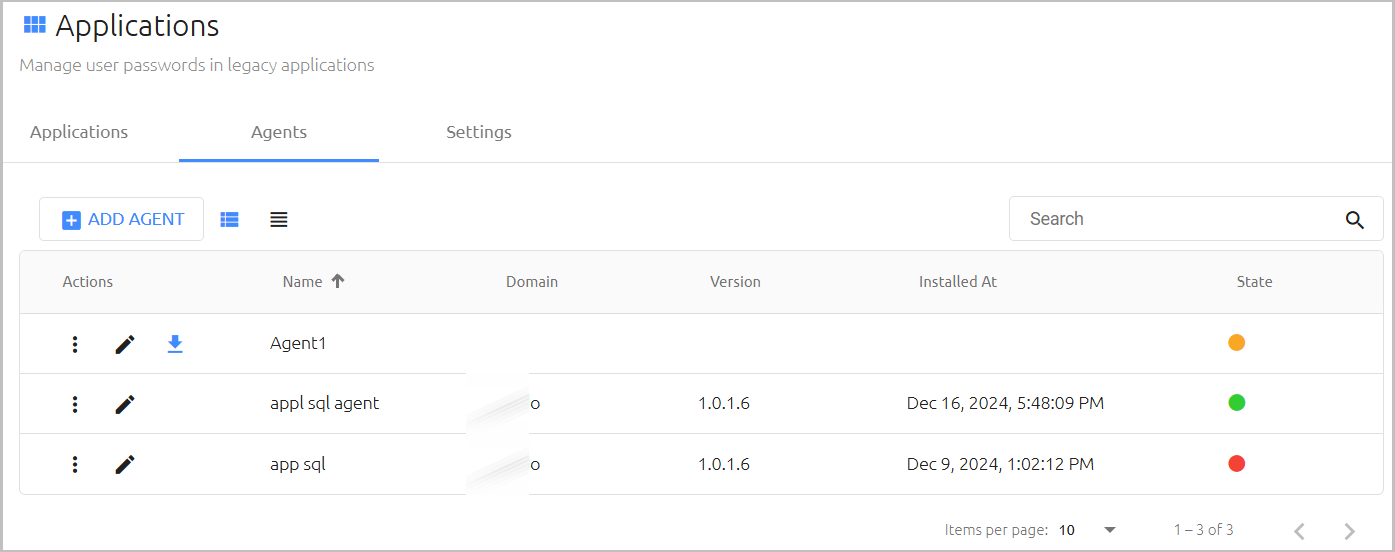
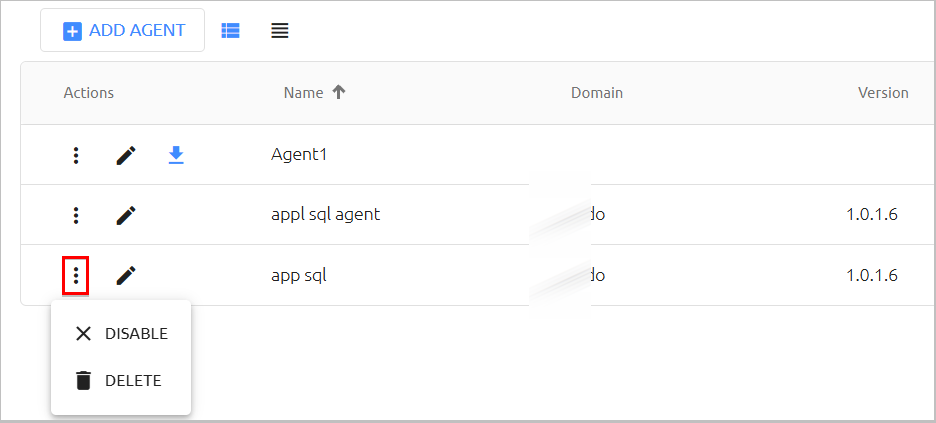
Clicking  in the row of an Agent enables you to perform the following actions:
Disable / Enable: Inactivates / Reactivates an installed Agent. (This action is not available for uninstalled Agents.) When disabling an Agent that is used by one or more applications, you need to confirm the action from a popup warning.
Delete: Removes the Agent from the system. Agents that are being used by applications cannot be deleted.
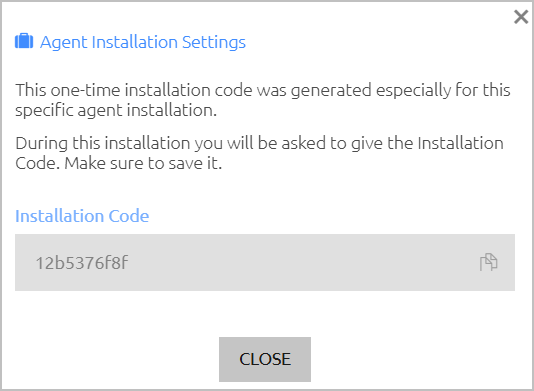
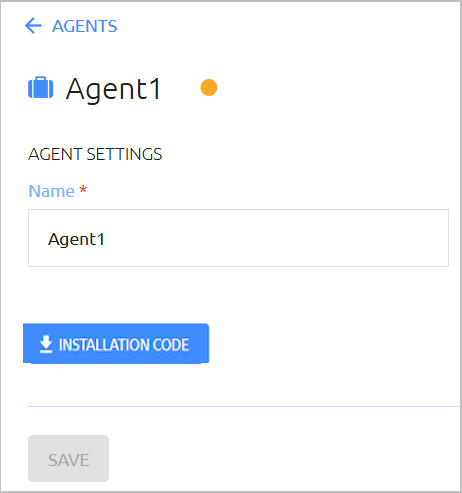
Clicking  in the row of an uninstalled Agent opens the Agent Installation Settings popup, from which you can copy the code required for Agent installation.
Adding SQL Agents
You can add multiple Octopus SQL Agents to the system. Every Agent added must be assigned a unique name.
To add an Octopus SQL Agent:
In the upper left corner of the Agents tab, click Add Agent.
In the popup that opens, enter a unique name for the new Agent. Then, click Create.
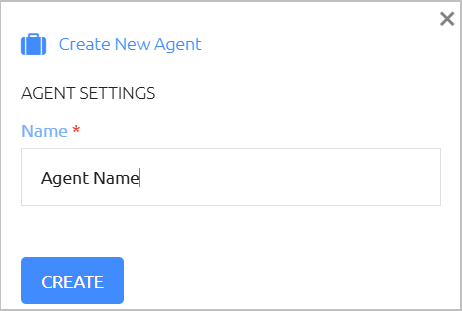
The Create New Agent popup closes, and a row for the new Agent is added to the Agents tab.
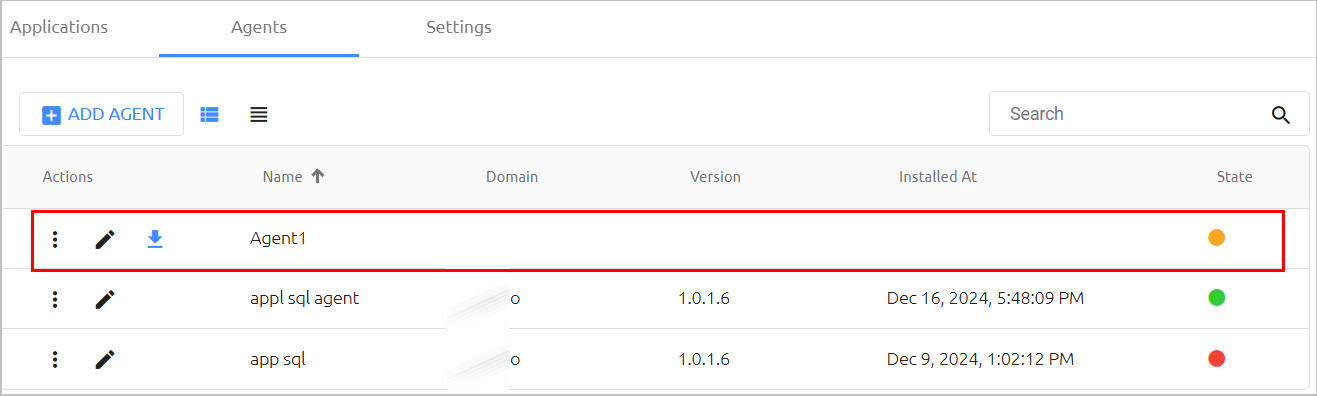
Continue by installing the new Agent. For details and instructions, refer to the Octopus SQL Agent Installation Guide.
IMPORTANT: The Octopus SQL Agent should be installed before adding an SQL type integrated application to the Management Console.
Viewing SQL Agent Settings
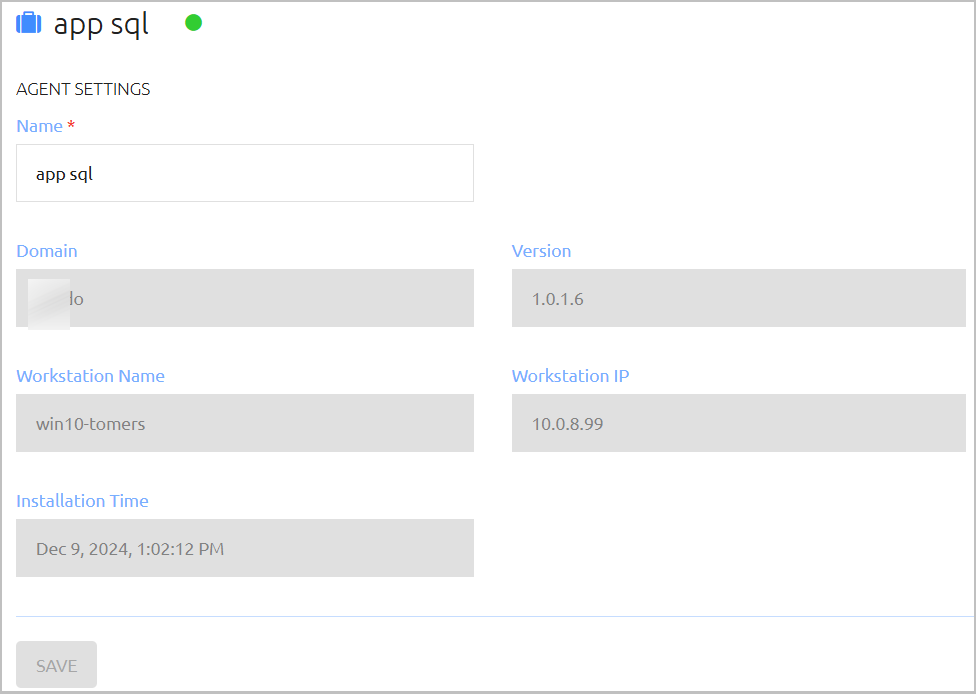
Clicking  in the row of an Agent opens the Agent Settings page, where you can change the name of the Agent. Enter the new name in the Name field, and then click Save.
The other settings for installed Agents cannot be updated. The settings displayed include the name and IP of the machine on which the Agent is installed, as well as domain, version and installation time.
If the Agent has not yet been installed, the Agent Settings page has an Installation Code button. Clicking this button opens a popup from which you can copy the one-time code required for installing the Agent.
The Config tab of an integrated application's settings displays data related to the Octopus SQL Agent and the database with which it communicates. This tab is therefore enabled for SQL type applications only.
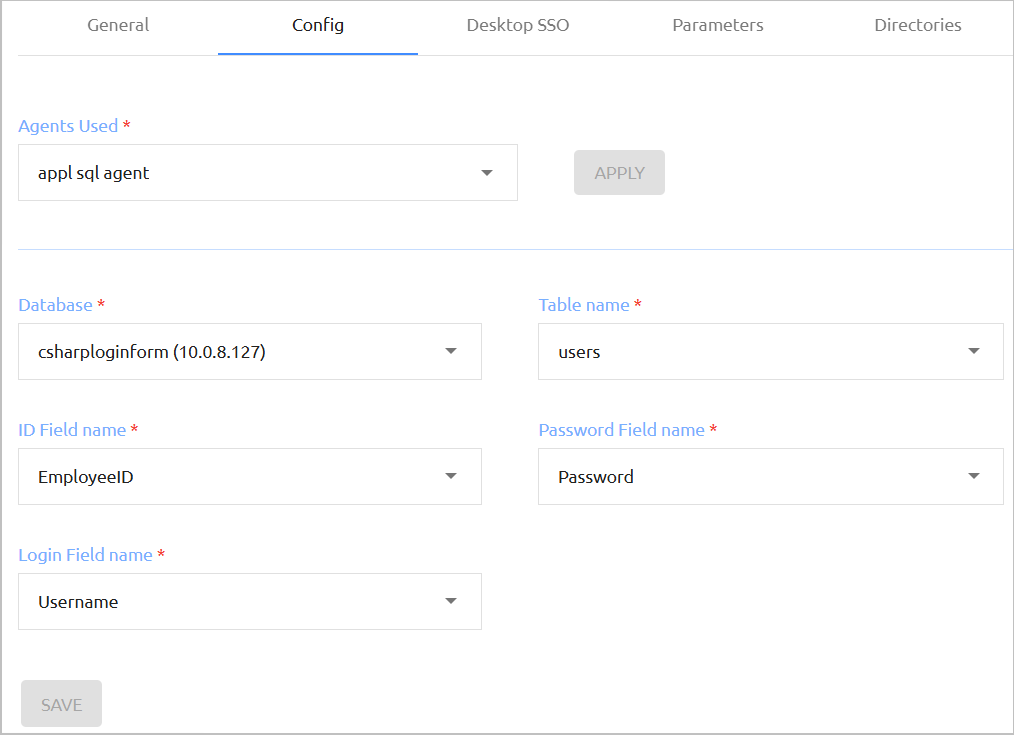
The upper portion of the tab displays the SQL Agent currently being used by the application, and allows you to assign a different one when required. To change the Agent being used, select the relevant Agent from the Agents Used list, and then click Apply.
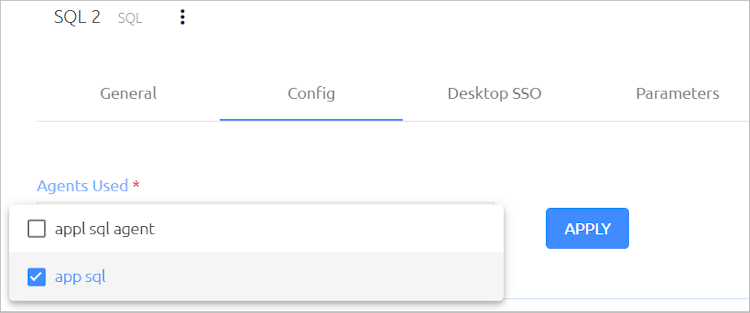
The lower portion of the tab shows the currently selected settings for directing the Octopus SQL Agent to locate user credentials in the application's database. By default, the settings shown are the ones that were configured upon installation of the SQL Agent. After installation, all settings except for Database may be updated by selecting a different option from the dropdown lists. The editable settings are:
Setting | Description |
|---|---|
Table name | Name of the database table storing user authentication credentials. |
ID Field name | The attribute used by the SQL Agent to identify the user in the database. |
Login Field Name | Name of the column holding the user credential to be entered in the Login field of the application. |
Password Field Name | Name of the column holding the user credential to be entered in the Password field of the application. |