This document provides step-by-step installation instructions to establish an Octopus Authentication System environment.
The Octopus Authentication Server authenticates users using a secret-sharing protocol for securely exchanging shares and establishing a shared secret. Once the secret is verified, the user is authenticated. The Authentication Server can then provide attestations to relying parties for the user's identity.
The Authentication Server is typically deployed on the enterprise domain, where it is configured to access the directory service and to work with relying parties that are either on-premise or off. Connecting to the directory service allows the administrator to assign Octopus Authenticators to users and define authentication policies. Connecting with the relying parties can be done by configuring standard interfaces (e.g., RADIUS, SAML, etc.) or by defining a non-standard interface.
In some cases, the Authentication Server authenticates the user and produces the required attestation for the relying party. In other situations, the Authentication Server may need to also facilitate the exchange of a session secret required by the relying party. For example, legacy systems that are still heavily password dependent may require that a password be produced. In such cases, the Authentication Server provides a temporary session password that is reset at the end of the session.
The administrator configures the system settings from the Secret Double Octopus Management Console.
For more details, refer to the Octopus Authentication System Guide or contact us at support@doubleoctopus.com
When you run the Octopus Authentication Server installation package, you will be prompted to choose one of four installation options:
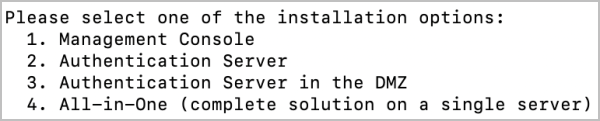
IMPORTANT: The All-in-One installation option should be used for POC environments only.
For production deployments, the best practice is to install the Management Console and Authentication Server separately. The database may be created as part of the Management Console Server installation, or it can be configured later by the administrator as a necessary first step of the Management Console configuration.
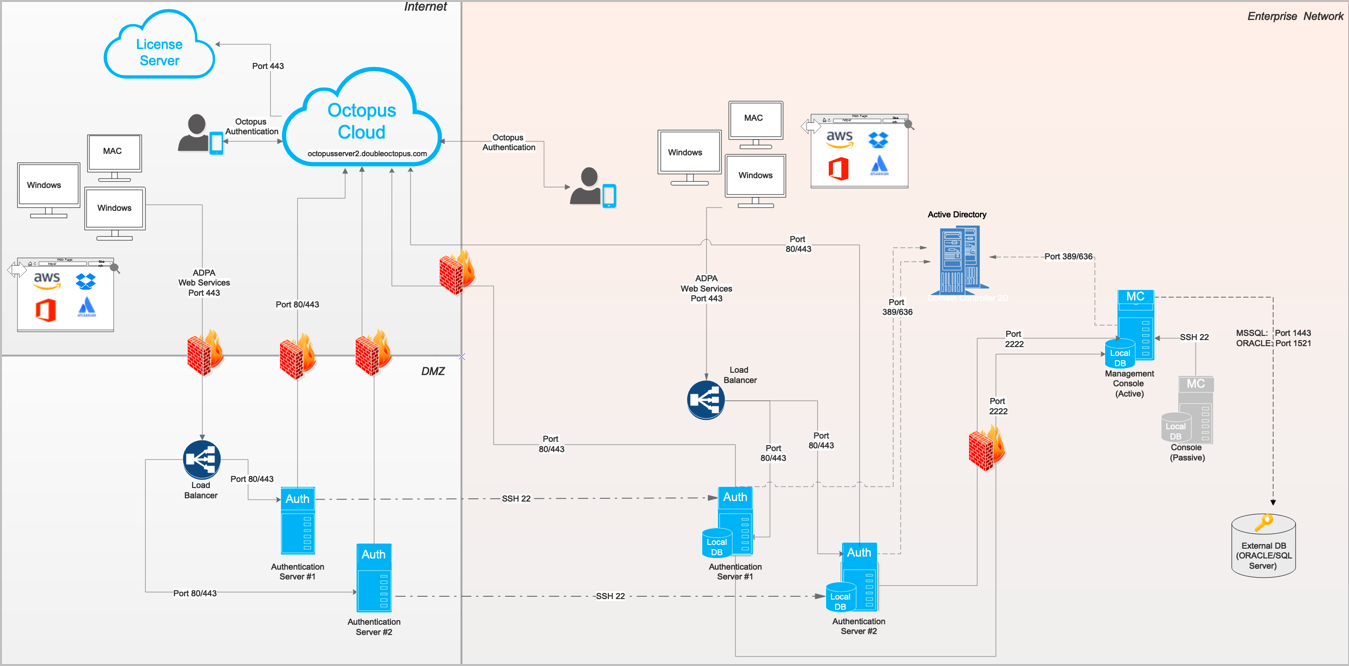
Installation of Octopus Authentication Server in the DMZ may be required in configurations where users are required to authenticate to services while outside the enterprise’s network without using a VPN connection. In this installation option, the Octopus Authentication system will include two or more Authentication Servers inside your network and at least one server in the DMZ.
For larger scale deployments, we recommend that each component be installed on a separate server. In addition, the installation of the distributed architecture should have at least two servers from each component, to support high availability in case of failure of one of the components.
The basic recommended architecture is shown in the following diagram.
POC Deployments
The All-in-One option is the recommended mode of installation for POC environments only. This option installs the Management Console, an Authentication Server and a database in a single installation process.
To improve availability and redundancy of Octopus Authentication and to increase performance, Octopus Authentication enables the use of balancing by adding additional Authentication Servers to the system. Following All-in-One installation, you can install a second Authentication Server on a different machine, and then configure the communication protocols.
When required, an Octopus Authentication Server in the DMZ may be added to POC deployments. The DMZ Server must be connected to an additional Authentication Server that is installed separately (NOT the Authentication Server installed as part of the All-in-One setup).
Installation of a secondary Management Console Server is not supported in POC environments.
Installation Parameters and Flags
The Secret Double Octopus installation package supports a number of optional parameters and flags that enable you to control some installation and post-installation processes.
Optional Command Line Parameters
The -s switch parameter allows you to prevent default upgrade of various external components during the installation process, including the:
- Nginx web server
- Redis server
- Node.js runtime environment
To implement the parameter, add the -s switch followed by the relevant comma-separated keywords: nginx,redis,node
Make sure to use the following required syntax:
- -s must be preceded by a double dash.
- There may be no spaces in the comma-separated list.
For example:
./octopus-el8-6.8.x-b00xx.run -- -s nginx,node
Optional Configuration Flags and Parameters
This section describes some post-installation modifications that can be done to the production.json file, as required. The path of the configuration file is /opt/sdo/mcbackendsql/config/envs
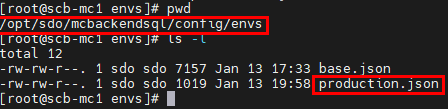
IMPORTANT: After editing the file, restart the service by running the following command:
systemctl restart sdomcbep
Enabling Autocomplete for User Search
autoSearchEnabled is a flag in the production.json file that controls the user search tool mechanism in the Octopus Management Console. To reduce load on the database, the default value is false, disabling the autocomplete operation. To support autocomplete when performing user searches, you can change the value to true:
"autoSearchEnabled": true
Supporting Legacy Invitation Templates
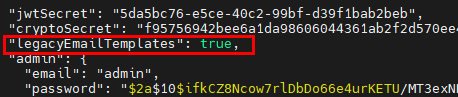
To support customized legacy invitation templates, the legacyEmailTemplates parameter needs to be added to the production.json file and set to true.
During installation, the installation script creates a user named SDO for running its services. If an existing SDO user is found, the script will spontaneously abort.
In order to ensure that the script can run as expected, do NOT manually create a user named SDO prior to installation and verify that there is no element in your environment (group, folder, etc.) named SDO.
Before beginning the installation process, make sure that you have:
Linux base OS (64-bit) with Minimal image option - Red Hat 8.2 to 8.10 / Red Hat 9.3 to 9.6, Oracle Linux 8.3 to 8.10 / Oracle Linux 9.3 to 9.6, or Rocky Linux 8.4 to 8.10 / Rocky Linux 9.3 to 9.6.
IMPORTANT: If you are using Linux 9 and the tar command is not pre-installed on your machine, please run the following command before installing Octopus Authentication Server:
yum install tar
Octopus Authentication Server version 6.8.4 does not support Linux 7 (el7). In addition, Red Hat versions 8.0 and 8.1 and CentOS (all versions) are no longer supported. Attempts to install the Octopus Authentication solution on these versions will be automatically aborted.
IMPORTANT: The Octopus Authentication solution can be installed on Red Hat 9.x, but it may NOT be upgraded to 9.x from a system already installed on Red Hat 8.x using the usual upgrade methods. If you need to upgrade ALL solution components to version 9.x, refer to System Upgrade to Red Hat 9.x.Octopus Authentication Server’s FQDN and Public IP (Secret Double Octopus should allow this address or IP to communicate with the Octopus cloud server.)
Octopus Authentication Server installation file (octopus- el8/el9-6.8.4<build number>.run)
Octopus Authentication Server activation file and its password
Checksum (.md5), Octopus Authentication Server activation file (.LIC) and a corresponding Code will be provided by the Secret Double Octopus CS team as required.
Corporate’s root-CA or Self-signed CA (to establish Nginx secure connection)
Corporate’s Mail Server details (SMTP)
For Active Directory Passwordless authentication only: The Domain controller or root CA is required. The domain controller should be signed by the domain CA.
NOTE: The Checksum MD5 file is provided to verify the integrity of the installation file. To run the validation check, use the syntax in the following example, with the name of the relevant installation file.
md5sum -c octopus-el8-6.8.4-b0xx.run.md5
Minimum Hardware Requirements
Verify that the following minimum requirements are met:
System Component | Cores | RAM | Disk Space | Notes |
|---|---|---|---|---|
Octopus Management Console Server | 4x cores | 16GB | 100GB | |
Octopus Authentication Server | 4x cores | 8GB | 50GB | Up to 2,000 concurrent authentications |
Octopus Authentication Server DMZ | 2x cores | 8GB | 50GB | Up to 2,000 concurrent authentications |
Octopus All-in-One Server for POC | 2x cores | 16GB | 40GB | This hardware should be used for POC only |
Required Configurations
Required firewall policy configurations are listed in the table below.
Source | Destination | Port | Description |
|---|---|---|---|
Octopus Authentication Server / Authentication DMZ Server | Octopus Cloud | TCP - HTTPS 443 | Authentication Server uses SSL polling towards the Octopus Cloud |
Octopus Management Console Server | User (LDAP) Directory Server | TCP - LDAP/S 389/636 | User LDAP Directory synchronization |
| Octopus Authentication Server | User (LDAP) Directory Server | TCP - LDAP/S 389/636 | User LDAP Directory synchronization |
Octopus Management Console Server | Mail (SMTP) Server | TCP – SMTP/S 25/587/465 | Mail Server communication |
RADIUS Client | Octopus Authentication Server | UDP - RADIUS 1812/1813/7351/1645/1646 | RADIUS authentication |
Octopus Authentication Server | Cloud Web Services | TCP - HTTPS 443 | According to the connection: HTTP/ HTTPS |
Windows / Mac workstations | Octopus Authentication Server | TCP - HTTPS 443 | Windows AD authentication |
Octopus Admin Terminal | Octopus Authentication Server | TCP - HTTP/S 8008/8443 | Administrator access to the Octopus Management Console |
Octopus Authentication Server | Octopus Management Console | TCP 2222 | Tunnel from the Authentication Server to the Octopus Management Console (configurable during the installation) |
Octopus Authentication Server DMZ | Octopus Authentication Server | TCP 22 | Tunnel from the Authentication Server DMZ to the internal Authentication Server |
Octopus Management Console | Enterprise DB Server | DB Server Port | Connection from the MC to the Enterprise DB Server |
The load balancer should be configured as termination or forwarding. The host name should be the same for both external and internal load balancers (resolve the same DNS name from external and internal).
Required Ports
The following table lists all ports that the Octopus Server requires for normal operation. These ports need to be available for successful installation and system operation.
Port Number | Applicable Role | Service | Notes |
|---|---|---|---|
443 | AIO/AUTH/DMZ | nginx | portal/rest/adpa |
2222 | MC/AIO | sdomcbe/sshd | default/user configurable |
4444 | MC/AIO | sdomcbe | auth → mc comm |
5555 | AIO/AUTH/DMZ | reverse proxy (nginx) for the portal (local) | |
5432 | MC/AIO | postgresql | if configured and running |
6379 | MC/AIO/AUTH | redis | |
9600/10000 | MC/AIO | logstash | |
8008 | MC/AIO | nginx | /api and /doc when ssl is disabled |
8080 | AIO/AUTH/DMZ | reverse proxy (nginx) for webauthn (local) | |
8443 | MC/AIO | nginx | /api and /doc when ssl is enabled |
3000 | MC/AIO | reverse proxy (nginx) for sdomcbe | /api and /doc on 8443 or 8008 |
3331 | AIO/AUTH/DMZ | reverse proxy (nginx) for sdomon/rest (local) | mc → auth comm |
3332 | AIO/AUTH/DMZ | reverse proxy (nginx) for sdomon/adpa | |
3333 | AIO/AUTH/DMZ | reverse proxy (nginx) for sdomon/rest | |
3334 | AIO/AUTH/DMZ | reverse proxy (nginx) for sdomon/saml | |
3340 | AIO/AUTH/DMZ | reverse proxy (nginx) for sdomon/saml (metadata) | |
9200/9300 | AIO/MC | elasticsearch | |
13700 + slot_id | MC/AIO | sdotun | mc → auth comm. Allocated for each connected authserver. The slot_id can be found in /opt/sdo/.conf of the authserver. |
14444 | AIO/AUTH/DMZ | sdotun | auth → mc comm tunneling |
16379 | AUTH/DMZ/secondaryMC | sdotun | redis tunneling |
10001 | AUTH/DMZ/AIO | sdotun | logstash tunneling |
12000 + dir_id | AUTH/AIO | ldap-proxy |
Supported Databases
The following database types and versions are supported:
| Database Type | Minimum Version | Maximum Version |
|---|---|---|
| PostgreSQL | PostgreSQL 9 | PostgreSQL 15 |
| MS SQL | SQL Server 2012 SP4 | SQL Server 2022 |
| Oracle | Oracle Database 12c | Oracle Database 19c |
Required user permissions for each supported database type are listed in the table below.
IMPORTANT: If you are working with multiple Management Console Servers, the same database user must be used for all instances.
Database Type | User Permissions |
MS SQL (SQL Server Authentication) |
|
| Oracle |
|
| PostgreSQL | Grant all privileges on database <db> to <user> |
Supported Mobile Devices
Supported Browsers
Browser | Supported Versions | Notes |
|---|---|---|
Chrome | 30 and higher | |
Safari | 13.1.2 and higher | |
Firefox | 25 and higher | |
Edge | 41 and higher | For User Portal and SAML authentication only |