To enable your users to successfully authenticate with Okta Verify, you need to make the following manual configurations in the Octopus Management Console (MC):
Add Okta as a third-party authenticator
Enable Okta authentication for the relevant directory (or directories)
Adding the Okta Authenticator
The Authenticators tab of the System Settings menu allows you to add and manage third-party authenticators. Follow the steps below to add an authenticator that is based on the built-in Okta template.
You can create multiple authenticators using the same template, according to your organizational needs. For example, you might want to have a separate authenticator dedicated to OTP authentication.
To add an Okta authenticator:
Log into the Management Console and navigate to System Settings > Authenticators. Then, click Add Authenticator.
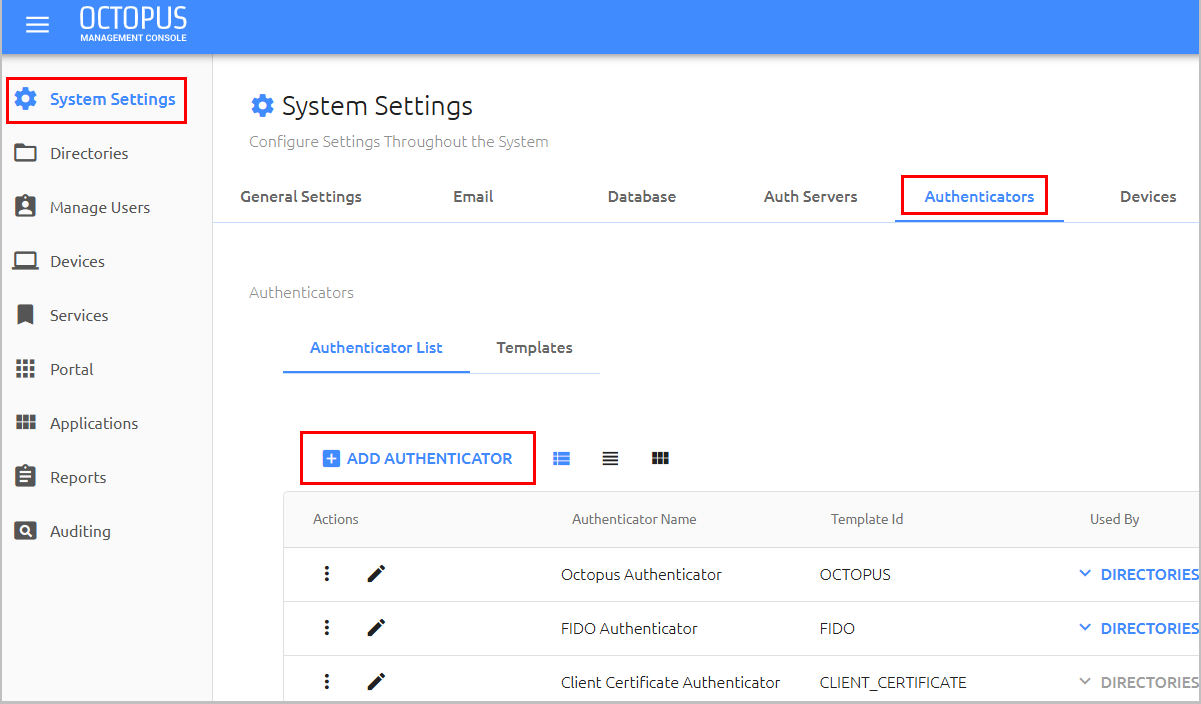
The Add 3rd Party Authenticator dialog opens.
In the Authenticator Name field, enter a friendly descriptive name for the new authenticator.
Open the Template dropdown list and select the template based on Okta (e.g., okta_v1).
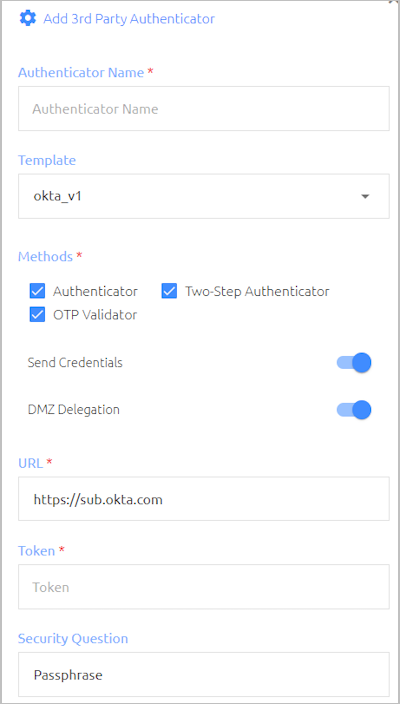
Select one or more Methods for the new authenticator:
Authenticator: The third party-authenticator can be used as an additional means of authentication (primary and/or secondary).
OTP Validator: The third party-authenticator can be used for one time password authentication (online and/or offline).
Two-Step Authenticator: Enables Okta users to log into Windows and the Octopus User Portal with voice, SMS, passphrase or strong authentication.
If you do NOT want to use the new authenticator for a method, clear the relevant checkbox.
Specify whether to send user credentials to the third-party authenticator by enabling or disabling the Send Credentials toggle button.
When credentials are sent (default setting), the third-party authenticator sends back a token for the User Portal, and the Portal opens automatically upon user authentication to Windows or Mac. If credentials are not sent, no token is sent back, and users will need to manually log into the User Portal after being authenticated by the third party.
Enable / Disable the DMZ Delegation toggle as required. When this setting is enabled, Authentication Servers in the DMZ can communicate directly with a server within the internal network.
Enter the following settings in the appropriate fields:
Url: The access URL for your Okta portal
Token: The API token generated from your Okta portal
Security Question: If you plan to use a passphrase for verification, you need to set up a custom security question called Passphrase. For more information, refer to the Octopus Management Console Admin Guide.
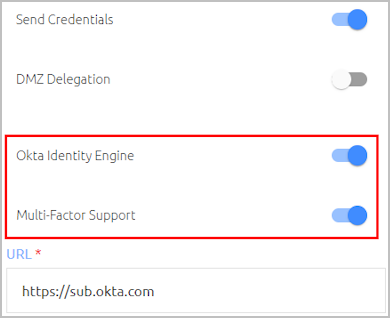
If you are using the okta_v2 template and you want to support Okta push notifications to two mobile devices simultaneously, make sure that the Okta Identity Engine and the Multi-Factor Support toggles are enabled. (In addition, verify that multi-factor operation is enabled in your Okta platform.)
To check the validity of your settings, click Test Connection.
Click Add.
The dialog closes, and the new authenticator is added to the list in the Authenticators tab.
Enabling Okta Authentication for the User Directory
Selection of the primary (and secondary) mobile authenticator and the OTP validator is done at the directory level. You can set the authenticator(s) that provide authentication for users in the Authenticators tab of the directory's settings.
IMPORTANT: In order to make these selections in the directory settings, the relevant methods (Authenticator and OTP Validator) must be enabled for the third party authenticator in the System Settings menu, as described in the section above.
To enable Okta as an authenticator and/or OTP validator for a directory:
In the Management Console, open the Directories menu.
In the tile or row of the relevant directory, click
 to display the directory settings. Then, select the Authenticators tab.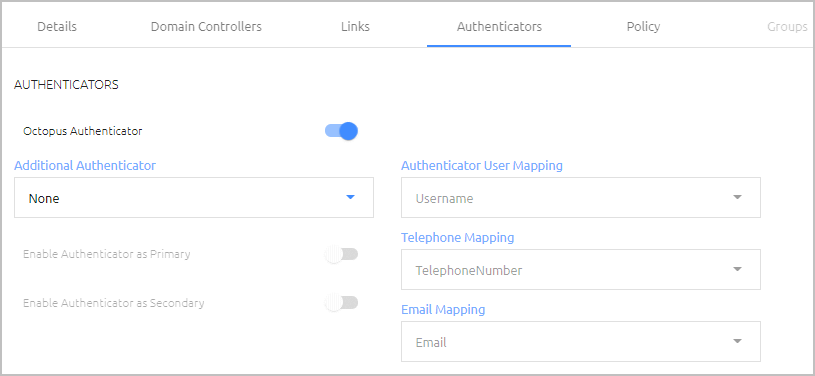
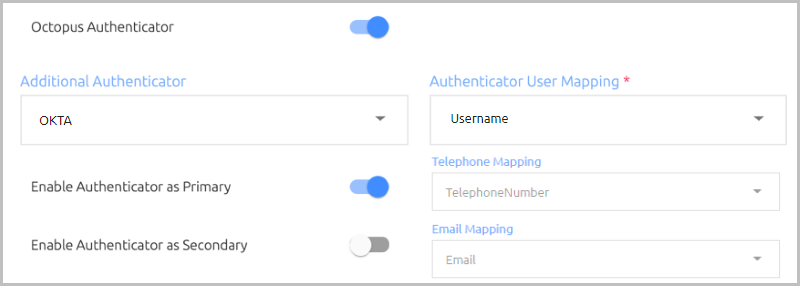
Enable / Disable Octopus Server authentication by clicking the Octopus Authenticator toggle button.
If this setting is disabled, users will not be able to authenticate with Octopus Authenticator, and you need to specify another authenticator. You can also specify an additional authenticator when Octopus Authentication is enabled.
To enable your Okta authenticator, select it from the Additional Authenticator list.
The settings below the list are then enabled.
Configure the following settings as required:
Enable Authenticator as Primary: When enabled, the Okta authenticator will serve as the first line of authentication. If the Octopus Authenticator is enabled, both authenticators will be primary authenticators, and the user will have the option to choose which one to use.
Enable Authenticator as Secondary: When enabled, the Okta authenticator receives user information from the primary authenticator and then approves or rejects authentication.
Authenticator User Mapping: Select a parameter to be used for authentication mapping. The options that appear in the dropdown list are the parameters that are defined in the Personal tab of your users' accounts.
Scroll to the Software OTP Authentication Settings in the Authenticators tab. Here you can enable either or both of the following options:
Online OTP: When enabled, enrolled users are able to log into Windows, Mac or the User Portal using a one time password issued by either the Octopus Authenticator or by a third-party authenticator.
Offline OTP: When enabled, enrolled users are able to log into Windows / Mac using a one time password that is stored locally. These OTPs are supplied by either the Octopus Authenticator or by a third-party authenticator.
When offline OTP is activated, a list of OTPs are securely stored on the Windows / Mac workstation to allow users to authenticate to the workstation when not connected to the network. The OTPs are timed-based and use the standard TOTP mechanism. They can therefore be added to any standard authentication mobile app that supports TOTP.
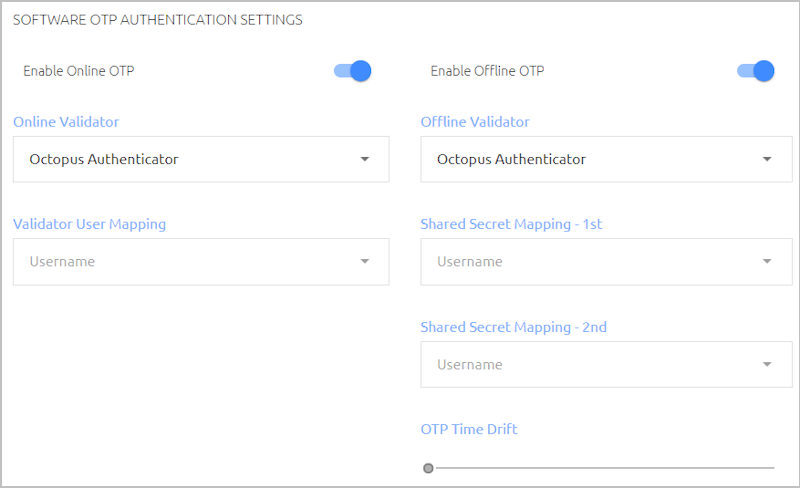
To activate online OTP, click the Enable Online OTP toggle button. Then, select the appropriate authenticator from the Online Validator list.
Under Validator User Mapping, select the user parameter to be used for OTP authentication.
To activate offline OTP, click the Enable Offline OTP toggle button. Then, select the appropriate authenticator from the Offline Validator list.
From the Shared Secret Mapping, list(s), select the mapping field(s) to be used to generate the offline tokens. The second Shared Secret Mapping field is optional.
If relevant, specify a value (in seconds) for the OTP Time Drift by dragging the slider to the required value. The maximum valid value is 600 seconds.
Under OTP Configuration, specify the appropriate settings. Make sure your settings match the OTP parameters of the authenticator you have chosen to generate the OTP tokens.
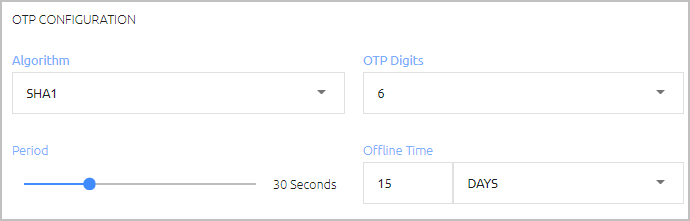
At the bottom of the Authenticators tab, click Save. Then, from the toolbar at the top of the page, click PUBLISH and publish your changes.