When an authenticator-specific configuration is defined, the Octopus Authentication Server sends the customized configuration (instead of the global one) to the mobile app. The Server continuously compares the configurations and updates device-specific settings in real time, according to changes in the global configuration.
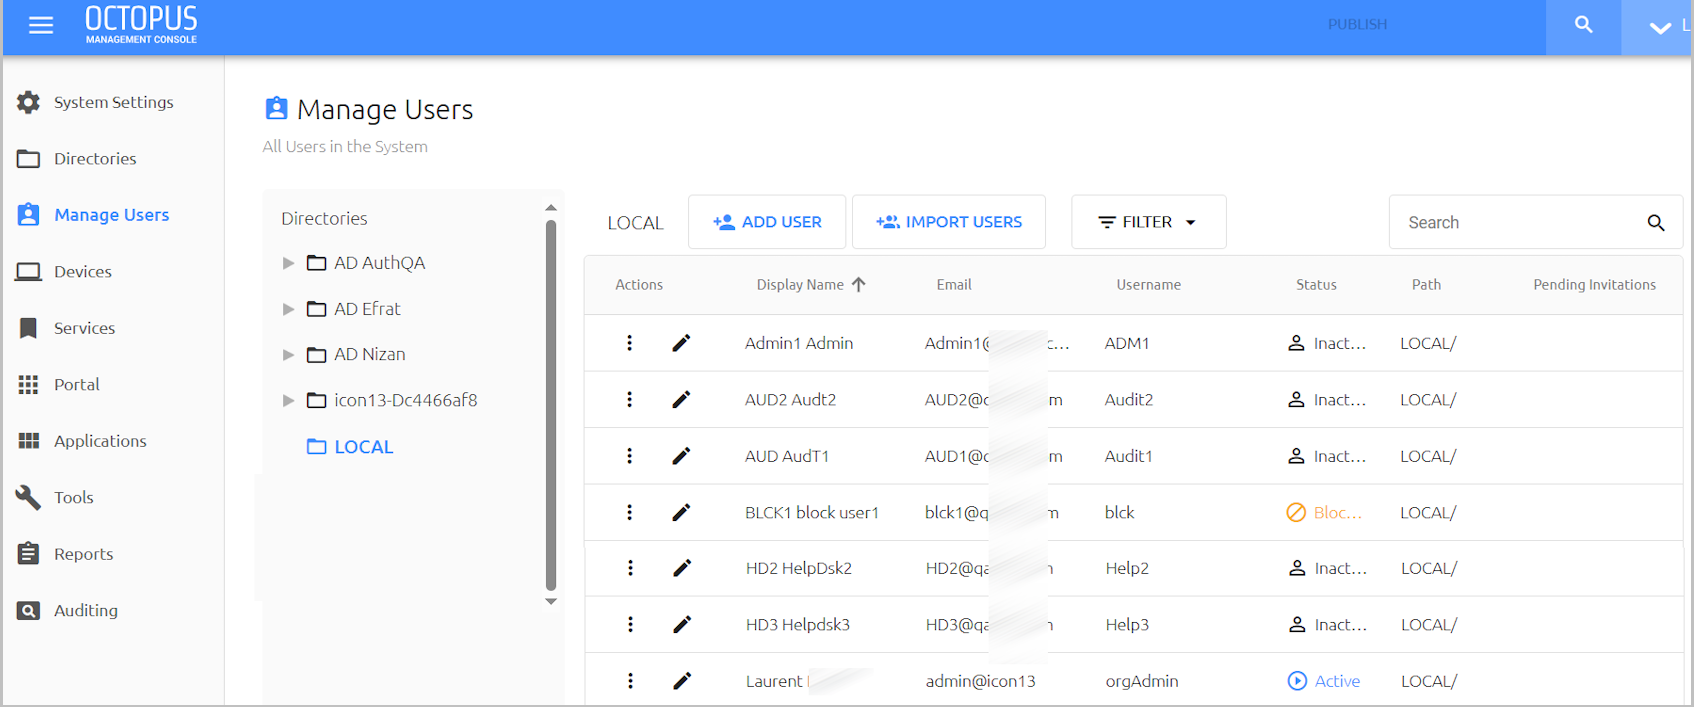
The Manage Users menu of the Octopus Management Console enables you to add and remove users, as well as perform administrative operations on any user or Group.
The following sections present:
Understanding the Users List: Explains how to work with the Users List
Working with Groups: Describes administrative operations that you can take on Groups
Performing Actions on Users: Explains different administrative actions that you can take on individual users
Adding Users to the Local Directory: Details methods for creating Local users
Importing Users from a Directory: Describes how to import users from an integrated corporate directory
Adding Users to a Federated Entra ID Directory: Describes how to add new users to a remote Entra ID directory
The Users List enables you to view details of any user by selecting the relevant directory and Group, or by performing a keyword search for the user or Group. By default, the Users List displays all the users in the Local directory.
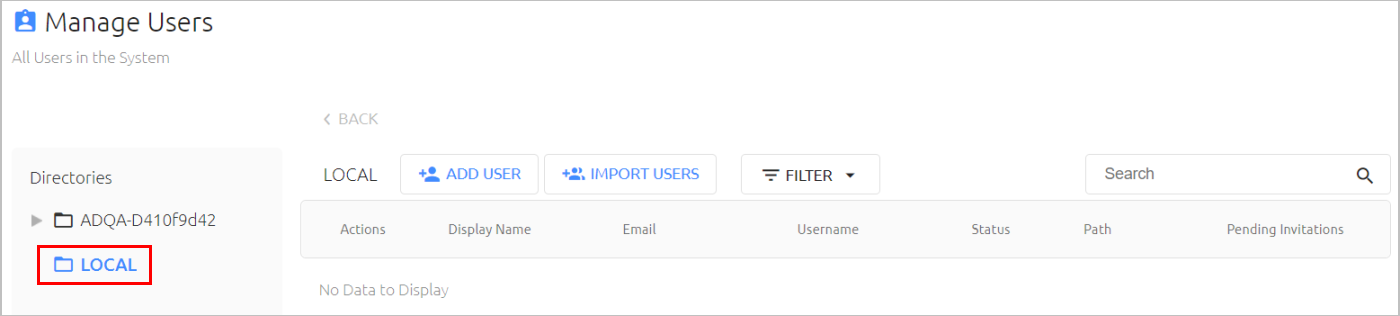
The Local directory is a default, internal directory that cannot be deleted. Users are added to the Local directory by manually creating them or by importing them from a CSV file. The Local directory is useful for organizations that do not manage users through external directories.
Unlike other integrated directories, the Local directory does not have directory settings. Local users therefore cannot utilize options that are configured per directory, such as 3rd party authenticators, OTP authentication and more. Local users can be assigned to SAML, RADIUS and REST API services, to which they can authenticate through the Octopus Authenticator or FIDO authentication only. (They cannot be assigned to LDAP or Active Directory Authentication services.) If services require a password for multifactor authentication, you can set a password for Local users in the Security tab of the user's settings. Local users can also use this password to access the Octopus Management Console.
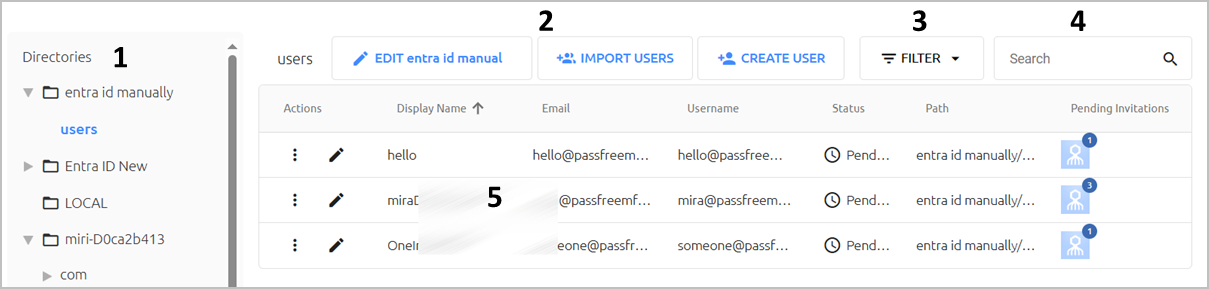
The main portions and features of the Users List are described in the table below the diagram.
Number | Feature | Description / Notes |
|---|---|---|
1 | Directories tree | Lists all configured directories and their folders. For more information, refer to Working with the Directories Tree. |
2 | Directory action buttons | Provide quick access to common directory management actions. The actions for the Local directory are Add User (allows you to manually create a Local user) and Import Users (allows you to upload Local users from a CSV file). The actions for integrated corporate directories include:
|
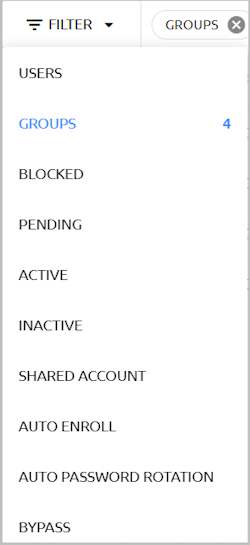
3 | Filtering options | Open the Filter list to view statistics about the currently displayed list, such as total number of Groups, total number of users, number of blocked users and so on. (These numbers vary according to the node / folder selected in the Directories tree.) Clicking a filtering option filters the list according to the selected option (e.g., clicking Pending displays only users with a Pending status). The currently selected filter is displayed in a chip next to the Filter list. For example:
|
4 | Search tool | To quickly locate a Group or user, type all or part of the Group name or the user's display name, username or email in the Search field. If you are currently viewing a directory, the search returns only Groups and users in the currently selected directory. If the root of the Directories Tree is selected, the search is performed across all directories. 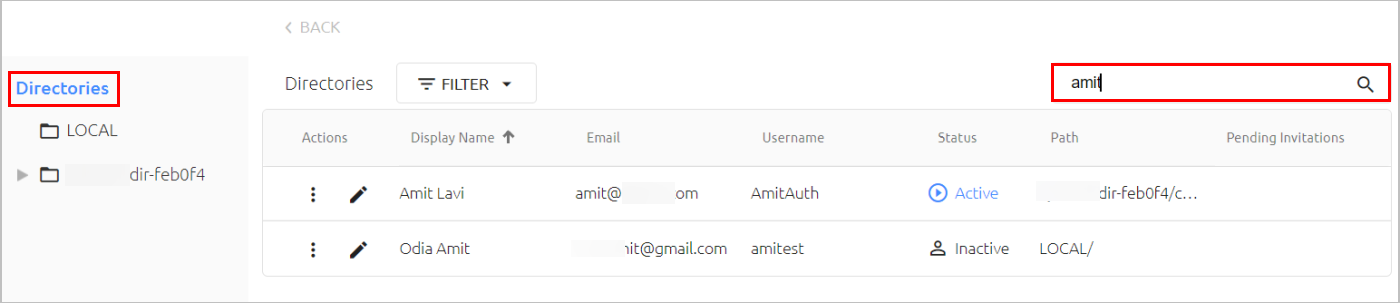 |
5 | User list | Lists basic details about the Groups and users in the currently selected node of the Directories Tree. You can sort the list according to any column by clicking the column header. A user's status can be one of the following:
Blocked: If a user is disabled in the Active Directory server, the row of that user in the Users list is disabled. You may continue to send and manage enrollment invitations for disabled users, but no other actions can be performed on them.  |


 The user is currently not authorized to authenticate using the Octopus Authenticator, PIN or FIDO key.
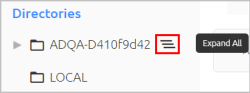
 The Directories list on the left side of the page lists the Local directory, as well as all other directories that have been integrated with the Management Console. It is organized in a tree format. The Expand All icon appears when you hover over any node that contains sub-nodes. For example:
Clicking this icon automatically opens all the sub-nodes beneath the selected node:
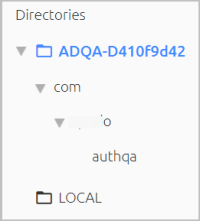
You can then select any Group or user and view relevant details. For more information, refer to Working with Groups and Performing Actions on Users.
For convenience, you can perform some common administrative actions on Groups directly from the Users list, by clicking  in the row of the Group and then selecting the relevant action.
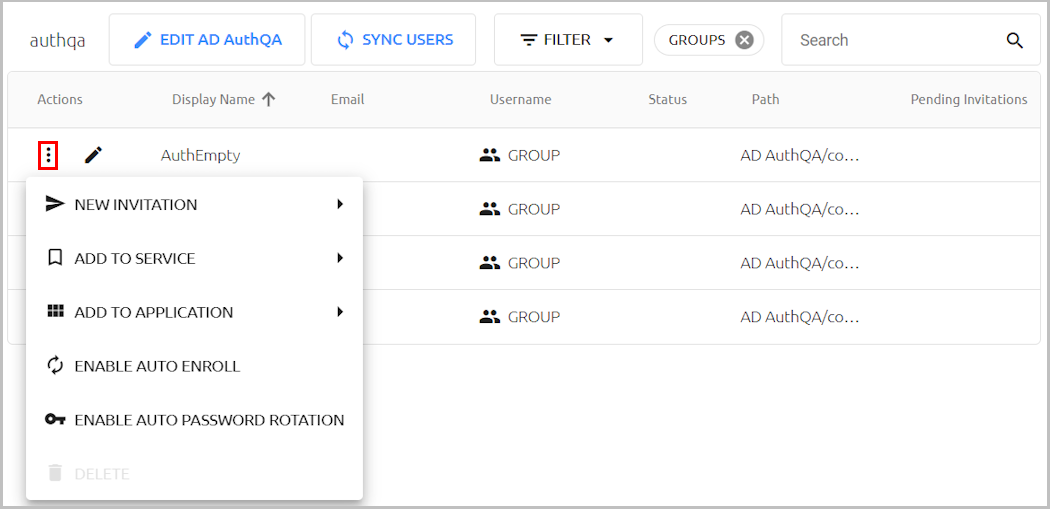
The available actions are:
New Invitation: Issues email invitations to all Group members. You can invite the members to enroll a device (Octopus Authenticator), register a FIDO key (FIDO Authenticator), obtain software one-time passwords (OTP Authenticator) or register a hardware OTP token.
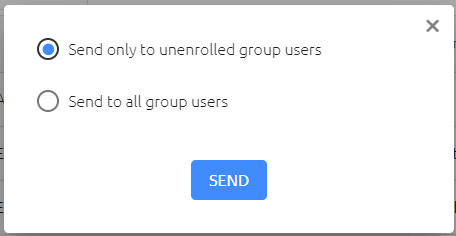
If some Group members are already enrolled, the following popup will open, prompting you to specify whether to send the invitations to the entire Group or only to the members who are not yet enrolled:
IMPORTANT: In order to enable users to authenticate to Windows using a FIDO key, the AD or Okta directory must have a configured domain. It is recommended to open the directory settings and verify that the Domain field is completed.
If the Windows agent is configured with both an internal and external Endpoint URL, users need to enroll their FIDO devices using the internal URL only.Add To Service: Enables you to control which services are enabled for the Group, by selecting or clearing the checkboxes. The services listed are the ones that are available for directories to which the Group belongs.
If a service is not listed, open the settings of the relevant service and verify that the appropriate directory is selected in the Directories tab.
Add To Application: Enables you to control which integrated applications are enabled for the Group, by selecting or clearing the checkboxes. The applications listed are the ones that are available for directories to which the Group belongs.
If an application is not listed, open the settings of the relevant application and verify that the appropriate directory is selected in the Directories tab.Enable / Disable Auto Enroll: Sets Auto Enrollment for the Group. In Auto Enrolled Groups, the system automatically sends enrollment emails to all Group members who are not yet enrolled.
Enable / Disable Auto Password Rotation: Determines whether the Authentication Server automatically rotates the AD password for all users within the Group, according to specified password settings. For more information, refer to Managing Group Global Settings (below).
Clicking  in the row of a Group opens the Users tab. This tab lists the subgroups and users assigned to the Group, and displays general information about each one. Open the Filter list to view the number of subgroups and users in the Group, as well as other relevant information about Group entities. You can perform actions on individual users directly from this list. (For more information about user actions, refer to Performing Actions on Users.)
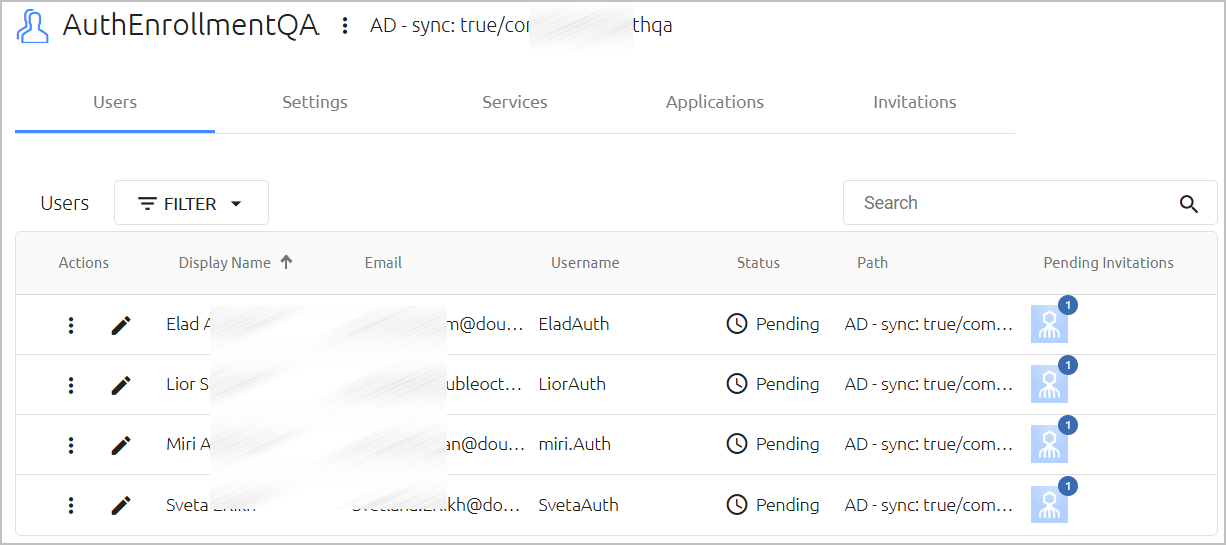
Clicking (to the right of the Group name) opens a quick access menu that enables you to perform the actions described above (New Invitation, Add To Service, etc.). This menu is available from each of the tabs at the Group level.
The following sections describe additional tabs that are available for Group management.
Managing Group Global Settings
The Settings tab enables you to control several global settings for a Group. To update settings, enable / disable the relevant toggle button(s) and click Save. Then, from the toolbar at the top of the page, click PUBLISH and publish your changes.
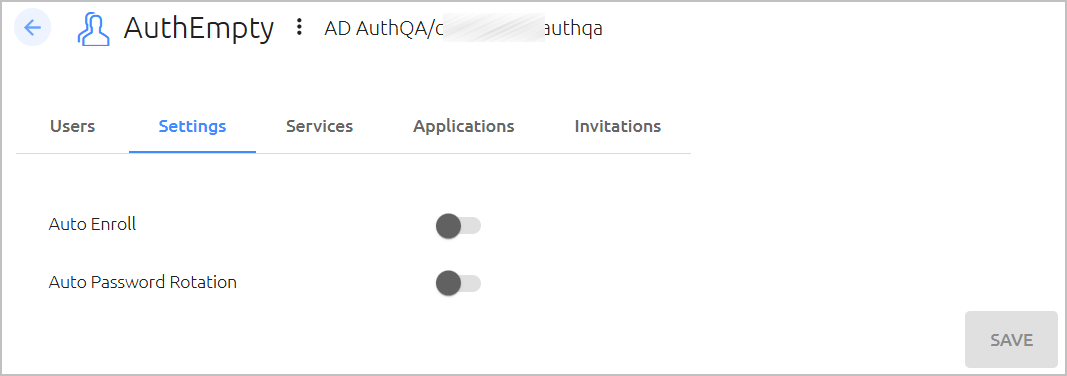
The settings are:
- Auto Enroll: When the toggle is enabled, every new user in the Group is sent an automatic invite.
- Auto Password Rotation: When the toggle is enabled, the Authentication Server regularly checks AD passwords of all users within the Group and automatically rotates passwords that have expired. Password requirements, including password age, are determined by the password settings defined in the Policy tab of the integrated directory. Since the Server performs the AD password check once a day, it is recommended to set the Password Age to a minimum value of 1 day.
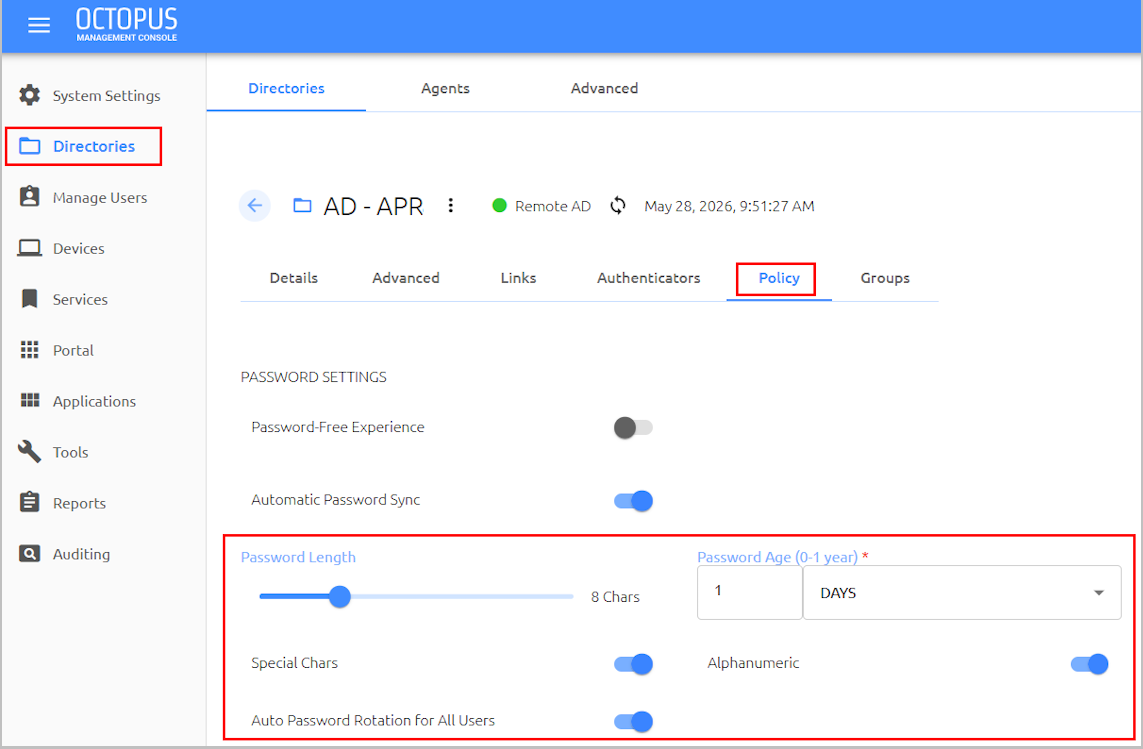
By default, automatic password rotation is implemented only for group members who have performed Octopus enrollment and have an Active status. If you want automatic password rotation to affect group members with any status, activate the Auto Password Rotation for All Users option.
Managing Group Services
This tab displays services that the Group is currently authorized to access. The checkboxes on the left are toggles that allow you to control whether that service is enabled for the Group. Clicking  in the row of a service redirects you to another page where you can update the settings for that service.
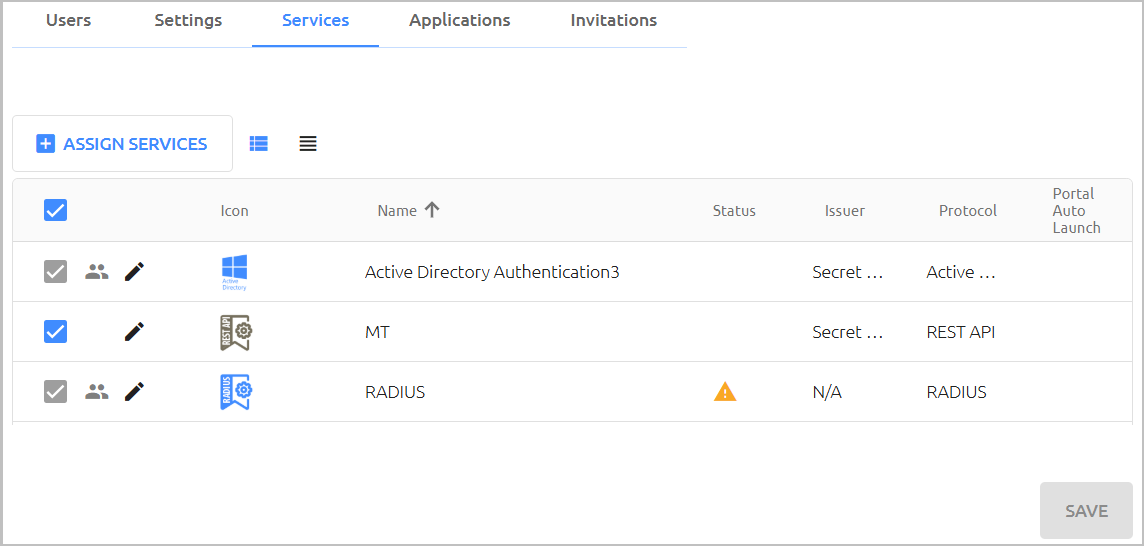
To assign additional services to the Group, click Assign Services. In the dialog that opens, specify the services to add by selecting the relevant checkboxes, and then click Save.
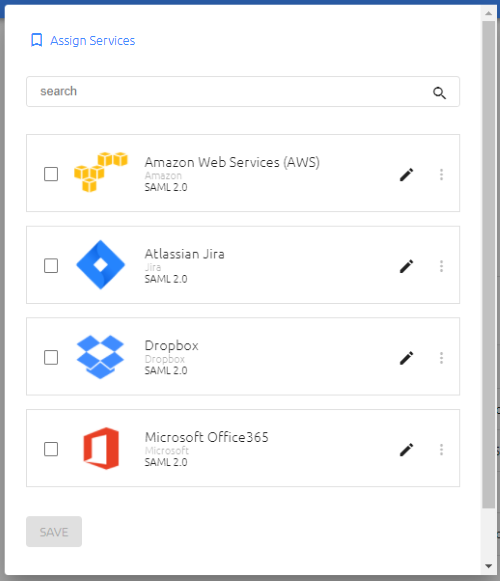
The services listed in the Assign Services dialog are ones to which the Group is not currently assigned AND which may be used by directories to which the Group belongs. If a service is not listed in the dialog, open the settings of the service and verify that the appropriate directory is selected in the Directories tab.
Managing Group Applications
This tab displays the integrated applications that the Group is currently authorized to access. The checkboxes on the left are toggles that allow you to control whether that application is enabled for the Group. Clicking in the row of a service redirects you to another page where you can update the settings for the application.
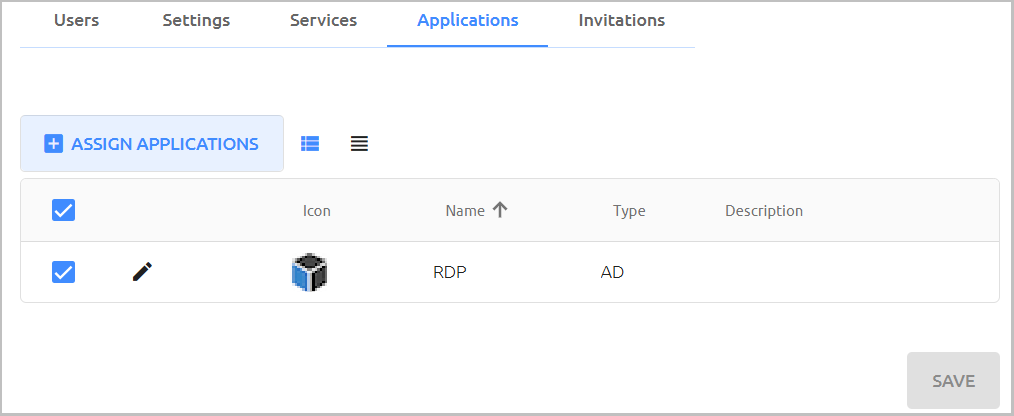
To assign additional applications to the Group, click Assign Applications. In the dialog that opens, specify the applications to add by selecting the relevant checkboxes, and then click Save.
The applications listed in the Assign Applications dialog are ones to which the Group is not currently assigned AND which may be used by directories to which the Group belongs. If an application is not listed in the dialog, open the settings of the application and verify that the appropriate directory is selected in the Directories tab.
Managing Group Invitations
This tab lists number of pending invitations sent to each member of the Group.
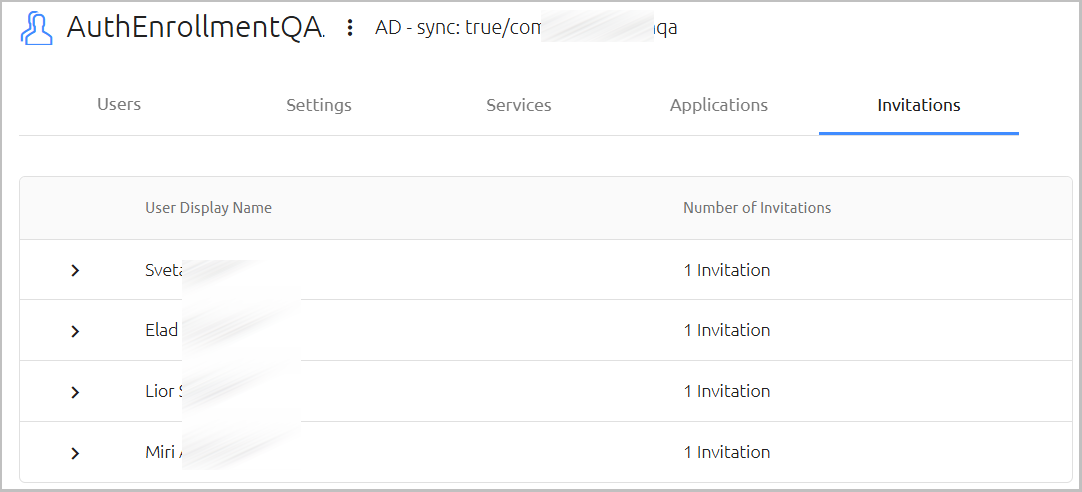
When a row is expanded, details about each invitation, such as its identifier, authentication type and creation date are displayed. The Status> column shows the handling workflow for the invitation. This workflow is determined by whether the user is already published in the system or is new. Possible statuses are:
- Waiting for Publish: The user has not yet been synced and published in the system. The invitation is being stored as a pending invitation and will be sent to the user as soon as the next Publish process completes successfully.
- Active: The user is published in the system and the invitation has been sent.
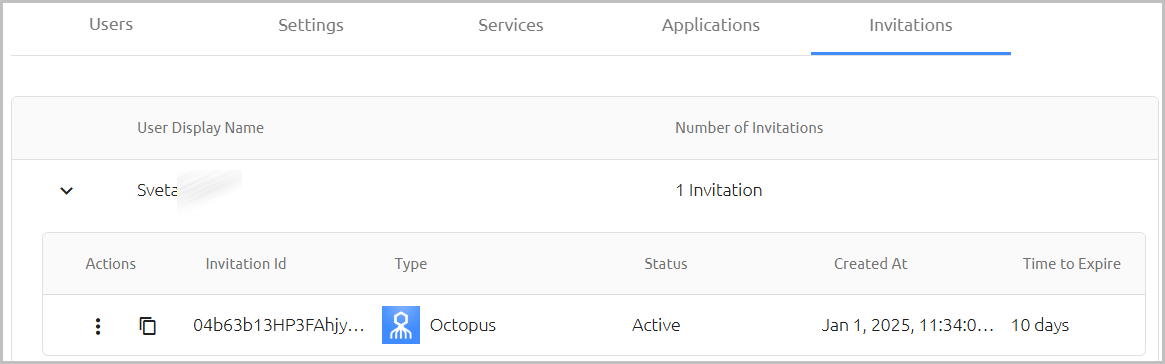
Clicking  copies the invitation's enrollment link or code, according to invitation type:
Octopus type invitations: The Copy action copies the Invitation ID, which is then converted to the manual enrollment code provided in the invitation.
FIDO / OTP type invitations: The Copy action copies the link for registration provided in the invitation.
Clicking opens an actions menu for the selected invitation. The actions are:
- Resend: Sends the invitation to the email address recorded in the system for the user (in the Personal tab of the user details).
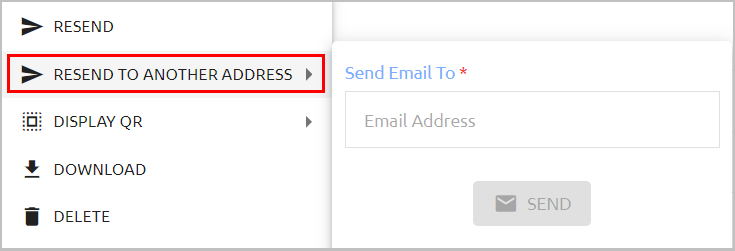
- Resend to Another Address: Sends the invitation to an email address other than the one recorded in the system. When selecting this option, enter the address in the field that opens, and then click Send.
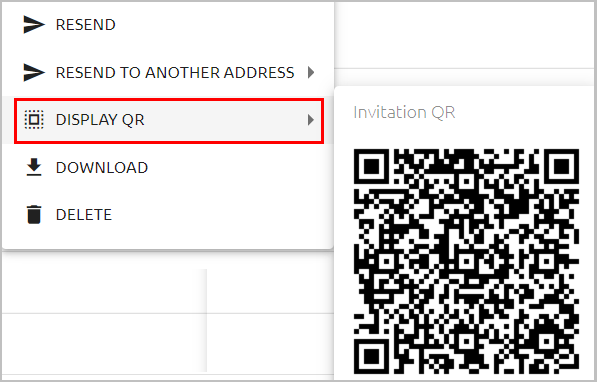
- Display QR: Shows the enrollment QR provided with the invitation. This action is relevant for Octopus type invitations only.
- Download: Saves the invitation as an email file and downloads it to your machine.
- Delete: Removes the invitation from the system.
Note: The Resend and Download actions are not available for invitations with a Waiting for Publish status.
Performing Actions on Users
For convenience, you can perform some common administrative actions on a user directly from the Users list, by clicking in the row of the user and then selecting the relevant action.
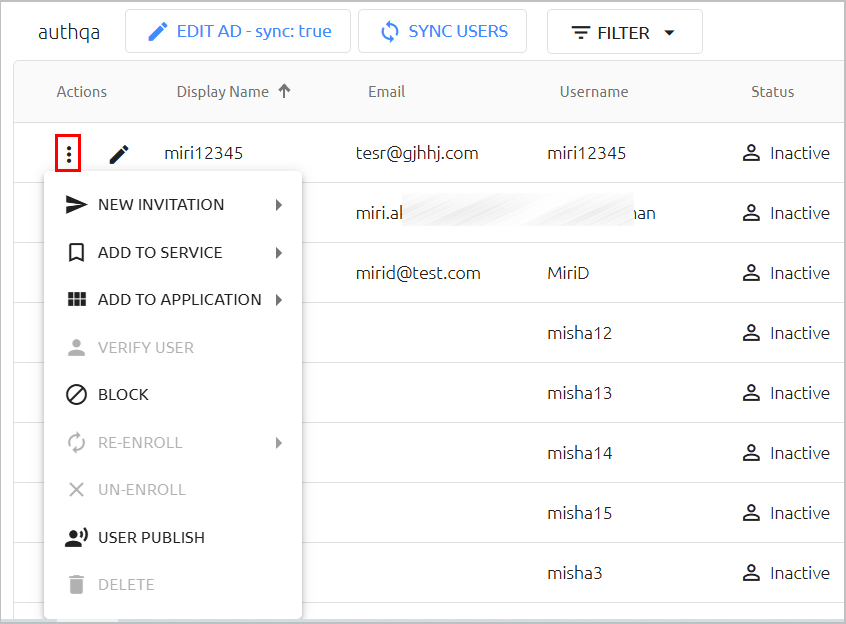
The available actions are:
New Invitation: Sends the user an invitation via email. You can invite users to enroll a device, register a FIDO key, obtain software one-time passwords (OTP Authenticator), or register a hardware OTP token. For more information about invitation management, refer to User Invitations.
IMPORTANT: In order to enable users to authenticate to Windows using a FIDO key, the AD or Okta directory must have a configured domain. It is recommended to open the directory settings and verify that the Domain field is completed.
If the Windows agent is configured with both an internal and external Endpoint URL, users need to enroll their FIDO devices using the internal URL only.Add To Service: Enables you to control which services are enabled for the user, by selecting or clearing the checkboxes. The services listed are the ones that are available for directories to which the user belongs.
If a service is not listed, open the settings of the relevant service and verify that the appropriate directory is selected in the Directories tab.
Add To Application: Enables you to control which integrated applications are enabled for the user, by selecting or clearing the checkboxes. The applications listed are ones that are available for directories to which the user belongs.
If an application is not listed, open the settings of the relevant application and verify that the appropriate directory is selected in the Directories tab.Verify User: Sends an authentication request to the user, in order to verify the user's identity.
Block/Unblock: The Block action prevents the user from authenticating with Octopus Authenticator, PIN or FIDO key. Unblock reverses the Block action.
Re-enroll: Removes user enrollment and sends the user an invitation to enroll again.
Un-enroll: Removes user enrollment without sending a re-enrollment invitation.
User Publish: Generates an immediate publishing process for actions (e.g.; enrollment invitations) and updates (e.g., adding a service) affecting the user.
Note: After removing a user from a service, a full publish is required.Delete: Removes the user and all the user's devices from the system. (If the directory has Auto Sync enabled, this option is not available.)
Note: New Invitation is the only action available for users who are disabled in the Active Directory server.
Clicking in the the row of a user opens a page from which you can view and manage user details. At the top of the page, the full path of the user's directory appears to the right of the user's name. Clicking opens a quick access actions list that enables you to perform common administrative operations on the user (as described above).
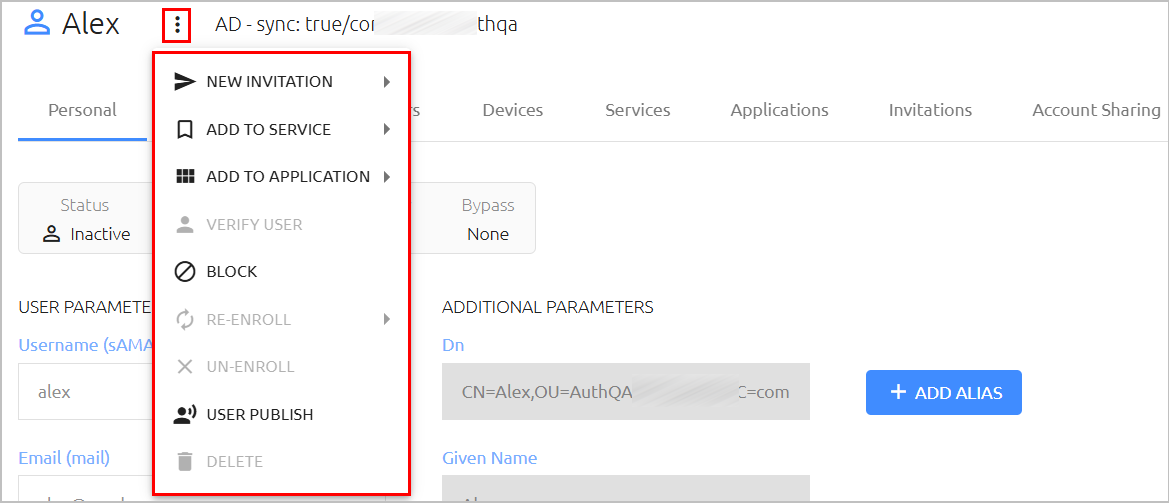
The following tabs allow you to view and update settings, parameters and resources related to the user:
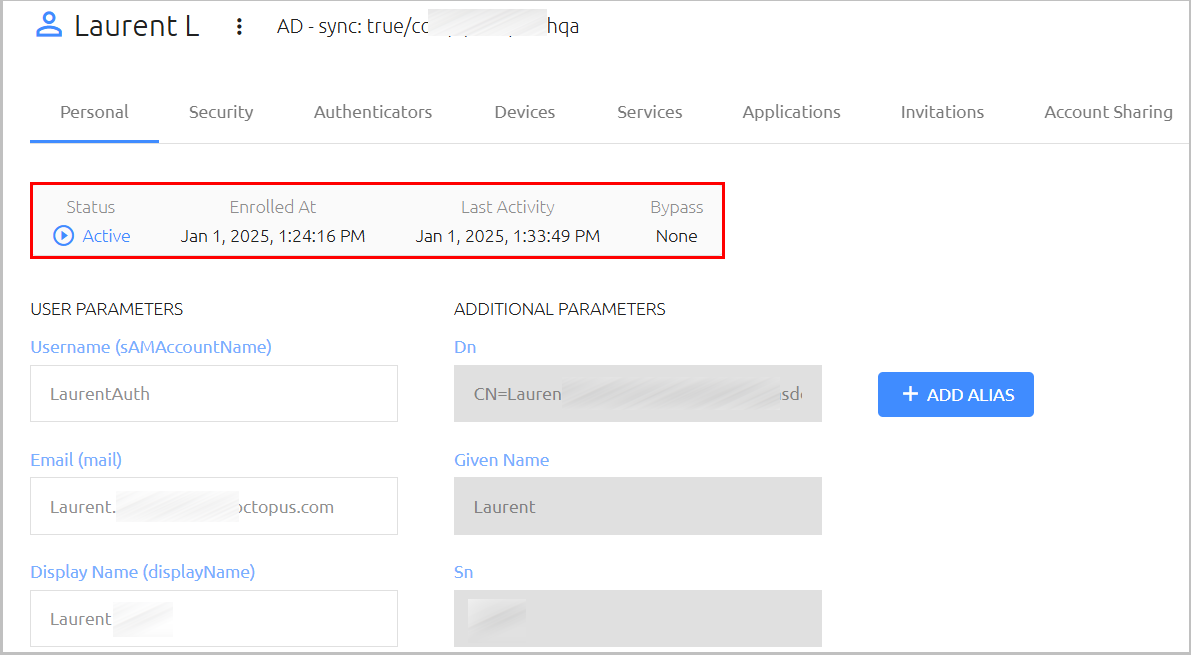
Personal: This tab, which is displayed by default when the page opens, lists general information such as username, email, role and aliases. The data in the Additional Parameters column are fields that are imported from the user's directory. (For more information about working with directory fields, refer to Using the Schema Mapping Script.)
The bar at the top of the Personal tab shows the user's status (Active, Inactive, Pending or Blocked), date / time of enrollment, date / time of the user's most recent activity, and details related to Octopus Authentication Bypass.
Security: Allows you to perform various security-related operations, such as setting passwords and PIN codes. For more information, refer to Setting Security Parameters.
Authenticators: Lists all integrated phones, FIDO keys and hardware OTP tokens of the user and allows you to perform administrative actions on these devices. For details, refer to Managing User Authenticators.
Devices: Lists enrolled workstations on which the user can perform Windows/MAC authentication and provide details about browsers used for the authentication process. For more information, refer to Managing User Workstations and Browsers.
Services: Displays the services to which the user is assigned. For details, refer to Managing User Services.
Applications: Lists the integrated applications to which the user is assigned. For details, refer to Managing User Applications.
Invitations: Lists all active enrollment invitations sent to the user and allows you to manage them. For details, refer to Managing Invitations.
Account Sharing: Allows you to enable account sharing and specify users who are authorized to log into the shared account. For more information, refer to Managing Shared Accounts.
Setting User Security Parameters
The Security tab allows you to perform various password, PIN and other security-related operations. (This tab does not appear for users who are disabled in the Active Directory server.)
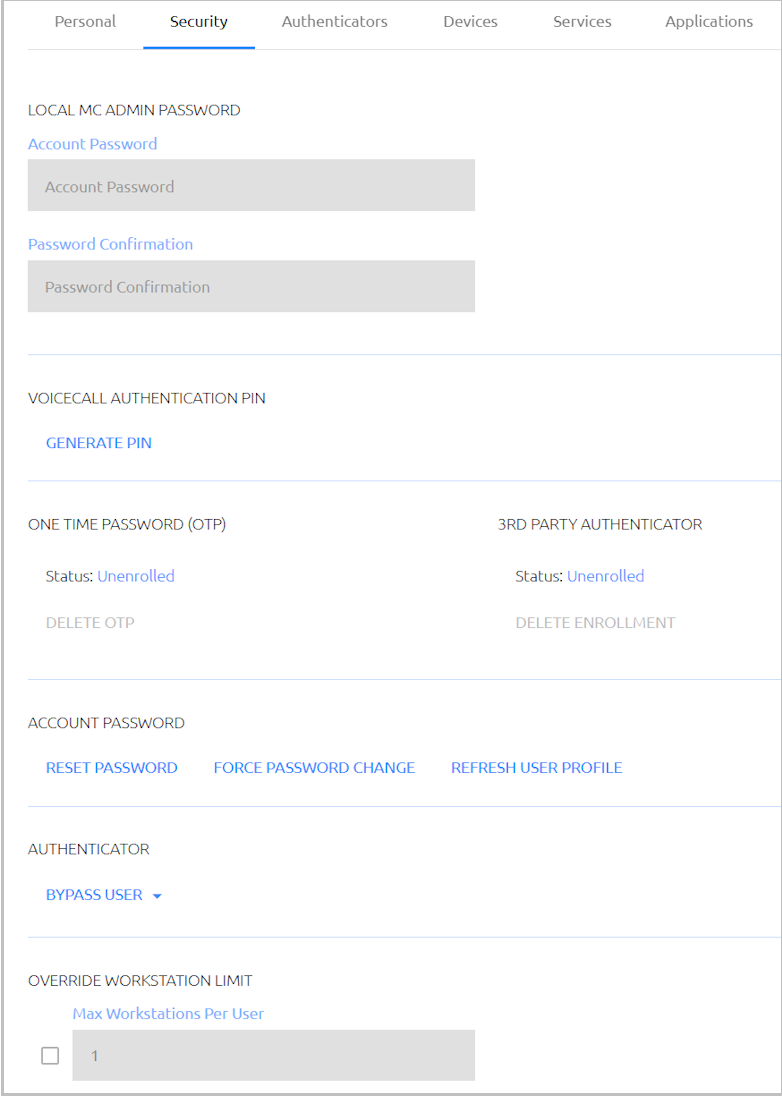
The following operations are available:
Set Local MC Admin Password: This is the password used for access to the Octopus Management Console (MC). The fields in this section are enabled only for Local users who are authorized to access the MC (roles of Admin, Helpdesk or Auditor).
IMPORTANT: The Local MC Admin Password is used for logging into the MC directly from the browser. When Local users authenticate to the MC via the User Portal, they should use the personal password issued to them for MFA verification.To set (or update) the password, enter the password in the Account Password field. Password requirements are displayed as you type. Re-enter the password in the Password Confirmation field, and then click Save.
Set Voicecall Authentication PIN: This operation is useful for users who do not own a smartphone. When these users perform authentication, they receive a voice call that prompts them to enter the PIN code.
To create a PIN for a user, click Generate PIN. The PIN is then displayed in a popup window.
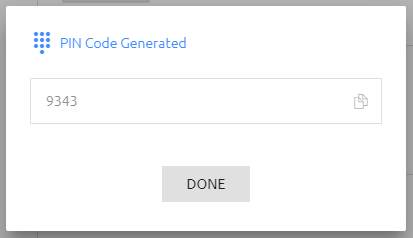
To remove the PIN, in the PIN Code section of the Security tab, click Delete PIN.
IMPORTANT: To use Voicecall Authentication, you need to have a Twilio account. The Twilio service handles the processes of calling the user and managing the verification code.
After you have set up your Twilio account, please send the Account SID, Token, and Phone number to<support@doubleoctopus.com>and the Support team will complete the integration between Twilio and Secret Double Octopus.View and manage one-time password (OTP) settings: The Status parameter indicates whether the user is currently enrolled for OTP authentication. If the status is Enrolled, you can remove the OTP for the user by clicking Delete OTP.
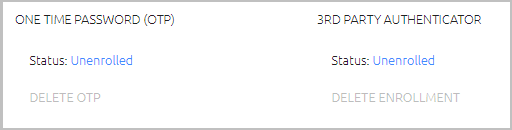
View and manage 3rd party authenticator settings: The Status parameter indicates whether the user has authenticated using of the defined 3rd party authenticators. (When the user first logs in using one of these authenticators, the status changes from Unenrolled to Active.) You can changes the status back to Unenrolled by clicking Delete Enrollment (e.g., if the user is no longer using that authenticator).
Bypass Octopus authentication: Enables users to authenticate with a username + password or temporary token. For details, refer to Bypassing Authentication.
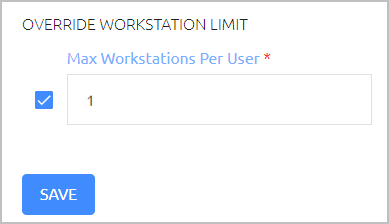
Override Workstation Limit: This feature enables you to define the number of workstations to which this specific user is allowed to authenticate. The value set here overrides the general value configured for all users (in the Devices tab of the System Settings menu). The Override feature is useful for accommodating users who need access to large numbers of workstations (e.g., IT personnel).
To set an override value, select the checkbox and enter the number of workstations allowed in the field to the right. Then, click Save.
The following operations appear in the Account Password section:
Reset Password: For users in integrated directories, this option allows you to create a password in the AD for user authentication to Windows/MAC. (The main use case is when a user is temporarily without a mobile device.) The Reset Password action will also unlock the user's account (if it had been locked).
If you enable the Replace Password on Next Login toggle when setting the password, the password you create will be a temporary one.
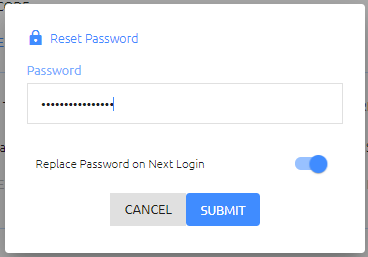
For users in the Local directory, Reset Password enables you to change the password for user verification in services that utilize multi-factor authentication. The Replace Password on Next Login toggle is disabled for Local users.
Note: Local users can change their own passwords in the User Portal when the Set Local User Password option is enabled in the Self Service tab of the Portal menu.Force Password Change: Replaces the password with a new one upon the next user login. (This operation is disabled for Local users.)
Refresh User Profile: Restores user details (in the Personal tab) to those currently recorded in the AD. (This operation is disabled for Local users.)
IMPORTANT: The actions in the Account Password section are not relevant to Zimbra users, as passwordless authentication is not supported for Zimbra directory types.
Bypassing Authentication
When the Bypass User feature is activated, users authenticate with a username + password or temporary token. The Bypass action is useful for workers who have forgotten their phones, for handling machine-to-machine authentication, and more.
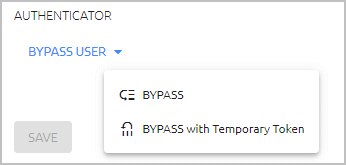
The BYPASS option enables you to set a specific or unlimited amount of time for the bypass period. During the bypass period, the user may authenticate with username and password.
To set a Bypass Authentication time period:
At the bottom of the Security tab for the relevant user, in the Authenticator section, select Bypass User > BYPASS.
Bypass parameters are displayed in a popup window.
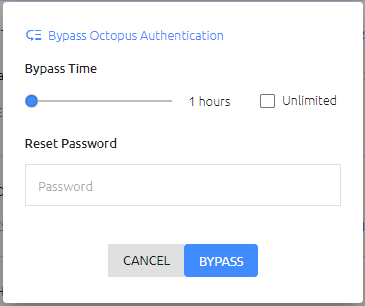
Drag the slider until the desired period for the bypass is displayed. (The range is 1 hour- 14 days.) Alternatively, click the Unlimited checkbox (recommended for machine-to-machine authentication).
If the user is not aware of the current password, in the Reset Password field, enter a new password with which the user can authenticate.
Click Bypass.
The popup closes. At the top of the Personal tab, the Bypass state is indicated in the user's information bar, and the time remaining until the bypass expires is displayed.
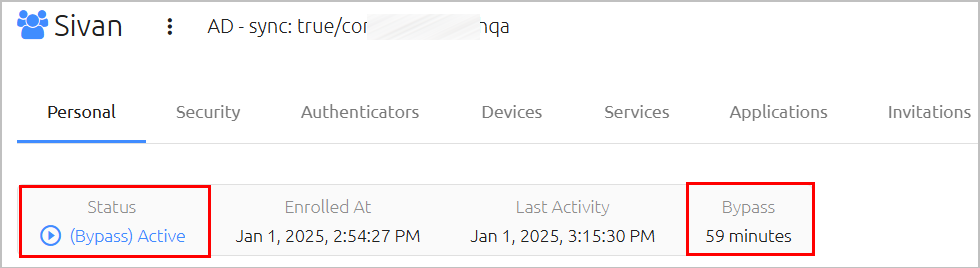
To cancel the bypass before the expiration time, at the bottom of the Security tab, click End Bypass.
The Bypass with Temporary Token option allows you to set a specific period of time for which the token is valid. Token requirements, such as number of characters, are set per directory in the Policy tab of the directory settings.
To set user bypass with a temporary token:
At the bottom of the Security tab for the relevant user, in the Authenticator section, select Bypass User > Bypass with Temporary Token.
Bypass parameters are displayed in a popup window.
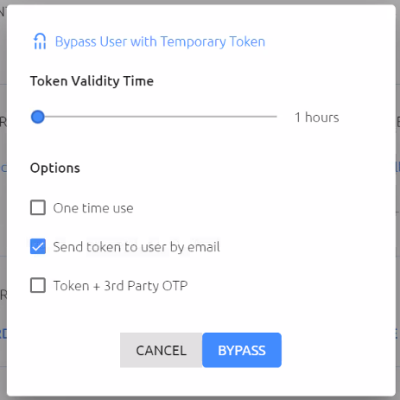
Drag the slider until the desired token validity time is displayed. (The range is 1 hour to 18 hours.)
Select the following checkboxes as required:
One time use: When selected, the token may be used for a single time only during the entire validity period. Once the token is used, the bypass ends. This feature is useful for a one-time access, e.g., by IT personnel.
Send token to user by email: When selected, the user receives the token to the email address displayed in the Personal tab of the user details, and the admin is not able to view the token. If the checkbox is NOT selected, the token is copied to the clipboard and the admin needs to forward it to the user.
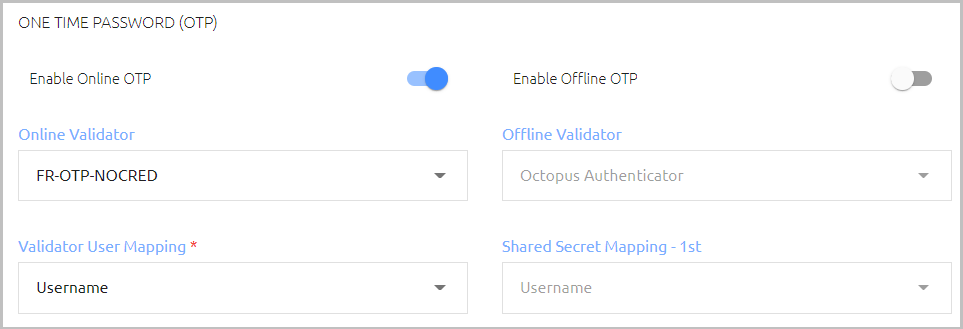
Token + 3rd Party OTP: When selected, the user is able to log into Windows and the User Portal with a temporary token + ForgeRock TOTP. For successful authentication, the user needs to enter the token (in the Password field) immediately followed by the OTP (without spaces or other breaks).
In order to use this option, a ForgeRock OTP Validator needs to be created (System Settings > Authenticators) and assigned as an OTP Validator in the Authenticators tab of the directory settings. For example:
Click Bypass.
The popup closes. At the top of the Personal tab, the Bypass state is indicated in the user's information bar, and the time remaining until the bypass expires is displayed.
To cancel the bypass before the expiration time, at the bottom of the Security tab, click End Bypass.
IMPORTANT: After starting or ending a bypass, publish your changes to the database.
Managing User Authenticators
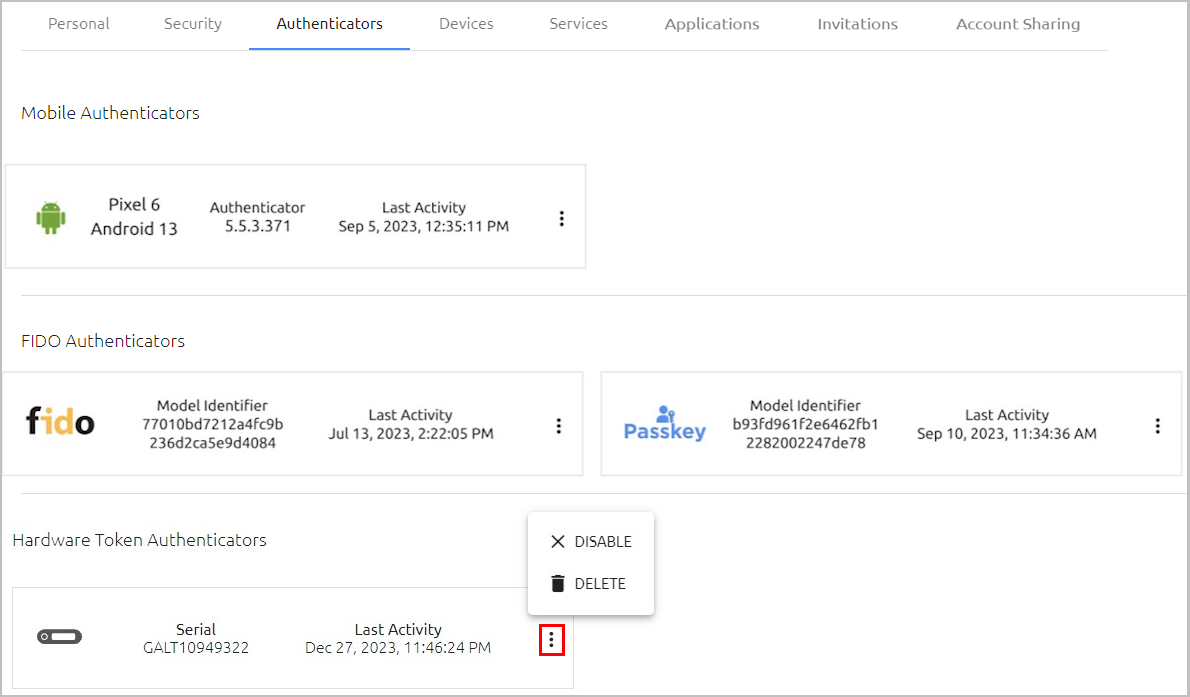
The Authenticators tab lists all integrated phones, FIDO keys and hardware OTP tokens of the user and provides basic information (e.g., OS version, model identifier, etc.) about each one.
Note: This tab does not appear for users who are disabled in the Active Directory server.
Clicking opens an actions list that allows you to enable / disable the device, or remove the device from the system.
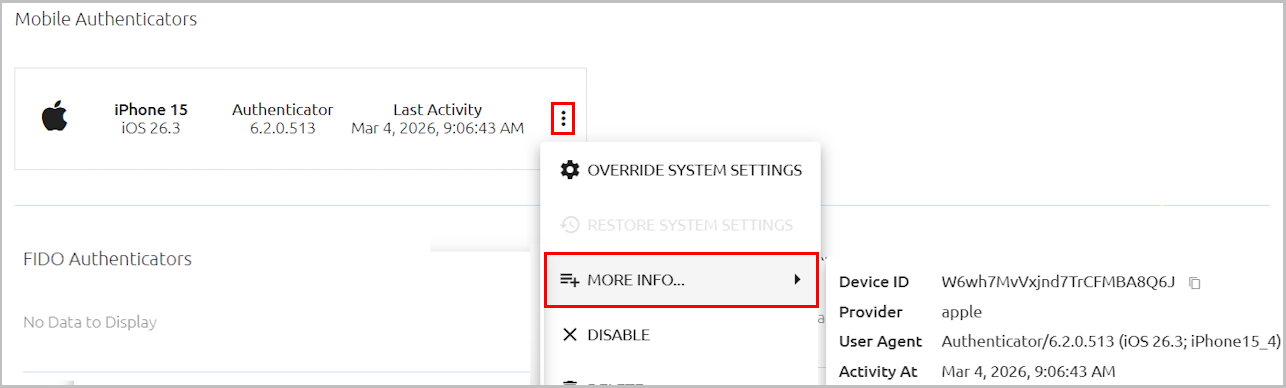
Mobile authenticators also have a More Info action. Selecting this action enables you to view additional details, including Device ID.
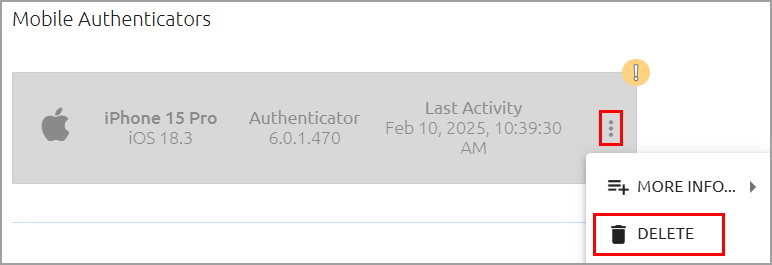
If the user has deleted the account on the mobile device, the Mobile authenticator is disabled and an alert icon appears in the upper right corner. The authenticator can no longer be used, and it cannot be enabled. To remove the authenticator, click  and select Delete.
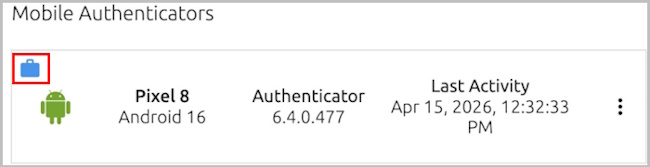
Mobile devices enrolled through an MDM solution are indicated by a case icon.
Setting Device-specific Configurations for Mobile Authenticators
The functionality and behavior of the Octopus Authenticator mobile app is determined by the global settings configured for the authenticator (System Settings > Authenticators). When required, the global configuration can be modified for specific mobile authenticators.
When an authenticator-specific configuration is defined, the Octopus Authentication Server sends the customized configuration (instead of the global one) to the mobile app. The Server continuously compares the configurations and updates device-specific settings in real time, according to changes in the global configuration.
To set device-specific mobile authenticator configurations:
- From the Manage Users menu, open the details of the relevant user and select the Authenticators tab.
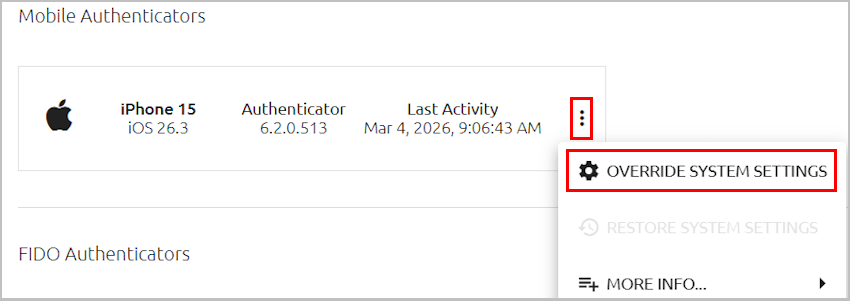
- From the frame of the relevant mobile authenticator, click and select Override System Settings.
A dialog opens displaying Octopus Authenticator configuration options that may be overridden.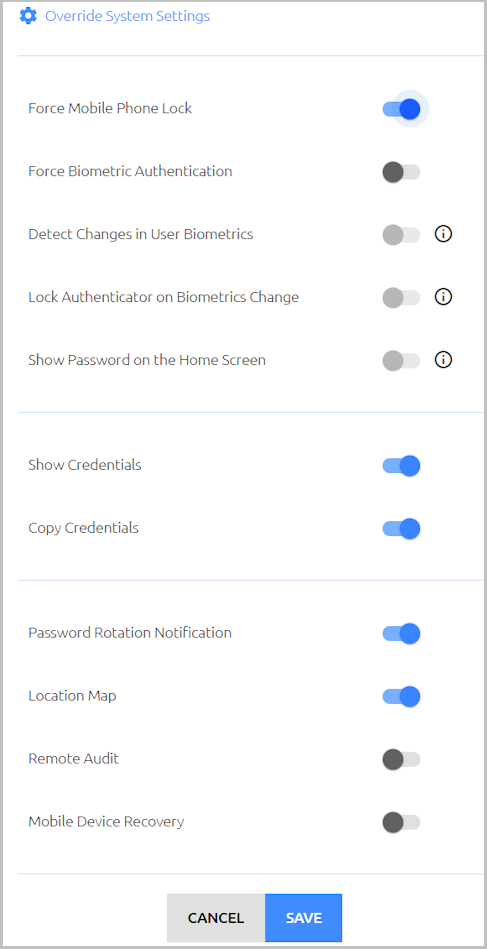
- Modify the settings as required. Settings that differ from the global configuration are indicated by a colored bar.
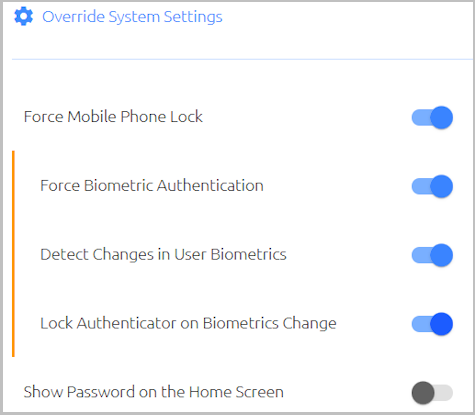
IMPORTANT: If the global setting for Credentials Obfuscation is Enabled or Enforced, attempts to override the Show Credentials and Copy Credentials settings are ignored by the Octopus Authentication Server. At the bottom of the dialog, click Save.
An Override icon appears in the frame of the mobile authenticator. In addition, the following actions are available:
Edit System Settings: Opens the Override System Settings dialog, where you can update the device-specific configuration.
Restore System Settings: Resets all options and settings to match the global configuration.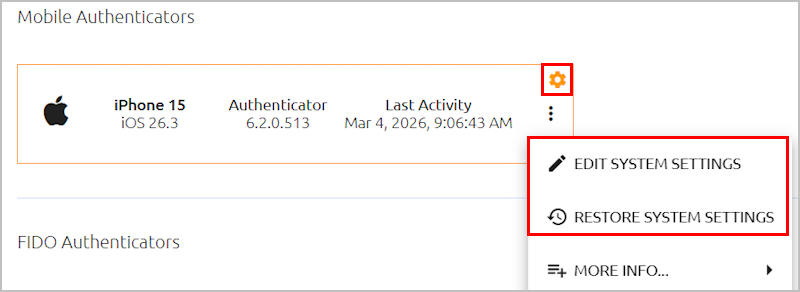
Override System Settings and Restore System Settings actions are recorded in the Management Console audit logs. In addition, the Detailed Authenticators Report template contains an option for including data about authenticators with device-specific configurations.
Managing User Workstations and Browsers
The Devices tab lists all devices through which the user has performed authentication. The tab has separate displays for workstation records and browser records. (The tab does not appear for users who are disabled in the Active Directory server.)
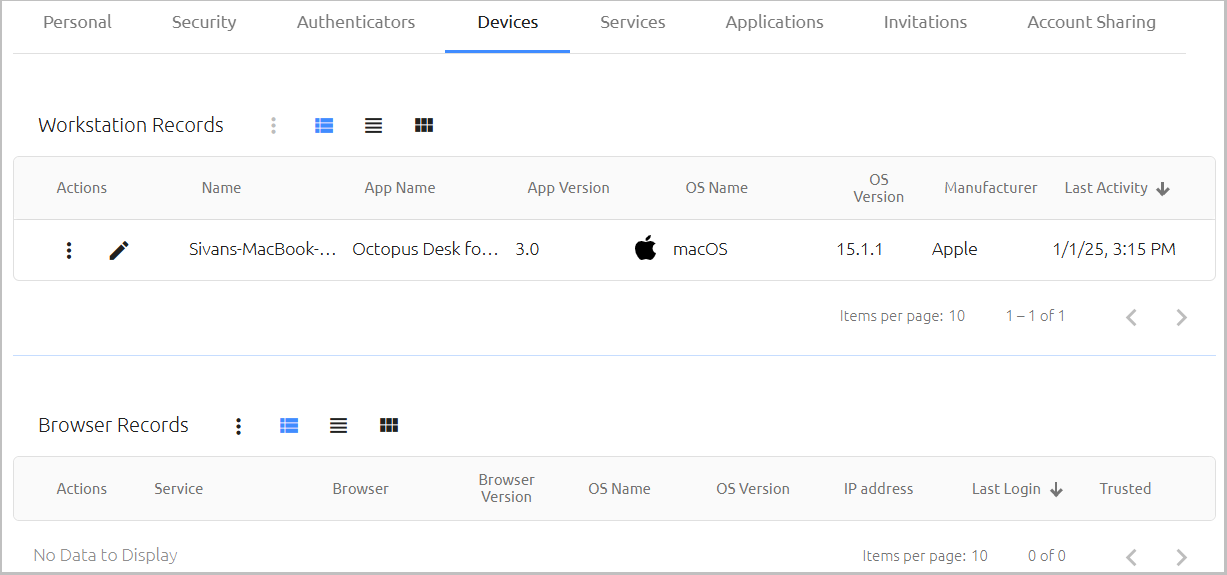
The Workstation Records display lists all enrolled workstations on which the user can perform Windows/MAC authentication. Basic information about each workstation, such as OS type, manufacturer, and Octopus application version is provided.
Clicking redirects you to another page where you can view more details about the workstation.
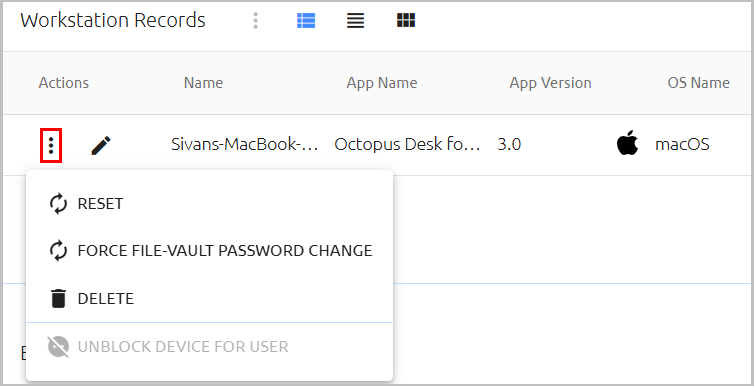
Clicking opens an actions menu for the selected workstation. The actions are:
Reset: Deletes the workstation's history and all generated security keys. Use the Reset action after upgrading the workstation to Windows Agent 3.3 or Mac Agent 2.3.0. Following a reset, the workstation will generate a new security key with the next authentication.
Force FileVault Password Change: Initiates an immediate rotation of the FileVault password. This operation is available for Mac workstations only.
If the Password Age setting is set to 0 (System Settings > Devices > macOS FileVault Password Settings), the operation is disabled.Delete: Deletes the workstation's history and security keys and also removes it from the list of workstations. Keep in mind that deleting a workstation removes it for all users.
The Delete action is generally reserved for workstations that are no longer in use. If a user authenticates on a deleted workstation, the workstation will be recreated and will appear in the list again.
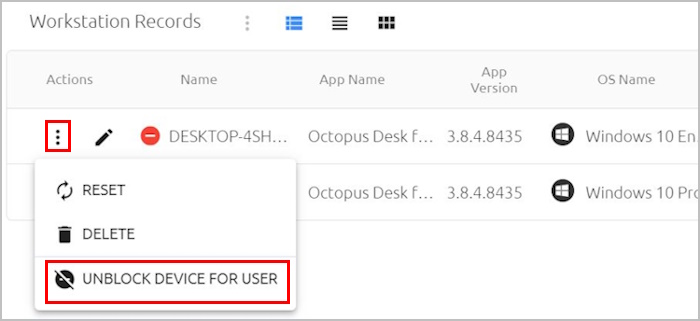
If the user is currently blocked from accessing a workstation due to enforcement of push fatigue protection mechanisms, a red Blocked icon appears in the row of the relevant workstation. To remove the block, click  and select Unblock Device For User.
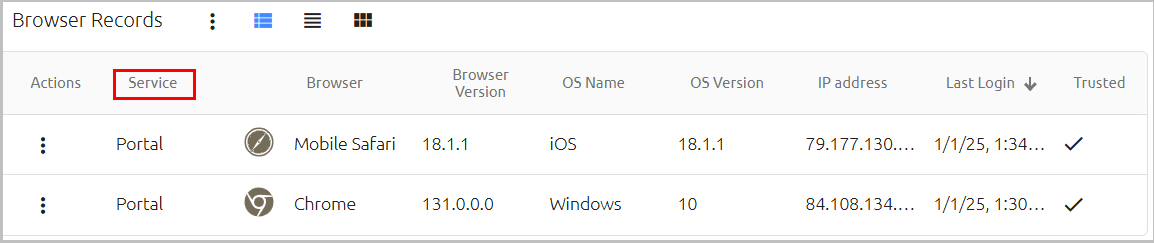
The Browser Records display lists all browsers through which the user has authenticated to SAML services or the User Portal. The browser version, basic workstation details and last login information are provided. A  icon indicates that when Adaptive Authentication is enabled, strong authentication is not required after the first authentication through that browser. In List view, the Service column lists the service to which the user authenticated (User Portal or name of SAML service).
Note: For more information about Adaptive Authentication, refer to Configuring System Settings (Devices tab).
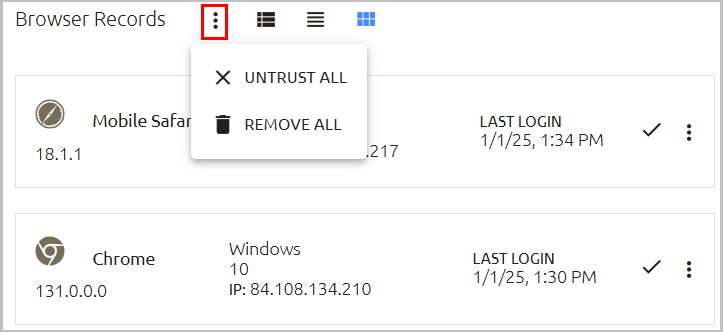
Clicking at the top of the display enables you to perform some bulk operations for managing the browsers. These actions are relevant when Adaptive Authentication is enabled:
Untrust All: Removes the Trusted status of all browsers currently marked as Trusted. (When users authenticate on untrusted browsers, they need to enter a verification code on every authentication.)
Remove All: Clears the browser list and removes the listed browsers from the system. When users next attempt Adaptive Authentication through these browsers, they will be treated as unrecognized devices.
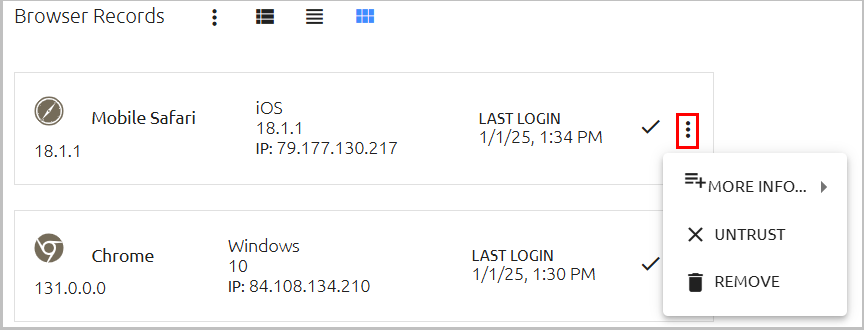
Clicking in the row or tile of a browser opens an actions menu for that browser. The actions are:
More Info: Displays additional data (such as engine details, CPU architecture and more) in a popup window.
Untrust: Removes the browser's Trusted status (relevant when Adaptive Authentication is enabled).
Remove: Clears the browser from the list and removes it from the system, giving it the status of an unrecognized device (relevant when Adaptive Authentication is enabled).
Managing User Services
This tab lists all services to which the user is assigned. (The tab does not appear for users who are disabled in the Active Directory server.)
Clicking in the row of a service redirects you to another page where you can update the service settings.
The checkboxes on the left side of each row are toggles that allow you to control whether that service is currently enabled for the user. If the user is part of a Group, services assigned to the Group are automatically assigned to the user, and cannot be enabled / disabled for an individual user. (These services are indicated by a Group icon and disabled Assign checkboxes.) However, in order to enable management of a Group-assigned service for individual members, these services can also be assigned to specific users within the Group, as necessary.
In the example below, the AWS service is assigned to both a Group to which the user belongs (non-editable settings), and directly to the user (editable settings). The Jira and Dropbox services are assigned only to Groups of which the user is a member.
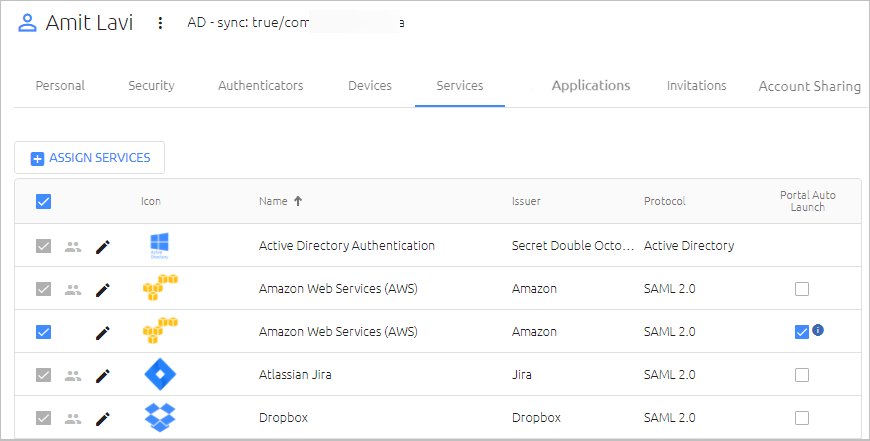
The Portal Auto Launch column, which is relevant only to SAML services, indicates whether the Auto Launch feature for that service is currently enabled for the user. (When the feature is enabled, the service opens automatically upon login to the User Portal.) You can enable or disable Automatic Launch for a user regardless of whether the Automatic Launch toggle is selected for the SAML service (in the Sign on tab of the service settings).
If the Auto Launch setting for a user differs from that specified in the service settings, the exception is indicated by an Information icon in the column. In the example shown above, AWS Auto Launch is enabled for this user, even though it is disabled for the Group and for the SAML service.
Note: To configure Automatic Launch, SSO must be enabled in the SAML service settings. If SSO is not selected in the service settings, the Portal Auto Launch checkbox is disabled.
To assign additional services to the user, click Assign Services. In the dialog that opens, specify the services to add by selecting the relevant checkboxes, and then click Save.
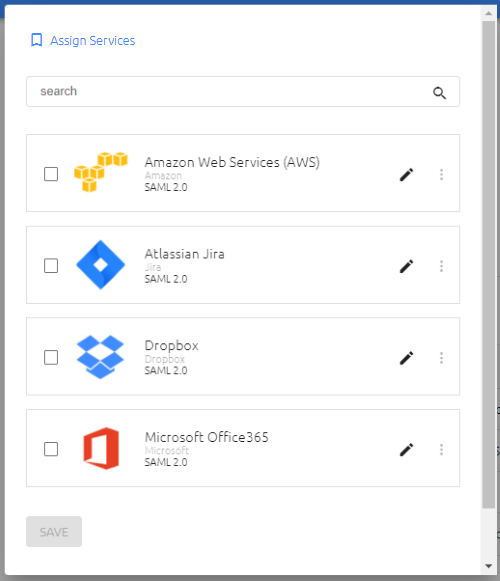
The services listed in the Assign Services dialog are ones to which the user is not currently assigned AND which may be used by directories to which the user belongs. If a service is not listed in the dialog, open the settings of the service and verify that the appropriate directory is selected in the Directories tab.
Managing User Applications
This tab lists integrated applications that the user is currently authorized to work with. The checkboxes on the left are toggles that allow you to control whether that application is enabled for the user. Clicking in the row of an application redirects you to another page where you can view and update settings for the application.
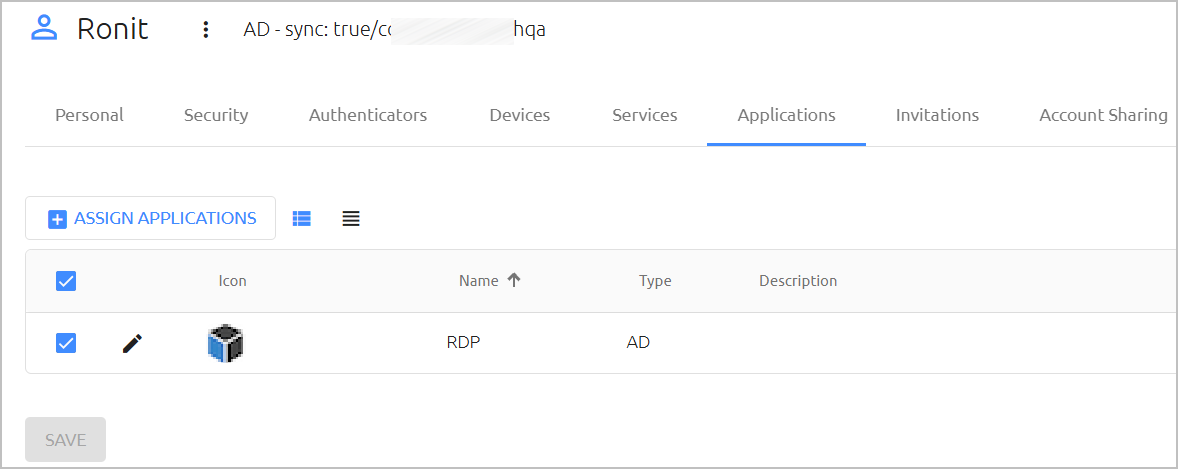
To assign applications to the user, click Assign Applications. In the dialog that opens, specify the applications to add by selecting the relevant checkboxes, and then click Save.
The services listed in the Assign Applications dialog are ones to which the user is not currently assigned AND which may be used by directories to which the user belongs. If an application is not listed in the dialog, open the settings of the application and verify that the appropriate directory is selected in the Directories tab.
Managing User Invitations
The Invitations tab lists all enrollment invitations sent to the user and details about each one, including its unique identifier, invitation type and time until expiration. The Status column shows the handling workflow for the invitation. This workflow is determined by whether the user is already published in the system or is new. Possible statuses are:
Waiting for Publish: The user has not yet been synced and published in the system. The invitation is being stored as a pending invitation and will be sent to the user as soon as the next Publish process completes successfully.
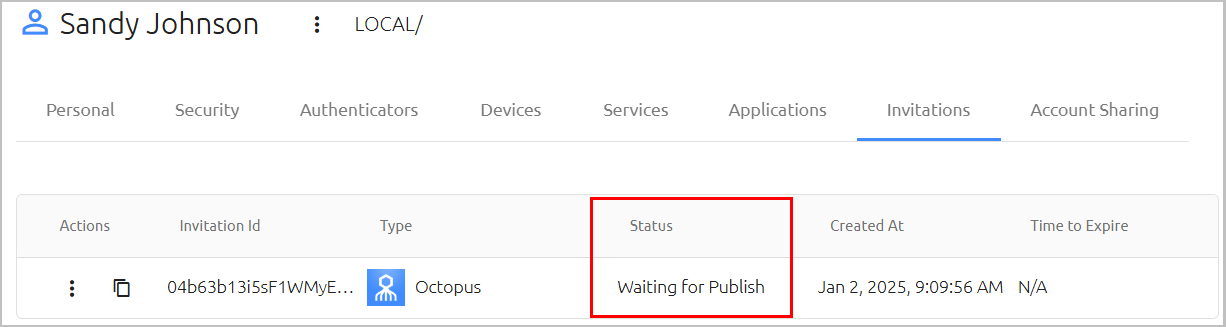
Active: The user is published in the system and the invitation has been sent.

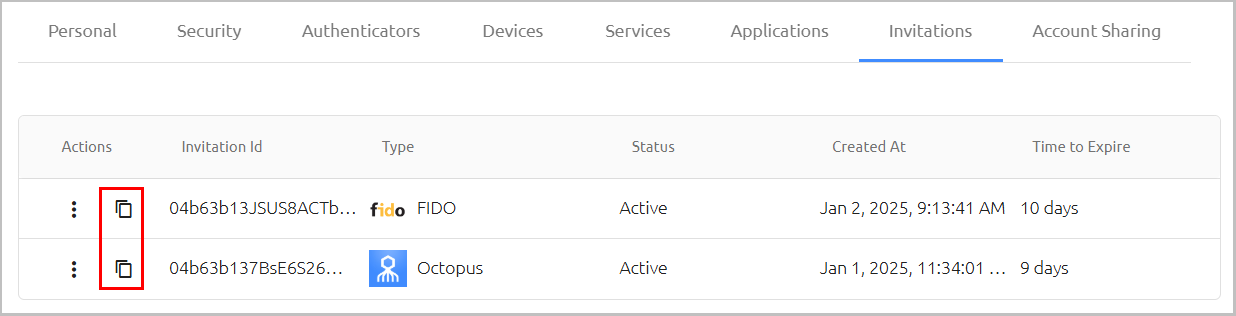
Clicking copies the invitation's enrollment link or code, according to invitation type:
Octopus type invitations: The Copy action copies the Invitation ID, which is then converted to the manual enrollment code provided in the invitation.
FIDO / OTP type invitations: The Copy action copies the link for registration provided in the invitation.
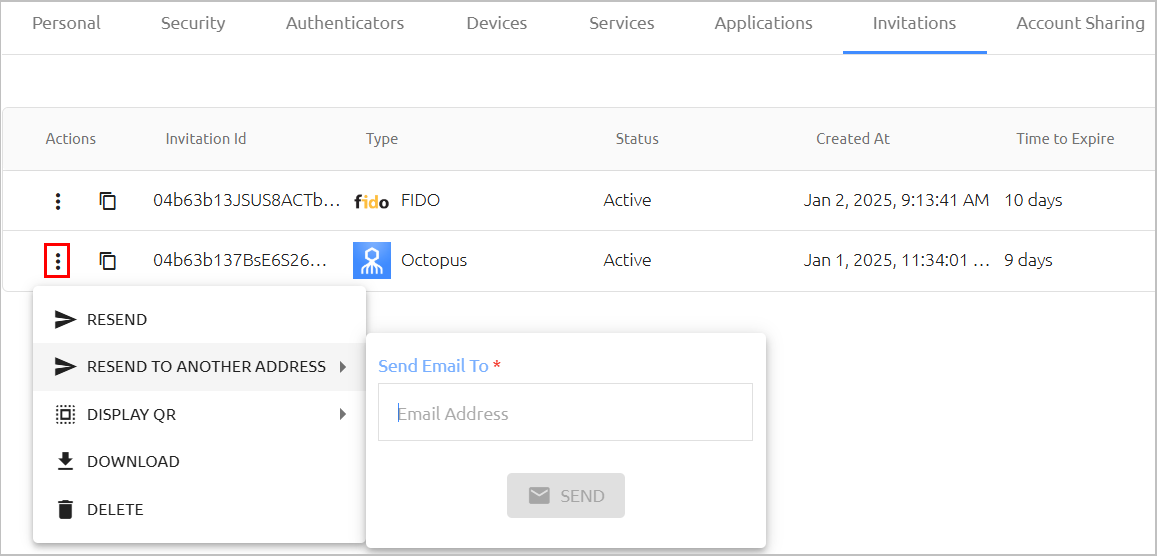
Clicking opens an actions menu for the selected invitation. The actions are:
Resend: Sends the invitation to the email address recorded in the system for the user (in the Personal tab of the user details).
Resend To Another Address: Sends the invitation to an email address other than the one recorded in the system. When selecting this option, enter the address in the field that opens, and then click Send.
Display QR: Shows the enrollment QR provided with the invitation. This action is relevant for Octopus type invitations only.
Download: Saves the invitation as an email file and downloads it to your machine.
Delete: Removes the invitation from the system.
Note: The Resend and Download actions are not available for invitations with a Waiting for Publish status.
Managing Shared Accounts
The Shared Account feature enables designated users to log into a generic account using their personal credentials and devices. Account sharing is particularly useful for the following scenarios:
- Specific groups of personnel (such as IT, DevOps, manufacturing floor workers, etc.) using a shared workstation
- Organizations with one web service account that is accessed by multiple users
Shared accounts are easily identified on the Users list by a special icon. Alternatively, you can filter the entire list for shared accounts. In addition, we recommend naming the account according to the specific shared use case, e.g., Machine 3, Salesforce Account, etc.

To manage a shared account, click the Edit (pencil) icon to open the user details and select the Account Sharing tab. The Enable sharing toggle button activates and disables account sharing. To allow users to log into the shared account, click Add and select the relevant user(s) from the dialog that opens.
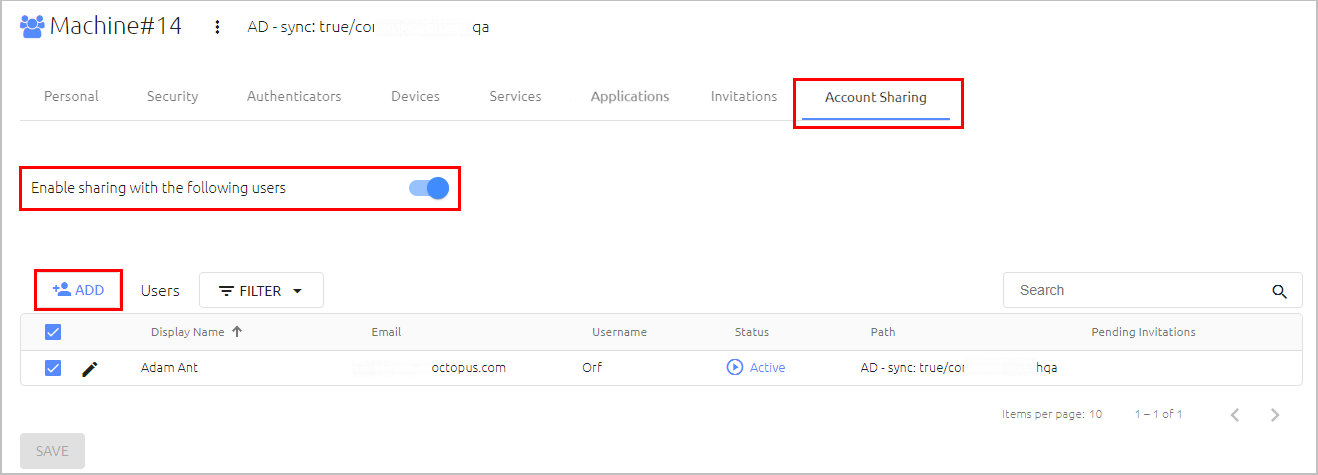
Once users are added, you can temporarily block their access to the account when required, by clearing the checkbox in the row of the relevant user(s).
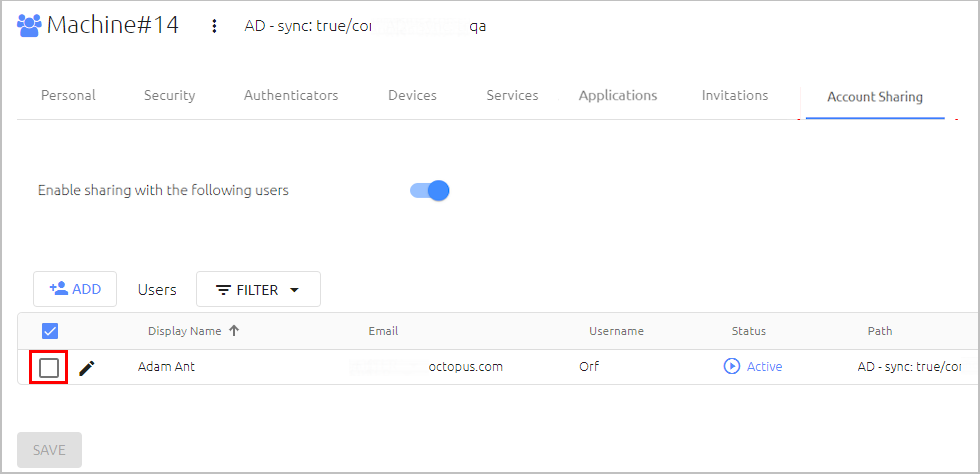
You can also temporarily disable account sharing when necessary by deselecting the Enable sharing toggle. The list of approved users will remain intact while sharing is disabled, so you can quickly and easily reactivate account sharing with those users.
In the Auditing menu, two users are recorded for the event of login to a shared account - the user who performed the login, and the shared account user. For example:
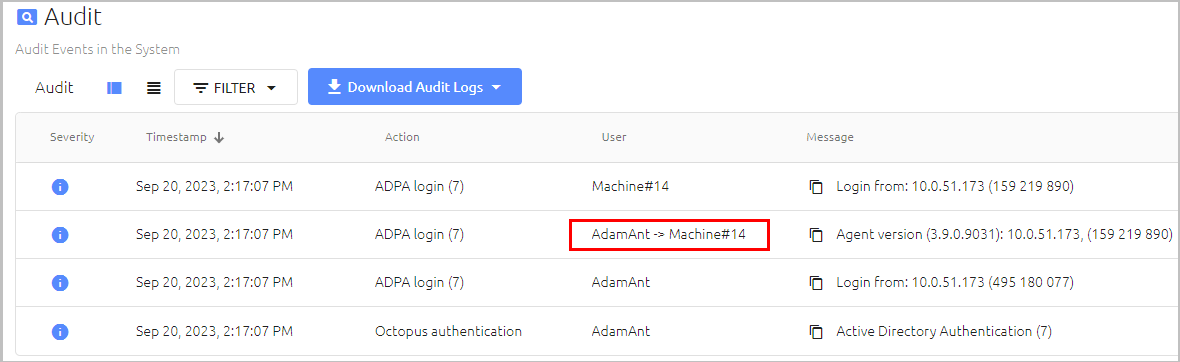
IMPORTANT: Shared account support for workstations requires integration with the Windows Agent (version 3.9 or higher) and configuration of some settings in the Windows MSIUpdater client. For details, refer to the Octopus Desk for Windows Installation Guide.
Shared account for web services is supported for WS-Fed services and all SAML services. For details about required configurations, refer to the Configuring Shared Account Support for Web Services section of the Services article.
The Local directory is a default, internal directory that cannot be deleted. It is useful for organizations that do not manage users through external directories.
You can add users to the Local directory by either creating them manually (by clicking Add User), or by uploading them from a CSV file (by clicking Import Users).
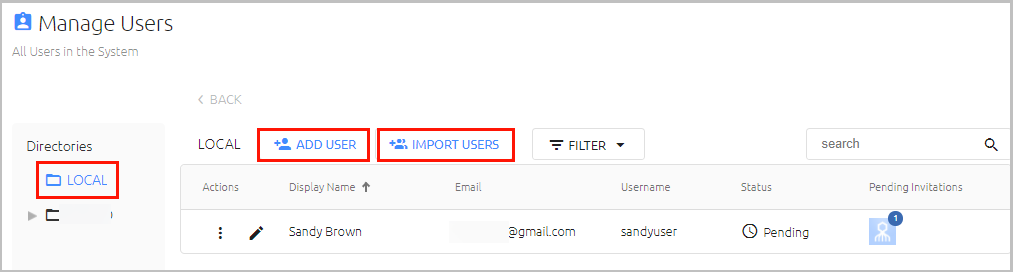
The Add User button enables you to create a new Local user.
To add a Local user manually:
From the Manage Users menu, select the LOCAL directory from the Directories list. Then, click Add User.
In the dialog that opens, enter the user's first name, last name, email and username in the appropriate fields. If desired, enter the user's mobile number in the Phone Number field (this setting is not required).
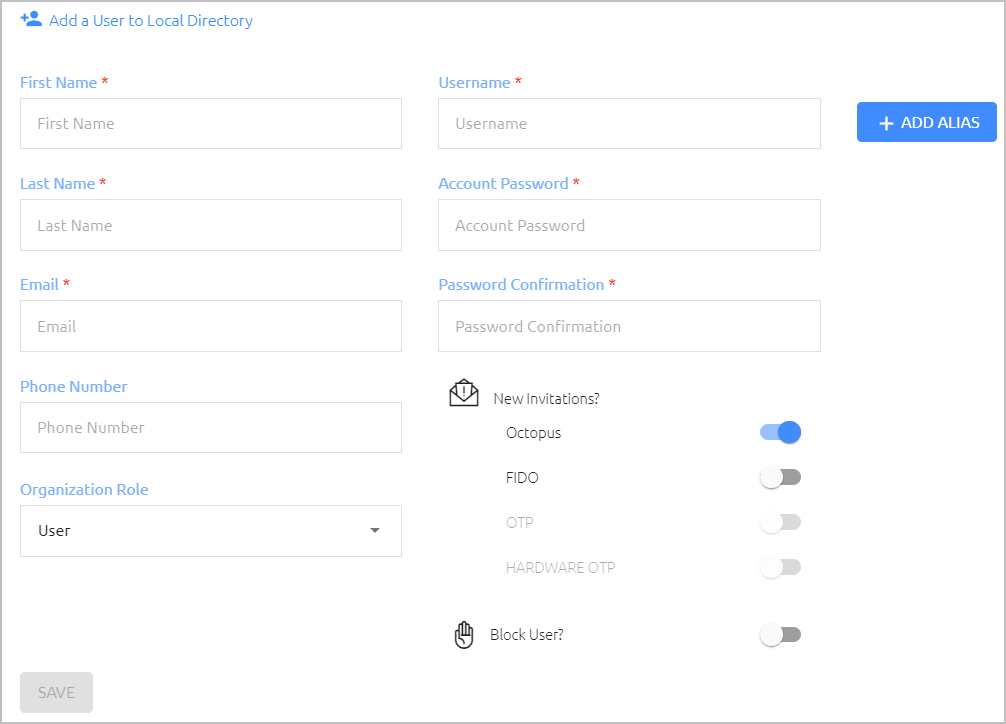
By default, a role of User is assigned. To assign a different role, open the Role in the Organization list and select one of the following options:
Auditor: Has read-only permissions in the Octopus Management Console.
Helpdesk: Has authorization to update user-related settings, such as setting passwords, generation PIN codes, bypassing Octopus Authentication, and unblocking user workstations. Directory synchronization may also be performed. All other Management Console settings are read-only.
Admin: Has authorization to view and update all settings in the Octopus Management Console.
If relevant, set an Account Password for the user, and re-enter it in the Password Confirmation field.
The password must contain 8-32 characters and include at least one uppercase letter, one lowercase letter, one number and one special character.
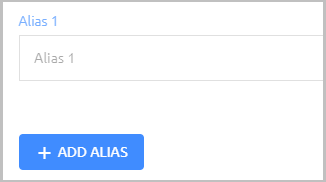
If you would like to add other details for the user (e.g., an additional email address), click Add Alias and enter the relevant detail in the field. You may add up to 20 Alias fields.
Review the following settings:
Send Invitations: By default, an enrollment email for the Octopus Authenticator is sent, prompting the new user to activate the account. To send invitations for additional authentication types, enable the relevant toggle buttons. If you do not want invitations to be sent, make sure the relevant toggle buttons are disabled. If you block the user (see below), the invitation buttons are automatically disabled.
Block User : By default, when new users activate an account they will be able to authenticate immediately. To block this behavior, click the toggle button to enable the Block feature.
At the bottom of the page, click Save.
The user is added, and a summary of user details is displayed.
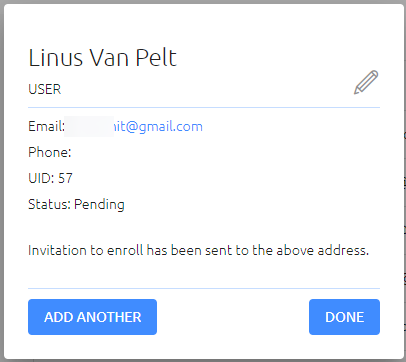
To change user details or perform other actions on the user, click
 .
.To create another user, click Add Another. To close the dialog and return to the Users list, click Done.
The Import Users button enables you to add Local users in a bulk operation by uploading user details from a import file. You can create your own import file based on the template provided, or use a file exported from Microsoft Office 365 or Google G Suite.
To import Local users from a CSV file:
From the Manage Users menu, select the LOCAL directory from the Directories list. Then, click Import Users.
The Import Users to Local Directory dialog opens.
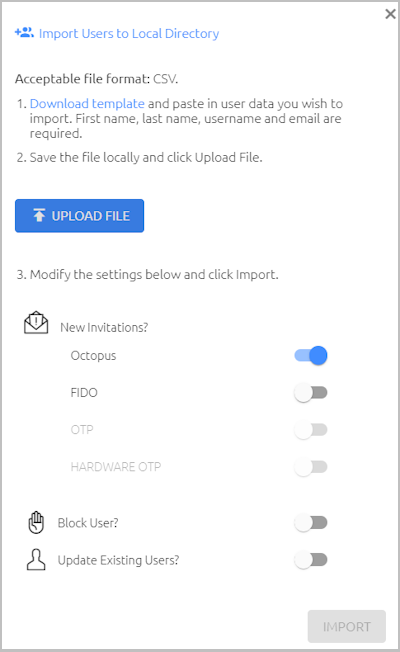
If you are using a file exported from Office 365 or G Suite, skip to Step 3.
To prepare your import file, click Download template and open the file to view the required syntax of the column headers. You may paste user details directly into this file. First and last name, username and email parameters are required for each user. All other details are optional.
After preparing the file, save it locally.
Click Upload File. Navigate to the relevant import file and then click Open.
Review the following settings and enable/disable the toggle buttons as required:
Send Invitations: Determines whether imported users will receive enrollment invitations by email. The default setting is that users receive an invitation to enroll for the Octopus Authenticator. To send invitations for additional authentication types, enable the relevant toggle buttons. If you do not want invitations to be sent, make sure the relevant toggle buttons are disabled. If you block users (see below), the invitation toggle buttons are automatically disabled.
Block Users: Determines whether imported users will be prevented from authenticating with Octopus Authenticator, FIDO key or OTP. The default setting is Disabled (users will be able to authenticate).
Update Existing Users: Determines whether user data is overwritten in the event that imported users are already in the system. The default setting is Disabled (user details are not overwritten).
To start the import, click Import.
When the import is complete, the Import Summary is displayed. The summary shows how many users were successfully imported, and how many failed to be imported. Click the information icons to view more details.
To perform an additional import, click Import More. To close the dialog and return to the Users list, click Done.
The Import Users feature enables you to add users to the Management Console in a bulk operation. Use this feature to import selected users from a directory that is integrated with the Management Console but does NOT have automatic syncing of users.
To import users from an integrated directory:
From the Manage Users menu, select the relevant directory from the Directories list. Then, click Import Users.
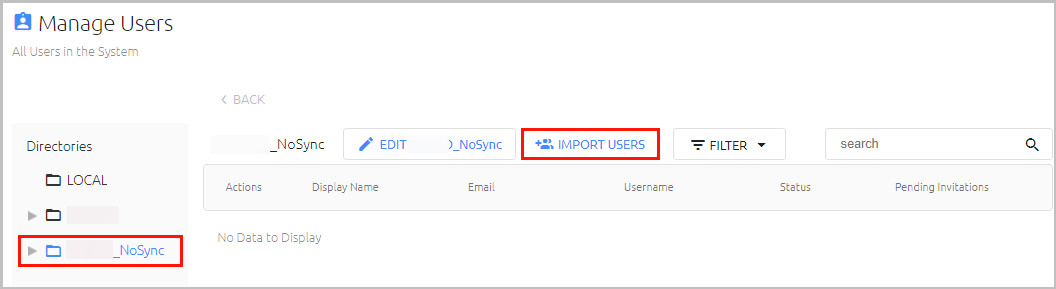
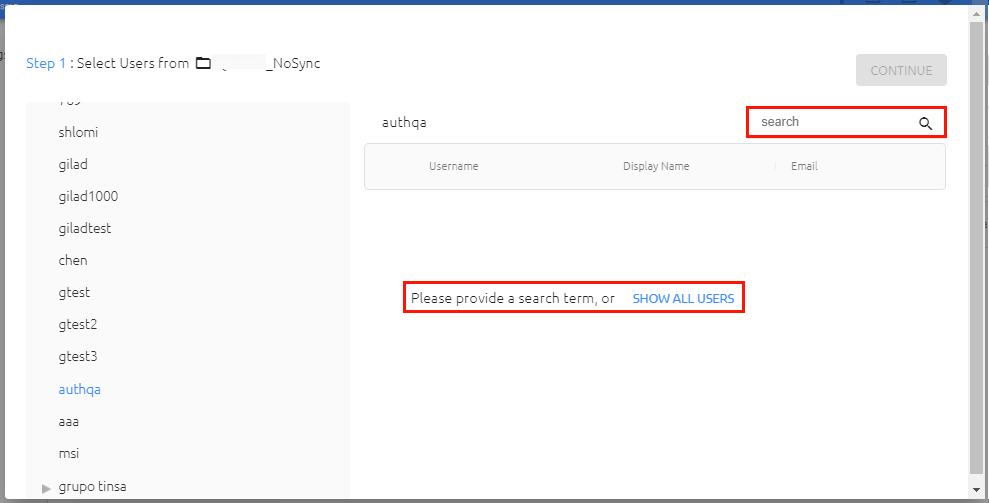
In the dialog that opens, expand the directory tree and select the node from which you want to import users. You will then be prompted to search for users, or to display all users by clicking Show All Users.
From the list that is displayed, select the checkboxes of the users you want to import.
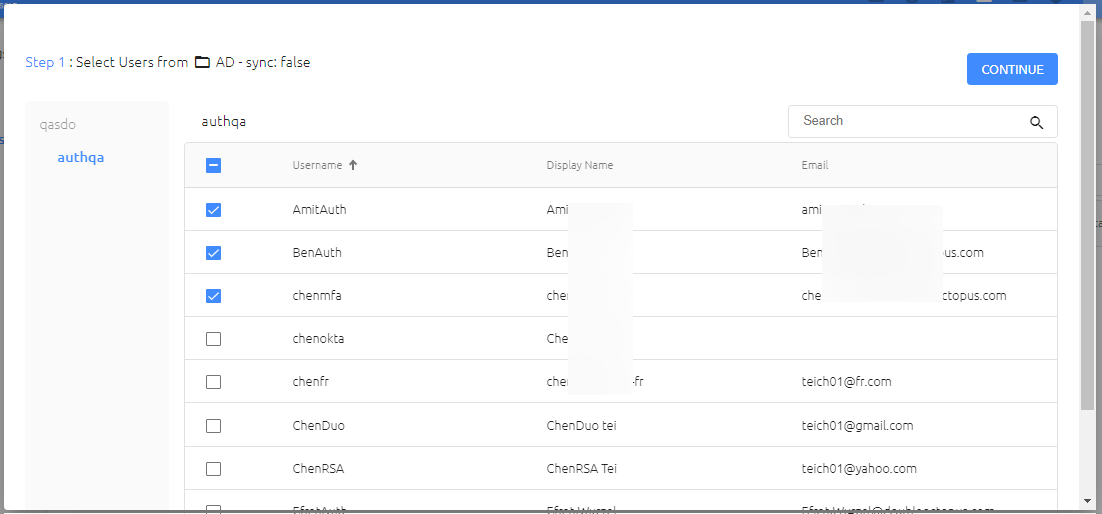
When you have finished selecting users, click Continue.
Review the following settings and enable/disable the toggle buttons as required:
Send Invitations: Determines whether imported users will receive enrollment invitations by email. The default setting is that users receive an invitation to enroll for Octopus Authenticator. To send invitations for additional authentication types, enable the relevant toggle buttons. If you do not want invitations to be sent, make sure the relevant toggle buttons are disabled. If you block users (see below), the invitation toggle buttons are automatically disabled.
Block Users: Determines whether imported users will be prevented from authenticating with Octopus Authenticator, FIDO key or OTP. The default setting is Disabled (users will be able to authenticate).
Update Existing Users: Determines whether user data is overwritten in the event that imported users are already in the system. The default setting is Disabled (user details are not overwritten).
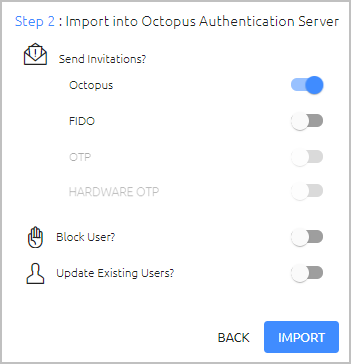
Then, click Import.
When the import is complete, the Import Summary is displayed. For example:
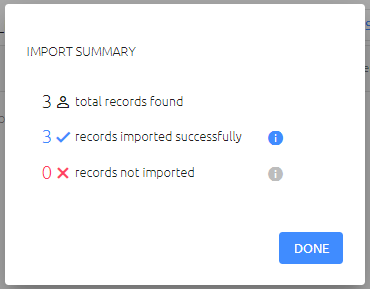
Click the information icons to view more details.
To close the dialog and return to the Users list, click Done.
Adding Users to a Federated Entra ID Directory
The Create User action enables you to add a user to an Entra ID directory type that supports 0-365 federation. The new user is added directly to the remote Entra ID directory. After creating the user, you will need to perform directory sync or directory import to add the user to the Octopus platform.
To add a user to a federated Entra ID directory:
- From the Manage Users menu, select the relevant Entra ID directory. Then, at the top of the page, click Create User.
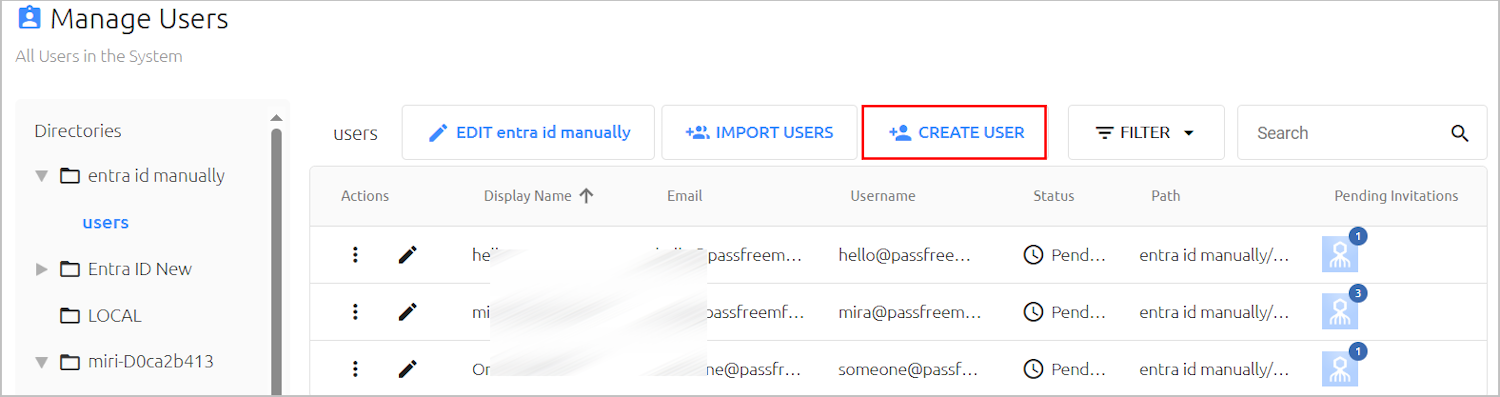
The Create a User wizard opens.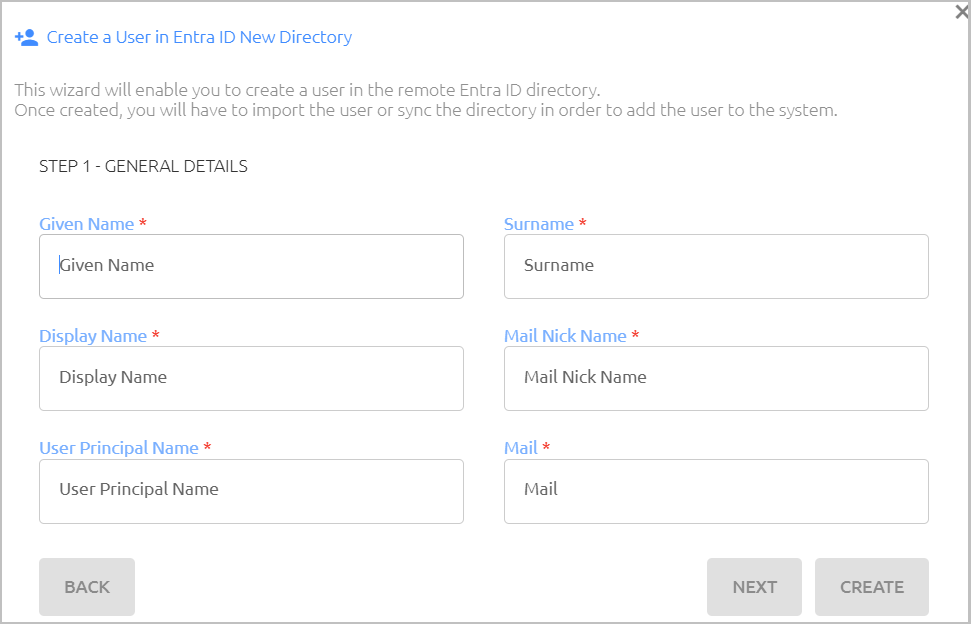
Complete all settings on the first page of the wizard (all are mandatory). When entering the UPN, verify that the federated domain name is used.
When all settings have been entered, the Next and Create buttons are enabled.
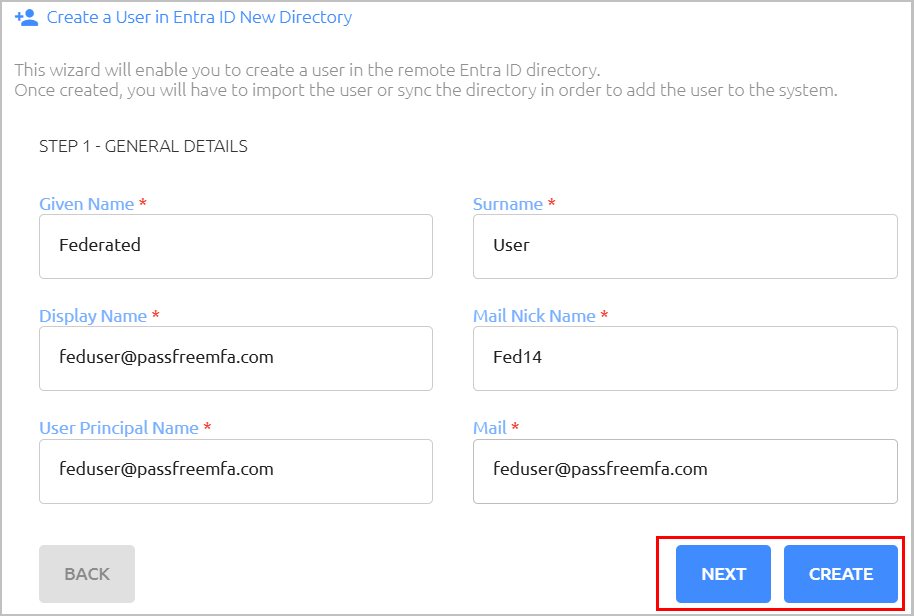
To create the user at this point, click Create and skip to Step 7 below.
Alternatively, click Next to add more information.On the Employee Details page of the wizard, complete optional data such as employee ID, phone number, etc.
To create the user at this point, click Create and skip to Step 7 below.
Alternatively, click Next to add more information.One the Address page of the wizard, enter street address details for the user. (All settings are optional.)
Then, click Next or Create.On the Summary page of the wizard, review all configured settings. If you need to correct data, click Back to navigate to the relevant page.
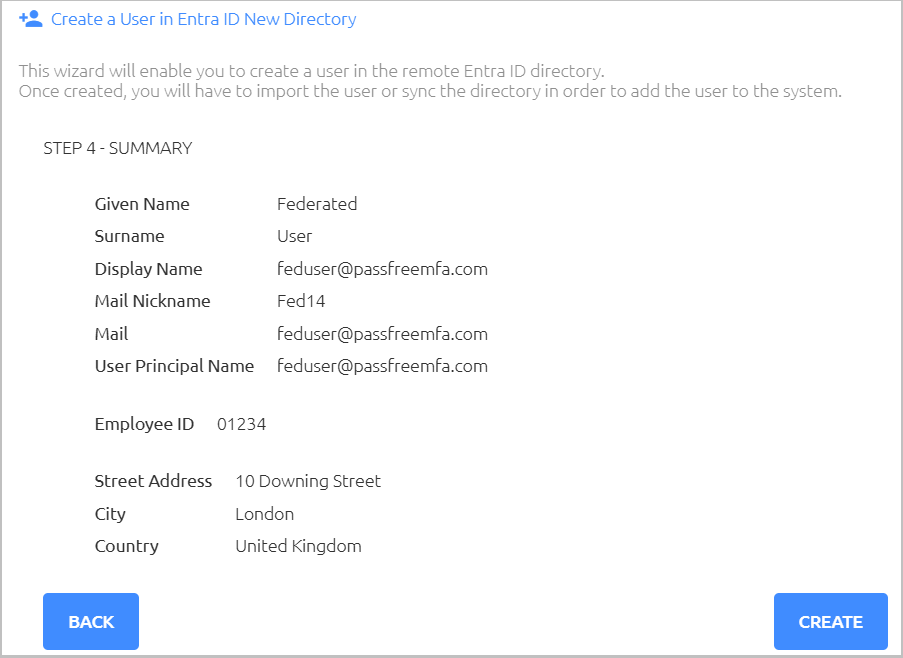
IMPORTANT: Check all information carefully. Once the user is created, details can be updated using native Microsoft tools only.Click Create.
When the user is successfully added, a confirmation message is displayed with a unique identifier for the new user.
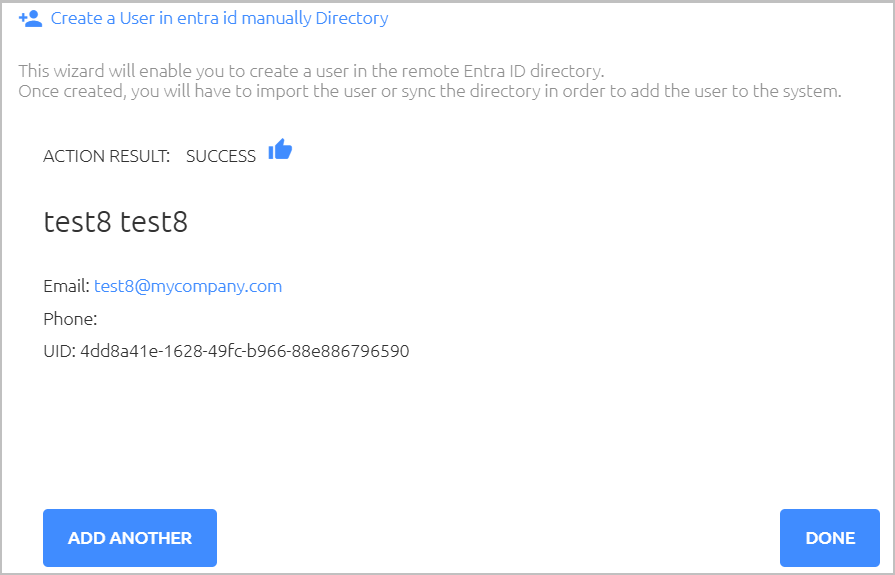
To create an additional user, click Add Another. To close the dialog and return to the Users list, click Done.
When all users have been created, add them to the Octopus platform using the relevant method:
If the Entra ID integrated directory has automatic syncing enabled, click Sync Users.
If the Entra ID integrated directory does not have automatic syncing, click Import Users to add the users manually.