The Remote AD connects the cloud-based Octopus Management Console with a corporate on-premise Active Directory. In addition, the Management Console supports integration with Entra ID, ForgeRock, ForgeRock Cloud, Google, Okta, and Oracle/Open LDAP directory types. You can configure integration with more than one directory type.
Directory integration provides the admin with simple user management capabilities when users are synced directly from one of the selected directory types. For example, when integration is done with an Active Directory (AD), all user and group management can be done directly in the AD, and the changes are then synced to the Octopus Authentication Server.
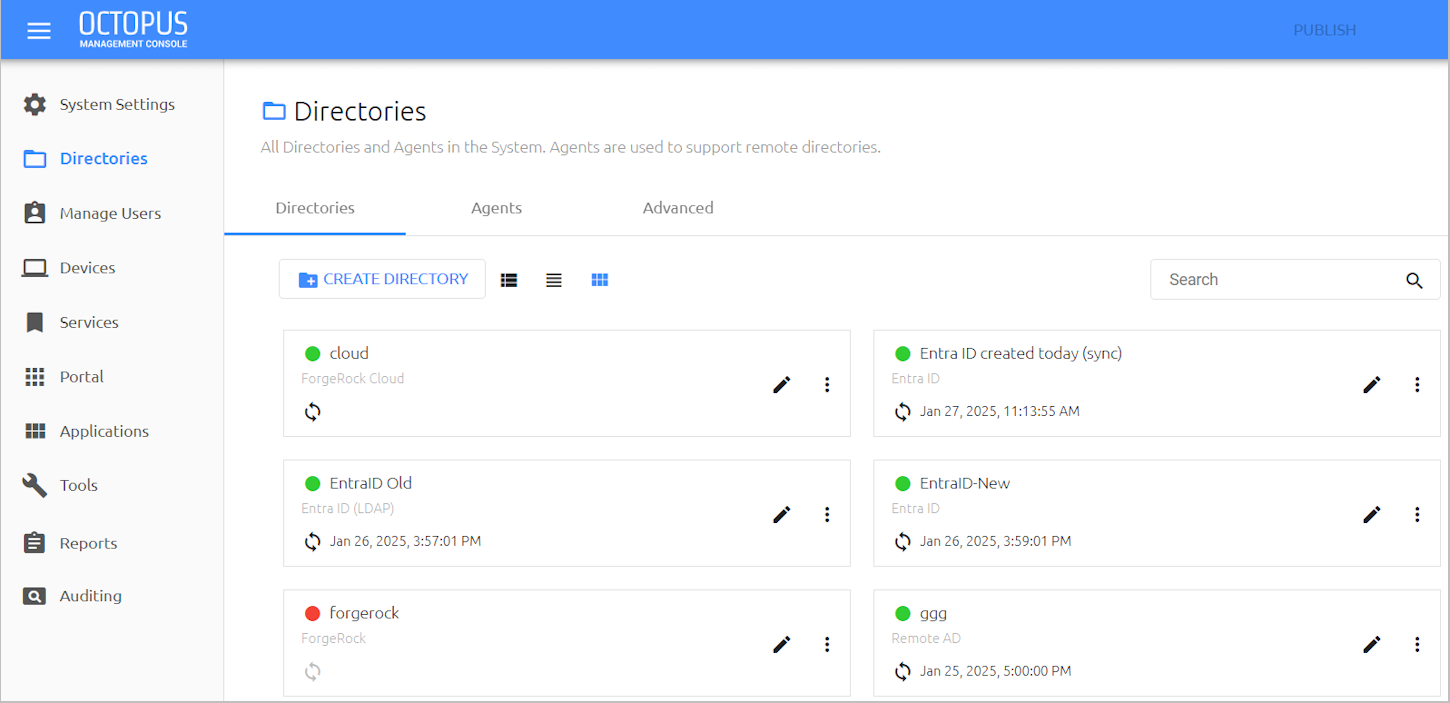
The Directories menu of the Octopus Management Console lists all integrated corporate directories and displays general information about each one.
The following topics present details about working with directories:
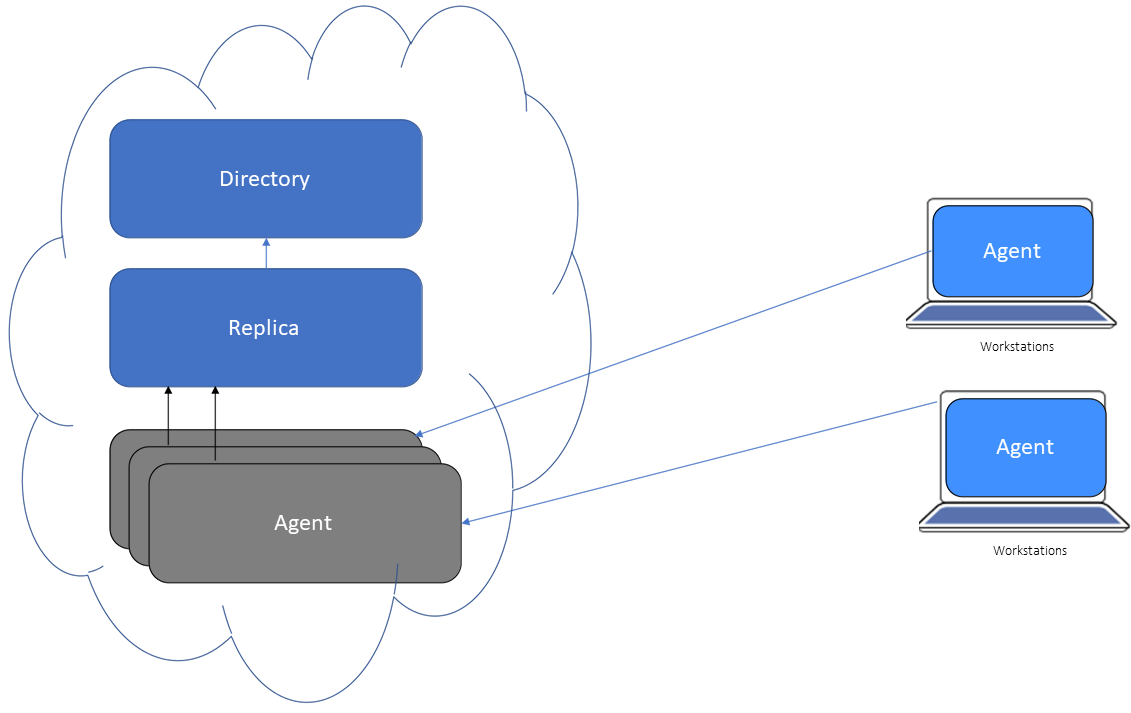
A Remote AD connects the cloud-based Octopus Management Console with a corporate on-premise Active Directory. The Remote AD contains a local Replica that represents the domain and a specified Base DN of the on-premise AD. The Replica is updated by means of a Remote AD Agent which is installed on a domain-joined on-premise Windows server or workstation.
Each Remote AD can work with only one Replica, but that Replica can be connected to multiple Agents.
The following sections describe how to create and work with Remote AD components:
In order to create a Remote AD directory, an Agent and a Replica need to be defined in the Management Console. If you try to create a Remote AD directory without first adding an Agent, the following popup opens:
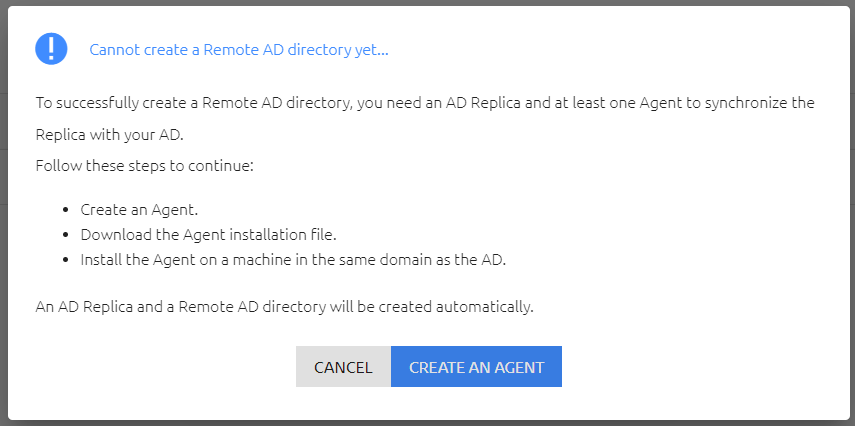
The best practice for adding the initial Remote AD is to create an Agent and install it on a domain-joined machine (as summarized in the procedure below). The Replica and Remote AD are created as part of the Agent installation process.
IMPORTANT: Minimum hardware requirements for Remote AD installation are a single-core CPU, 500 MB disk space, and 4 GB RAM.
To add a Remote AD by creating and installing a Remote AD Agent:
From the Directories menu, select the Agents tab and click Create Agent.
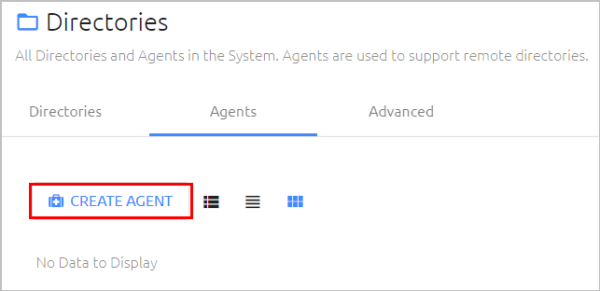
In the popup that opens, enter a name for the Agent and then click Create.
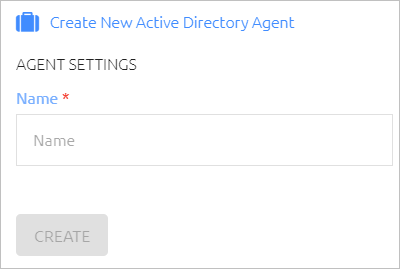
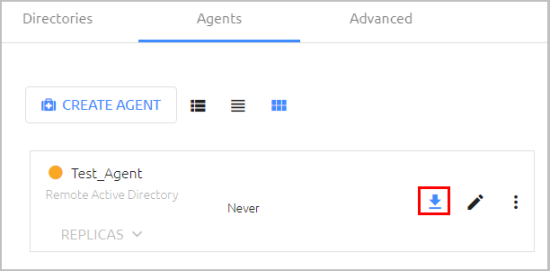
The new Agent is listed in the Agents tab.
Click the Download icon to download the Agent installation file.
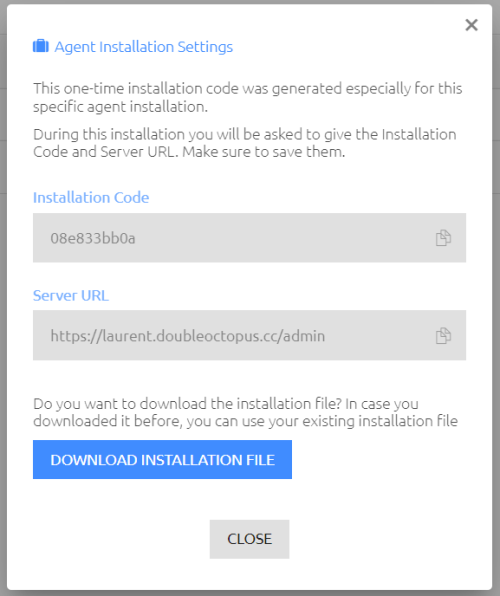
In the popup that opens, copy the Installation Code and Server URL to a secure location. (You will need them later, during the installation process.) Then, click Download Installation File.
Run the installation file on a Windows server or workstation in the same domain as the AD. For full details about the installation wizard, refer to the Octopus Remote AD Agent Installation Guide.
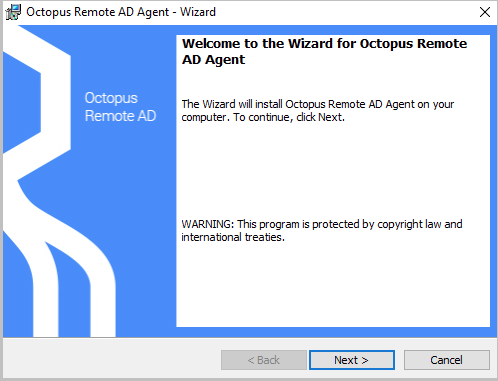
When the Agent is successfully registered, the directory is created and listed in the Directories tab.
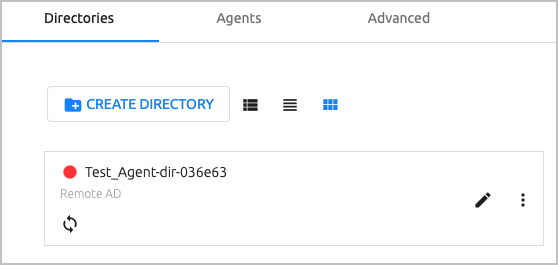
Once at least one Agent and Replica are added to the system, you can create a Remote AD using the Create Directory feature.
To add a Remote AD using the Create Directory feature:
Verify that your environment contains at least one Agent and one Replica. (Check this by viewing the Agents tab and the Advanced tab.)
At the top of the Directories tab, click Create Directory.
The Select Directory Type dialog opens.
Open the Directory Type list and select Remote AD.
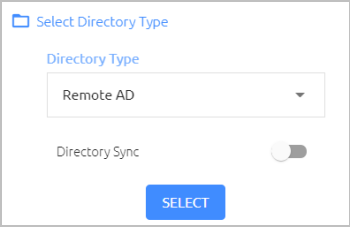
Click the Directory Sync toggle button to enable and disable automatic syncing.
IMPORTANT: You will NOT be able to change this setting after adding the directory.Click Select.
The Create New Remote AD Directory page opens.
In the Name field, enter a name for the Remote AD directory.
Open the Domain Replica list and select the Replica for the Remote AD. (All created Replicas are listed.)
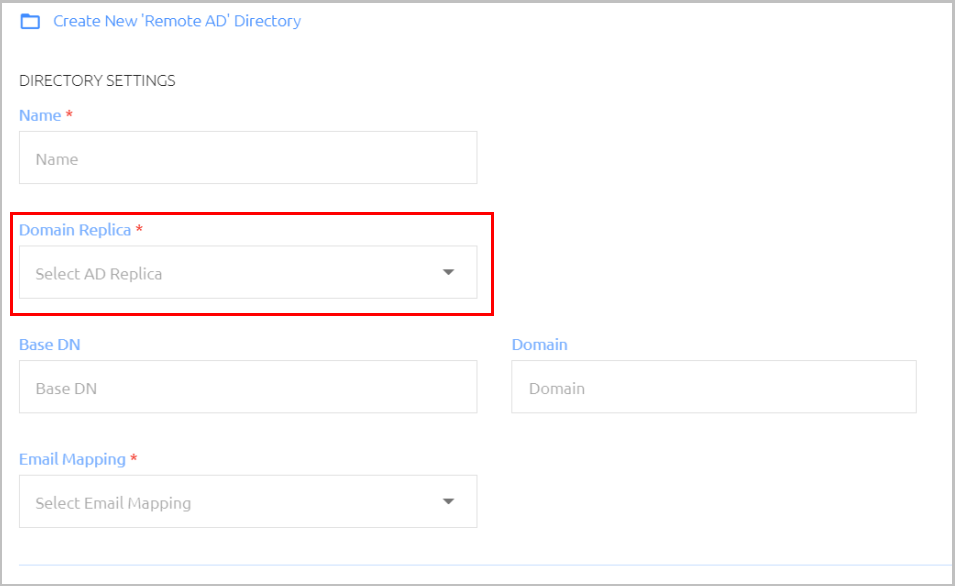
When a Replica is selected, the Base DN and Domain fields are populated automatically with the settings defined for that Replica.
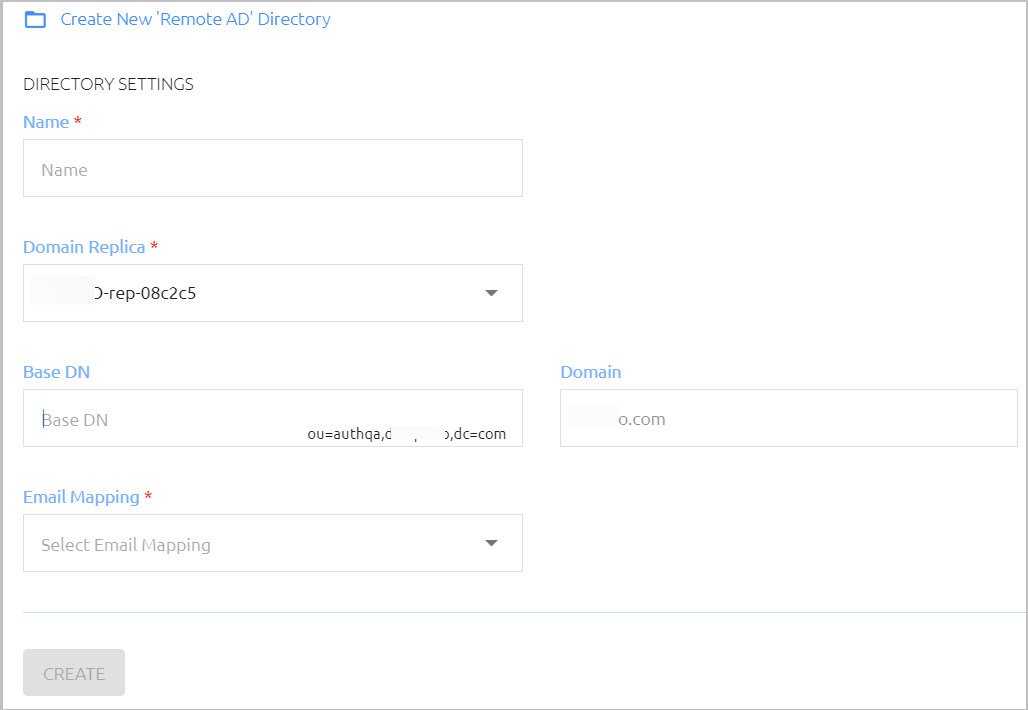
If relevant, update the Base DN. (The Domain is not editable.)
IMPORTANT: The Base DN must be a subset of (or match) the Base DN defined for the Replica.Under Email Mapping, select the source used to retrieve the emails of users (proxyAddresses or mail). Keep in mind that you will NOT be able to update this setting after creating the directory.
Click Create. Then, from the toolbar at the top of the page, click PUBLISH and publish your changes.
A Remote AD Agent updates the Replica of the Remote AD with the changes made in the on-premise AD. In order to sync data, the Agent needs to be installed on a domain-joined on-premise machine. (For details, refer to the Octopus Remote AD Agent. Installation Guide.)
The Agents tab lists all created Agents (installed and uninstalled) and enables you to perform administrative actions on them. The following information is provided about each Agent:
Name
Domain, version and installation date and time (for installed Agents)
Replicas connected with the Agent (if relevant). Click REPLICA to view Replica names.
Connectivity status:
Green indicator: Agent is installed and connected.
Red indicator: Agent is installed but not currently connected.
Orange indicator: Agent has been created / downloaded but has not yet been installed.
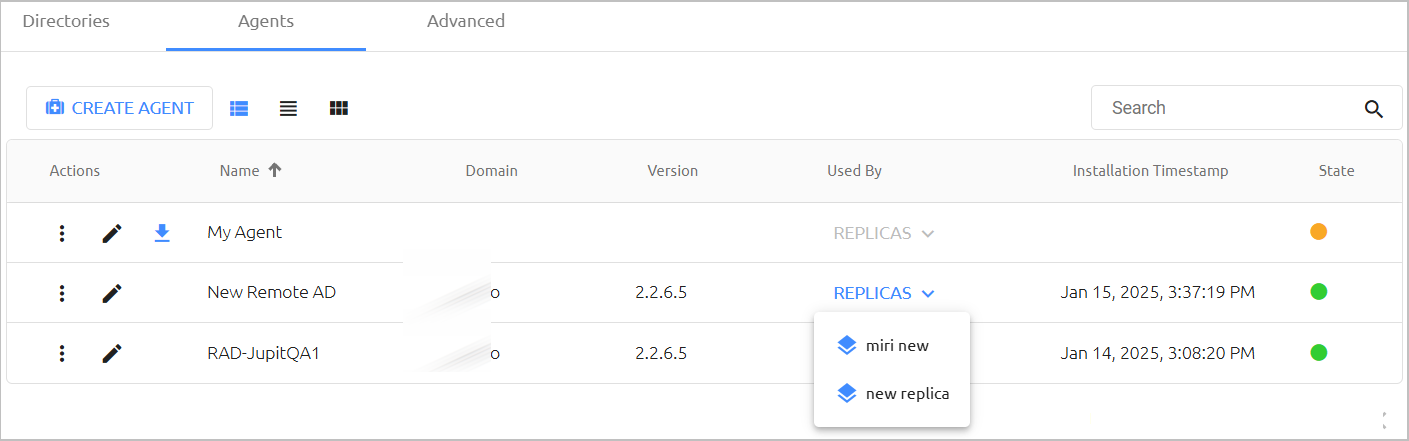
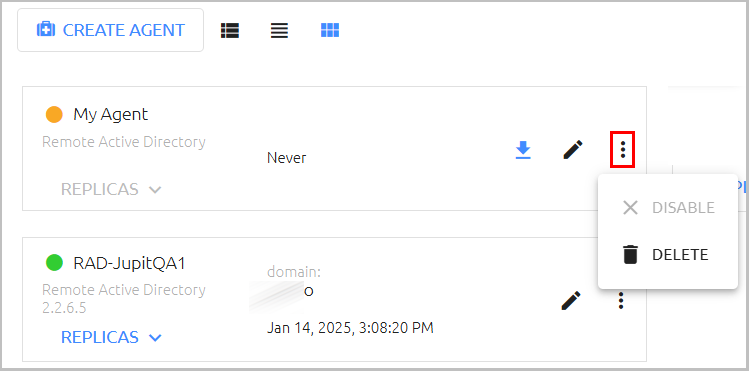
You can perform the following actions from the Agents tab:
Disable / Enable: Inactivates or reactivates an installed Agent. (This action is not available for uninstalled Agents.) To perform the action, click
 and select Disable (or Enable). When disabling an Agent that is used by one or more Replicas, you need to confirm the action from a popup warning.
Delete: Removes the Agent from the system. To perform the action, click
and select Delete.Agents that are being used by one or more Replicas cannot be deleted.
The  icon appears in the cards/rows of uninstalled Agents. Clicking the icon opens a popup from which you can copy parameters required for installation and download the installation file.
Viewing Agent Settings
Clicking  in the card or row of an Agent opens the Agent Settings page, where you can change the name of the Agent. Enter the new name in the Name field, and then click Save.
The other settings for installed Agents cannot be updated. The settings displayed include the name and IP of the machine on which the Agent is installed, as well as domain, version and installation time.
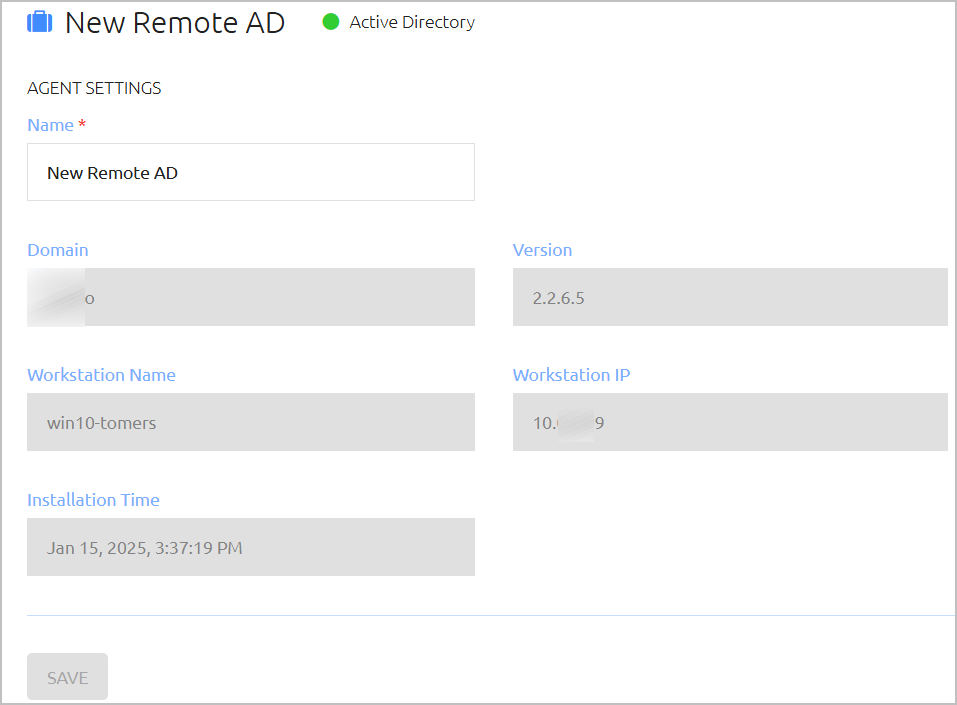
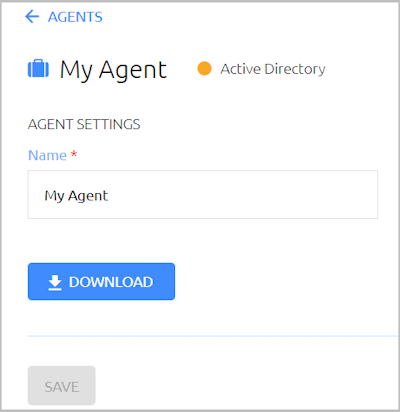
If the Agent has not yet been installed, the Agent Settings page has a Download button that allows you to download the installation file. For more details about the Download action, refer to Performing Actions on Agents (below).
A Replica represents the domain and a specified Base DN of the on-premise AD. The Replica is updated by means of a Remote AD Agent. A Remote AD can work with only one Replica, but a Replica may be connected to multiple Agents.
The Advanced tab lists all defined Replicas and allows you to manage them. The following information is provided for each Replica:
Name
Domain, Base DN and installation date and time
Directories connected with the Replica (if relevant). Click Directories to view directory names.
Current connection status (green or red indicator)
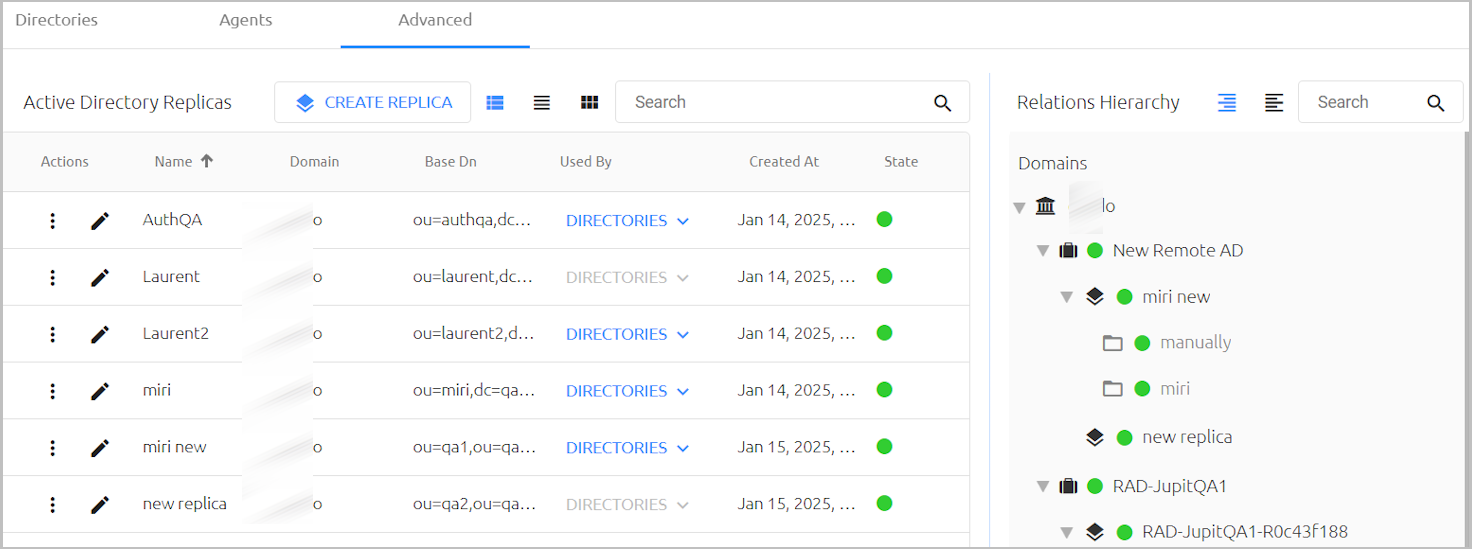
You can perform the following actions from the left side of the Advanced tab:
Disable / Enable: Inactivates or reactivates a Replica. To perform the action, click
and select Disable (or Enable). When disabling a Replica that is used by one or more directories, you need to confirm the action from a popup warning.Delete: Removes a Replica from the system. To perform the action, click
and select Delete.Replicas that are being used by one or more directories cannot be deleted.
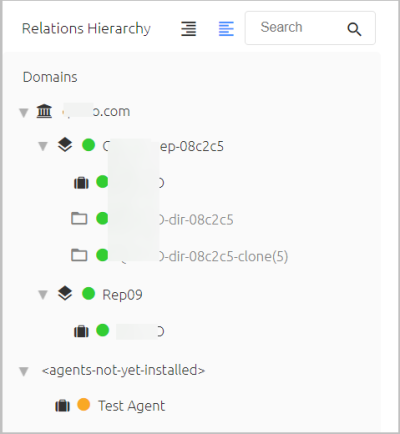
The right side of the Advanced tab displays a tree showing the relationships between the Agents, Replicas and directories in each domain. You can view the Replicas connected to each Agent (as in the example above) or the Agents connected to each Replica (as in the figure below).
Adding Replicas
Adding a new Replica involves naming the Replica and specifying the domain and Base DN. Every Replica needs to have a unique name and Base DN.
To add a Replica:
At the top of the Advanced tab, click Create Replica.
The Create New AD Replica dialog opens.
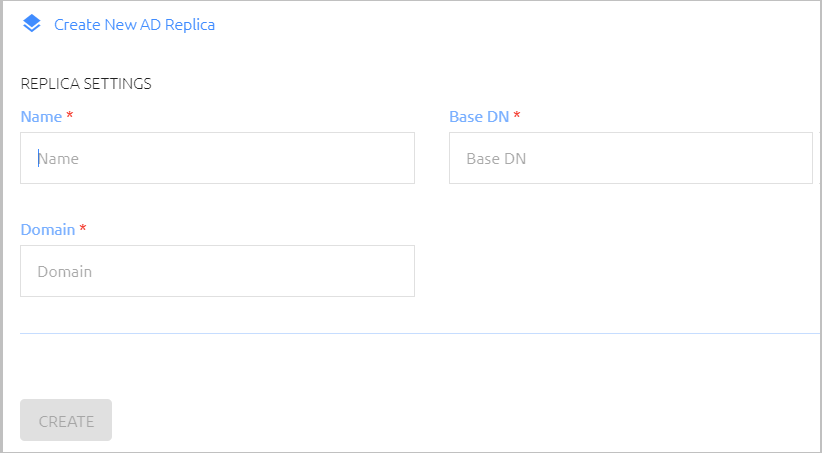
Enter the following settings:
Name: Unique name by which the Replica is known.
Base DN: The distinguished name from which the Replica will start the sync.
Domain: The IP address or NetBIOS domain name of the domain.
Click Create.
The Details page for the new Replica opens. For more information, refer to Viewing and Updating Replica Details (below).
Viewing and Updating Replica Details
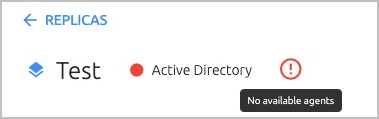
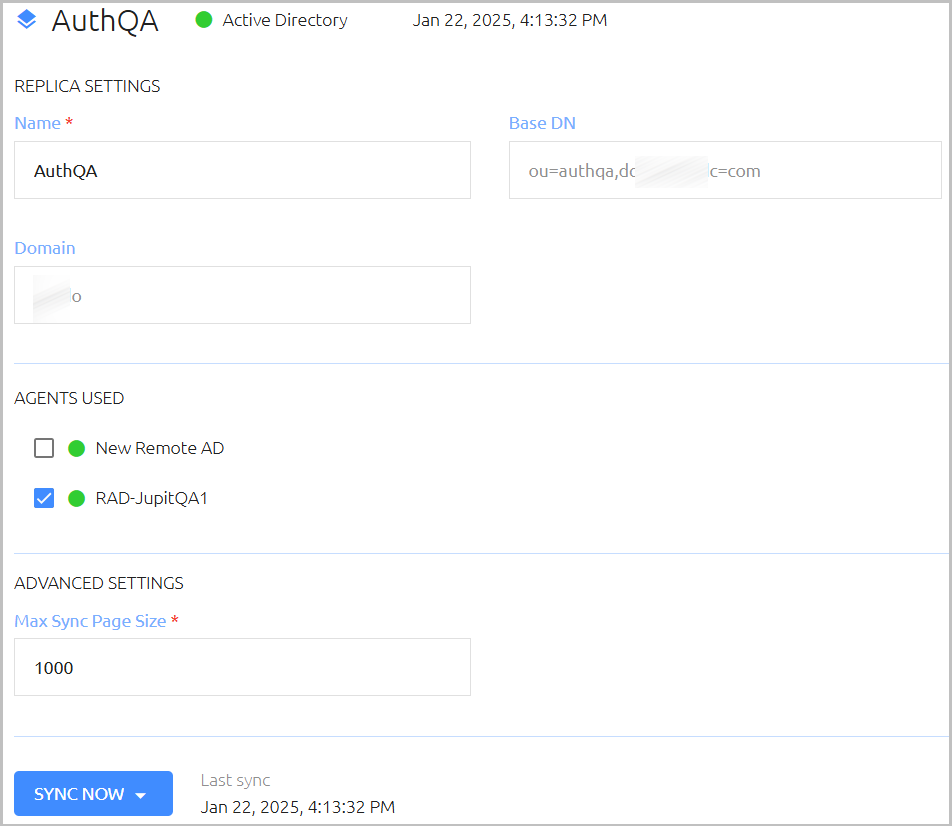
Clicking  in the card or row of a Replica opens a page containing additional details about the Replica. The name, timestamp of last sync (if relevant) and status (green or red indicator) of the Replica appear at the top of the page. A red indicator, which is accompanied by a warning icon, can be caused by any of the following issues:
No Agents have been created.
There is no Agent assigned to update the Replica.
The Replica is having connection issues.
Hover over the warning icon to view a tooltip describing the issue.
The following settings and functions are available on the Replica details page:
Replica Settings: The name, Base DN and domain of the Replica. The name may be updated. The Base DN and domain are not editable.
Agents Used: Select the checkbox(es) of the Agent(s) used to update the Replica.
Advanced Settings: The following settings appear in directories with automatic syncing enabled:
Max Sync Page Size: Pagination is set when adding users from the directory to Octopus Authenticator. Page size affects the number of records that can sync with the Active Directory. A small page size can lead to multiple calls to the AD.
Sync Now: Click to initiate a directory sync.
After updating settings, click Save.
Adding a New Directory
The Octopus Management Console supports integration with multiple directory types. When adding directories, keep the following points in mind:
- Upon creating a directory, you will need to decide whether or not to enable automatic directory syncing. When this feature is enabled, Groups and users are synced automatically with the directory, and the users list is updated regularly according to the schedule that you specify as part of the directory's settings. When automatic directory syncing is NOT enabled, after adding the directory you will need to select users from the folders within the directory and manually import them.
- If you integrate multiple directories that contain one or more identical user objects, the Authentication Server will work with the settings of the user object that is enabled. In the event that a user is enabled in two (or more) directories, the Authentication Server will select the directory that was integrated with Secret Double Octopus first.
Oracle/Open LDAP and ForgeRock
To add a new Oracle/Open LDAP or ForgeRock directory:
At the top of the Directories menu, click Create Directory.
The Select Directory Type dialog opens.
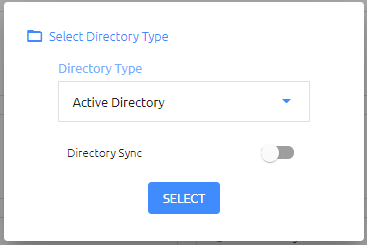
Open the Directory Type list and select the type of directory that you want to add.
Click the Directory Sync toggle button to enable and disable automatic syncing.
IMPORTANT: You will NOT be able to change this setting after adding the directory.Click Select.
The Create New Directory page opens. For example:
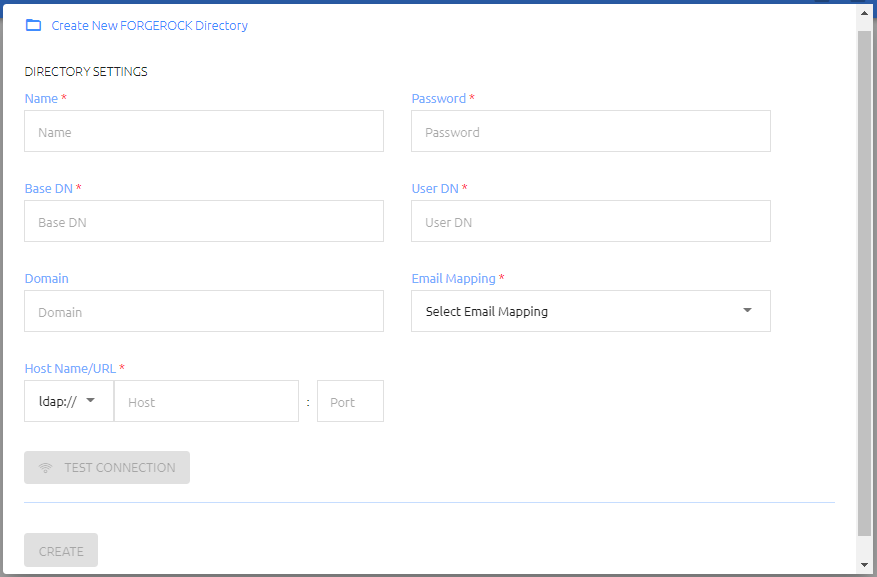
Configure the following Directory Settings:
Name: Name by which the directory is known.
Password: The password for the administrative user account.
Base DN: The distinguished name of the directory from which users will be added to Octopus Authenticator. If you want to add only a specified set of users, enter the relevant node(s) of the directory.
User DN: The username and distinguished name of the administrative user account that allows access to import from the directory.
Domain: The IP address or NetBIOS domain name of the domain.
Email Mapping: The field in the corporate directory used to retrieve the emails of users. Select the mapping source from the list. Keep in mind that you will NOT be able to update the mapping source after directory settings are saved.
Host Name/URL: Select LDAP or LDAPS. Then, in the Host field, enter the FQDN of the domain. In the Port field, enter 389 for LDAP or 636 for LDAPS.
Certificate: If you are using LDAPS, click Upload Certificate and select the relevant certificate file.
Click Test Connection to perform a validity check.
At the bottom of the page, click Create. Then, from the toolbar at the top of the page, click PUBLISH and publish your changes.
ForgeRock Cloud
To add a new ForgeRock Cloud directory:
At the top of the Directories menu, click Create Directory.
The Select Directory Type dialog opens.
Open the Directory Type list and select ForgeRock Cloud.
.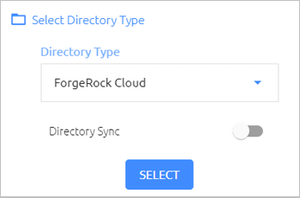
Click the Directory Sync toggle button to enable and disable automatic syncing.
IMPORTANT: You will NOT be able to change this setting after adding the directory.Click Select.
The Create New Directory page opens.
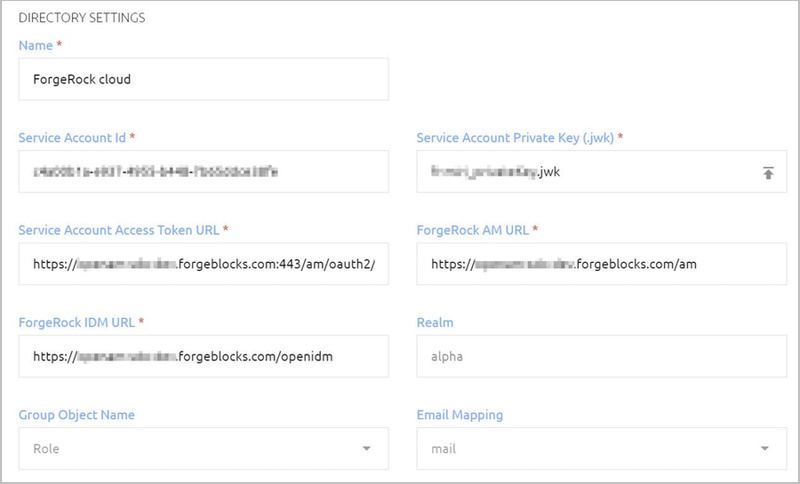
Configure the following Directory Settings:
Name: Name by which the directory is known.
Service Account Id: Copy this value from the Service Accounts page of the ForgeRock Identity Cloud Admin UI (under Tenant Settings).
Service Account Private Key: Copy this value from the Service Accounts page of the ForgeRock Identity Cloud Admin Ul (under Tenant Settings).
Service Account Access Token URL: Enter the Oauth2 access token URL in the following format:
https://<tenant-env-fqdn>:443/am/oauth2/access_token
For further information please refer to this article.
ForgeRock AM URL: The public AM URL.
ForgeRock IDM URL: The public IDM URL.
Realm: The IDM realm being used.
Group Object Name: Use the value set in your ForgeRock environment. (The default setting is Role.)
Email Mapping: The field in the corporate directory used to retrieve the emails of users. Select the mapping source from the list. Keep in mind that you will NOT be able to update the mapping source after directory settings are saved.
Click Test Connection to perform a validity check.
At the bottom of the page, click Create. Then, from the toolbar at the top of the page, click PUBLISH and publish your changes.
Okta
To add a new Okta directory:
At the top of the Directories menu, click Create Directory.
The Select Directory Type dialog opens.
Open the Directory Type list and select Okta.
Click the Directory Sync toggle button to enable and disable automatic syncing.
IMPORTANT: You will NOT be able to change this setting after adding the directory.Click Select.
The Create New Directory page opens.
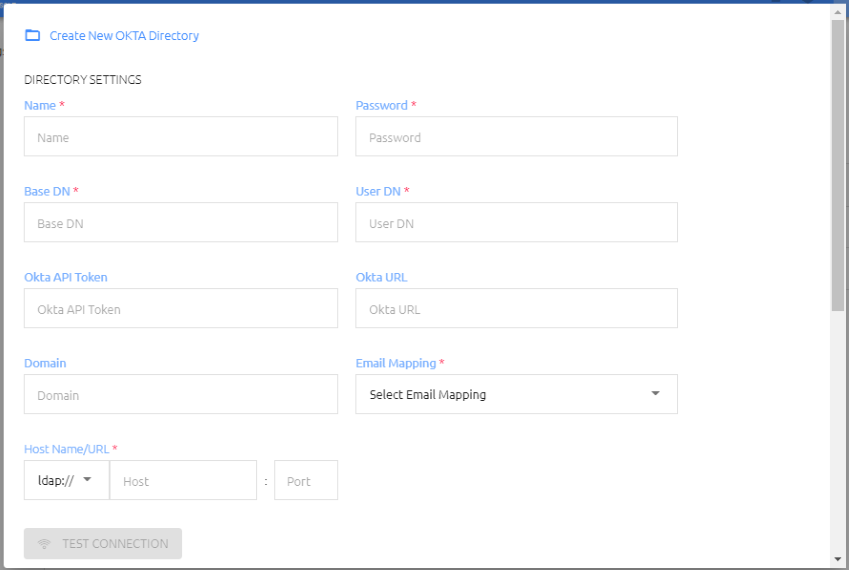
Configure the following Directory Settings:
Name: Name by which the directory is known.
Password: The password for the administrative user account.
Base DN: The distinguished name of the directory from which users will be added to Octopus Authenticator. If you want to add only a specified set of users, enter the relevant node(s) of the directory.
User DN: The username and distinguished name of the administrative user account that allows access to import from the directory.
Okta API Token: The API token for authentication requests (created in your Okta Admin account).
Okta URL: Your access URL to Okta.
Domain: The IP address or NetBIOS domain name of the domain.
Email Mapping: The field in the corporate directory used to retrieve the emails of users. Select the mapping source from the list. Keep in mind that you will NOT be able to update the mapping source after directory settings are saved.
Host Name/URL: Select LDAP or LDAPS. Then, in the Host field, enter the FQDN of the domain. In the Port field, enter 389 for LDAP or 636 for LDAPS.
Certificate: If you are using LDAPS, click Upload Certificate and select the relevant certificate file.
Click Test Connection to perform a validity check.
At the bottom of the page, click Create. Then, from the toolbar at the top of the page, click PUBLISH and publish your changes.
Note: As the Okta directory does not support paging, it is recommended to manually set the number of records to sync. Paging settings are configured in the Details tab of the directory settings. For more information, refer to Viewing and Managing Directories (Configuring Advanced Settings).
Entra ID
The Octopus platform supports two kinds of Entra ID directory types. Both types enable integration of users in Entra ID directories.
| Directory Type | Description / Requirements |
|---|---|
| Entra ID | Uses the Microsoft Graph API. Does not require LDAP or P1 Entra ID license. This directory type supports 0-365 federation with Secret Double Octopus while using Entra ID. |
| Entra ID (LDAP) | Uses the LDAP API, which requires a P1 Entra ID license. |
IMPORTANT: Migration from an Azure AD directory type to an Entra ID directory type is not supported. It is also not possible to migrate from an Entra ID directory type to an Entra ID (LDAP) directory type, or vice versa.
To add a new Entra ID directory (Graph API):
At the top of the Directories menu, click Create Directory.
The Select Directory Type dialog opens.
Open the Directory Type list and select Entra ID.
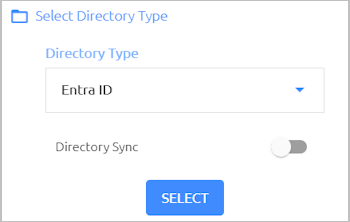
Click the Directory Sync toggle button to enable and disable automatic syncing.
IMPORTANT: You will NOT be able to change this setting after adding the directory.Click Select.
The Create New Directory page opens.
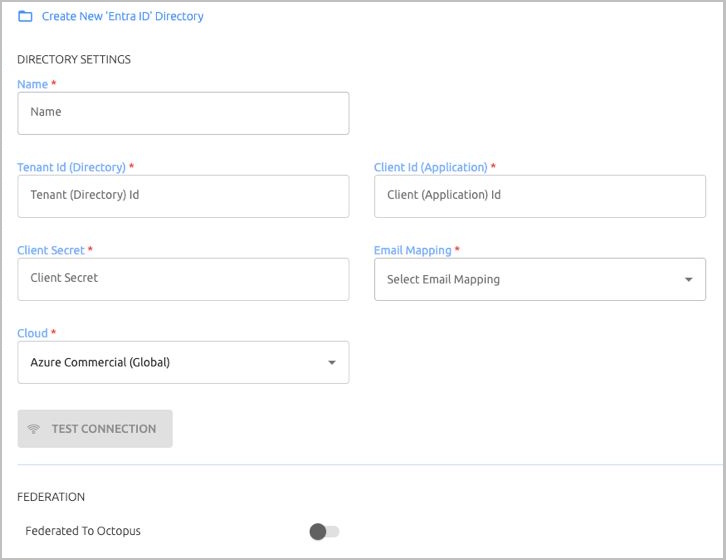
Configure the following Directory Settings:
Name: Name by which the directory is known.
Tenant ID (Directory) and Client ID (Application): Copy these values from your Entra ID application. (They are displayed in App registrations, under the relevant app.)
Client Secret: Copy the value from your Entra ID application after creating the secret. (To create the secret, navigate to Certificates and Secrets, click New Client Secret and enter a value.)
Email Mapping: The field in the corporate directory used to retrieve the emails of users. Select the mapping source from the list. Keep in mind that you will NOT be able to update the mapping source after directory settings are saved.
Cloud: The cloud environment of the directory. For standard Azure deployments, select Azure Commercial (default value). Select Azure US Government only if your organization's Entra ID directory is hosted in the Azure Government cloud environment.
Click Test Connection to perform a validity check.
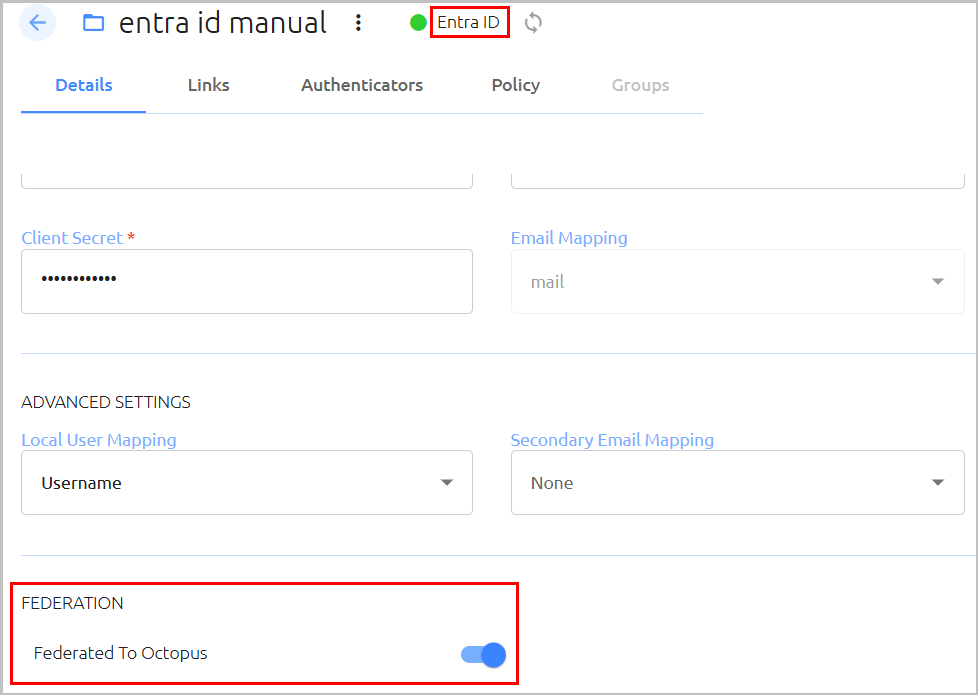
If you have a federated Entra ID domain, select the Federated To Octopus toggle button to enable the setting.
When this setting is enabled, you will be able to add users directly to the remote Entra ID directory, and then import or synchronize them into the Octopus platform.
At the bottom of the page, click Create. Then, from the toolbar at the top of the page, click PUBLISH and publish your changes.
For directories with Automatic Sync, it is recommended to enable Selective Sync in the directory settings:
a. From the Directories menu, click
in the row or tile of the relevant directory to open the directory settings.b. Scroll to the bottom of the Details tab. Under Directory Sync, enable the Selective Sync toggle button.
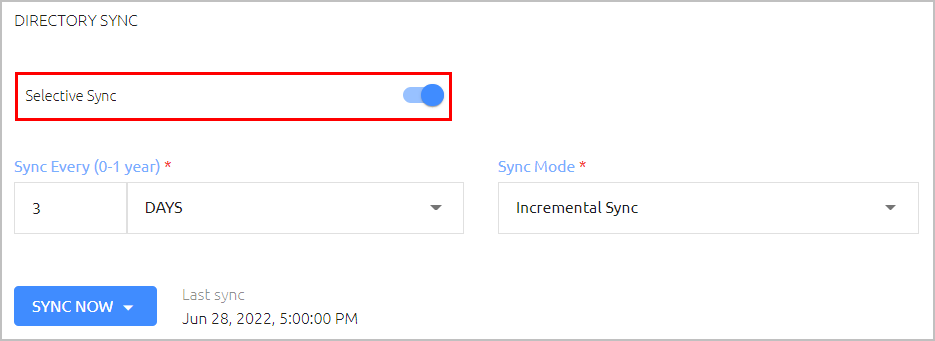
c. Click Save.
Note: For more information about Selective Sync, refer to Working with Selective Syncing.
To add a new Entra ID (LDAP) directory:
At the top of the Directories menu, click Create Directory.
The Select Directory Type dialog opens.
Open the Directory Type list and select Entra ID (LDAP).
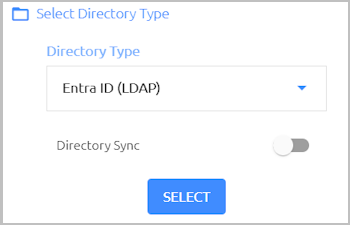
Click the Directory Sync toggle button to enable and disable automatic syncing.
IMPORTANT: You will NOT be able to change this setting after adding the directory.Click Select.
The Create New Directory page opens.
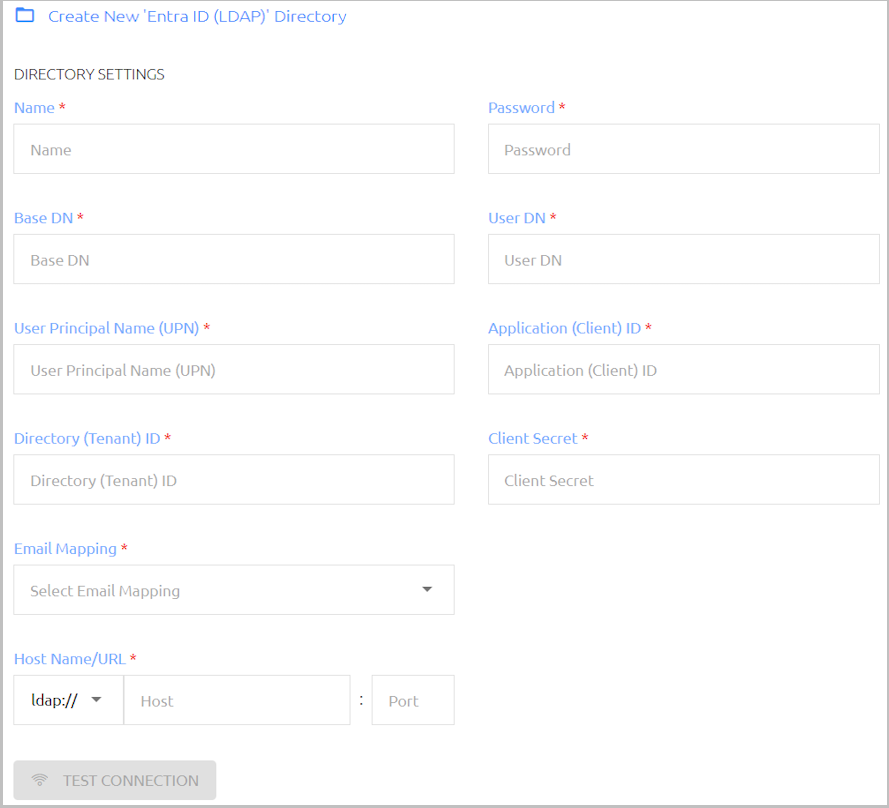
Configure the following Directory Settings:
Name: Name by which the directory is known.
Password: The password for the administrative user account.
Base DN: The distinguished name of the directory from which users will be added to Octopus Authenticator. If you want to add only a specified set of users, enter the relevant node(s) of the directory.
User DN: The username and distinguished name of the administrative user account that allows access to import from the directory.
User Principal Name (UPN): The user account used for connecting to the directory.
Application (Client) ID and Directory (Tenant) ID: Copy these values from your Entra ID application. (They are displayed in App registrations, under the relevant app.)
Client Secret: Copy the value from your Entra ID application after creating the secret. (To create the secret, navigate to Certificates and Secrets, click New Client Secret and enter a value.)
Email Mapping: The field in the corporate directory used to retrieve the emails of users. Select the mapping source from the list. Keep in mind that you will NOT be able to update the mapping source after directory settings are saved.
Host Name/URL: Select LDAP or LDAPS. Then, in the Host field, enter the FQDN of the domain. In the Port field, enter 389 for LDAP or 636 for LDAPS.
Certificate: If you are using LDAPS, click Upload Certificate and select the relevant certificate file.
Click Test Connection to perform a validity check.
At the bottom of the page, click Create. Then, from the toolbar at the top of the page, click PUBLISH and publish your changes.
For directories with Automatic Sync, it is recommended to enable Selective Sync in the directory settings:
a. From the Directories menu, click
in the row or tile of the relevant directory to open the directory settings.b. Scroll to the bottom of the Details tab. Under Directory Sync, enable the Selective Sync toggle button.
c. Click Save.
Note: For more information about Selective Sync, refer to Working with Selective Syncing.
To add a new Google directory:
At the top of the Directories menu, click Create Directory.
The Select Directory Type dialog opens.
From the Directory Type dropdown list, select Google.
Click the Directory Sync toggle button to enable and disable automatic syncing.
IMPORTANT: You will NOT be able to change this setting after adding the directory.Click Select.
The Create New Directory page opens.
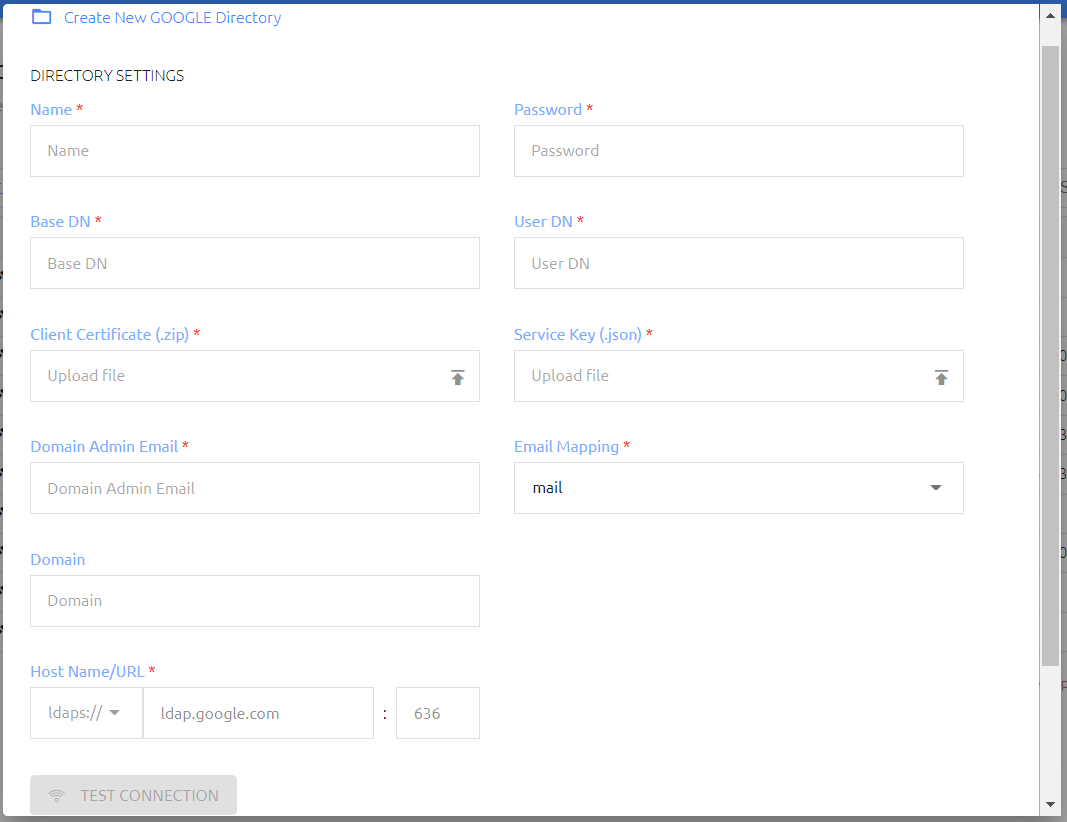
Configure the following Directory Settings:
Name: Name by which the directory is known.
Password: The password for the administrative user account.
Base DN: The distinguished name of the directory from which users will be added to Octopus Authenticator. If you want to add only a specified set of users, enter the relevant node(s) of the directory.
User DN: The username and distinguished name of the administrative user account that allows access to import from the directory.
Client Certificate: Upload the ZIP file from your Google Admin console.
Service Key: Upload the JSON file from your Google Admin console.
Domain Admin Email: Email address of the administrative user account that allows access to import from the directory.
Domain: The IP address or NetBIOS domain name of the domain.
Email Mapping: The field in the corporate directory used to retrieve the emails of users. Select the mapping source from the list. Keep in mind that you will NOT be able to update the mapping source after directory settings are saved.
Host Name/URL: The default setting is prepopulated and is not editable.
Click Test Connection to perform a validity check.
Click Create. Then, from the toolbar at the top of the page, click PUBLISH and publish your changes.
The Directories menu lists all integrated directories and enables you to update their settings. The following information is provided about each directory:
Name and Type
Automatic Sync indicator icon. Clicking this icon starts a directory sync. If automatic syncing is disabled for the directory, the icon is grayed out.
Date and time of most recent sync (if automatic syncing is enabled)
Current connectivity status (green or red indicator)
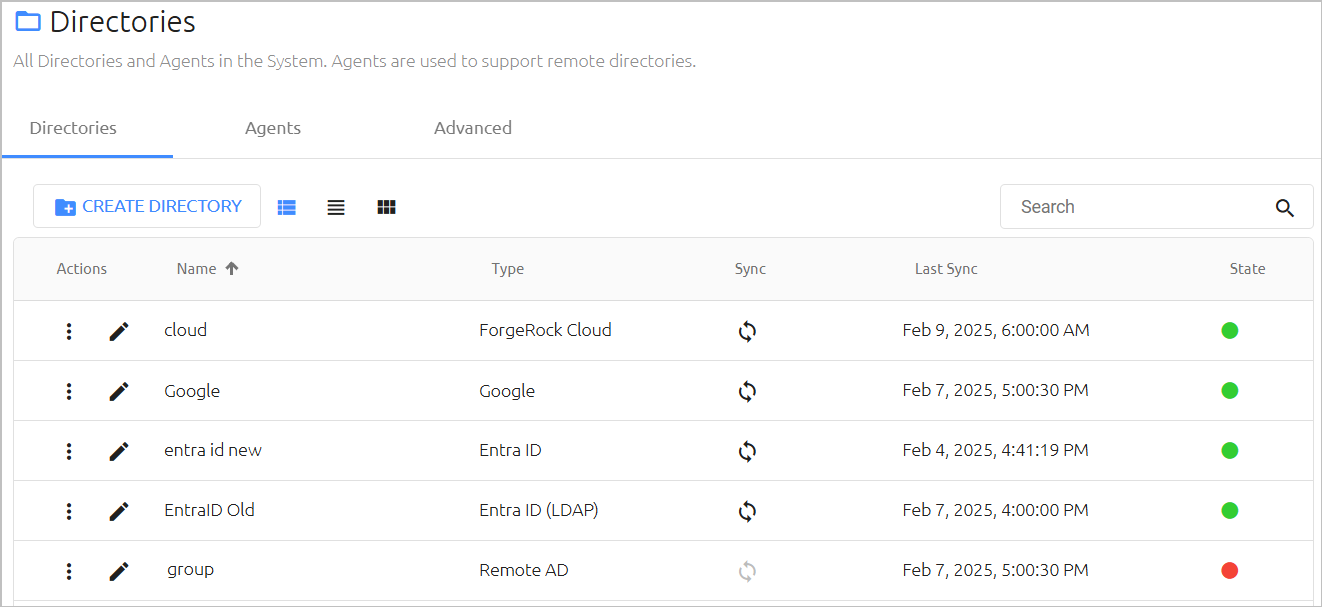
Clicking in the card or row of a directory opens a series of tabs from which you can view and update directory settings. For more information, refer to Updating Directory Details (below).
The Actions menu allows you to remove directories that are no longer being used. To remove a directory, click and select Delete.
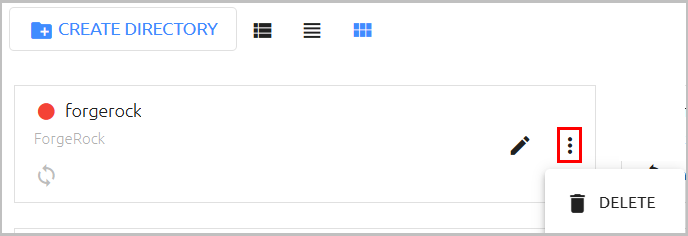
The Delete action is also available on the settings pages of individual directories.
Clicking in the card or row of a directory open another page that displays the settings for that directory in a series of tabs. The name and type of the directory and its current connection state are displayed above the tabs. The Delete and Sync actions (if the directory has automatic sync) are also available from here.
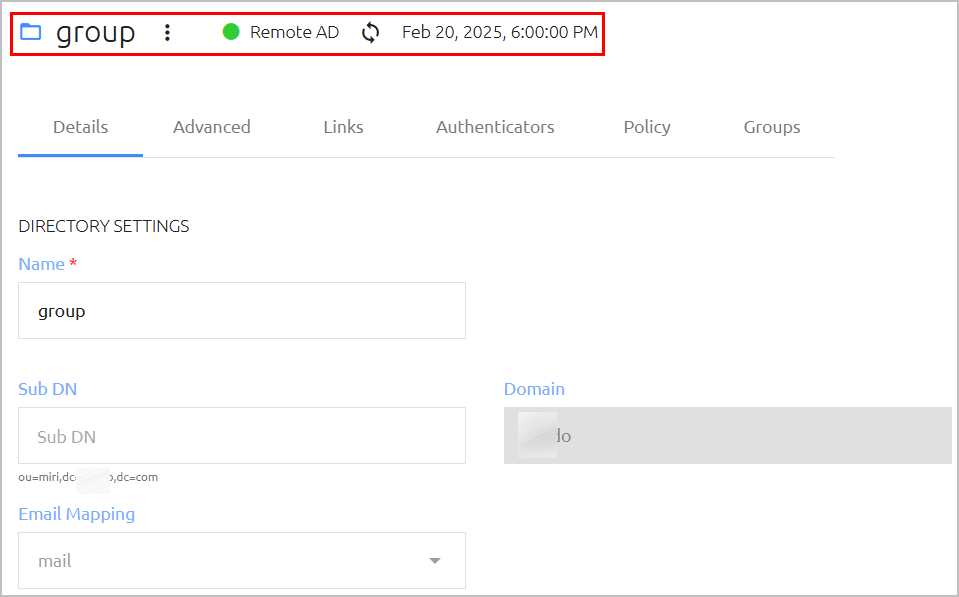
The Details tab, which is displayed by default when you open the settings page, contains the following sections:
Directory Settings: Displays the directory connection configuration. For details about these settings, refer to Adding a New Directory.
Advanced Settings: Allows you to set maximum number of records and other directory-specific parameters. For details, refer to Configuring Advanced Settings.
Directory Sync: This section appears only in directories for which automatic syncing is enabled. For more information, refer to Configuring Directory Sync Settings.
After updating settings on the Details tab, click Save. Then, from the toolbar at the top of the page, click PUBLISH and publish your changes.
Configuring Advanced Settings
When relevant, you can update default values for the directory's Advanced Settings. The settings vary slightly depending on whether the directory has automatic syncing enabled.
In directories that do NOT have automatic syncing, you can set the Max Sync Page Size value, which controls the number of records added when users are synced from the directory.
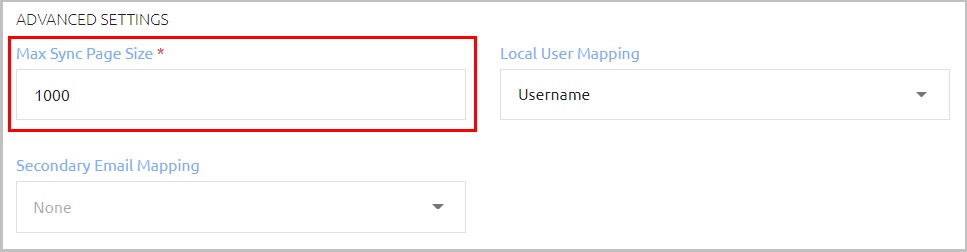
The Sync Page Size setting appears in directories with automatic syncing. When the toggle is enabled, pagination is set when adding users from the directory to Octopus Authenticator. If you choose this option, specify the Max Sync Page Size in the field to the right.

Note: Keep in mind that page size affects the number of records that can sync with the Active Directory. A small page size can lead to multiple calls to the AD.
When the Sync Page Size setting is disabled, the Max Number Of Records setting appears instead. For an unlimited number of records, enter 0.

The following settings are available for all directories, regardless of automatic syncing status:
Local User Mapping: The identifier used for authentication of Local users to Windows.
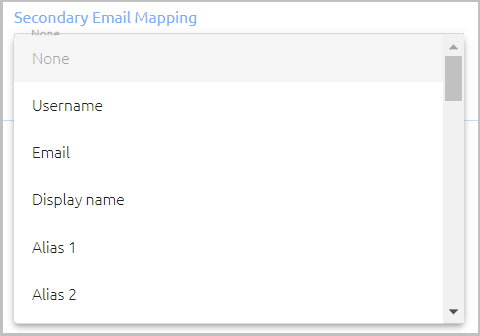
Secondary Email Mapping: This setting allows enrollment invitations to be automatically sent to two email addresses - the one specified in the Personal tab of the user details, and an additional one. When the value is None, enrollment emails are sent to only one address (the one listed in the Personal tab). The additional email address can be mapped to an attribute added to the directory schema, or to an Alias parameter defined in the Personal tab of the user details.
The Federation section appears in Entra ID directory types. It is recommended to activate the Federated To Octopus setting if you have a federated Entra ID domain.
When this setting is enabled, you will be able to add users directly to the remote Entra ID directory, and then import or synchronize them into the Octopus platform.
After updating Advanced Settings, click Save. Then, from the toolbar at the top of the page, click PUBLISH and publish your changes.
The Directory Sync settings are available only for directories that have automatic syncing enabled.
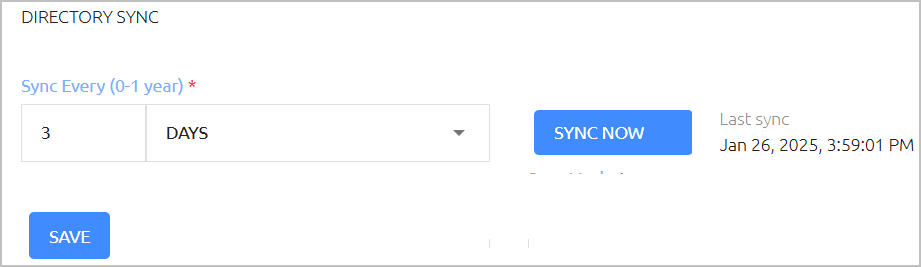
The settings are:
Sync Every: Determines the frequency at which automatic syncing occurs. The frequency can range from one hour to one year.
Note: To disable automatic syncing, set the value to 0.Sync Now: Initiates an immediate sync of the directory.
Additional Sync Settings for Active Directory
AD type directories support Selective Sync. When the feature is enabled, you will be able to choose the Groups that are included in the sync process. For more information, refer to Working with Selective Syncing.
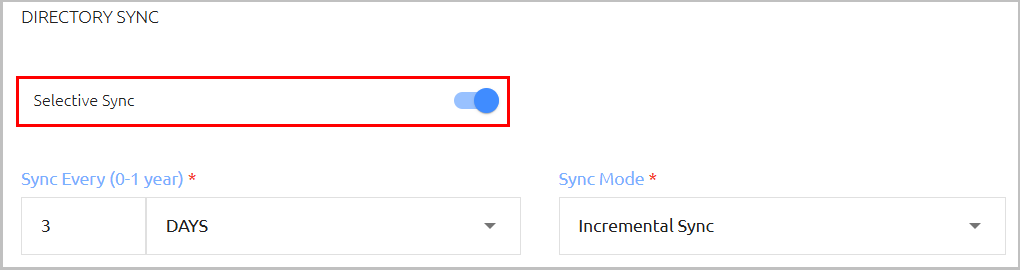
IMPORTANT: It is best practice to enable Selective Sync, for increased efficiency and reduced server load.
In addition, the settings for AD type directories allow you to choose the extent of the sync. The following sync modes are supported:
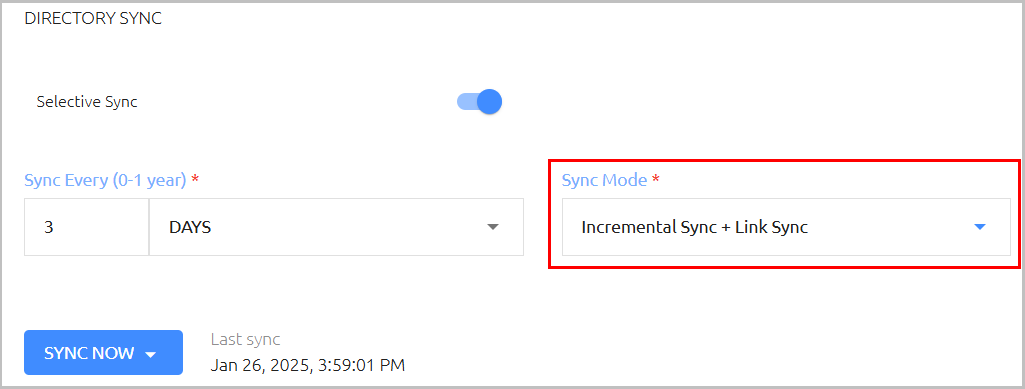
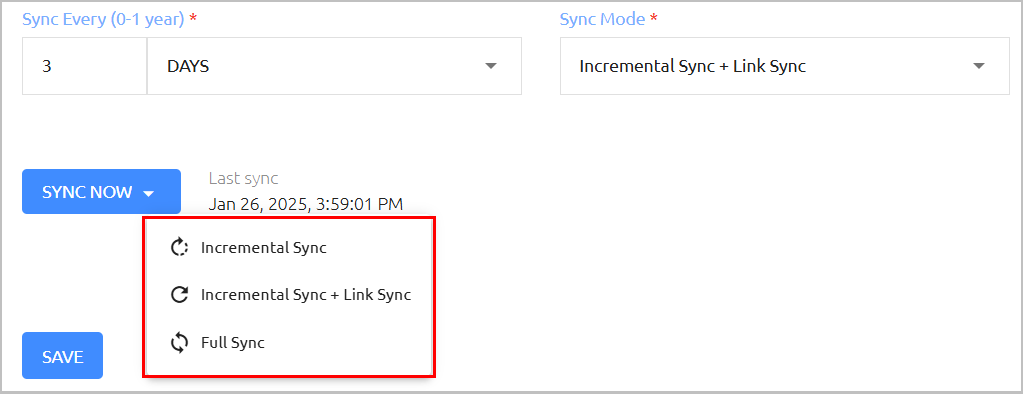
Incremental Sync: Checks for changes and updates in the Active Directory and syncs these changes with the Management Console.
Incremental Sync + Link Sync: As part of the incremental sync, user properties in all linked directories are also updated.
Full Sync: Involves a complete sync with the Active Directory (regardless of changes and updates).
The sync mode needs to be selected when configuring the following settings and actions:
Scheduling automatic syncing: After specifying the syncing frequency, select the mode from the Sync Mode dropdown list.
Initiating an immediate sync: Click Sync Now and then select the sync mode from the options list that opens.
After updating Directory Sync settings, click Save. Then, from the toolbar at the top of the page, click PUBLISH and publish your changes.
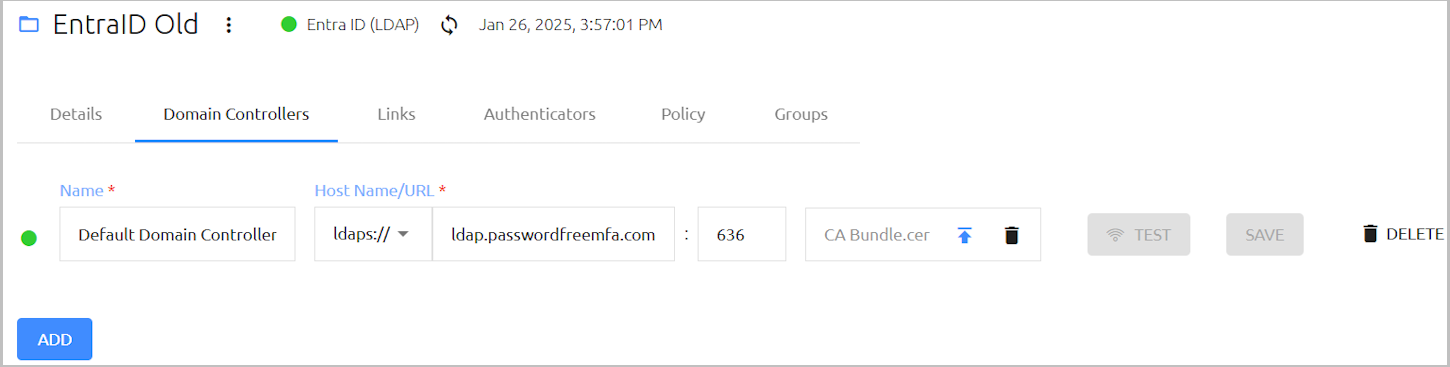
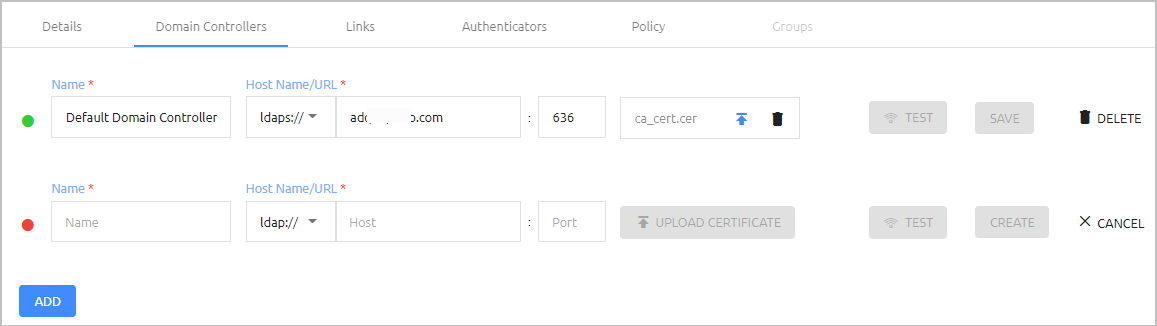
The Domain Controllers tab displays the hostname/URL that was specified for the directory server when the directory was created. The tab appears for all directory types except Remote AD, ForgeRock Cloud, and Entra ID.
The colored indicator (green or red) to the left of the Name indicates the current connectivity status of the server. The icons in the certificate field allow you to replace or delete the current certificate.
The Test button becomes enabled whenever you make changes to parameters of a domain controller, allowing you to perform a validity check before saving the new settings. The Delete button enables you to remove domain controllers that are no longer in use.
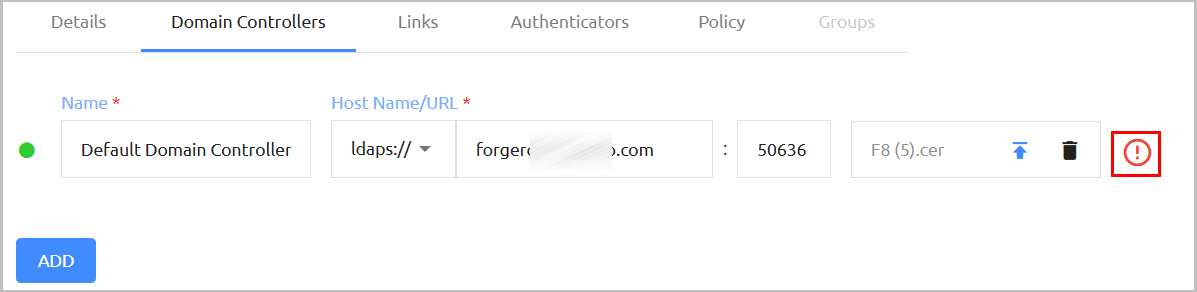
If there are connection problems related to a domain controller, an error icon appears on the right side of the row.
If your environment utilizes multiple servers for the directory, you can configure the additional domain controllers in the Management Console. Click Add and enter the details of the domain controller in the relevant fields. Then, click Create.
Some of your users may be members of more than one directory. The Links tab of a directory's settings enables you to link specific parameters in different directories. This linking enables the Management Console to map the given parameters, preventing the need for multiple enrollments for the same user.
The directory from which you create the link is called the Local directory. The directory to which you link is known as the Remote directory.
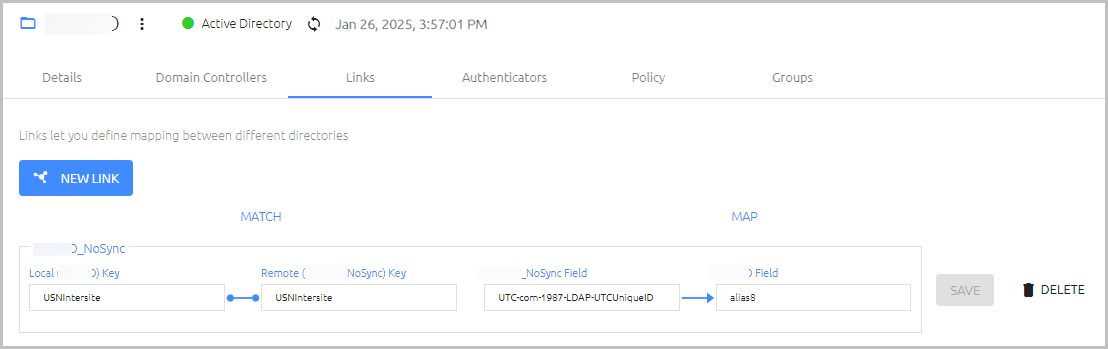
To add a directory link:
From the Directories menu, open the settings of the directory in which you want to create a link and select the Links tab. At the top of the tab, click New Link.
The Select Directory To Link dialog opens.
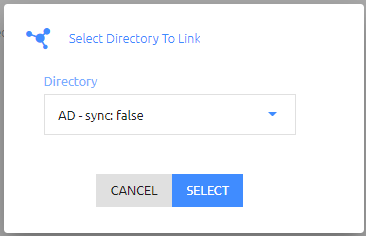
Open the Directory list and select the directory to which you want to link (the Remote directory). Then, click Select.
A new row is added to the Links tab.
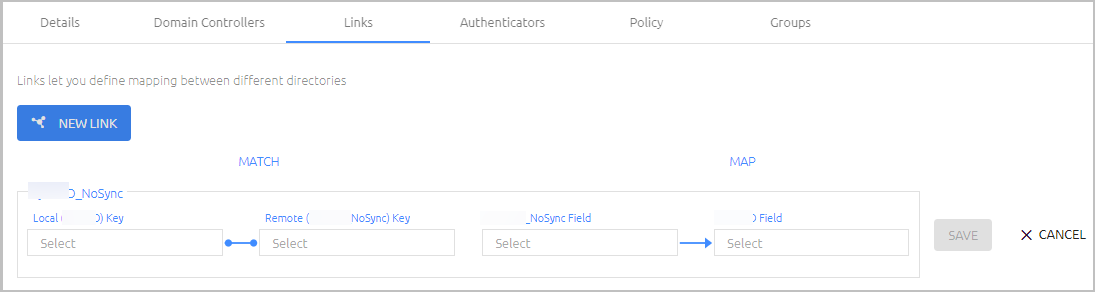
On the left side of the row, click Select and choose a parameter in each directory. An exact match of these parameters will indicate that the user in each directory is the same user.
On the right side of the row, select a value to be imported from the Remote directory to the Local directory. Then, select the parameter in the user properties of the Local directory to which the value will be imported. (This is generally one of the Alias fields.)
To save the new link in the system, click Save . Then, from the toolbar at the top of the page, click PUBLISH and publish your changes.
Secret Double Octopus provides the ability to authenticate to Windows, Mac and the Users' Portal using third-party authenticators that are integrated with the platform by means of Authenticator plugins. Once these plugins are added to the system they can serve as primary or secondary authenticators (or both) and act as OTP validators (for One Time Password authentication) for users in specific directories.
The Authenticators tab of a directory's settings enables you to select the authenticator(s) that provide authentication and OTP validation for users. The tab also contains various other settings related to authentication, including FIDO2 Settings and Default Authentication Method.
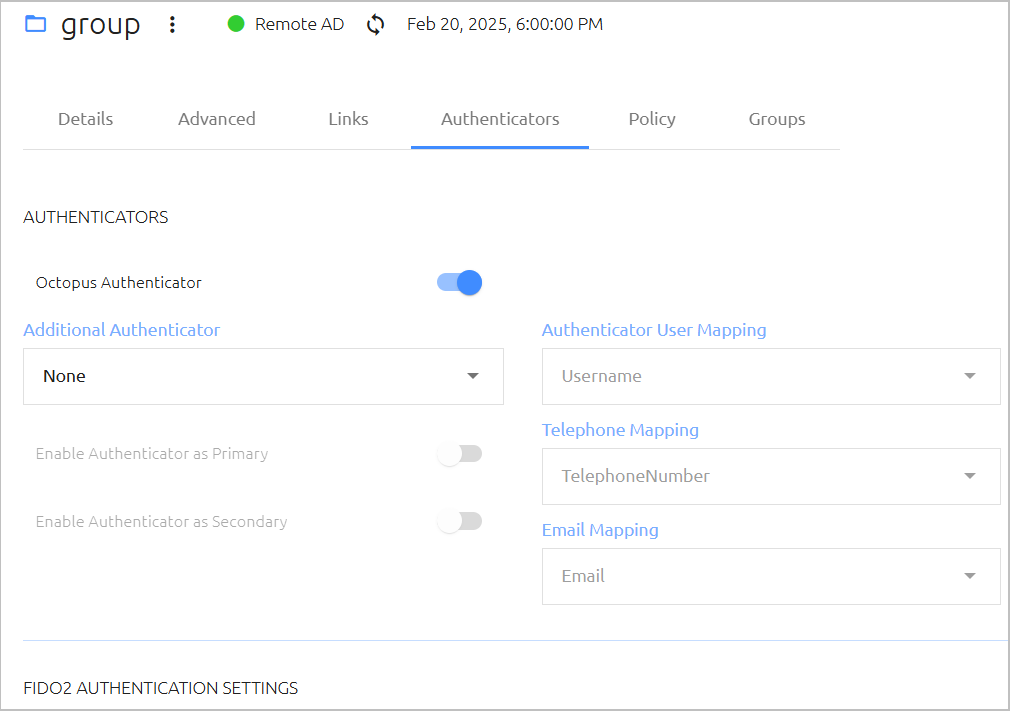
After updating settings in the Authenticators tab, click Save. Then, from the toolbar at the top of the page, click PUBLISH and publish your changes.
Authenticator Settings
This section of the Authenticators tab lets you set the authenticator(s) that provide authentication for users in the directory. When a third-party authenticator is selected as either a Primary or Secondary authenticator, information including user agent, Source IP, etc. is sent to that authenticator for additional policy enforcement or authentication.
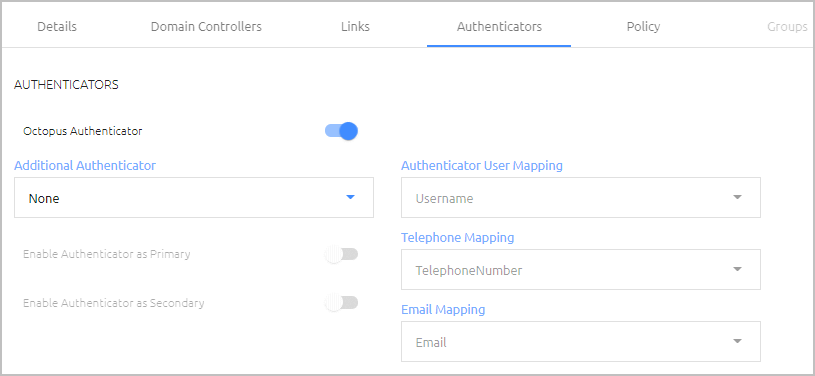
To set the authenticator(s) for the directory:
Enable / Disable Octopus Server authentication by clicking the Octopus Authenticator toggle button.
If this setting is disabled, users will not be able to authenticate with Octopus Authenticator, and you need to specify another authenticator. You can also specify an additional authenticator when Octopus Authentication is enabled.
To set another authenticator, select the relevant third-party authenticator from the Additional Authenticator list. (The list is comprised of all third-party authenticators that have been added to the Authenticator List of the System Settings menu.)
Once you have selected an authenticator, the settings below the list are enabled.
Configure the following settings as required:
Enable Authenticator as Primary: When enabled, this authenticator will serve as the first line of authentication. If the Octopus Authenticator is enabled, both authenticators will be primary authenticators, and the user will have the option to choose which one to use.
Enable Authenticator as Secondary: When enabled, this authenticator receives user information from the primary authenticator and then approves or rejects authentication. This information includes the usual headers (user agent, Source IP, etc.) as well as the authentication that was used for the primary authenticator.
Authenticator User Mapping: Select a parameter to be used for authentication mapping. The options that appear in the dropdown list are the parameters that are defined in the Personal tab of your users' accounts. For example, authentication to ForgeRock can be done with Username:
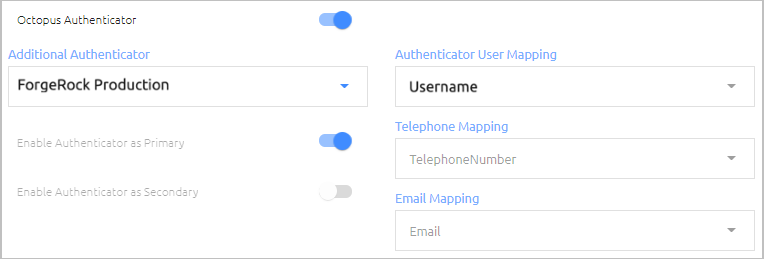
Telephone Mapping and Email Mapping: These settings are enabled when Twilio is selected as an additional authenticator. Select the user parameter to be mapped to user phone number and email address.
At the bottom of the Authenticators tab, click Save. Then, from the toolbar at the top of the page, click PUBLISH and publish your changes.
FIDO2 Authentication Settings
FIDO authentication is supported for:
Any web application (e.g., SAML with Chrome, Edge, Safari) that uses WebAuthn or WebView2
USB interface authentication
Windows and Mac login (online /offline)
Radius login (e.g., VPN)
Retrieving the user AD password
Launching the SSO portal
FIDO authentication is NOT currently supported for:
Embedded browser applications (e.g., the Office365 desktop application)
NFC and BLE interface authentication
LDAP services
The FIDO2 Authentication Settings allow you to enable / disable FIDO authentication and set other parameters related to the FIDO authenticator.
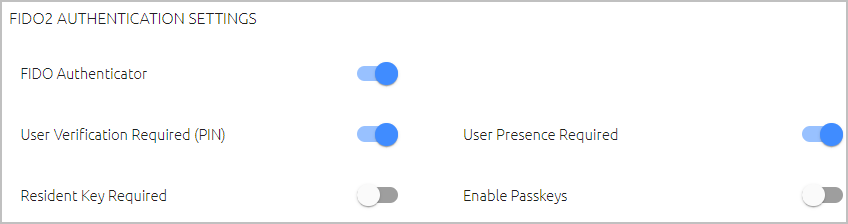
The settings are:
FIDO Authenticator: Click the toggle button to enable and disable FIDO authentication for users in the directory.
IMPORTANT: If the FIDO Authenticator is currently disabled globally ( System Settings > Authenticators), you will not be able to enable FIDO authentication for the directory.User Verification Required (PIN): When this setting is enabled, users are asked to choose a new PIN code during the registration process. This feature is used for passwordless authentication in which the FIDO authenticator requires a PIN as the additional authentication factor.
User Presence Required: When this setting is enabled, users are required to touch their token after entering the PIN. The setting is enabled by default.
This setting operates in conjunction with the setting configured in the Windows MSIUpdater (version 3.8.0 and up). For details, refer to the Octopus Desk for Windows Installation Guide.
Note: During initial enrollment of a FIDO token, user presence is always required, even when the User Presence Required setting is disabled.Enable Passkeys: When this toggle is selected, users can authenticate to the User Portal and web applications using a passkey that is integrated with their workstation or smartphone. For successful passkey authentication, the following requirements must be fulfilled:
The FIDO authenticator needs to be enabled both globally (System Settings > Authenticators) and in the directory settings.
Users must work with a passkey-supporting phone or a workstation with Windows Hello / Touch ID enabled with fingerprint sensor.
Resident Key Required: When enabled, the identity of the private key used for authentication is required.
Hardware OTP Authentication Settings
Secret Double Octopus supports use of HW OTP tokens to authenticate to Windows and the User Portal. To allow users to authenticate with these devices, enable the relevant toggle button(s) under Hardware OTP Authentication Settings. You can activate Online OTP Offline OTP, or both.
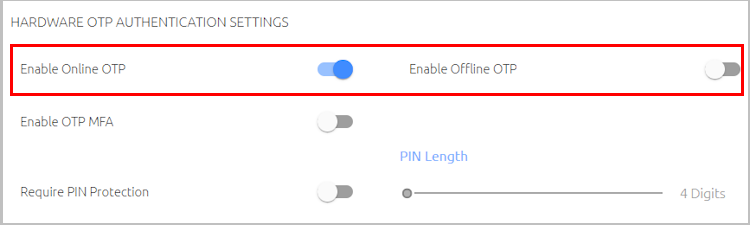
When the Require PIN Protection setting is enabled, users need to enter a PIN together with the OTP code. (Users will select a PIN during the enrollment process.) Under PIN Length, use the slider to specify the required number of digits in the PIN code. Supported PIN lengths are 4-10 digits.
IMPORTANT: PIN protection is mandatory for Offline hardware OTP authentication. In addition, TPM must be supported on the Windows workstation.
Online hardware OTP authentication can be configured with or without PIN protection.
The Enable OTP MFA toggle determines whether or not users must provide a password when authenticating to the User Portal with a hardware OTP token.
Software OTP Authentication Settings
To enhance authentication capabilities, Secret Double Octopus provides the option of issuing a one time password for login. OTP settings are configured per directory, in the Authenticators tab of the directory's settings. By default, the OTP feature is disabled.
Secret Double Octopus offers the following OTP processes. Either or both can be enabled, as required:
Online OTP: When enabled, enrolled users are able to log into Windows, Mac or the User Portal using a one time password issued by either the Octopus Authenticator or by a third-party authenticator.
Offline OTP: When enabled, enrolled users are able to log into Windows / Mac using a one time password that is stored locally. These OTPs are supplied by either the Octopus Authenticator or by a third-party authenticator.
When offline OTP is activated, a list of OTPs are securely stored on the Windows / Mac workstation to allow users to authenticate to the workstation when not connected to the network. The OTPs are timed-based and use the standard TOTP mechanism. They can therefore be added to any standard authentication mobile app that supports TOTP.
To enable OTP:
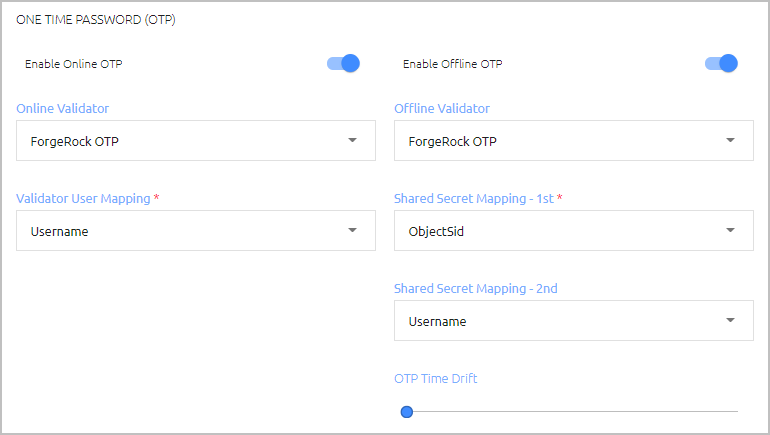
To activate online OTP, click the Enable Online OTP toggle button. Then, select the appropriate authenticator from the Online Validator list.
Note: The Validator list is comprised of the Octopus Authentication Server as well as all third-party authenticators that have been added to the Authenticators List of the System Settings. For more information, refer to Configuring System Settings (Authenticators tab).Under Validator User Mapping, select the user parameter to be used for OTP authentication.
To activate offline OTP, click the Enable Offline OTP toggle button. Then, select the appropriate authenticator from the Offline Validator list.
From the Shared Secret Mapping, list(s), select the mapping field(s) to be used to generate the offline tokens. The second Shared Secret Mapping field is optional.
If relevant, specify a value (in seconds) for the OTP Time Drift by dragging the slider to the required value. The maximum valid value is 600 seconds.
Under OTP Configuration, specify the following settings:
Algorithm: Security strength- SHA1 (default) or SHA256 .
OTP Digits: Length of the password - six (default) or eight characters.
Period: Number of seconds after which each token expires and is replaced by a new one (default = 30).
Offline Time: The period of time for which the user is allowed to authenticate offline (default = 15 days).
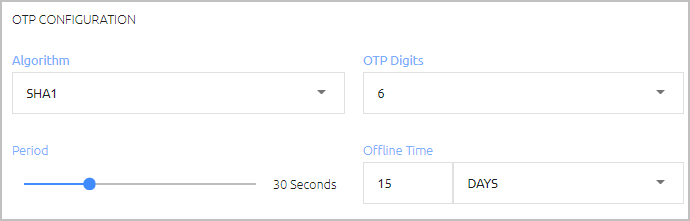
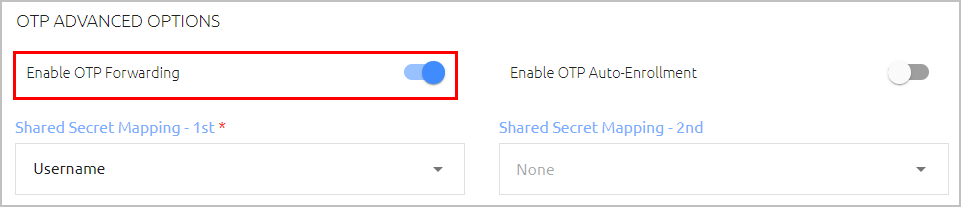
IMPORTANT: Make sure your settings match the OTP parameters of the authenticator you have chosen to generate the OTP tokens.If you want to provide authorization to pass the OTP to another authentication platform, under OTP Advanced Options, click the Enable OTP Forwarding toggle button. Then open the Shared Secret Mapping - 1st list and select the user identification parameter utilized by the external authenticator. Optionally, you may select an additional parameter from the Shared Secret Mapping - 2nd list.
At the bottom of the Authenticators tab, click Save. Then, from the toolbar at the top of the page, click PUBLISH and publish your changes.
OTP Auto-Enrollment
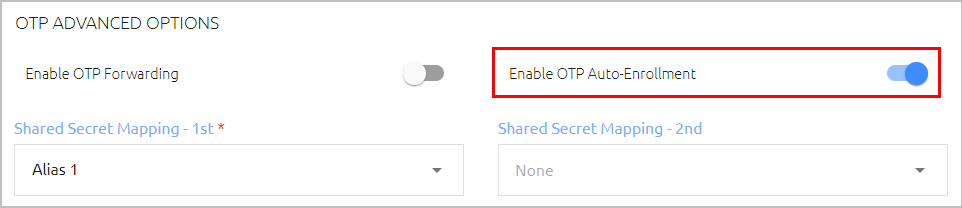
The Octopus authentication platform supports online authentication using OTP tokens generated by a third- party platform (e.g., ForgeRock), without requiring users to enroll a new account in Octopus Authenticator. To use this feature, in the OTP Advanced Options section, activate the Enable OTP Auto-Enrollment toggle button. Then, from the Shared Secret Mapping - 1st list, select the user attribute populated by the OTP seed (e.g., Alias 1).
For further guidelines on setting up OTP Auto-Enrollment, please reach out to Secret Double Octopus support.
Default Authentication Method
The default authentication method is the authenticator used to access services without Login screens that allow users to select an authentication type (e.g., LDAP and RADIUS services). Select the relevant authenticator from the Authentication Method dropdown list.
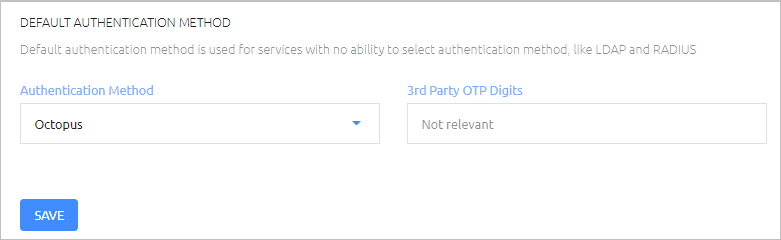
The options are:
Octopus: The Octopus Authenticator.
OTP: The validator that is specified in the directory's One Time Password (OTP) settings.
IMPORTANT: If you select a third-party OTP validator, enter the length of the validation code in the 3rd Party OTP Digits field.Additional: The third-party authenticator that is selected as an Additional Authenticator in the directory's Authenticators settings.
None: Select this option if a default authentication method is not relevant (e.g., RADIUS / LDAP services are not used, or users work with FIDO authentication only and no other authenticator in the system is enabled).
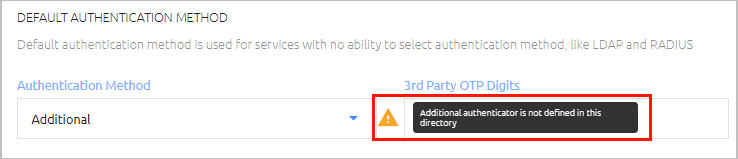
If you select a default authentication method that is currently disabled or not defined in the directory's settings, a warning icon appears next to your selection.
Event Reporting
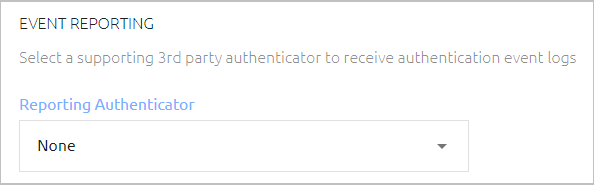
This feature enables you to designate a third-party authenticator that receives authentication event logs. This enables generation of additional log reports that can be viewed in the third-party platform.
IMPORTANT: Event reporting is currently available for ForgeRock authenticators only.
To enable third-party event reporting, select the relevant reporting authenticator from the list. All authenticators that have been assigned the Reporting method (System Settings > Authenticators) are listed.
The Policy tab of a directory's settings contains parameters related to various security options, including:
After updating settings in the Policy tab, click Save. Then, from the toolbar at the top of the page, click PUBLISH and publish your changes.
Password Settings
When Compatibility Mode is on, you can configure the following password settings:
Password Length: Number of characters in the password (4-20).
Password Age: Period of time before the password expires. The maximum supported value is one year. If you enter a value of 0, the system will NOT rotate the AD password, and the password will never expire on the Octopus Server.
Special Chars: Determines whether the password must include special characters.
Alphanumeric: Determines whether the password must include both letters and numbers.
IMPORTANT: The settings you select here must match the applicable password policy in the directory.
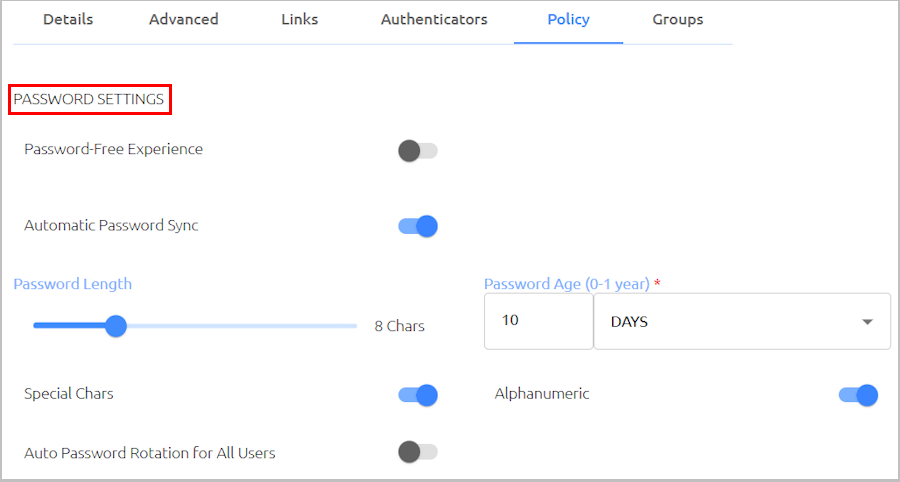
The Auto Password Rotation for All Users toggle is related to automatic password rotation for members of designated groups. By default, this toggle is off.
The Password-Free Experience toggle is related to support of the Password Free Experience on the Windows Agent. By default, this toggle is off, as the feature is not relevant when the system is working in Compatibility Mode. If you turn Compatibility Mode off, make sure to turn activate the Password-Free Experience toggle. When the toggle is on, the other password settings are disabled.
Note: For more details about Compatibility Mode, refer to Configuring System Settings (Devices tab).
When Automatic Password Sync is activated (default setting), users will be able to authenticate using the Octopus mobile app even when the AD password has been changed by an entity outside of Secret Double Octopus (e.g., the organization's IT team). If there is a mismatch between the current password and the previous one, the Octopus Agent immediately sends a password reset request to the Octopus Authentication Server. The Server then sends an additional authentication request, including a verification code, to the mobile app with the following message to the user: “Password change detected. Approve to reset password and unlock machine." Upon approval of the authentication request, the Server resets the user’s AD password and allows login to the workstation.
IMPORTANT: If the Automatic Password Sync toggle is disabled, Octopus authentication will fail in the event of a password mismatch.
Temporary Bypass Token Settings
These settings determine the requirements for the authentication tokens issued to users who are in Bypass with Temporary Token mode. During the bypass period, these users can authenticate with a username and the token, so they can continue working.
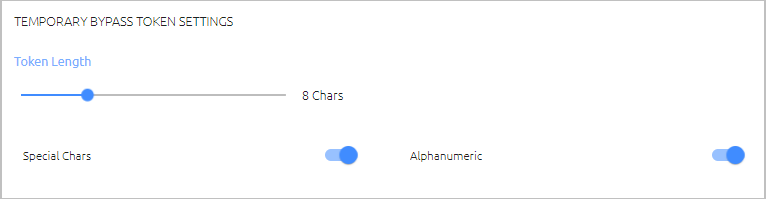
The settings are:
Token Length: Drag the slider to the required value. Values range from 4-20 characters.
Special Chars: When the setting is enabled, the token must contain at least one special character.
Alphanumeric: When the setting is enabled, the token must contain both numbers and letters.
Handling Disabled Users (AD only)
The Disabled Users Actions section appears only for Active Directory types that have Automatic Sync. When this setting is enabled, users who are currently disabled in the AD are included in the directory sync.
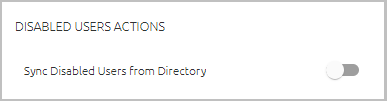
You may continue to send enrollment invitations to disabled users as necessary (e.g., during AD migrations).
User Inactivity Actions
These settings allow you to block or unenroll users who have not authenticated for a specified period of time. By default, the Inactivity Action feature is off and no action is taken against inactive users.
To set user inactivity actions:
Activate the feature by clicking the User Inactivity Action toggle button.
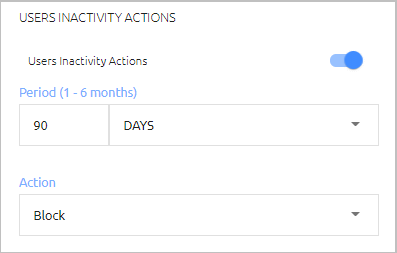
Specify the maximum period of time that can elapse from a user's last authentication until the inactivity action is taken. Valid values range from 30 days - 6 months.
From the Action dropdown list, select the inactivity action (Block or Unenroll).
At the bottom of the tab, click Save. Then, from the toolbar at the top of the page, click PUBLISH and publish your changes.
Enrollment Email Setting
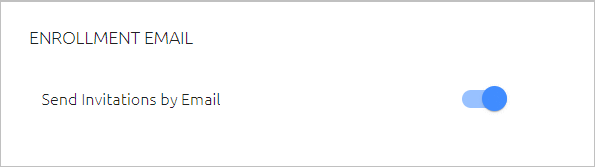
This setting allows you to control how enrollment invitations are delivered. By default, the toggle is enabled and invitations are automatically emailed to users. To support delivery of invitations by other means (e.g., internal organizational workflows), click the toggle to disable the setting, and then click Save. When the setting is disabled, invitations continue to be generated in the system but are not emailed to users.
Auto Enrolled Groups Settings
In Auto Enrolled Groups, enrollment invitations are sent to all Group members automatically. The Auto Enrolled Groups settings let you control the types of invitations that are sent and authentication ability for users who have been removed from the Active Directory.
Note: Auto Enrolled Groups settings appear only in directories for which automatic syncing is enabled.
The settings are:
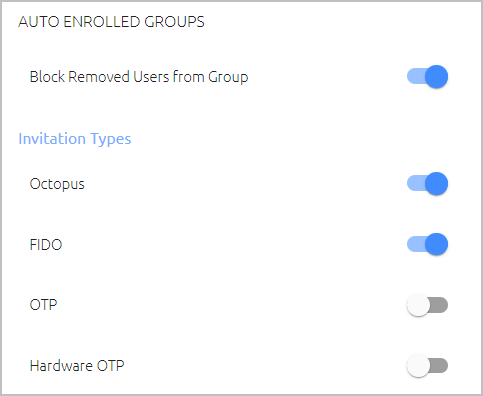
Block Removed Users from Group (for AD types only): Determines whether users who have been removed from the Active Directory are prevented from authenticating. By default, this setting is enabled (the users are blocked).
Invitation types: Determines the type(s) of Octopus enrollment invitations that can be sent to Group members (Octopus Authenticator, FIDO, software OTP and hardware OTP token). Invitations that have been sent are listed in the Invitations tab for the Group and the users.
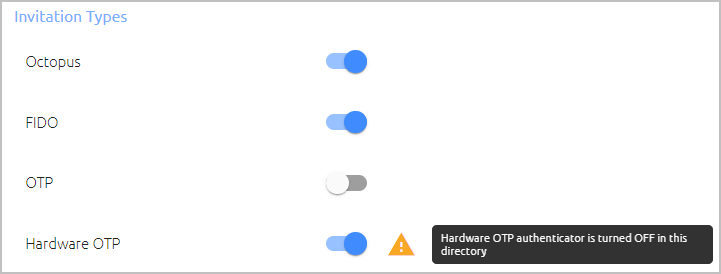
If an authentication method is disabled or not currently assigned to the directory, a warning icon and message appear when that method is selected.
When an Active Directory type directory is created with Directory Sync, you can choose one of the following syncing options:
Full Sync: All Groups in the directory are automatically synced with Secret Double Octopus.
Selective Sync: Only the Groups specified in the Octopus Management Console (in the Groups tab of the directory's settings) are automatically synced.
IMPORTANT: It is best practice to enable Selective Sync, for increased efficiency and reduced server load.
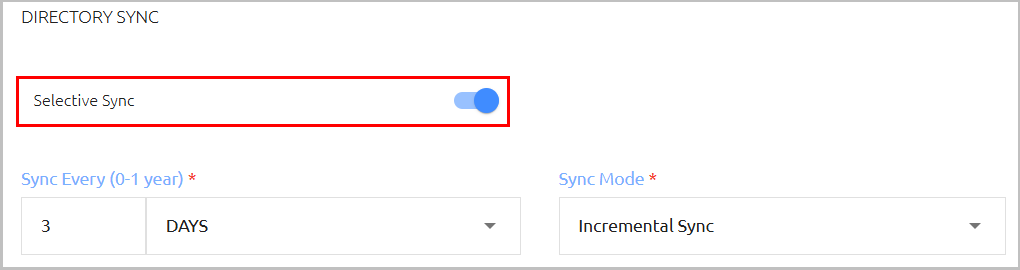
Use the Selective Sync toggle button to enable and disable selective sync. This toggle is at the bottom of the Details tab of the directory's settings.
When you switch from Full Sync to Selective Sync, the following popup opens, prompting you to specify how to handle Groups that are currently not assigned to any services. (Groups assigned to services will continue to be synced.)
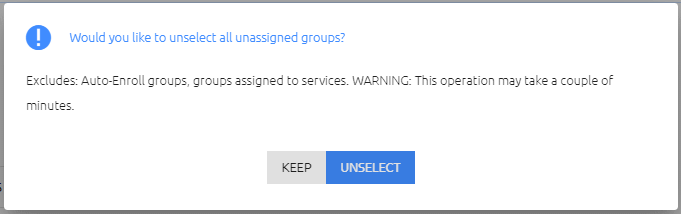
Choose one of the following options, and then click Save:
Unselect: No Groups will be selected for syncing. You will need to specify which Groups are synced by adding them to the Groups tab (see the next section for details).
Keep: All Groups will be selected for syncing. You will need to specify which Groups should not be synced by clearing their checkboxes in the Groups tab.
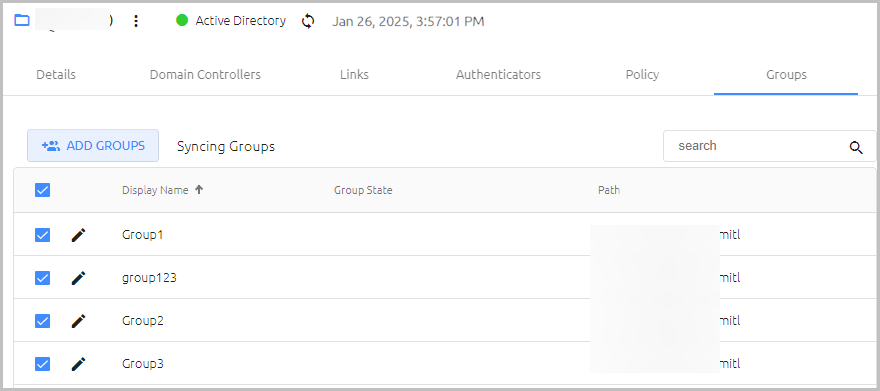
Selecting Groups for Automatic Directory Syncing
When Selective Sync is enabled for a directory, the Groups tab is enabled. This tab allows you to control which Groups in the Directory are automatically synced with Secret Double Octopus. You can change your Group selections at any time.
Follow the procedure below to specify Groups to be synced with the directory.
To select Groups for automatic syncing:
At the top of the Groups tab, click Add Groups.
The Sync Groups To dialog opens.
On the left side of the dialog, expand the directory tree. Then, choose Groups to sync by selecting the relevant checkboxes. (The checkboxes of Groups previously selected for syncing are disabled.)
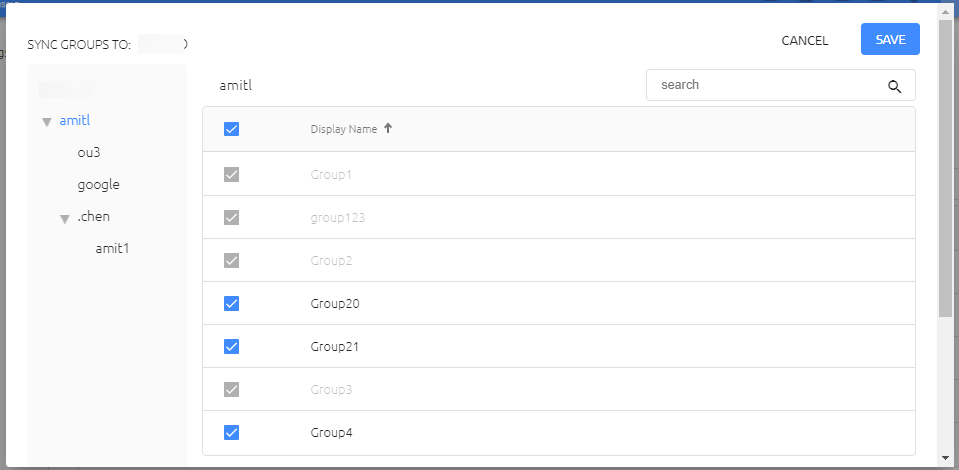
At the upper right corner of the dialog, click Save.
A popup opens, prompting you to sync the directory.
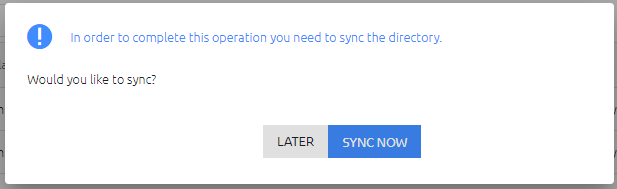
Click one of the following options:
Later: The Groups are added to the list of Groups for automatic syncing, but the users are not added until the next time a sync is done.
Sync Now: The Groups are added and users are immediately synced with the system.
The popup closes, and the selected Groups are listed in the Groups tab.
To stop automatic syncing of a selected Group, clear the relevant checkbox, and then click Save.
To add more Groups to the automatic syncing process, repeat Steps 1-3.