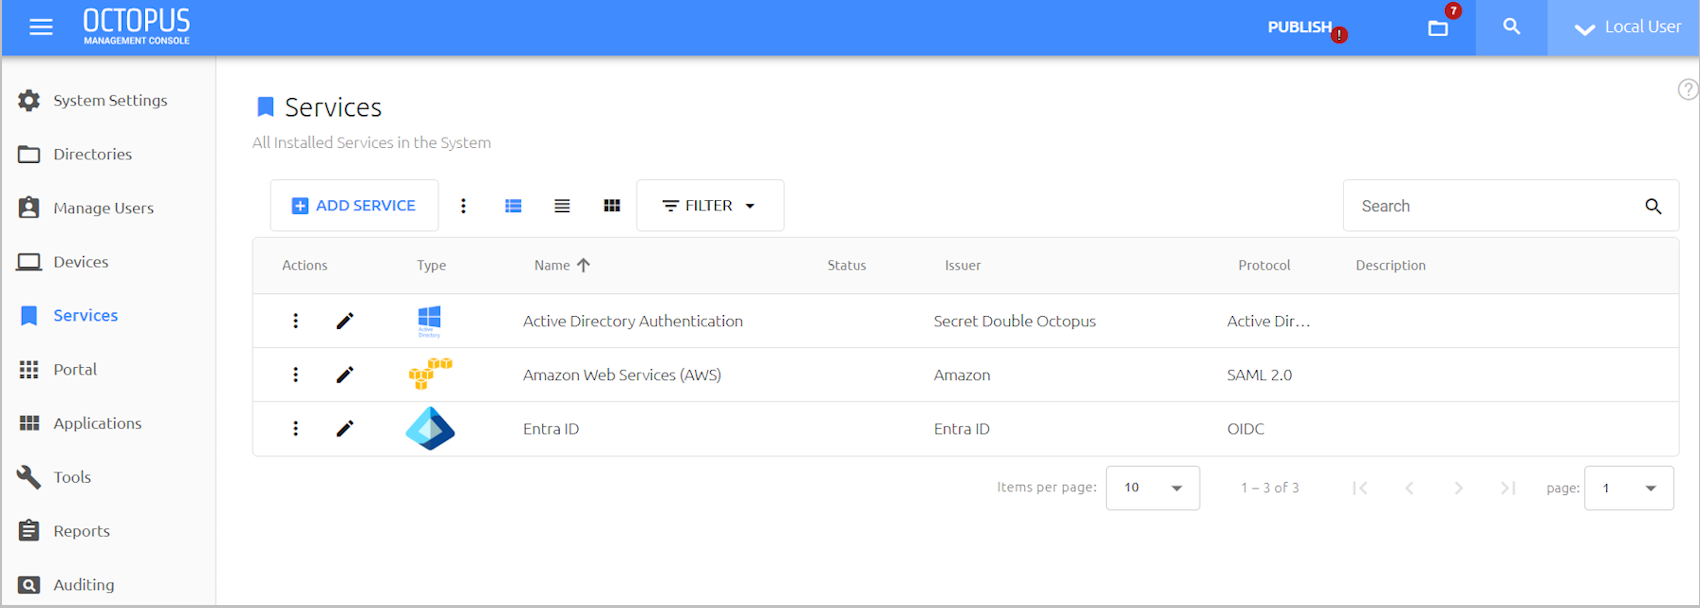
Services are the applications that are integrated to work with Octopus Authenticator to authenticate users. All services are added, configured and updated from the Services menu of the Octopus Management Console.
Note: Secret Double Octopus provides an extensive collection of guides containing end-to-end instructions on how to configure integration for different services. These How-to guides can be found on the Support Portal or on our website: doubleoctopus.com
The following sections provide detailed information about working with services:
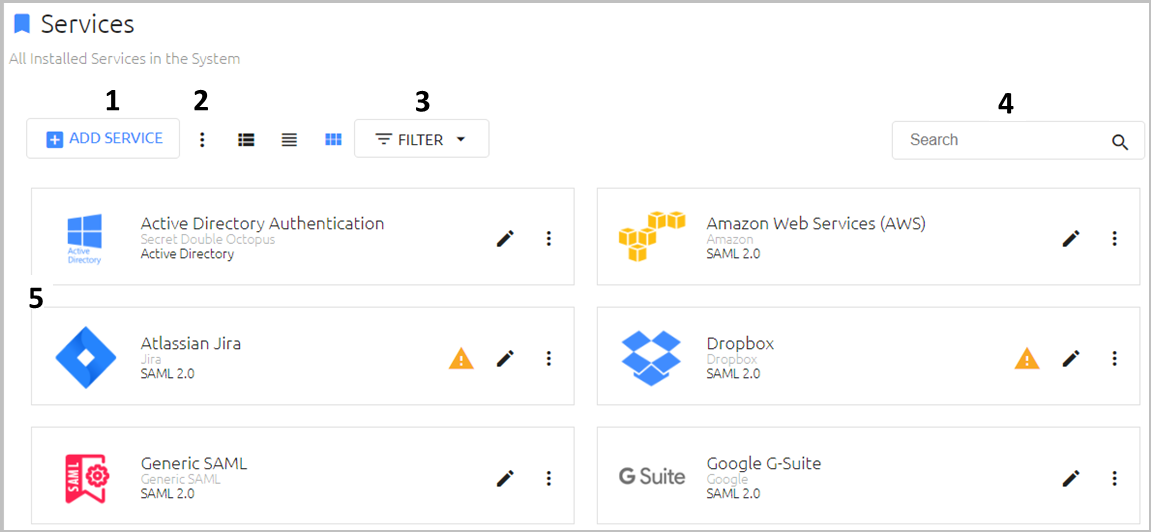
The Services page displays information about all added services and enables you to perform various administrative actions on the services. The main portions and features of the page are described in the table below the diagram.
Number | Feature | Description / Notes |
|---|---|---|
1 | Add Service button | Enables you to add a new service. For details, refer to Creating a Service. |
2 | Display mode selector | Allows you to switch to multiselect mode (to perform bulk operations) or to display a list of deleted services. For details, refer to Performing Actions on Services. |
3 | Filter | This feature shows the total number of enabled and disabled services, and allows you to filter the Services list according to the selected option (e.g., clicking Disabled displays only services that are currently disabled). |
4 | Search tool | To quickly locate a service, type all or part of the service name in the Search field. Keep in mind that the search will be performed only on services that match the current filtering. |
5 | Services list | Lists your installed services and provides basic information about each one, including the service name, issuer and type. A You can perform various operations on individual services directly from the Services list. For details, refer to Performing Actions on Services. |

The following management operations are available directly from the Services list:
Multiselect feature: Clicking the
 icon at the upper left corner of the Services list opens an actions menu from which you can enable / disable multiple services simultaneously.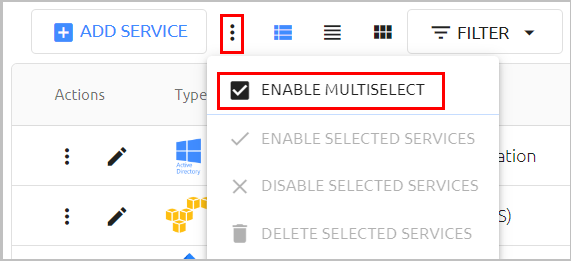
When you click Enable Multiselect, checkboxes appear next to each service, allowing you to select one or more services in the Services list. Once services are selected, you can disable them (if they are currently enabled), enable them (if they are currently disabled), or remove them from the Services list.
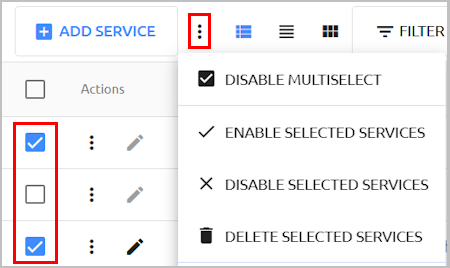
To hide the checkboxes and exit selection mode, click Disable Multiselect.
Deleted service management: To view services that have been removed, click
and select Display Deleted Services. 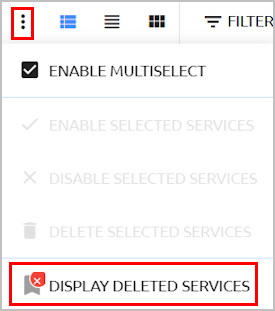
The Deleted Services list is read-only, but you can filter the list according to keyword, and restore a removed service.
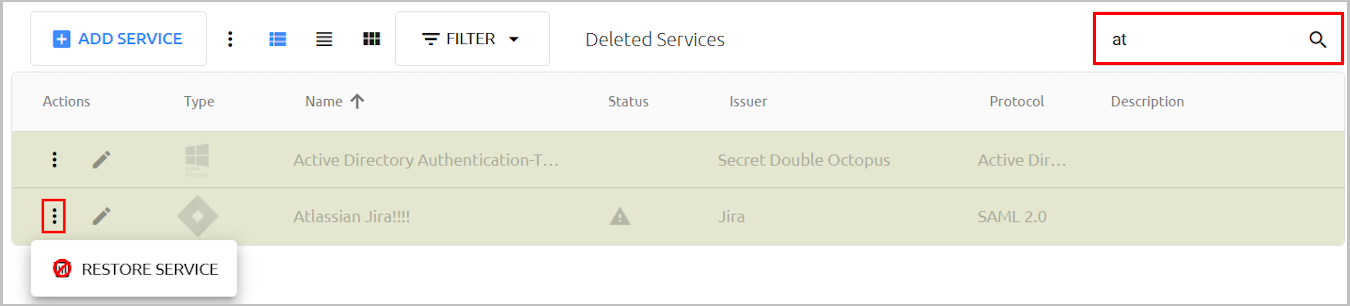
If you are working in multiselect mode, you can restore services in a bulk operation by clicking Restore Selected Services.
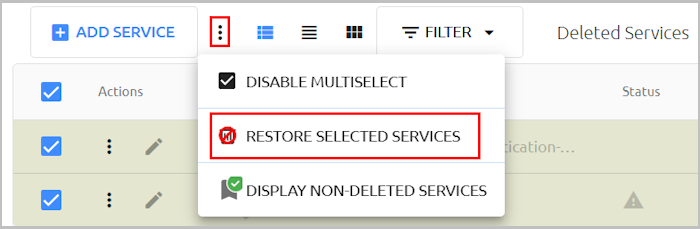
To return to the default view of the Services list, click Display Non-Deleted Services.
Note: Restored services are always disabled by default, and need to be manually enabled.Edit Service function: The Edit action allows you to make updates to the settings of a service. To access service settings, click
 in the tile or the row of the relevant service.
Service actions menu: To open the actions menu, click
in the tile or the row of the relevant service.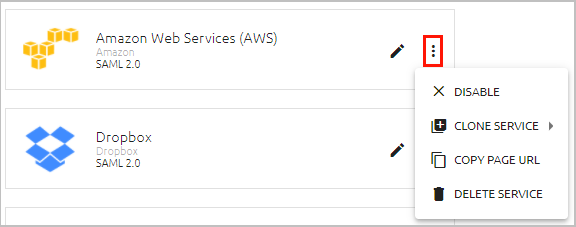
The actions are:
Enable/Disable: Enables a service that is currently disabled, or disables a service that is currently enabled.
Clone Service: Creates a new instance of the service. All settings of the cloned service are identical to the original service except for certain Sign On settings. For more information, refer to Cloning Services.
Copy Page URL: Provides quick access to the service URL for user authentication. This action is available for SAML services only.
Delete Service: Removes the service from the Octopus Management Console.
Note: These actions are also available on the settings pages of individual services.
Cloning Services
The Clone Service action enables you to create a new instance of an existing service. For convenience, all service settings are automatically copied, allowing you to configure only the adjustments that are required for the new service. The following Sign On settings, however, are NOT copied:
URLs configured for the service (e.g., Endpoint URL, etc.) are regenerated. The new URLs contain a random UUID instead of the service number. Furthermore, in SAML services, the specific service name no longer appears in the URL path (only saml is used).
In LDAP and RADIUS services, the Port field of the cloned service is left blank. The port number needs to be set before the service can be used.
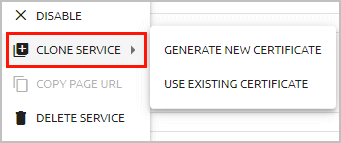
When cloning a service, you will be prompted to select one of the following options:
Generate New Certificate: Choose this option to create and use an additional service with settings similar to the original service.
Use Existing Certificate: Choose this option if you want to continue using the same service but with the newly generated Sign On settings. After cloning the service ,copy the new URLs to the service-side settings.
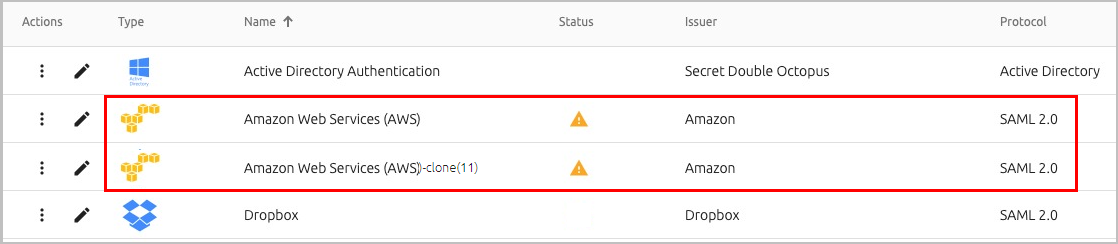
The name of the cloned service is automatically generated and includes the word clone as well as a unique identifier, to avoid cloned service name duplications.
The Add Service feature enables you to integrate different types of services with the Octopus Management Console. The following categories of services are available:
Generic services: These services include RADIUS, REST API, Generic SAML, and LDAP services. When you add any of these services, the Management Console presents an empty template in which you need to enter all the required parameters.
Customized templates: These include selected services commonly used in enterprises (e.g., Office 365, Jira, etc.) When you add these services, the Management Console presents a template customized for the selected service, in which some of the parameters are pre-populated.
Active Directory Authentication services: This is a service unique to Secret Double Octopus that enables authentication for Windows, Mac and Microsoft Exchange Server.
OpenID Connect: This service type enables you to integrate Octopus Authentication with any service that supports the standard OIDC protocol.
Entra ID EAM: This service enables users to log into the Microsoft Entra admin center using the Octopus platform as a means of two-factor authentication.
WS-Fed: Enables integration between the Octopus Authenticator and the WS-Federation mechanism. This allows full-scale integration with Entra ID, so the Octopus platform can be used on Entra ID domain-joined machines.
Service Integration Workflow
The general process of integrating a service with the Management Console is the same for all service types. The steps involved are as follows:
Create the service: Select the service type and specify the service's name, issuer and display icon. The name of the service must be unique.
Configure general details: Add a description and change the default logo that is displayed to users on the Login screen when they authenticate.
Set parameters: Parameters are settings of the specific service that the Octopus Management Console requires for successful integration. In most cases, the parameters are the configuration received from the service side, and you can copy them to the Octopus Management Console.
Set sign on details: These are the sign-on settings required for the protocol used by the service. After configuring the sign on details, copy them to the Admin Console of the service. Sign on details are generated automatically and need to be copied to the service side.
Select directories and users: Select the directories that have authorization to authenticate to the service. You can then assign specific Groups and users to the service.
For more information about creating a service, configuring general details and selecting users, refer to Creating a Service and Assigning Users.
For information about setting specific parameters and sign on details, refer to the topic describing configuration for the relevant service type.
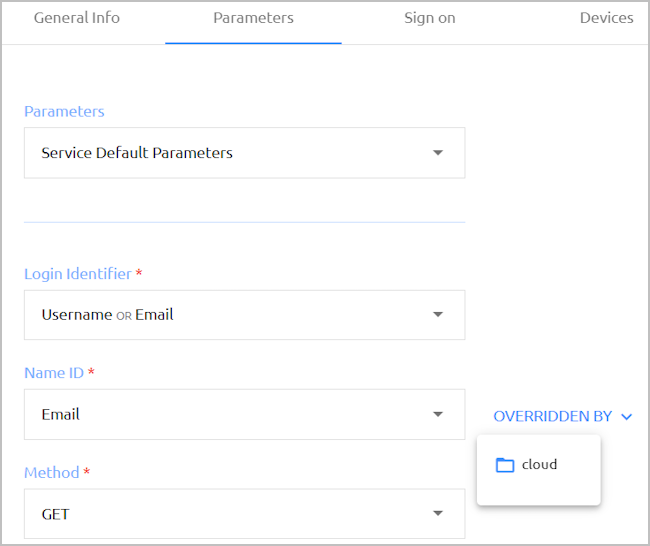
For information about creating directory-specific parameters that override default service parameters, refer to Overriding Default Service Parameters.
For information about defining security mechanisms related to workstations and browsers used to authenticate to a service, refer to Configuring Service-specific Workstation and Browser Settings.
For information about setting up shared account login to a service, refer to Configuring Shared Account Support for Web Services.
Although each service integrated with the Octopus Management Console has its own parameters and sign-on details, the processes of creating a service and assigning users are the same for every service you add. The following sections explain these processes in detail.
Adding a Service and General Information
The first step in any service integration is adding the service and specifying its basic details.
To add a service:
Open the Services menu and click Add Service.
In the tile of the service type that you want to add, click ADD. You can filter for services you need by entering the service name or related keyword in the Search field.
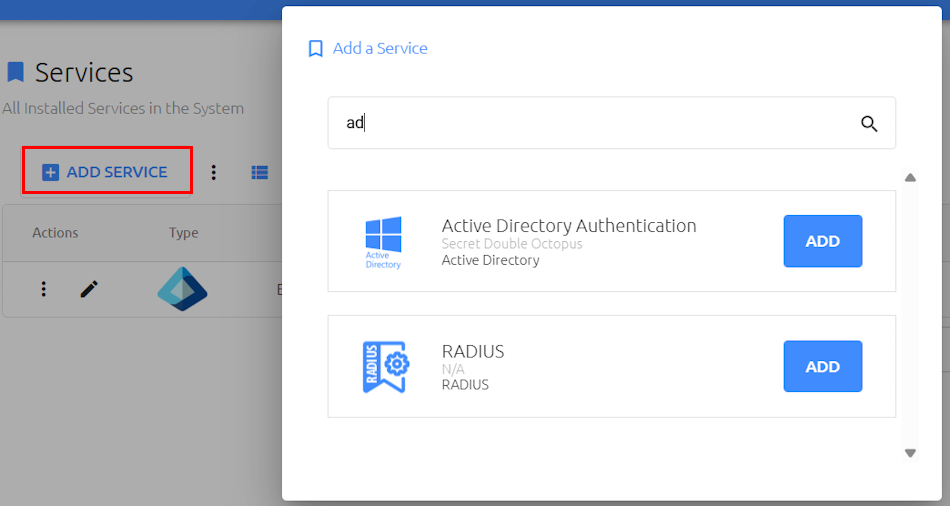
A dialog opens displaying a default name, issuer and display icon for the service.
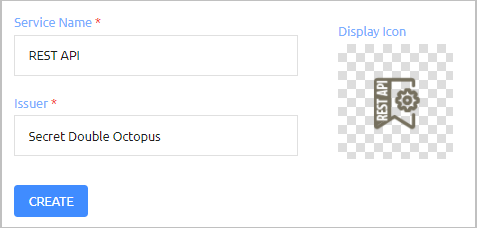
If desired, update the default service name and issuer. To change the icon, click the tile and navigate to the file you want to upload. Supported image size is 128x128 pixels.
Note: It is not mandatory to update these settings at this point. You will be able to modify the name, issuer and display icon after creating the service.Click Create.
The General Info tab for the service opens.
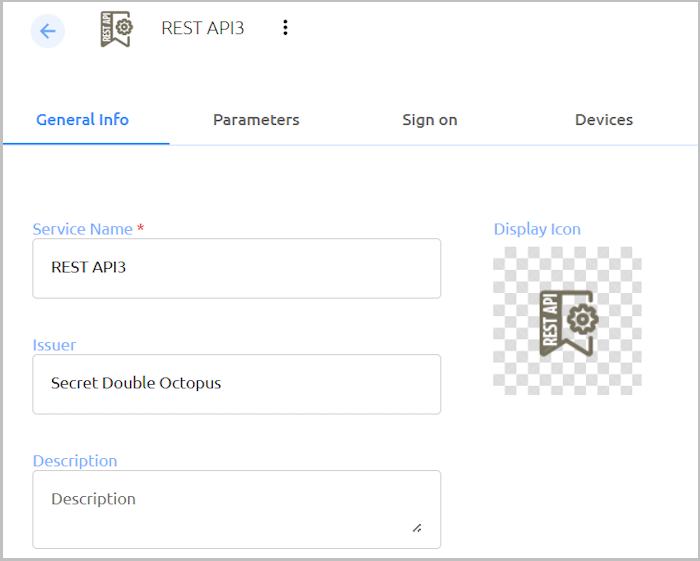
If relevant, configure the following additional settings for the service:
Service activation: By default, the service is enabled upon creation. If you don't want the service to be active right away, click
and select Disable.Service description: You may enter a brief note about the service in the Description field.
Click Save. Then, from the toolbar at the top of the page, click PUBLISH and publish your changes.
Assigning Directories and Users to a Service
In order to be able to access a service using Octopus Authenticator, a user needs to be assigned to the service within the Octopus Management Console. Any user who is not specifically assigned to a service will not have authorization to authenticate to the service.
Before assigning users to a service, it is recommended to assign the relevant directory (or directories) to that service.
IMPORTANT: In order to enable users to authenticate to Windows using a FIDO key, the AD or Okta directory must have a configured domain. It is recommended to open the directory settings and verify that the Domain field is completed.
The following procedure explains how to assign directories and users from the service settings.
Note: A service can be enabled or disabled for an individual user from the Services tab, in the settings of the relevant user.
To assign directories and users to a service:
Open the settings of the relevant service and select the Directories tab. Select the checkboxes of the directories that you want to integrate with the service, and then click Save.
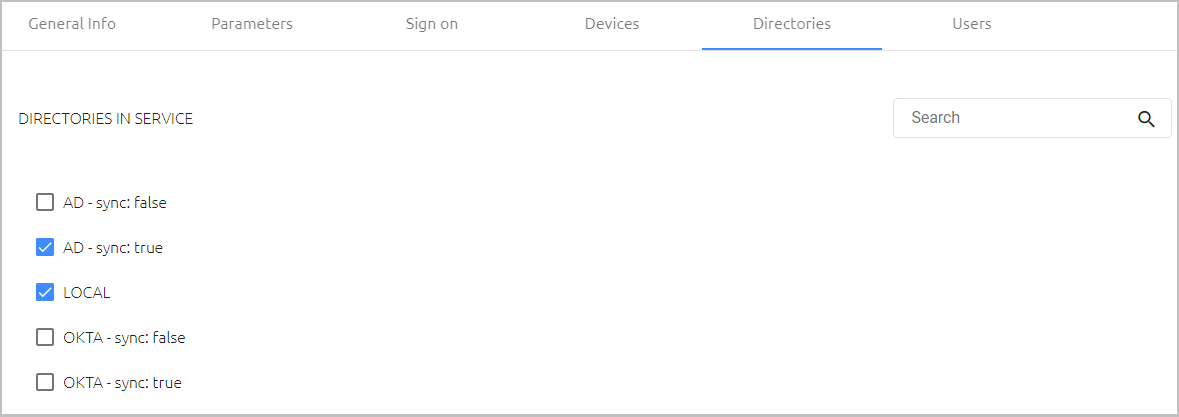
Only ONE directory may be selected for integration with LDAP services.After selecting directories, open the Users tab and click Add.
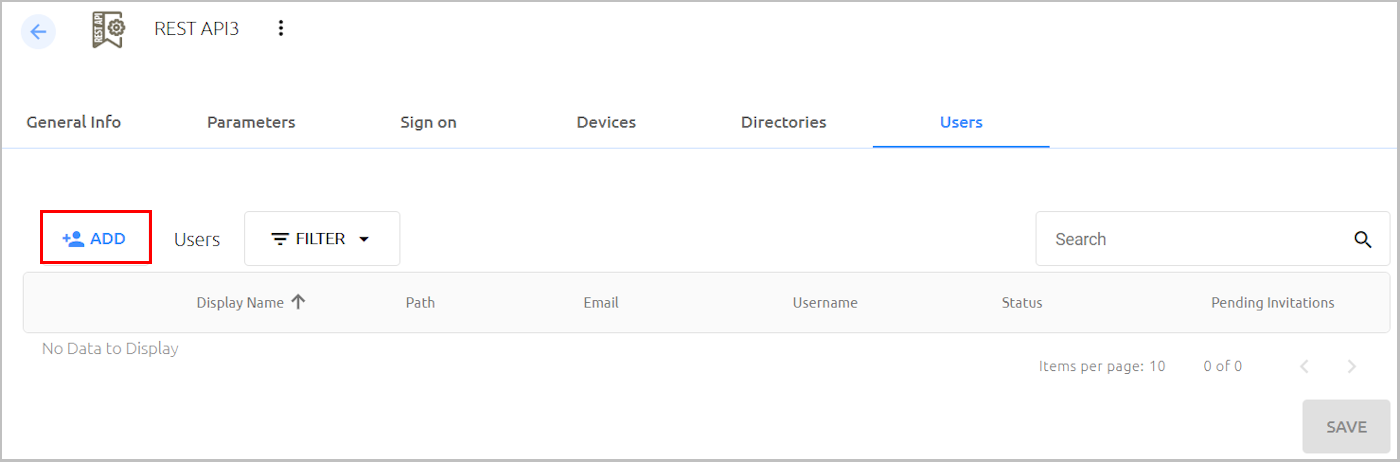
The Add Users To popup opens. A list of directories integrated with the Management Console appears on the left side of the popup.
Open the directories tree and select the checkboxes of the users and Groups that you want to add to the service.
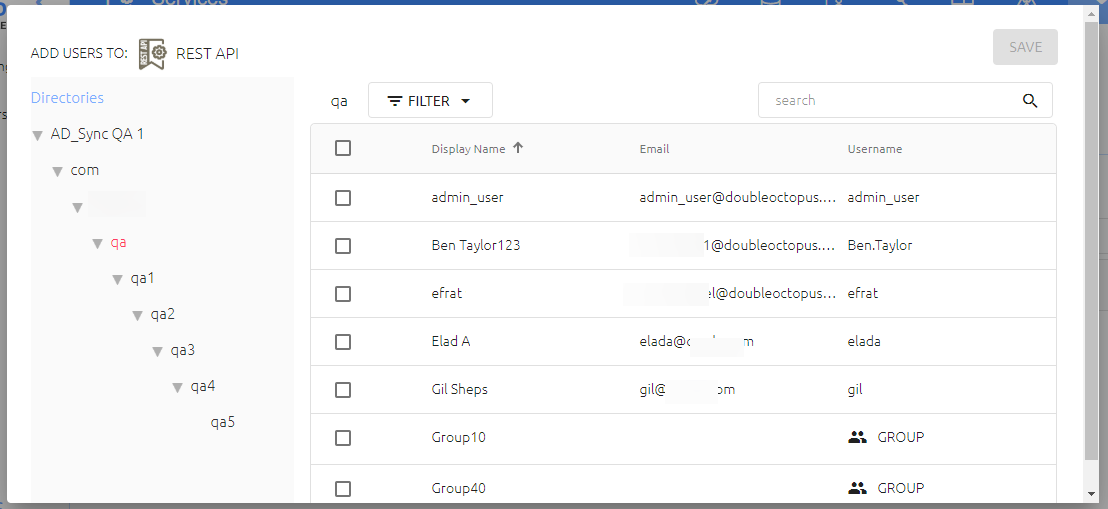
When you have finished making your selections, close the popup by clicking SAVE.
From the toolbar at the top of the page, click PUBLISH and publish your changes.
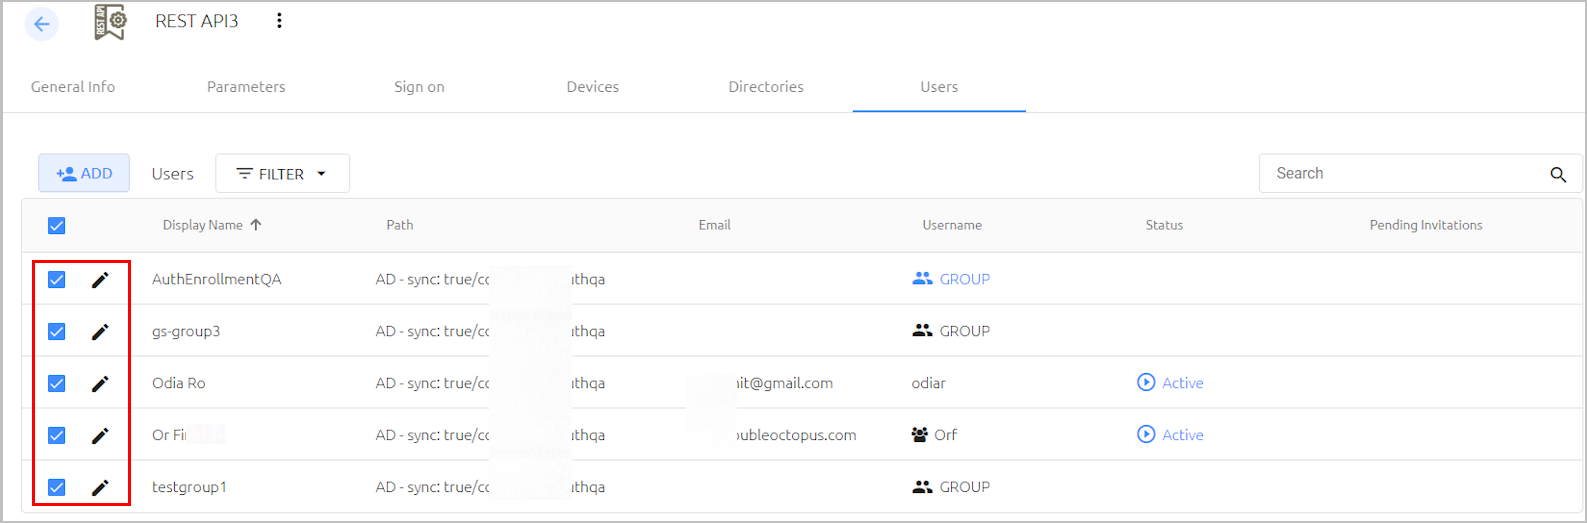
After assigning users to a service, you can manage them directly from the Users tab. To enable or disable the service for a specific user, toggle the checkbox on the left side of the row. Clicking the Edit icon next to the checkbox opens the individual settings for that user.
Portal Auto Launch
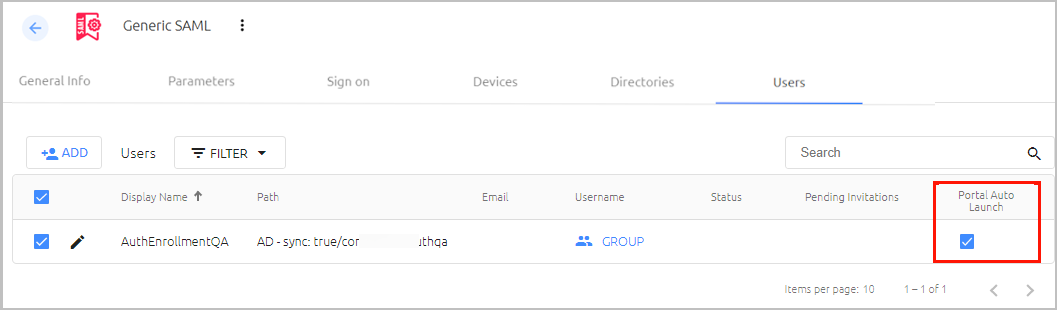
The Portal Auto Launch column, which is relevant only to SAML services, indicates whether the Auto Launch feature is currently enabled for that group / user. (When the feature is enabled, the SAML service opens automatically upon login to the User Portal.) You can enable or disable Automatic Launch for any group or user, regardless of whether the Automatic Launch toggle is selected for the SAML service (in the Sign on tab of the service settings).
In the example below, Automatic Launch is enabled for the group, matching the setting specified in the Sign on tab of the SAML service.
If the setting for a group or user differs from that specified in the service settings, the exception is indicated by an Information icon in the column. In the following example, Auto Launch is NOT enabled for this particular group, but it is enabled in the service settings.
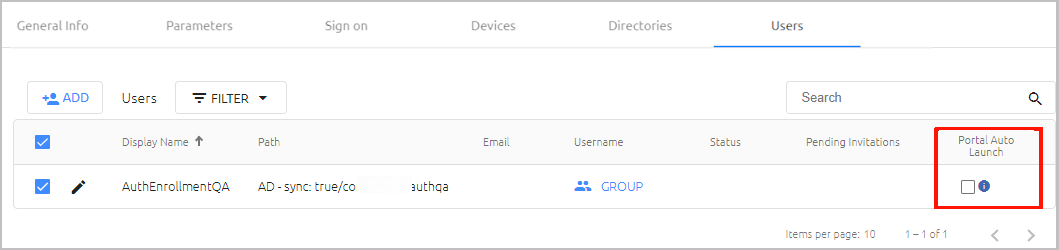
To configure the Automatic Launch setting for a group or user, select or clear the Portal Auto Launch checkbox, and then click Save.
Note: To configure Automatic Launch, SSO must be enabled in the SAML service settings. If SSO is not selected in the service settings, the Portal Auto Launch checkbox is disabled.
Admin Elevation
The Admin Elevation column, which appears in Active Directory Authentication services only, is relevant for Groups assigned to the service. When the checkbox is selected, users belonging to the Group are able to get temporary Admin privileges to perform specific operations on a workstation.
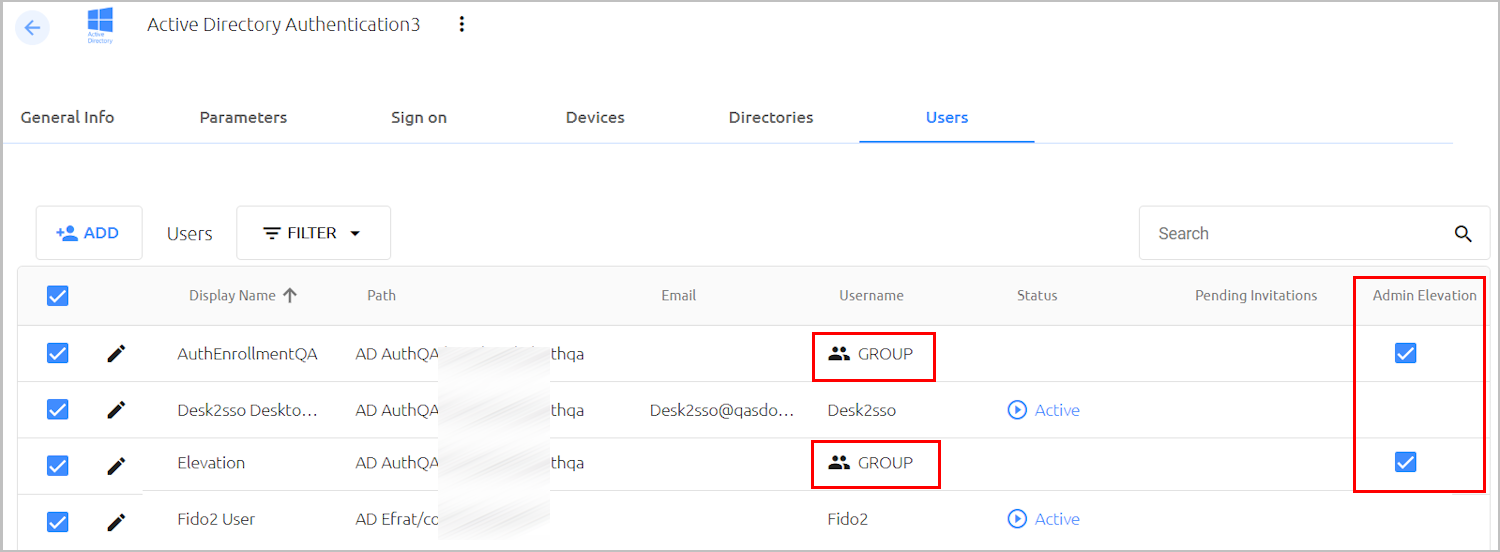
To receive Admin permissions, members of an Admin Elevation group choose the relevant application and select Run as administrator. They then need to approve a push authentication request. Upon successful authentication, they are granted Admin permissions for that application only. After quitting the application, user privileges revert to the original permissions level.
The Admin Elevation feature operates in conjunction with the setting configured in the Windows MSIUpdater (version 4.3.0 and up). For details, refer to the Octopus Desk for Windows Installation Guide.
Configuring Service-specific Workstation and Browser Settings
The Devices tab for a service enables you to define various security mechanisms related to workstations and browsers used for authentication to specific services integrated with the Octopus system.
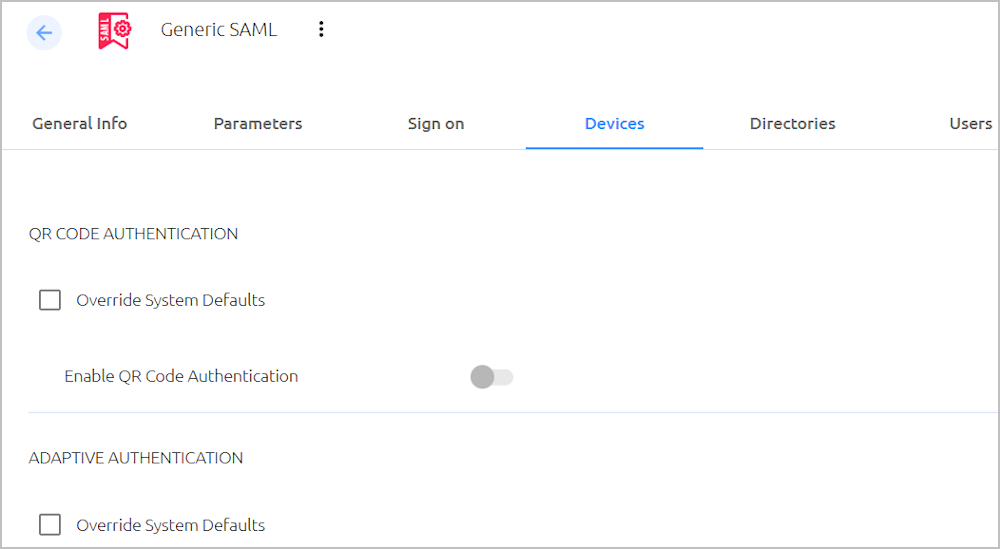
QR Code Authentication
When this setting is enabled, users have the option of authenticating to the User Portal and web services using a QR code displayed on the Login page for the service. Users logging in from workstations scan the QR code with their enrolled mobile devices. Users working on their mobile devices can tap the QR code to generate a push notification from Octopus Authenticator. They then approve the authentication request to access the required service.
IMPORTANT: Services that support QR code authentication include all SAML services, Entra ID, WS-Fed and OIDC services.
QR code authentication is NOT currently supported for Windows and Mac login.
The global setting for activation of QR code authentication is defined in the Devices tab of the System Settings menu. However, if you want to enable or disable the feature for a specific service, you can override the global setting for that service only, in the Devices tab of the service's settings.
Note: QR code authentication is not supported for services that have the Check Password setting (in the Sign on tab) enabled.
To enable / disable QR code authentication for a specific service:
- From the Services menu, click
 to open the service settings. Then, select the Devices tab.
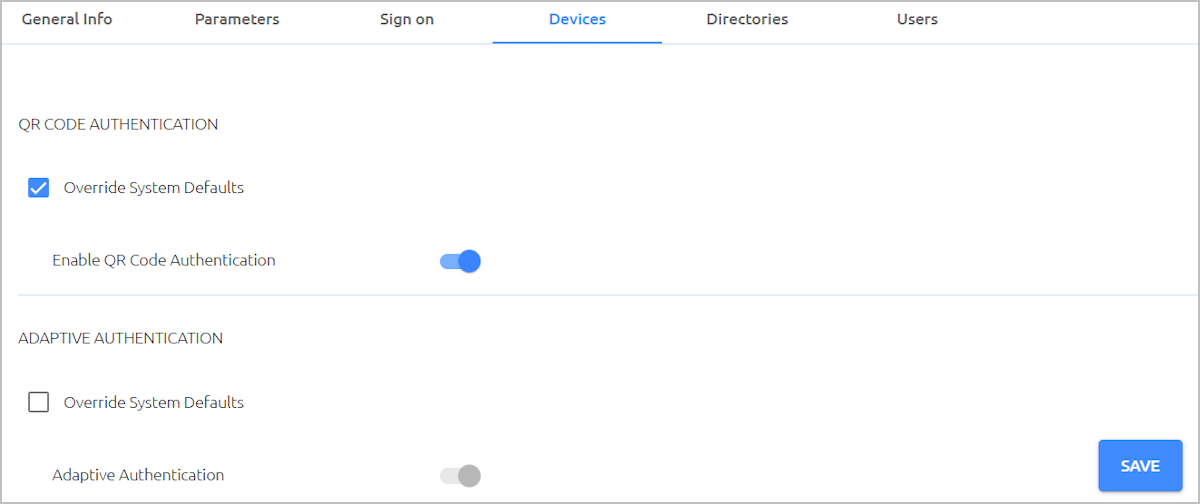
 - Under QR Code Authentication, select the Override System Defaults checkbox to enable the toggle button below.
- Click the toggle to enable / disable the setting, as required. Then, click Save.
Clicking Restore System Settings (at the bottom of the tab) resets all Adaptive Authentication settings to the default values defined in the System Settings menu. After clicking this button, confirm the action by clicking Restore in the verification popup. Then, click Save.
Adaptive Authentication
Adaptive Authentication provides an extra layer of security when authentication is attempted from a workstation or browser not previously used for Octopus Authentication. When the feature is enabled, users authenticating for the first time from a unrecognized device are required to enter the verification code that is generated and displayed in the Octopus Authenticator mobile app. Following the first successful authentication, you can either designate the browser or workstation as a Trusted device (strong authentication is no longer required), or you can specify a frequency at which users are required to enter a code again.
Global settings for Adaptive Authentication are defined in the Devices tab of the System Settings menu. However, if a specific service requires different handling of Adaptive Authentication, you can configure other settings for that service only, in the Devices tab of the service's settings. For example, you may not want to use Adaptive Authentication for a given service, or you might want to change the number of digits in the verification code.
To define Adaptive Authentication settings for a specific service:
- From the Services menu, click
 to open the service settings. Then, select the Devices tab.
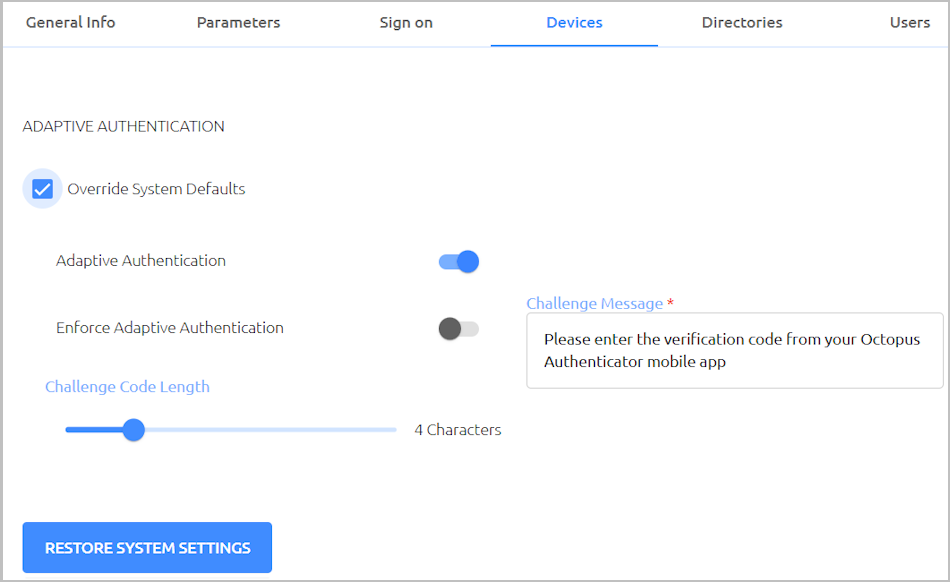
 - Under Adaptive Authentication, select the Override System Defaults checkbox to enable the settings below.
- Configure the following settings as required:
Setting Description / Notes Adaptive Authentication Activates / Disables the Adaptive Authentication mechanism. When the toggle is not selected, the other settings are disabled. Enforce Adaptive Authentication This setting determines whether the Adaptive Authentication mechanism will apply to users authenticating with versions of Octopus Authenticator lower than 5.0. When the setting is off, users with previous versions of Windows, Mac or Exchange agent will be able to authenticate from an unrecognized device without entering a challenge code. When the setting is on, authentication will fail, and these users will need to upgrade to the newest version in order to successfully authenticate. Challenge Code Length Number of characters in the verification code. Valid values range from 3-8. The default value is 4. Challenge Message The message displayed to users prompting them to enter the verification code. (This setting does not appear in Active Directory Authentication service settings.)
The Workstation Trust Expiration setting, which appears in Active Directory Authentication services only, determines how often Adaptive Authentication is required following the first successful login to a workstation. The options are:
Option Description Never The workstation is a Trusted device and strong authentication is no longer required. Always Users receive a verification code with every login to the workstation. After Adaptive Authentication is required periodically. When selecting this option, specify the expiration period in the fields to the right. 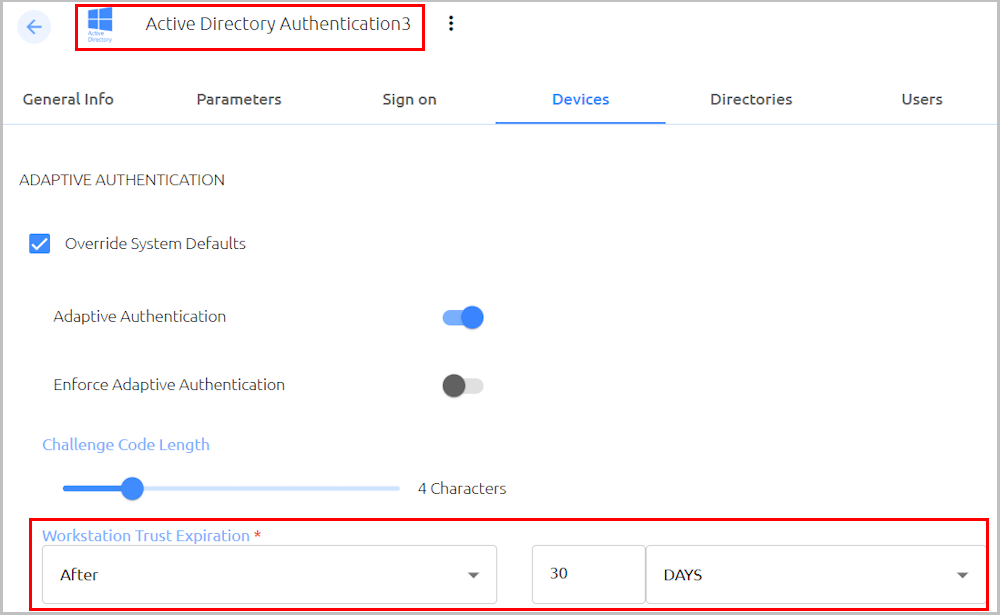
Click Save.
Clicking Restore System Settings resets all Adaptive Authentication settings to the default values defined in the System Settings menu. After clicking this button, confirm the action by clicking Restore in the verification popup. Then, click Save.
Distributed Workstations Vault Settings (ADPA only)
Active Directory Authentication services feature an additional setting in the Devices tab which allows you to choose the version of the Agent-driven Passwordless Authentication protocol used by the platform. The ADPA protocol is used by Octopus agents (Windows, Mac, RADIUS, etc.) to perform authentication queries against the Octopus Authentication Server. The version selected determines the level of security hardening for client-server communication. The options are:
- V1: Supports both legacy and newer workstation Agent versions. (Legacy workstations are those running versions below Windows Agent 3.3 and Mac Agent 2.3.0.) Legacy workstation support is generally implemented when support of the Exchange server is required.
- V2: Supports newer workstation Agent versions only.
- V3: Supports ADPA with signed payload only.
The global setting for Minimum Supported ADPA Version is defined in the Devices tab of the System Settings menu. However, you can override the default setting for your Active Directory Authentication service in the Devices tab of the service's settings.
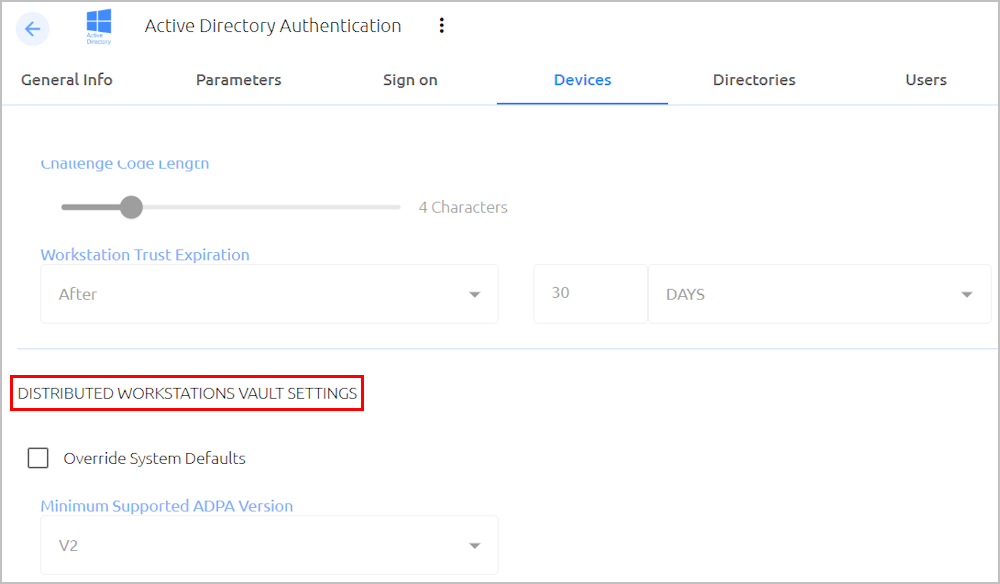
To set Minimum Supported ADPA Version for an AD Authentication service:
- From the Services menu, in the row or card of the relevant AD Authentication service, click the Edit (pencil) icon to open the service settings. Then, select the Devices tab.
- Under Distributed Workstations Vault Settings, select the Override System Defaults checkbox to enable the settings below.
- From the Minimum Supported ADPA Version dropdown list, select the required version. Then, click Save.
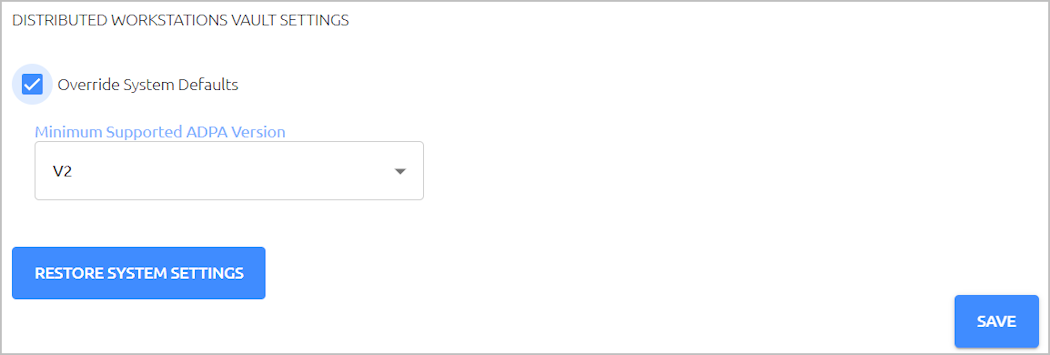
IMPORTANT: If the Compatibility Mode toggle in the global Distributed Workstations Vault Settings (System Settings > Devices) is OFF, the V1 option is not supported.
Clicking Restore System Settings resets all settings in the Devices tab to the default values defined in the System Settings menu. After clicking this button, confirm the action by clicking Restore in the verification popup. Then, click Save.
Configuring Shared Account Support for Web Services
Octopus Authentication Server supports the ability for different users to authenticate to a single shared service account using their personal credentials and devices. This feature is especially useful for organizations with one company account that is accessed by multiple users. Services supporting shared account login include all SAML services, as well as WS-Fed services.
Setting Up Support for Shared Account Login
In order for users to successfully log into a shared service account, user and service settings need to be configured correctly. The following requirements are related to user configuration:
- User status: All guest users must be enrolled and Active.
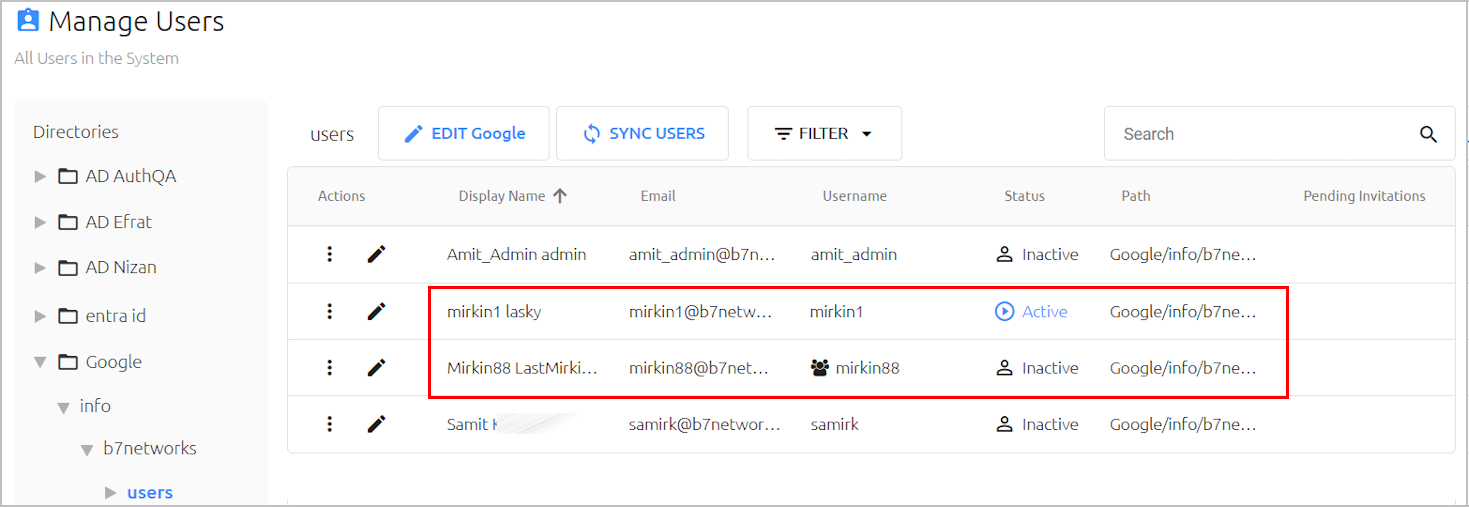
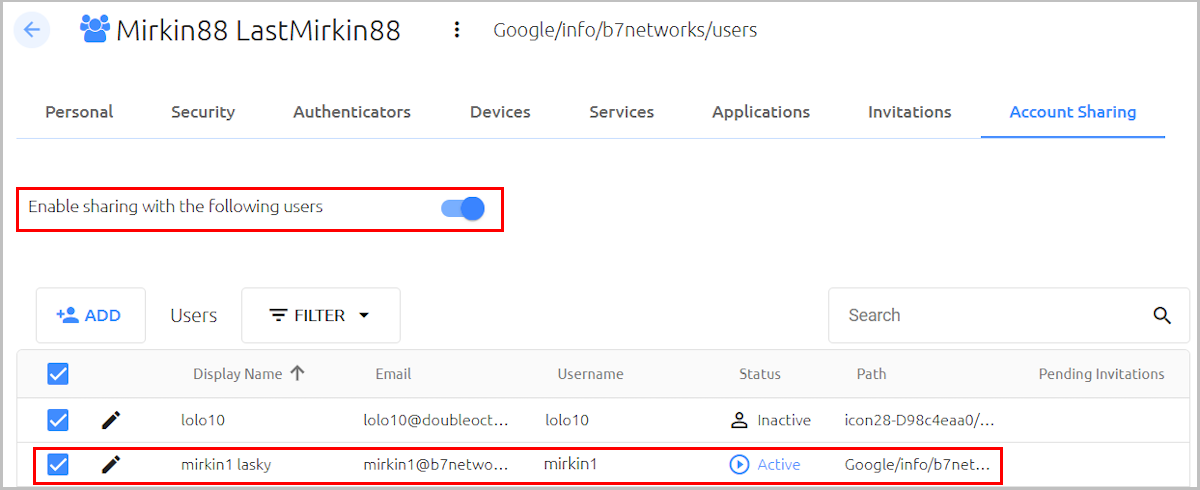
- Account sharing details: In the Account Sharing tab of the account user, the toggle must be enabled and all guest users need to be added.
In addition, the following configurations are required in the settings of the relevant service:
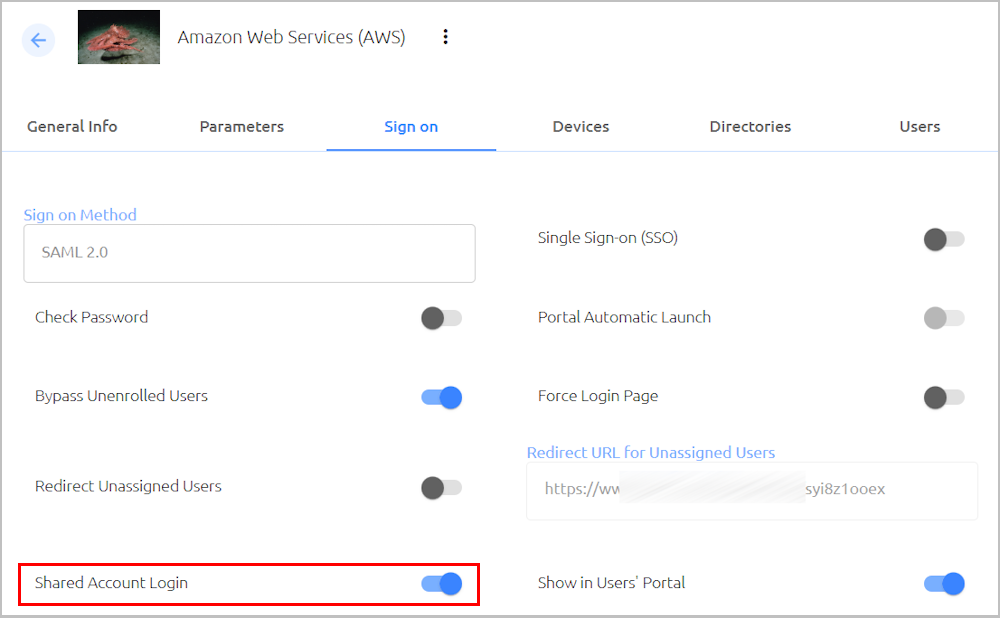
- In the Sign on tab, the Shared Account Login setting must be enabled.
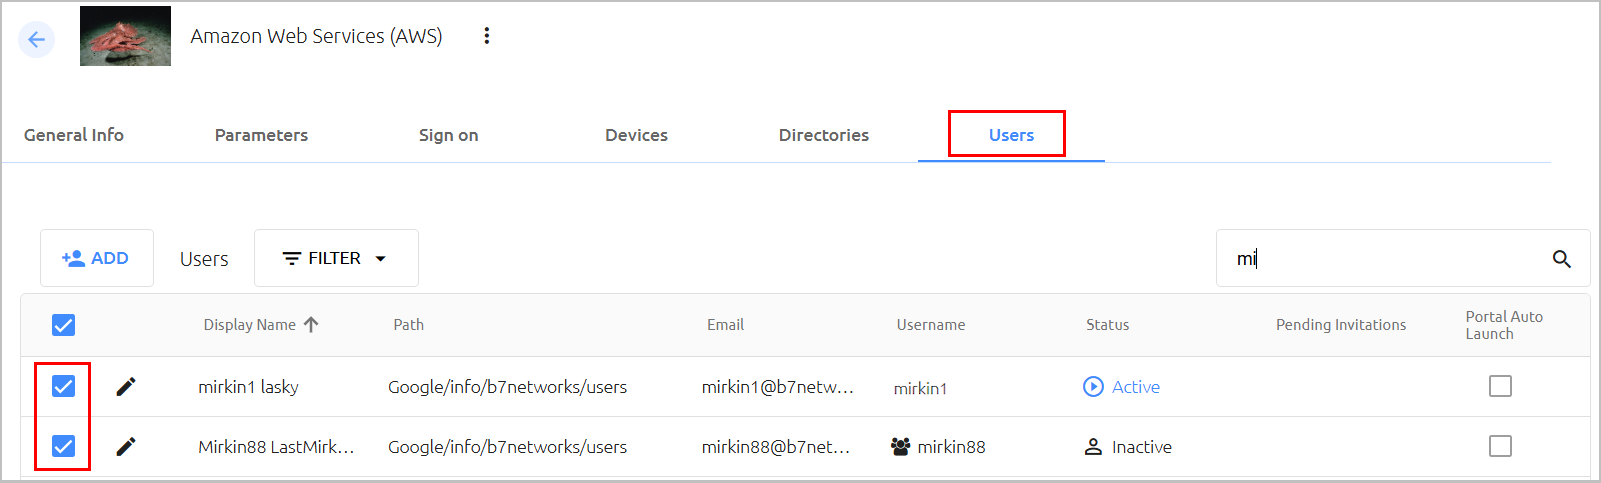
- In the Users tab, the account user and all guest users need to be assigned to the service.
Shared Account Service Authentication Flow
The login flow for guest users to a shared service account is as follows:
- On the Login page for the service, guest users enter their own username (e.g., email) and click Next. The system recognizes the guest user and a Shared Accountcheckbox is displayed on the Login page.
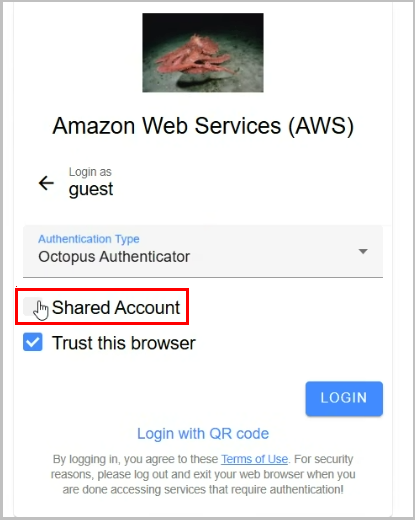
After selecting the checkbox, the guest user enters the username of the account user, and clicks Login.
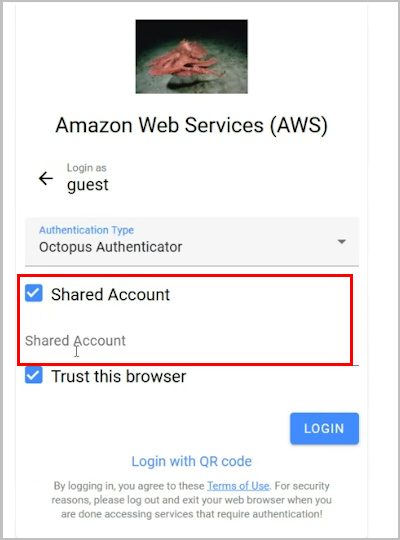
A push authentication request is sent to the mobile device of the guest user.The guest user accepts the authentication request.
Upon successful authentication, the account user is logged into the service.
Configuring RADIUS Services
The following sections explain the parameters and sign on settings that you need to configure when adding a RADIUS service.
RADIUS Parameters
Parameters are settings of the RADIUS service that the Octopus Management Console requires for successful integration. To view and update these values, open the settings for the relevant RADIUS service and select the Parameters tab.
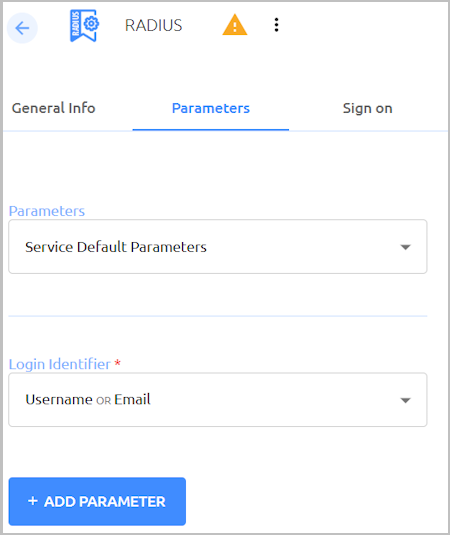
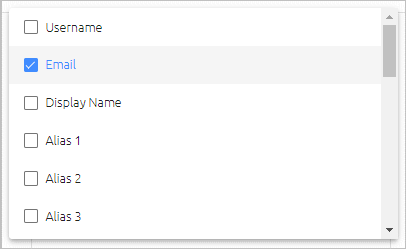
The Login Identifier is the identifier that the user needs to enter in order to log into the RADIUS service (email, username, etc.). You can configure multiple identifier types to support various platforms. To specify the identifier(s), click the field and select the relevant checkbox(es).
To define additional parameters that are not included in the generic template, click Add Parameter. Then, enter the name of the parameter key and select its value from the dropdown list. If you select the Free Text option, an additional field opens where you can enter the required value(s).
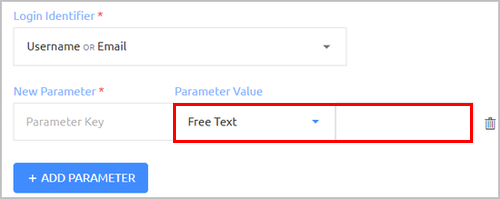
The following additional parameter is commonly configured for RADIUS services:
Parameter | Value | Description / Notes |
|---|---|---|
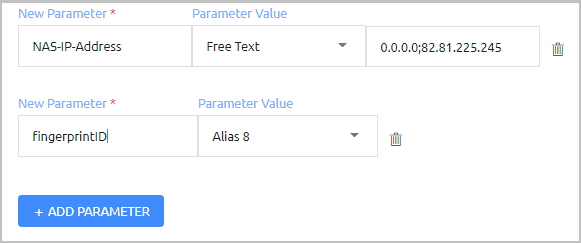
NAS-IP-Address | Free text | The IP of the RADIUS server. To support multiple clients, you can enter several semicolon-separated values, e.g., 0.0.0.0;82.81.225.245 |
IMPORTANT: When multiple values are specified within a single parameter, the values have an OR relationship. However, the separate parameters are handled with AND logic, so all parameters must be matched for successful authentication. In the example below, the RADIUS client needs to send one of the specified IP addresses as well as a matching fingerprint.
After adding or updating parameters, click Save. Then, from the toolbar at the top of the page, click PUBLISH and publish your changes.
RADIUS Sign On Settings
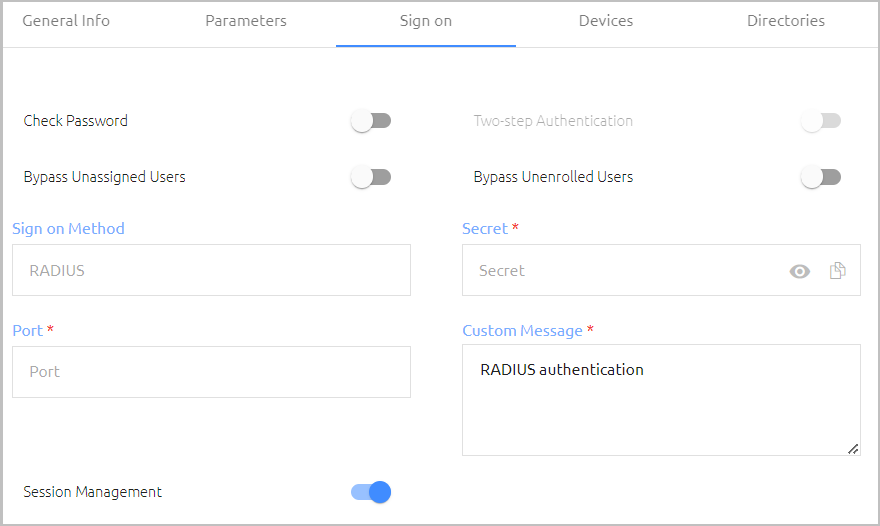
The sign on settings provide information required by the RADIUS service protocol. To view and update this information, open the settings for the relevant RADIUS service and select the Sign on tab. The settings are described in the table below the figure.
Setting | Description / Notes |
|---|---|
Check Password | When enabled, users are required to enter a password for MFA authentication. |
Two-step Authentication | This setting is used to support Adaptive Authentication for login to the RADIUS service. When enabled, users are required to enter the verification code that is generated and displayed in the mobile app after they have approved the push authentication request. Note: Adaptive Authentication for RADIUS services is not necessary for FIDO and bypassed users, as they routinely need to provide an accesss token in order to authenticate. Users working with a FIDO key receive the temporary token to enter using the Systray Retrieve Credentials function. Bypassed users should authenticate with the usual bypass token mechanism. |
Bypass Unassigned Users | When enabled, users who are not assigned to the service will be allowed to login with username and password (without MFA). By default, this option is disabled, and unrecognized users are refused authentication. Bypass Unassigned Users is generally used on a temporary basis only, during gradual rollouts of Octopus Authenticator. |
Bypass Unenrolled Users | When enabled, users who are known to the system but have not yet enrolled a mobile device or workstation will be allowed to login with username and password (without MFA). |
Secret | The RADIUS secret key required for communication between the RADIUS service and Octopus Authenticator. To copy the secret (e.g., in order to paste it in the Admin Console of the RADIUS service), click the Copy icon. Click the Eye icon to unmask and mask the secret. |
Port | Port used for communication with the RADIUS server. |
Custom Message | Message displayed to the user upon successful authentication. Enter the text of your choice in the field. |
Session Management | When enabled, multiple authorization requests for a single authorization are ignored. |
After updating settings, click Save. Then, from the toolbar at the top of the page, click PUBLISH and publish your changes.
External Service Configuration
An Octopus Authentication RADIUS service replaces the direct connection to the RADIUS Server, and performs Octopus Authentication instead of the legacy Username and Password authentication. To redirect authentication requests to the Octopus Server, make the following change in your external RADIUS service configuration:
Replace the RADIUS Server URL with <EnterpriseBaseURL>:<port>
Enterprise Base URL: The address of the Octopus Authentication Server (or the load balancer in distributed deployments). The URL is displayed in the Octopus Management Console under System Settings > General Settings.
Port: The port defined in the Sign on tab of the Octopus RADIUS service.
The following sections explain the parameters and sign on settings that you need to configure when adding a generic SAML service.
Generic SAML Service Parameters
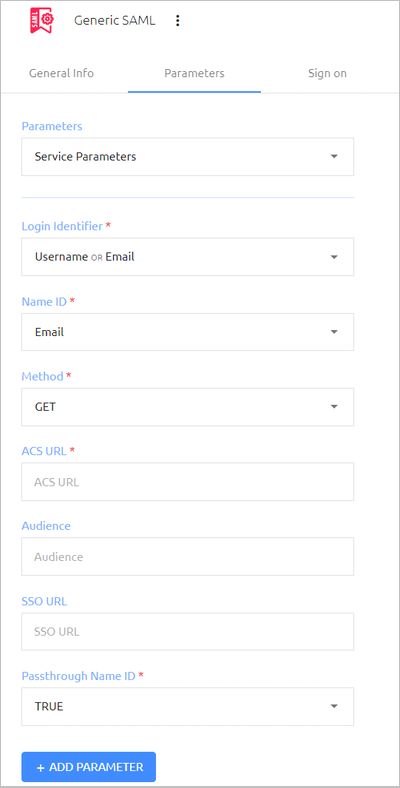
Parameters are settings of the SAML service that the Octopus Management Console requires for successful integration. To view and update these values, open the settings for the relevant SAML service and select the Parameters tab. Each parameter is described in the table below the figure.
After updating service parameters, click Save. Then, from the toolbar at the top of the page, click PUBLISH and publish your changes.
Parameter | Supported Values | Description / Notes |
|---|---|---|
Login Identifier | User fields | The identifier that the user needs to enter in order to log into the SAML service (username, email, etc.). You can configure multiple identifier types to support various platforms. To specify the identifier(s), click the field and select the relevant checkbox(es). |
Name ID | User fields | The identification that is sent to the service to identify the user in the service. When selecting a Name ID, verify that the server accepts this form of identification for user authentication. |
Method | GET / POST | Sets the service method:
|
ACS URL | URL | The return address to the service, following successful authentication. |
Audience | Value | A parameter used for service identification. The value will be sent to the service for additional verification that the authentication is valid and from a valid source. |
SSO URL | URL | This URL can be set as the authentication address that users utilize to authenticate and receive the authentication request. |
Passthrough Name ID | TRUE / FALSE | Used for getting the name ID from the SAML request (either from the subject or from the hint) and populating the Login field in our SAML Login page. |
The following are optional parameters that are commonly added for generic SAML services:
Parameter | Value | Description |
|---|---|---|
signResponse | TRUE | Signs the SAML response sent back to the service provider. |
nameIdentifierFormat | Free text value | The name identifier format to be sent to the service provider. |
nameIdentifierDomain | Free text value | The domain to be used as part of the Name ID <nameIdentifierDomain>\<nameID> |
oldSAML | Free text value | When the value is set to TRUE, the login page for the service will be displayed in the format used for older versions. In this format, Octopus Authenticator is the only authentication method offered, and there is no option for users to change their login identifier. Use the oldSAML parameter if you want users to authenticate with Octopus Authenticator only, or if the service does not support third party authenticators. |
| bypassOldSaml | Any value (e.g., TRUE) | This parameter can be added to integrated services running on embedded browsers (such as MS Office 365 and others) to enable successful Octopus and FIDO authentication to these services. |
samlIssuer | Free text value | Enter the issuer text as required by the SAML service. |
windowsFidoLogin | Any value (e.g., TRUE) | This parameter enables support of FIDO authentication to services that use older browsers or internal browsers, e.g., Office 365. Important: When using this parameter, the Check Password and Force Login Page options (on the Sign on tab) need to be enabled. |
| externalSsoUrl | Free text value | When this parameter exists and users do not possess an SDO SSO token, they are immediately redirected to the URL specified in the parameter's value. The parameter supports any URL, but generally the value used is the SSO URL of an external IdP. Important: For this parameter to function as expected, the SSO setting for the SAML service (in the Sign on tab) must be enabled. |
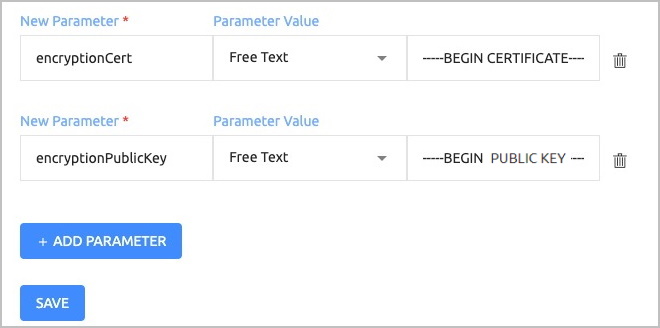
The following parameters implement whole SAML assertion encryption. The encryption certificate is provided by the SP federated partner holding the private key.
Parameter | Value |
|---|---|
encryptionCert | PEM certificate of the SAML service |
encryptionPublicKey | PEM formatted public key of the SAML service |
The following parameters support sending username and password in the SAML assertion:
Parameter | Value | Description |
|---|---|---|
username | Can point to any value from the user object (username, alias, etc.) | Returns the value in the SAML assertion. |
password | Any value | When this parameter exists, the password is sent from the vault. |
encodePassword Note: This parameter is relevant only when password is set. | Any value | When this parameter exists, the password is Base64 encoded. When the parameter is not set, the password is sent as clear text. |
The parameters below support sending user groups in the SAML assertion. When the groupsAttributeName parameter is defined, a list of all groups to which a user belongs is included in the assertion. The assertion contains only groups to which the user is directly linked (e.g., defined in the user’s memberof attribute in LDAP), and not groups inherited recursively. For instance, if a user is a member of group G1, and G1 is a member of G2, the assertion will contain only G1.
Parameter | Value | Description |
|---|---|---|
groupsAttributeName | roles, memberof, or groups | Name of the attribute in the SAML schema containing a user’s groups. When the parameter is set, user groups are sent as part of the SAML response. |
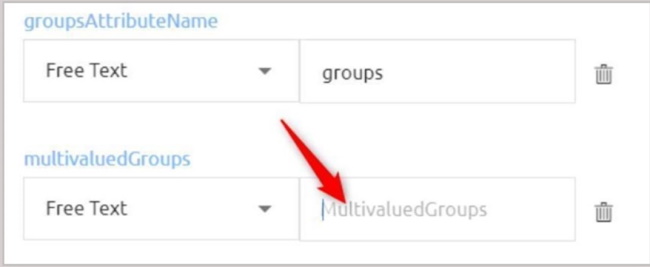
multivaluedGroups | Empty or any value | This optional parameter sets the format of the SAML when you use the groupsAttributeName parameter. If the parameter is not defined, or if the value is empty, the format is a comma-separated string. If any value is defined, the format is multi-line. |
groupsFullDn | Any value | When this parameter exists, the full DN of groups is sent instead of CN. groupsFullDn must be used together with multivaluedGroups. Otherwise, the response will be invalid. |
The following example shows how these parameters are added to the Parameters tab of the relevant SAML service. Since a value is defined for the multivaluedGroups parameter, the SAML response will display each value in a separate line.
Generic SAML Service Sign On Settings
The sign on settings provide information required by the SAML service protocol. To view and update this information, open the settings for the relevant SAML service and select the Sign on tab. The settings are described in the table below the figure.
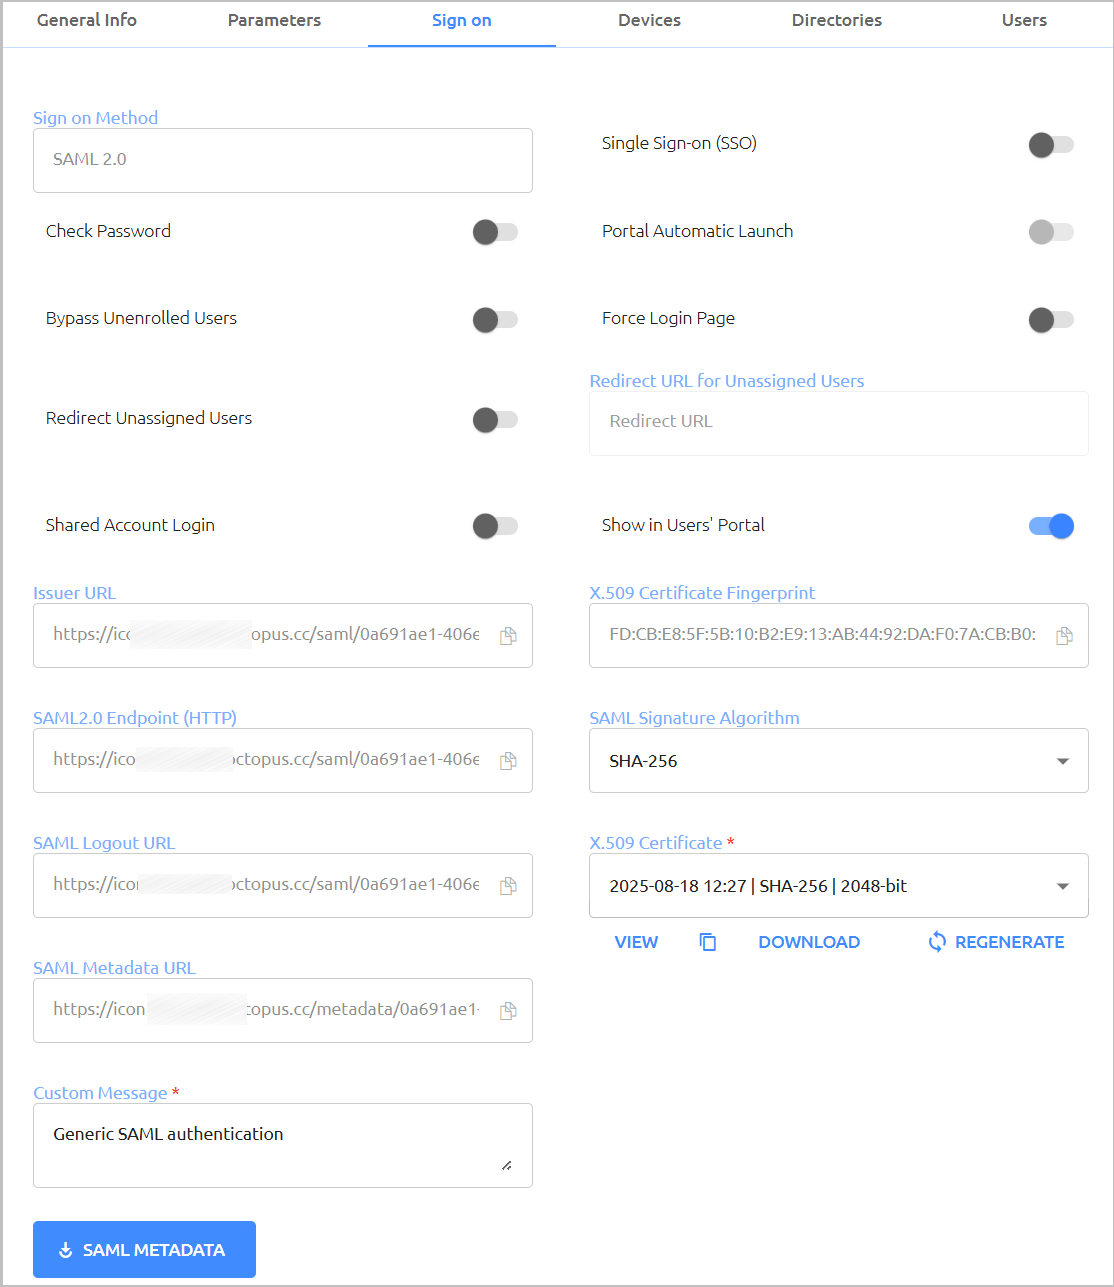
Setting | Description / Notes | Configurable? |
|---|---|---|
| Sign on Method | The authentication method used for the service. | No |
Check Password | When enabled, a password is required for authentication (in addition to the authentication methods used by Octopus Authenticator). | Yes |
Bypass Unenrolled Users | When enabled, users who are known to the system but have not yet enrolled a mobile device or workstation will be allowed to login with username and password (without MFA). | Yes |
Single Sign-on (SSO) | When selected, users who are currently logged into another integrated SAML service or logged into the User Portal can log into this service without having to authenticate again. | Yes |
Portal Automatic Launch | This toggle is enabled when SSO is used. When the setting is selected, the SAML service will open immediately upon successful login to the User Portal. The global setting you select here can be overridden for specific groups and users. For example, you can enable Automatic Launch for individual users even though the Automatic Launch toggle is not selected in the Sign On settings for the service. | Yes |
Force Login Page | When selected, users will be presented with the Login page for the service, where they select an authentication method every time they login. When Force Login Page is NOT selected (default setting), the Login page is presented on the first login to the service. Afterwards, the system recognizes users who have previously logged in and automatically authenticates them based on information stored in the browser. (Users who want to change their authentication method can clear browser data by selecting the Clear Authenticator Preferences self-service option in the User Portal.) Note: The Force Login Page setting is disabled when Single Sign-on (SSO) is selected. | Yes |
Redirect Unassigned Users | When enabled, users not assigned to the service can access the service via an alternate URL. After enabling the setting, enter the Redirect URL in the field to the right. Note: As this feature does not function as expected in legacy services, the setting should not be enabled for services that use the oldSAML parameter. | Yes |
| Shared Account Login | Determines whether or not shared account access to the service is permitted. When enabled, different users can authenticate to a shared account using their personal credentials and devices. | Yes |
| Show in User Portal | When enabled (default status), the service can be accessed from the User Portal. When this setting is disabled, the service does not appear in the Portal and users will be unable to log into the service via the Portal. | Yes |
Issuer URL | The URL used by the service to connect to Octopus Authenticator. To copy the URL (e.g., in order to paste it into the Admin Console of the SAML service), click the Copy icon. | No |
SAML2.0 Endpoint (HTTP) | The URL used by the service for SAML protocol communications. | No |
SAML Logout URL | The URL to which users are redirected when they log out of the service. | No |
X.509 Certificate Fingerprint | The calculated fingerprint of the generated X.509 certificate. | No |
SAML Signature Algorithm | The signature of the generated X.509 certificate. Select SHA-256 (default) or SHA-1. Note: SHA-1 is not supported for Red Hat Enterprise Linux 9.3. | Yes |
X.509 Certificate | The public certificate used by the service to authenticate with Octopus Authenticator. The following options are available:
| Yes |
SAML Metadata URL | Provides a link to the XML file containing the metadata for the service. To copy the link, click the Copy icon. | No |
Custom Message | The message displayed to the user upon successful authentication. Enter the text of your choice in the field.. | Yes |
Clicking SAML METADATA opens a new tab displaying all data configured for the service in an XML file format.
After updating settings, click Save (at the bottom of the tab). Then, from the toolbar, click PUBLISH and publish your changes.
IMPORTANT: For enhanced security, SAML service URLs (Issuer URL, Endpoint URL, etc.) in Octopus Authentication Server versions 5.0 and higher contain randomly generated UUIDs, instead of the service numbers used in previous versions. Services in new installations of Version 5.0 and higher will automatically use the new URL format. However, upgrades to these versions (from versions lower than 5.0) will preserve the original URL format, to avoid interruptions in workflow. After upgrade, you can use the Clone Service action to upgrade SAML service URLs to the new syntax.
Configuring Generic OpenID Connect Services
The following sections explain the parameters and sign on settings required for configuring a generic OpenID Connect (OIDC) service. Add this service type to integrate Octopus Authentication with any service that supports the standard OpenID Connect protocol.
Generic OpenID Connect Service Parameters
Parameters are settings of the OIDC service that the Octopus Management Console requires for successful integration. To view and update these values, open the settings for the relevant OIDC service and select the Parameters tab. Each parameter is described in the table below the figure.
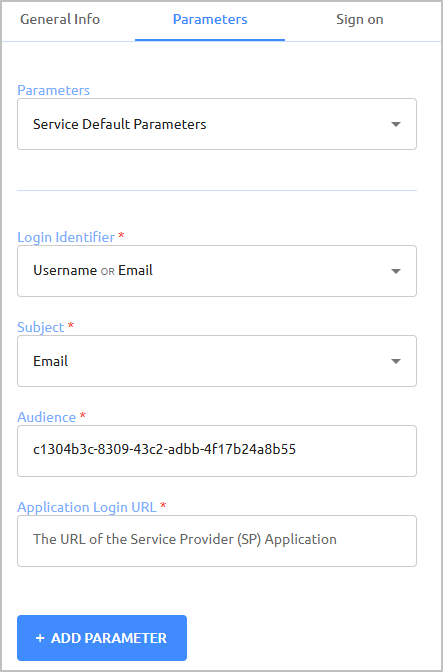
| Parameter | Description |
|---|---|
| Login Identifier | The identifier that the user needs to enter in order to log into the OIDC service (username, email, etc.). You can configure multiple identifier types to support various platforms. To specify the identifier(s), click the field and select the relevant checkbox(es). |
| Subject | The identification that is sent to the service to identify the user in the service. When selecting a Subject, verify that the server accepts this form of identification for user authentication. |
| Audience | A parameter used for service identification. The value will be sent to the service for additional verification that the authentication is valid and from a valid source. |
| Application Login URL | The URL to which users are directed to sign into the application. This is the login page of the Relying Party that redirects to the identity provider for authentication. |
After updating service parameters, click Save. Then, from the toolbar at the top of the page, click PUBLISH and publish your changes.
Generic OpenID Connect Service Sign On Settings
The sign on settings provide information required by the OIDC service protocol. To view and update this information, open the settings for the relevant OIDC service and select the Sign on tab. The settings are described in the table below the figure.
After updating settings, click Save. Then, from the toolbar at the top of the page, click PUBLISH and publish your changes.
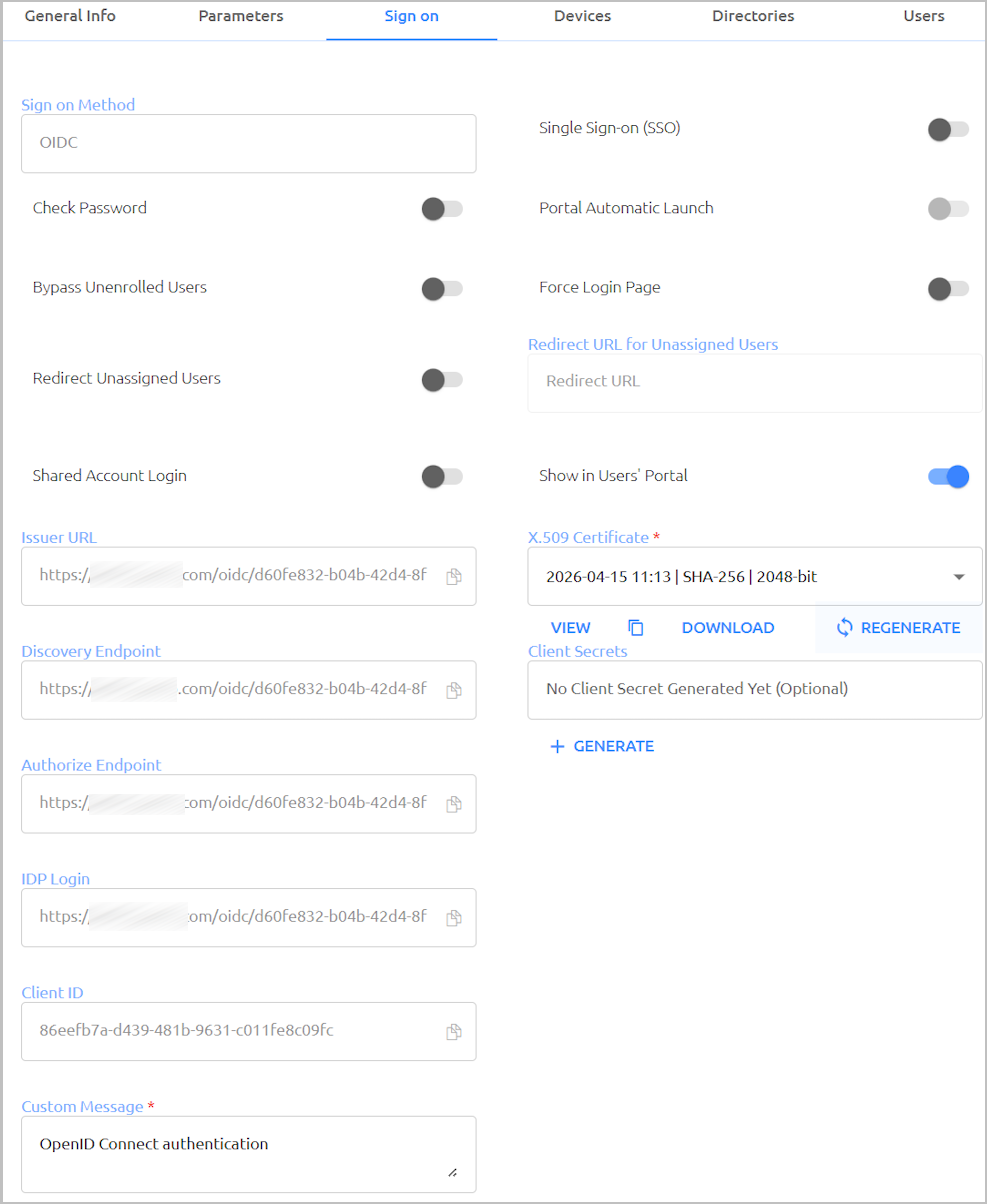
Setting | Description / Notes | Configurable? |
|---|---|---|
| Sign on Method | The authentication method used for the service. | No |
Check Password | When enabled, a password is required for authentication (in addition to the authentication methods used by Octopus Authenticator). | Yes |
Bypass Unenrolled Users | When enabled, users who are known to the system but have not yet enrolled a mobile device or workstation will be allowed to login with username and password (without MFA). | Yes |
Single Sign-on (SSO) | When selected, users who are currently logged into another integrated OIDC service or logged into the User Portal can log into this service without having to authenticate again. | Yes |
Portal Automatic Launch | This toggle is enabled when SSO is used. When the setting is selected, the service will open immediately upon successful login to the User Portal. The global setting you select here can be overridden for specific groups and users. For example, you can enable Automatic Launch for individual users even though the Automatic Launch toggle is not selected in the Sign On settings for the service. | Yes |
Force Login Page | When selected, users will be presented with the Login page for the service, where they select an authentication method every time they login. When Force Login Page is NOT selected (default setting), the Login page is presented on the first login to the service. Afterwards, the system recognizes users who have previously logged in and automatically authenticates them based on information stored in the browser. (Users who want to change their authentication method can clear browser data by selecting the Clear Authenticator Preferences self-service option in the User Portal.) Note: The Force Login Page setting is disabled when Single Sign-on (SSO) is selected. | Yes |
Redirect Unassigned Users | When enabled, users not assigned to the service can access the service via an alternate URL. After enabling the setting, enter the Redirect URL in the field to the right. Note: As this feature does not function as expected in legacy services, the setting should not be enabled for services that use the oldSAML parameter. | Yes |
| Shared Account Login | Determines whether or not shared account access to the service is permitted. When enabled, different users can authenticate to a shared account using their personal credentials and devices. | Yes |
| Show in User Portal | When enabled (default status), the service can be accessed from the User Portal. When this setting is disabled, the service does not appear in the Portal and users will be unable to log into the service via the Portal. | Yes |
| Issuer URL | The URL used by the service to connect to Octopus Authenticator. | No |
Discovery Endpoint | A URL pointing to a configuration document containing metadata about the OIDC provider, including URLs for authorization, token supply, user data and more. | No |
Authorize Endpoint | A redirect URL allowing the OIDC service to authorize use of the external identity provider for authentication. | No |
IDP Login | The URL of the Identity Provider's authentication endpoint. Users will be redirected to the IDP Login to verify identity before accessing the application. | No |
Client ID | A unique identifier for the service called to handle the authentication request. | No |
X.509 Certificate | The public certificate used by the service to authenticate with Octopus Authenticator. The following options are available:
| Yes |
| Client Secrets | Enables generation of up to two shared secrets to provide an additional layer of security to the authentication flow. For details, refer to Configuring OIDC Authorization Code Flow with Shared Secret (below). | Yes |
Custom Message | The message displayed to the user upon successful authentication. Enter the text of your choice in the field.. | Yes |
Configuring OIDC Authorization Code Flow with Shared Secret
The optional Client Secrets setting provides an additional layer of security to the authentication flow through use of a shared secret. When a secret is generated, it is copied, saved and stored on the client side to be used in the authorization code flow. The secret is also saved (in hashed format) in the Secret Double Octopus database, where it is verified against the client secret provided during authentication.
To manage client secrets:
- To create a secret, click Generate.
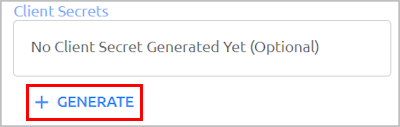
The secret is generated and displayed in a popup. - Copy the secret and store it securely. Then, click Done.
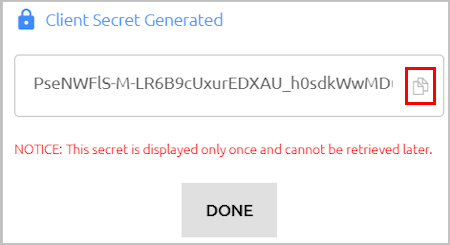
IMPORTANT: Once you click Done, you will not be able to retrieve the secret from the Management Console. - After clicking Done, a masked form of the secret is displayed next to the timestamp of secret creation.
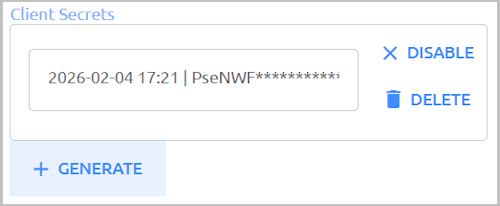
The following actions are available:
Disable: Temporarily inactivates the secret.
Delete: Removes the secret from the system. - If necessary, click Generate to create a second secret, and repeat Step 2.
A maximum of two secrets can be generated.
The following sections explain the parameters and sign on settings that you need to configure when adding a REST API service.
REST API Service Parameters
Parameters are settings of the REST API service that the Octopus Management Console requires for successful integration.
To view and update REST API service parameters:
Open the settings for the relevant REST API service and select the Parameters tab.
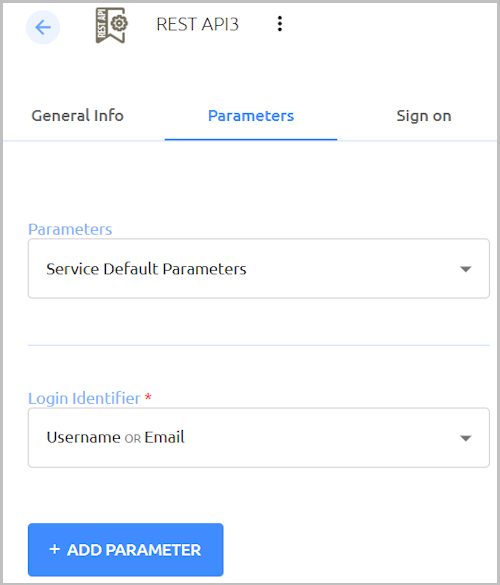
The Login Identifier is the identifier that the user needs to enter in order to log into the REST API service (username, email, etc.). You can configure multiple identifier types to support various platforms. To specify the identifier(s), click the field and select the relevant checkbox(es).
To define additional parameters that are not included in the generic template, click Add Parameter. Then, enter the name of the parameter key and select its value from the dropdown list.
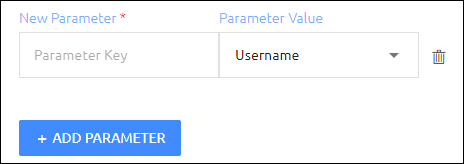
Click Save. Then, from the toolbar at the top of the page, click PUBLISH and publish your changes.
REST API Service Sign On Settings
The Sign On settings provide information required by the REST API service protocol. To view and update this information, open the settings for the relevant REST API service and select the Sign On tab. The settings are described in the table below the figure.
After updating settings, click Save. Then, from the toolbar at the top of the page, click PUBLISH and publish your changes.
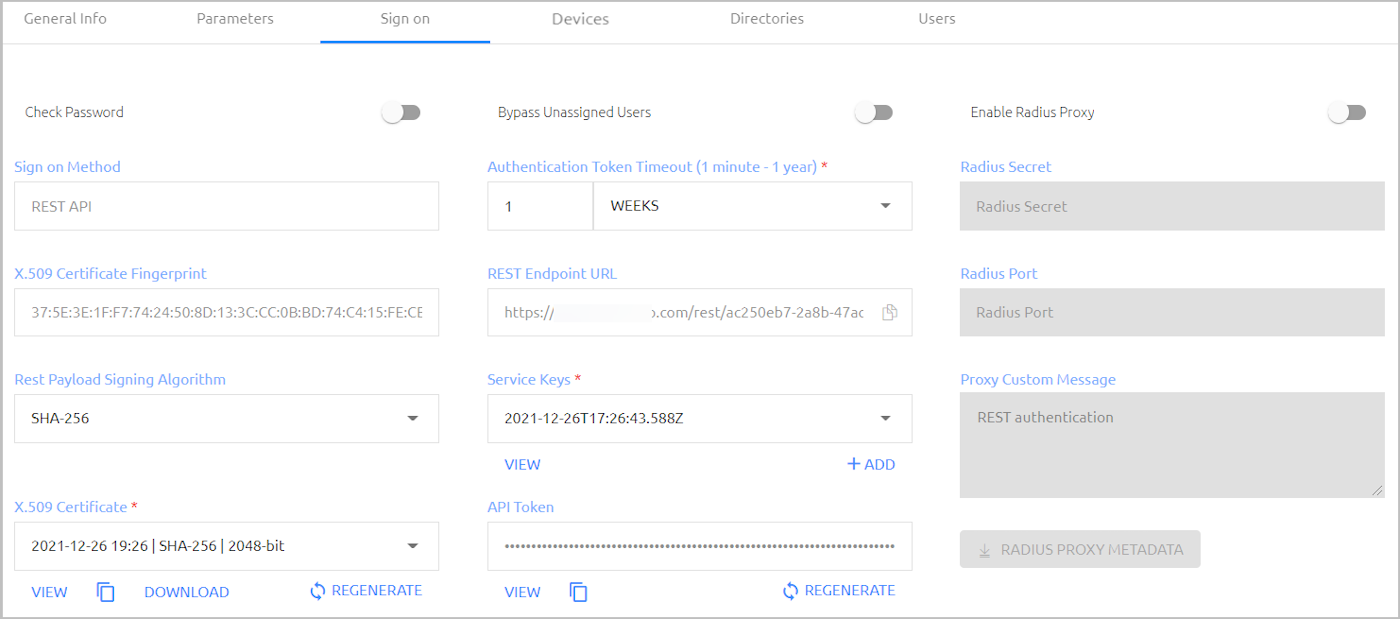
Setting | Description / Notes | Configurable? |
|---|---|---|
Check Password | When enabled, a password is required for authentication (in addition to the authentication methods used by Octopus Authenticator) | Yes |
Bypass Unassigned Users | When this toggle is enabled, users who are not assigned to the service will be allowed to login with username and password (without MFA). By default, this option is disabled, and unrecognized users are refused authentication. Bypass Unassigned Users is generally used on a temporary basis only, during gradual rollouts of Octopus Authenticator. | Yes |
Sign On Method | The authentication method used for the service. | No |
X.509 Certificate Fingerprint | The calculated fingerprint of the generated X.509 certificate. | No |
Rest Payload Signing Algorithm | The signature of the generated X.509 certificate. Select SHA-1 or SHA-256. Note: SHA-1 is not supported for Red Hat Enterprise Linux 9.3. | Yes |
X.509 Certificate | The public certificate used by the service to authenticate with Octopus Authenticator. The following options are available:
| Yes |
Authentication token timeout | The time period after which the REST authentication token becomes invalid. The value can range from one minute to one year. | Yes |
REST Endpoint URL | The URL used by the service for REST protocol communications. To copy the URL (e.g., in order to paste it into the Admin Console of the REST service), click the Copy icon. | No |
Service Keys | The key(s) used by the service to authenticate with Octopus Authenticator. The following options are available:
For more information, refer to Working with Service Keys. | Yes |
API Token | The token used for an authentication request. The following options are available:
| Yes |
Using the RADIUS Proxy
Using a RADIUS proxy enables secure transport of a RADIUS service over an untrusted network. If you use the Windows RADIUS Agent, there is no need for any further proxy configuration. For legacy configurations, it is recommended to deploy the Octopus RADIUS proxy by configuring the relevant settings in the Sign on tab of the REST API service and installing a RADIUS proxy component.
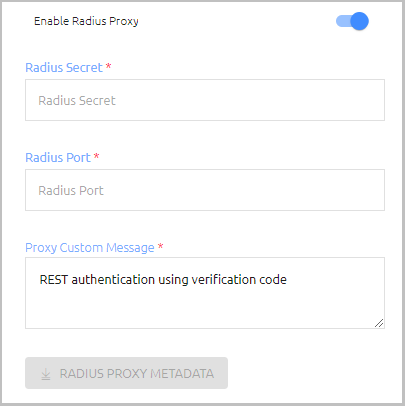
The settings are:
Enable Radius Proxy: Enables/Disables the RADIUS proxy.
Radius Secret: The secret used to connect to the RADIUS proxy.
Radius Port: The port number used for RADIUS proxy communication.
Proxy Custom Message: The message displayed to the user upon successful authentication.
When all the settings have been configured, the Radius Proxy Metadata button is enabled. Clicking this button downloads the proxy data in a JSON file format that can be used for installation of the proxy component.
An Octopus Authentication LDAP service replaces the direct connection to the LDAP Repository Server, and performs Octopus Authentication instead of the legacy Username and Password authentication. (Octopus Authentication can also be used as MFA).
The following sections describe the parameters and sign on settings for the Octopus LDAP service, and explain how to configure your external LDAP service for successful integration with the Octopus Server.
LDAP Parameters
Parameters are settings of the LDAP service that the Octopus Management Console requires for successful integration.
To view and update LDAP service parameters:
Open the settings for the relevant LDAP service and select the Parameters tab.
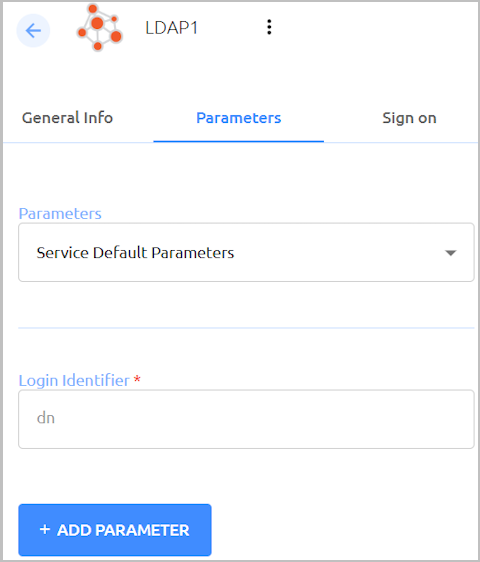
The Login Identifier is the login method to the LDAP Repository (Principle’s Username or DN). This parameter is not editable.
To define additional parameters, click Add Parameter. Then, enter the name of the parameter key and select its value from the dropdown list.
Click Save. Then, from the toolbar at the top of the page, click PUBLISH and publish your changes.
LDAP Sign On Settings
The sign on settings provide information required by the LDAP service protocol. To view and update this information, open the settings for the relevant LDAP service and select the Sign on tab. The settings are described in the table below the figure.
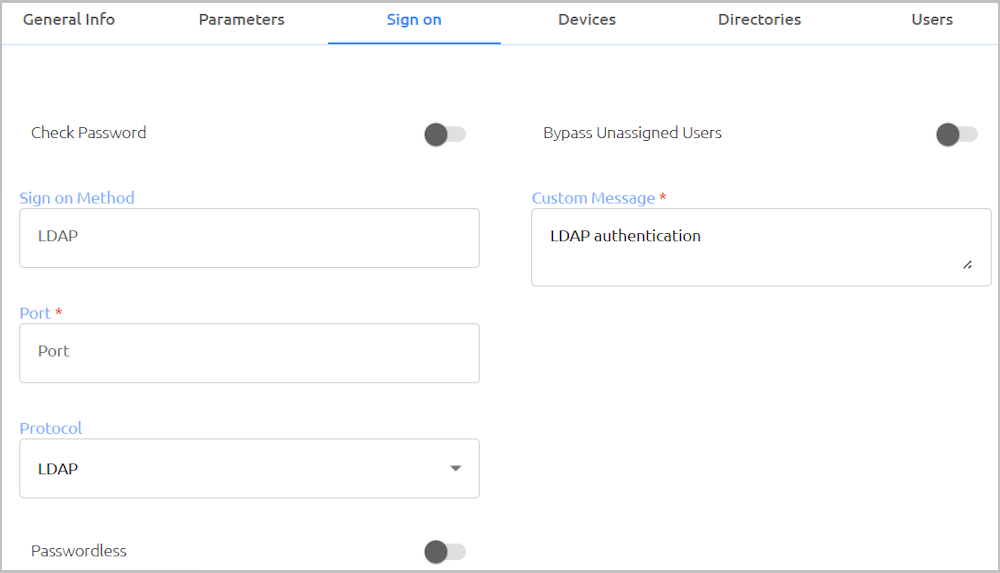
Setting | Description / Notes |
|---|---|
Check Password | When enabled, users are required to enter a password for MFA authentication. |
Bypass Unassigned Users | When enabled, users who are not assigned to the service will be allowed to login with username and password (without MFA). By default, this option is disabled, and unrecognized users are refused authentication. Bypass Unassigned Users is generally used on a temporary basis only, during gradual rollouts of Octopus Authenticator. |
Port | Enter the port used for communication with the LDAP server. Make sure the port number matches the service provider’s LDAP port number. |
Protocol | Select LDAP or LDAPS. |
Passwordless | When enabled, the user’s password on the AD is rotated transparently, allowing passwordless authentication to all integrated services. |
Custom Message | The message displayed to users upon successful authentication. |
After updating settings, click Save. Then, from the toolbar at the top of the page, click PUBLISH and publish your changes.
External LDAP Service Configuration
To ensure successful integration with the Octopus LDAP service, you need to configure your corresponding external LDAP service as follows:
To redirect authentication requests to the Octopus Server, replace the LDAP Repository URL with <EnterpriseBaseURL>:<port>
Enterprise Base URL: The address of the Octopus Authentication Server (or the load balancer in distributed deployments). The URL is displayed in the Octopus Management Console under System Settings > General Settings.
Port: The port defined in the Sign on tab of the Octopus LDAP service.
The Admin Name and Password for the service should match the values defined for the integrated directory configured in the Octopus Management Console. (These values are displayed in the Details tab of the directory settings.)
The Base DN for the service should be at the same level (or lower) in the hierarchy defined in the integrated directory, so the search will focus on the same DN.
The following sections explain the parameters and sign on settings that you need to configure when adding an Active Directory Authentication service.
AD Authentication Service Parameters
Parameters are settings of the Active Directory that the Octopus Management Console requires for successful integration. To view and update these values, open the settings for the relevant AD Authentication service and select the Parameters tab.
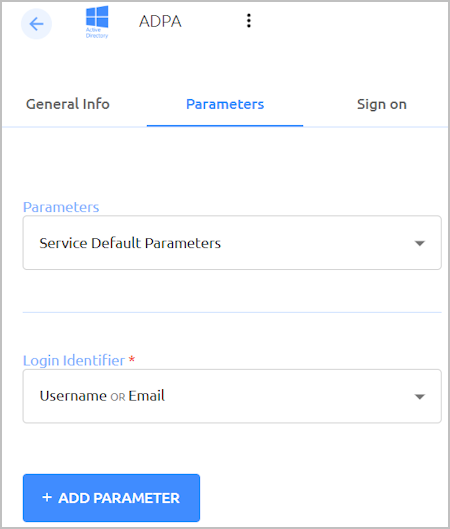
The Login Identifier is the identifier that the user needs to enter in order to log into the AD Authentication service (e.g., Username). You can configure multiple identifier types to support various platforms. To specify the identifier(s), click the field and select the relevant checkbox(es).
After updating or adding parameters, click Save. Then, from the toolbar at the top of the page, click PUBLISH and publish your changes.
AD Authentication Service Sign On Settings
The sign on settings provide data required by the AD Authentication service for user authentication on the workstation. Settings configured in this tab can affect the user experience when authenticating to the workstation. For example, you may decide to allow users who are unenrolled with Octopus to continue to authenticate with Username + Password.
To view and update this type of data, open the settings for the relevant AD Authentication service and select the Sign on tab. The settings are described in the table below.
After updating settings, click Save. Then, from the toolbar at the top of the page, click PUBLISH and publish your changes.
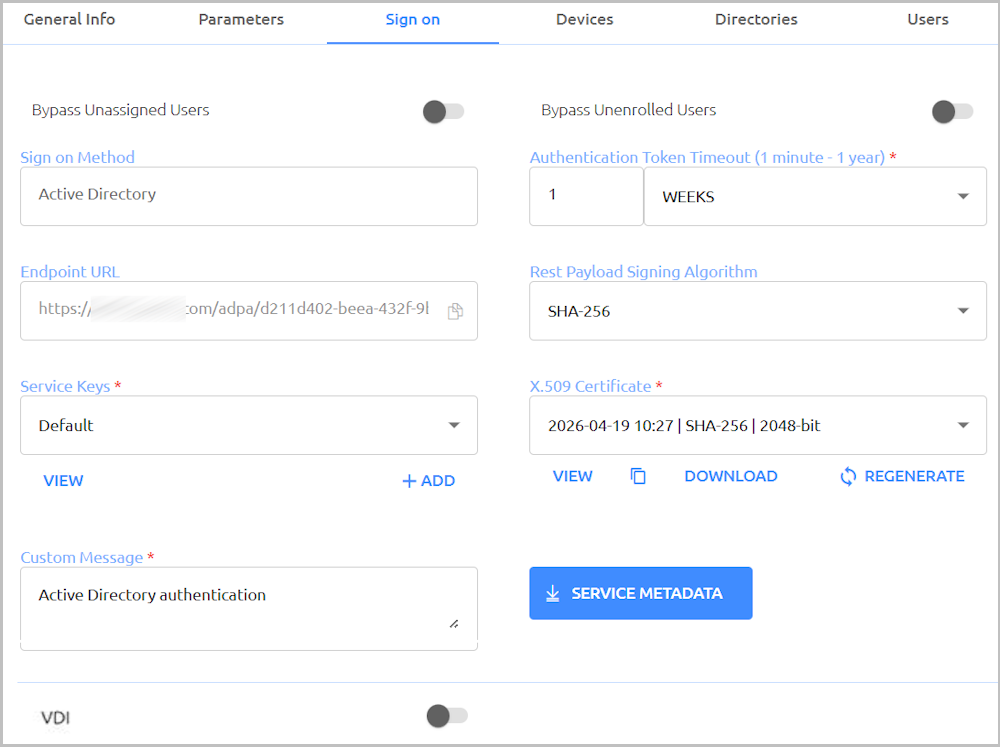
Setting | Description / Notes | Configurable? |
|---|---|---|
Bypass Unassigned Users | When this toggle is enabled, users who are not assigned to the service will be allowed to login with username and password (without MFA). By default, this option is disabled, and unrecognized users are refused authentication. Bypass Unassigned Users is generally used on a temporary basis only, during gradual rollouts of Octopus Authenticator. | Yes |
Bypass Unenrolled Users | When enabled, users who are known to the system but have not yet enrolled a mobile device or workstation will be allowed to login with username and password (without MFA). | Yes |
Sign On Method | The authentication method used for the service. | No |
Endpoint URL | The access URL from the AD client to the Octopus Authentication server. To copy the URL (e.g., in order to paste it into the Admin Console of the AD service), click the Copy icon. | No |
Service Keys | The key(s) used by the service to authenticate with Octopus Authenticator. The following options are available:
For more information, refer to Working with Service Keys. | Yes |
Authentication token timeout | The time period after which the authentication token becomes invalid. The value can range from one minute to one year. | Yes |
Rest Payload Signing Algorithm | The signature of the generated X.509 certificate. Select SHA-1 or SHA-256. Note: SHA-1 is not supported for Red Hat Enterprise Linux 9.3. | Yes |
X.509 Certificate | The public certificate used by the service to authenticate with Octopus Authenticator. The following options are available:
| Yes |
Custom Message | The message shown to users upon successful authentication. | Yes |
| VDI | When this toggle is enabled, authentication to VDI desktops is supported. For more information, refer to Configuring Support for VDI Authentication (below). | Yes |
Clicking Service Metadata downloads all data configured for the service to a file format (XML) that can be used by the Active Directory. If there are multiple active service keys, you will be prompted to select the key to be included in the file.
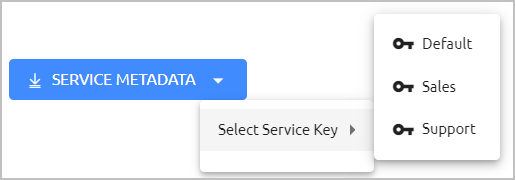
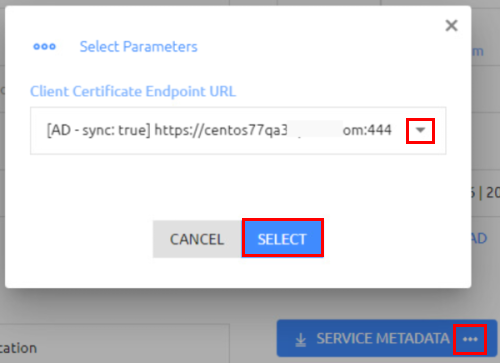
If more than one client certificate has been configured in the system (e.g., there are multiple directories, each with its own certificate), you will see a Browse icon on the Service Metadata button. To specify which certificate will be included in the XML file, click the icon, choose the required certificate from the list and then click SELECT.
Configuring Support for VDI Authentication
The VDI feature enables supports for authenticating to VDI machines. It is strongly recommended to create a dedicated ADPA service for your VDI desktops.
When setting up VDI support, you will be prompted to select one of the following options, based on the configuration of your VDI platform:
- Persistent (static): Every user is assigned a dedicated machine for each connection.
- Non-persistent (random): Upon connection, any available machine from the pool can be assigned to a user. (The specific machine changes from session to session.)
IMPORTANT: Currently, the features of Adaptive Authentication, Push Fatigue Protection, and Compatibility Mode OFF (when the Authentication Server uses the decentralized vault concept) are supported for Persistent mode only.
To configure support for VDI authentication:
- At the bottom of the Sign on tab of the relevant ADPA service, enable the VDI toggle button.
- From the Assignment Type dropdown list, select Persistent or Non-persistent.

Click Save. Then, from the toolbar at the top of the page, click PUBLISH and publish your changes.
Active Directory Authentication services and REST API services can support multiple service keys for authentication. You can add as many keys as necessary and use each of them for different Windows / Mac credential provider configurations.
Service keys are managed from the Sign on tab of the AD Authentication or REST API service settings. The names of active keys are listed under Service Keys.
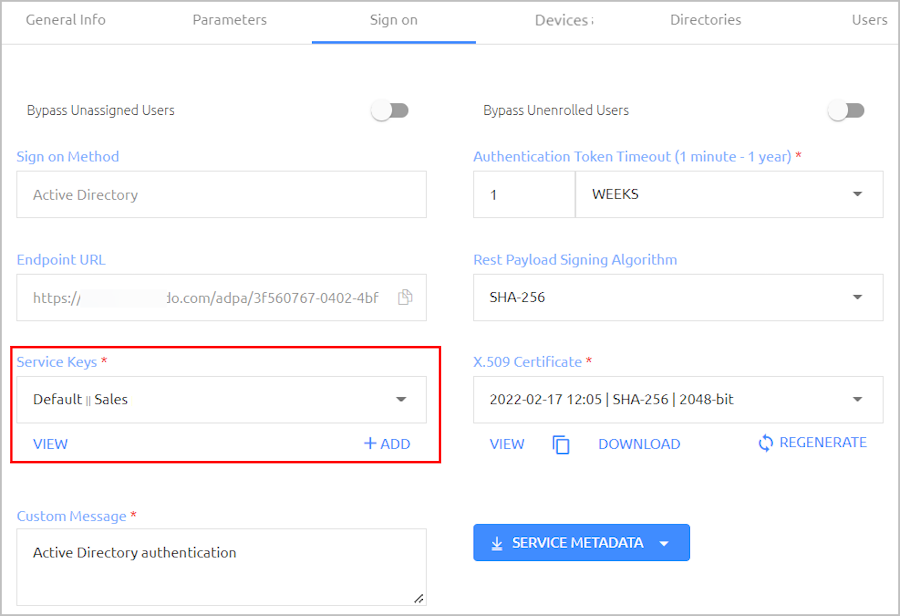
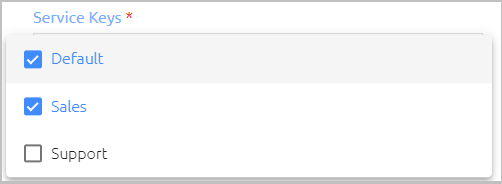
To view all defined service keys, click to open the list. Active service keys are indicated by a selected checkbox. (At least one key must be active at all times.) Inactive keys cannot be included in service metadata and cannot be used for authentication.
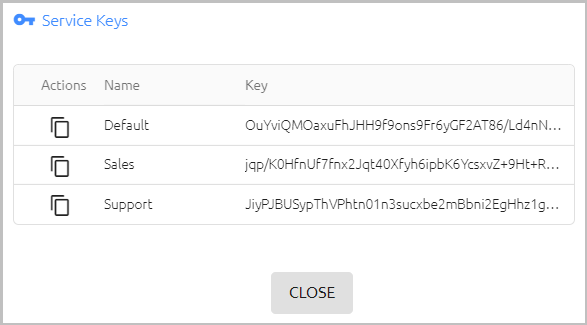
Clicking VIEW opens a popup from which you can view and copy all active service keys.
To generate a new service key, click ADD. Then, enter a name for the key and press <Enter> (or click the confirmation icon). By default, new service keys are active.
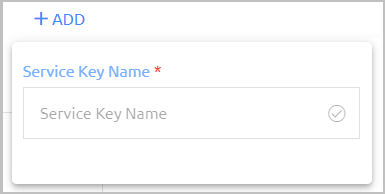
If there are multiple active service keys, you will be prompted to select the key to be included in the file when downloading service metadata.
The AWS SAML service enables SAML 2.0 integration between the Octopus Authenticator and Amazon Web Services. For successful integration, you need to create the service in the Octopus Management Console and configure the appropriate third party Identity Provider and Role in your AWS account. The following procedure provides a summary of the integration process. For more detailed information, you may refer to the document How to Configure Octopus Authentication for Amazon Web Services.
To configure AWS integration:
In the Octopus Management Console, open the Services menu and click Add Service. In the Amazon Web Services (AWS) tile, click Add.
In the dialog that opens, update the default service name and issuer if desired. To change the display icon, click the tile and upload the logo of your choice (supported image size is 128x128 pixels). Then, click Create.
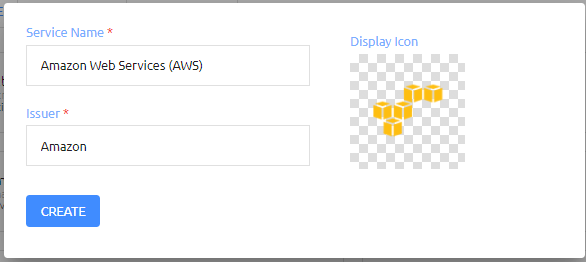
Review the settings in the General Info tab. If you add a description or update other settings, click Save.
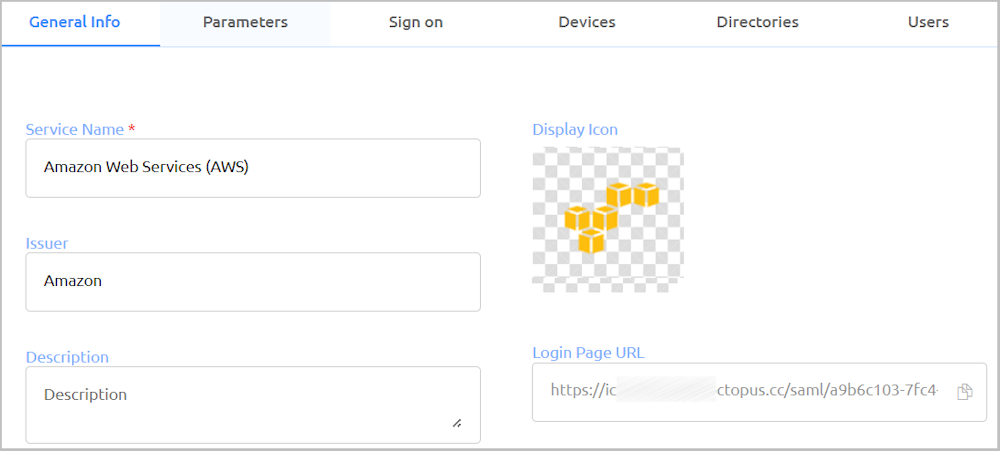
Add directories, users and groups to the service. For details, refer to Creating a Service and Assigning Users.
Open the Sign on tab. At the bottom of the tab, click SAML METADATA to view the metadata.xml file. Store this file. You will need it to configure the 3rd party IdP that you will create in your AWS account.
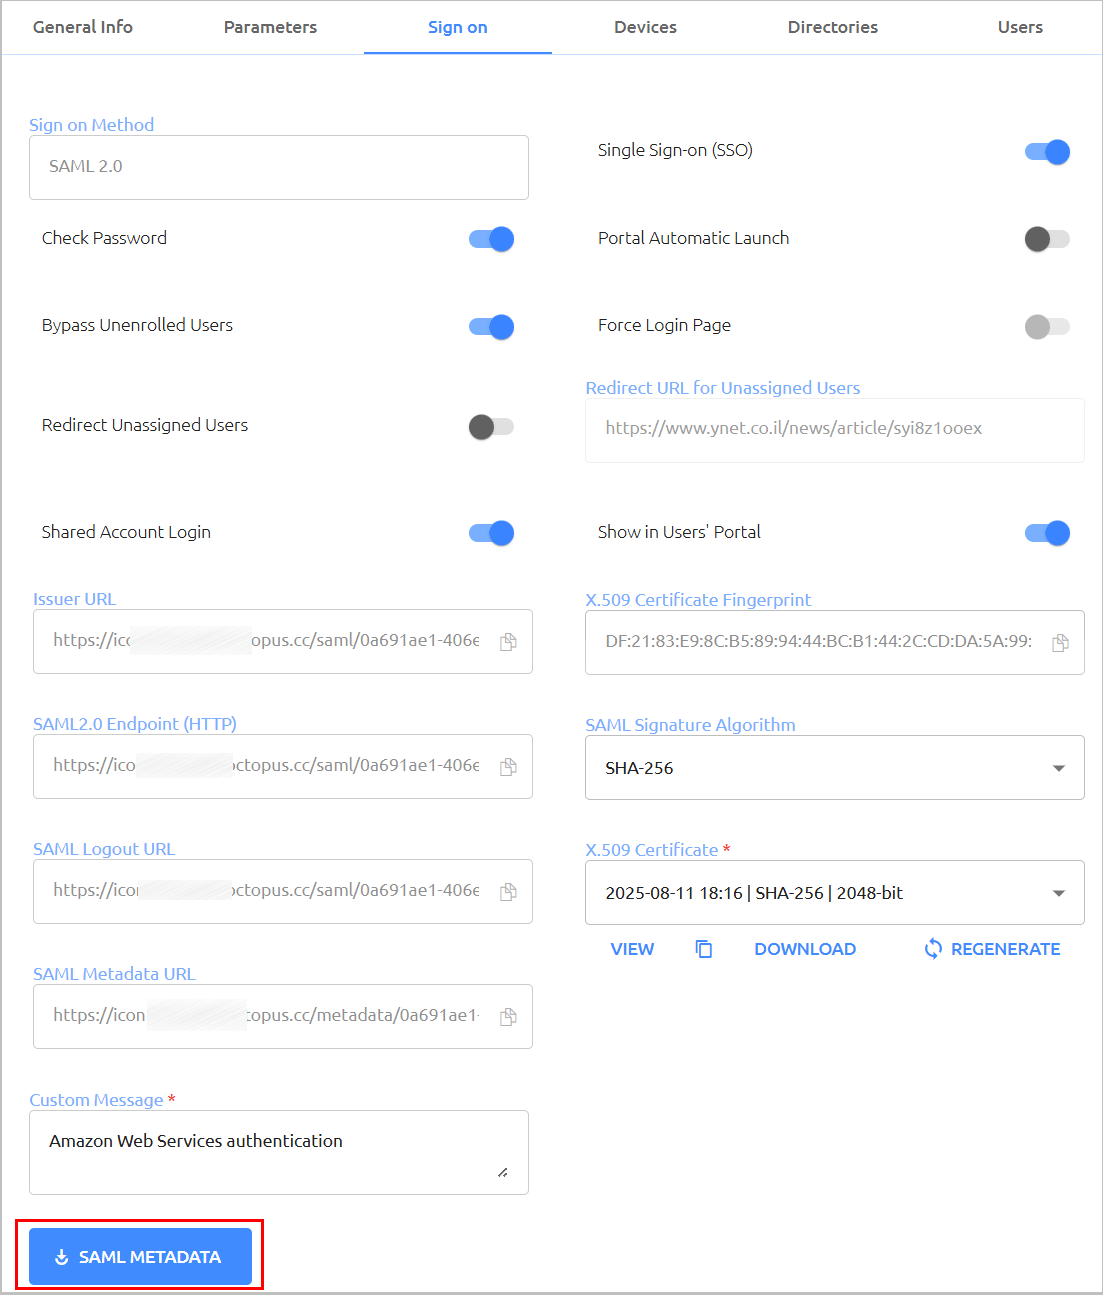
Log into your AWS account and perform these procedures:
Create and configure the AWS Identity Provider
Create the IAM Role
For details, refer to the integration document: How to Configure Octopus Authentication for Amazon Web Services.
After completing the procedures, you will have an AWS Role ARN and an AWS Provider ARN.
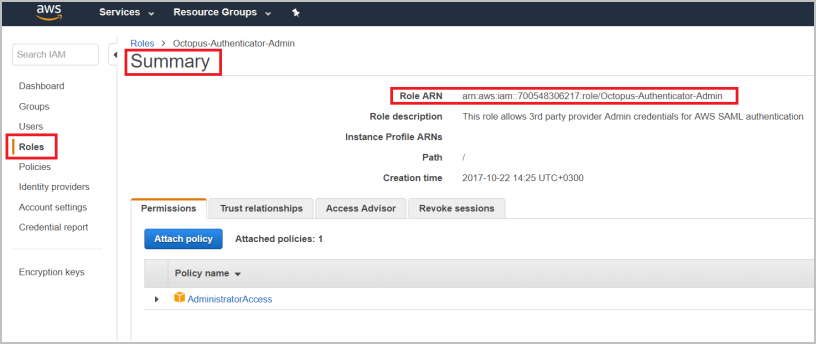
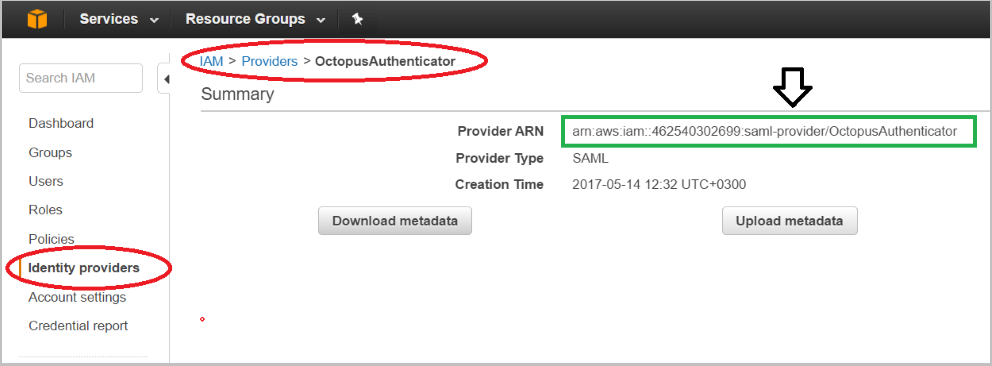
In the Octopus Management Console, open the service settings for the AWS SAML service you created. Select the Parameters tab and configure the following settings:
Setting
Value / Notes
Login Identifier
Select the login method(s) for the Octopus Authenticator Server.
Role Session Name
Select Email.
Role ARN
Set the value with the AWS Role ARN string.
Trusted Entities
Set the value with the AWS Provider ARN string.
Session Duration
Set the period of time (in seconds) for which the console can be open before the session expires.
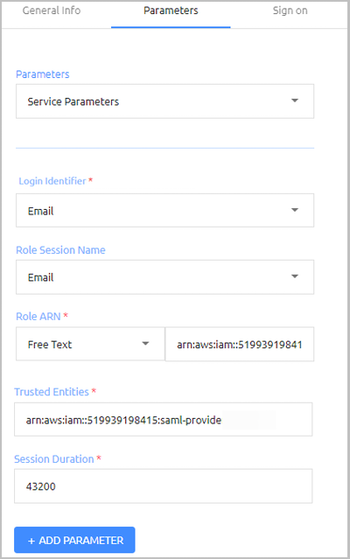
If you wish, you may click Add Parameter to create additional optional parameters that are commonly added to SAML services. For a list of these parameters, refer to Generic SAML Service Parameters.
Click Save. Then, from the toolbar at the top of the page, click PUBLISH and publish your changes.
The Jira SAML service enables SAML 2.0 integration between the Octopus Authenticator and the Jira software service. For successful integration, you need to create the service in the Octopus Management Console and set up the SAML SSO configuration in your Atlassian account. The following procedure provides a summary of the integration process. For more detailed information, you may refer to the document How to Configure Octopus Authentication for Jira Software.
To configure Jira integration:
In the Octopus Management Console, open the Services menu and click Add Service. In the Atlassian Jira tile, click Add.
In the dialog that opens, update the default service name and issuer if desired. To change the display icon, click the tile and upload the logo of your choice (supported image size is 128x128 pixels). Then, click Create.
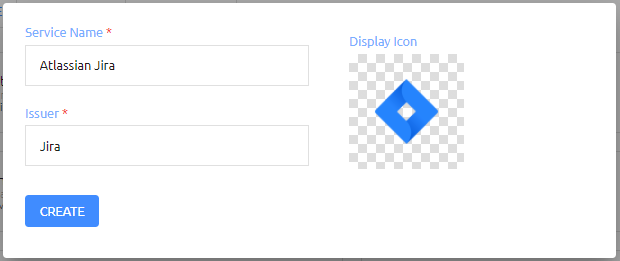
Review the settings in the General Info tab. If you add a description or update other settings, click Save.
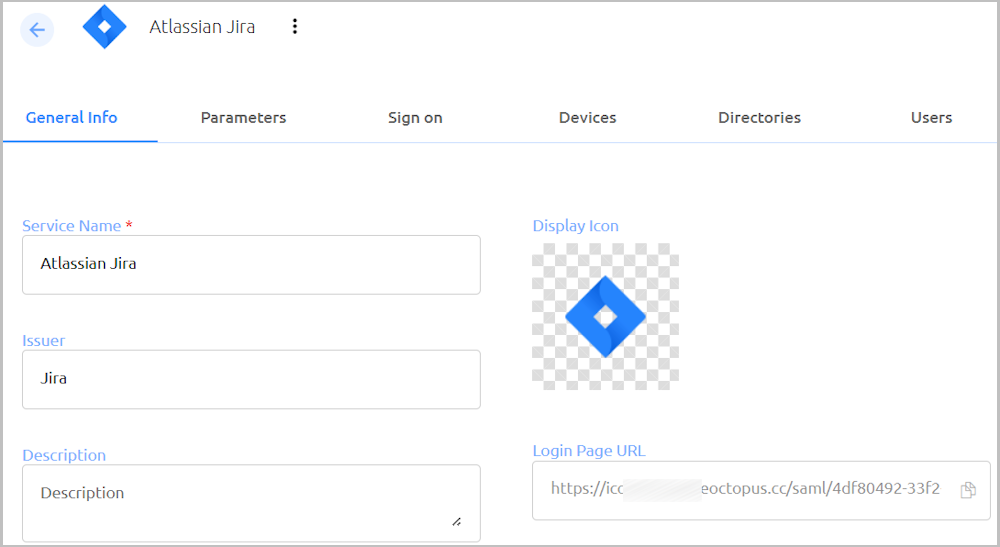
Add directories, users and groups to the service. For details, refer to Creating a Service and Assigning Users.
Open the Sign on tab. Copy or download the following elements:
Issuer URL: The URL used by the Jira service to connect to Octopus Authenticator. Click the Copy icon to copy the URL.
SAML2.0 Endpoint (HTTP): The Octopus Authenticator Login page URL to which the Jira service provider will refer users for Octopus authentication. Click the Copy icon to copy the URL.
X.509 Certificate: Click View. Then, in the popup that opens, click Copy to copy the content of the certificate file.
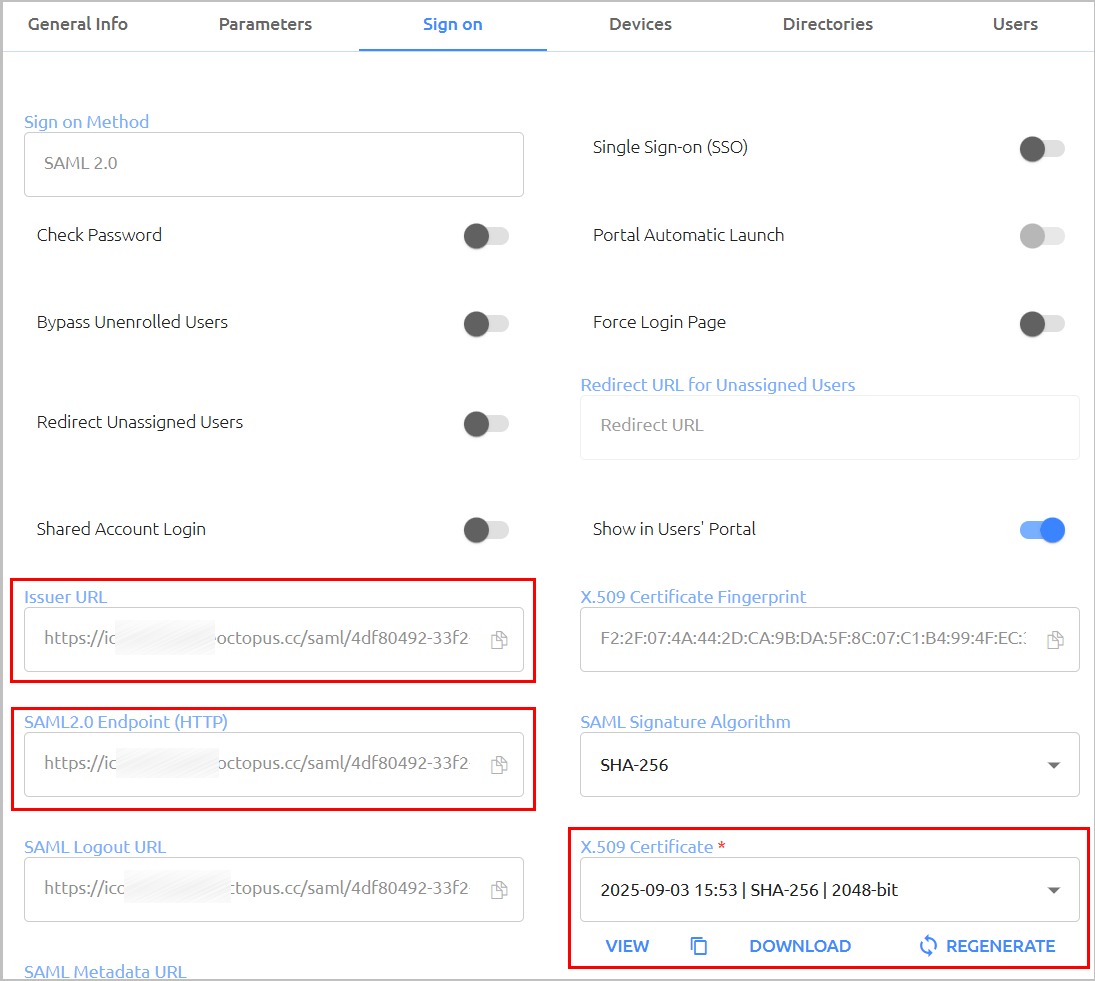
You will need these elements to set up the SAML SSO configuration in your Atlassian account.
Log into your Atlassian account as an administrator and edit the settings of the SAML single sign-on configuration. For details, refer to the integration document: How to Configure Octopus Authentication for Jira Software.
After completing the configuration, Jira SAML Single Sign-On parameters will be generated and displayed on the SAML single sign-on page.
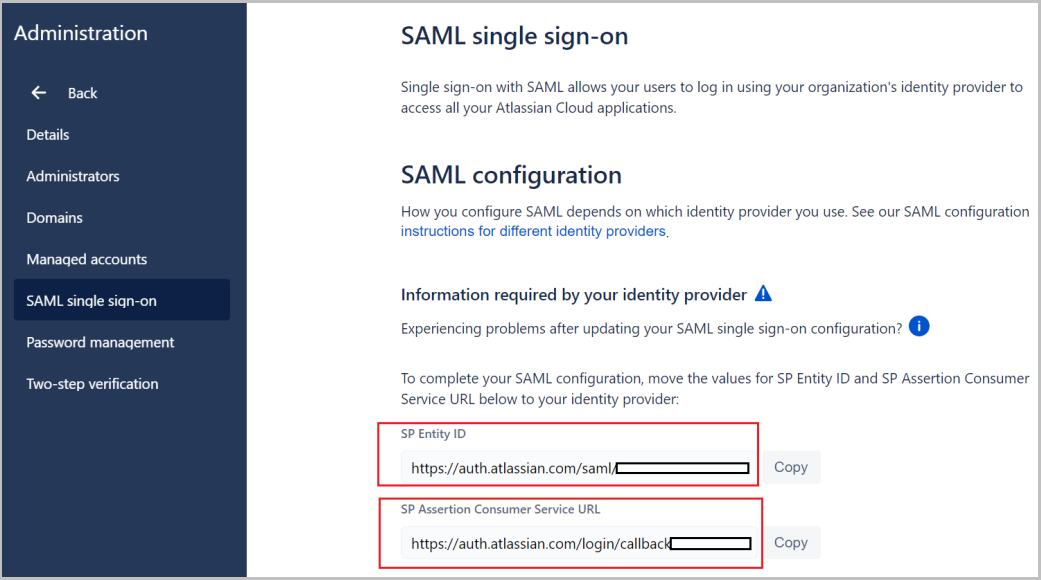
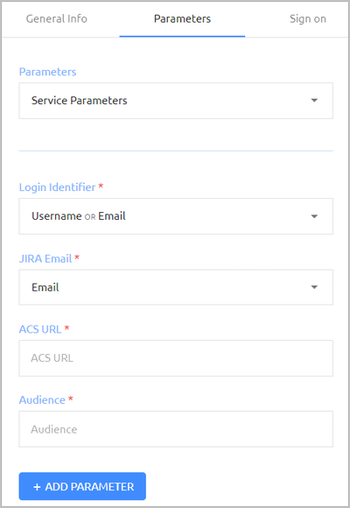
In the Octopus Management Console, open the service settings for the Jira SAML service you created. Select the Parameters tab and configure the following settings:
Setting
Value / Notes
Login Identifier
Select the login method(s) for the Octopus Authenticator Server.
JIRA Email
Login method for Jira software (default = Email.)
ACS URL
Set the value to the SP Assertion Consumer Service URL.
Audience
Set the value to the SP Entity ID.
If you wish, you may click Add Parameter to create additional optional parameters that are commonly added to SAML services. For a list of these parameters, refer to Generic SAML Service Parameters.
Click Save. Then, from the toolbar at the top of the page, click PUBLISH and publish your changes.
The Dropbox SAML service enables SAML 2.0 integration between the Octopus Authenticator and the Dropbox web service. For successful integration, you need to create the service in the Octopus Management Console and set up SSO configuration in your Dropbox admin account. The following procedure provides a summary of the integration process. For more detailed information, you may refer to the document How to Configure Octopus Authentication for Dropbox.
To configure Dropbox integration:
In the Octopus Management Console, open the Services menu and click Add Service. In the Dropbox tile, click Add.
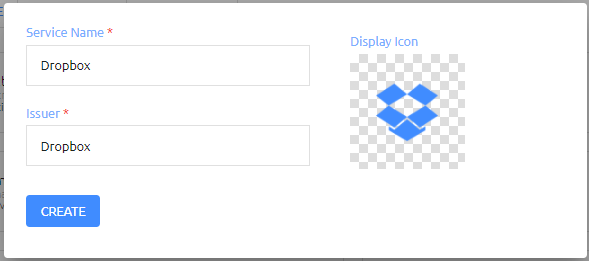
In the dialog that opens, update the default service name and issuer if desired. To change the display icon, click the tile and upload the logo of your choice (supported image size is 128x128 pixels). Then, click Create.
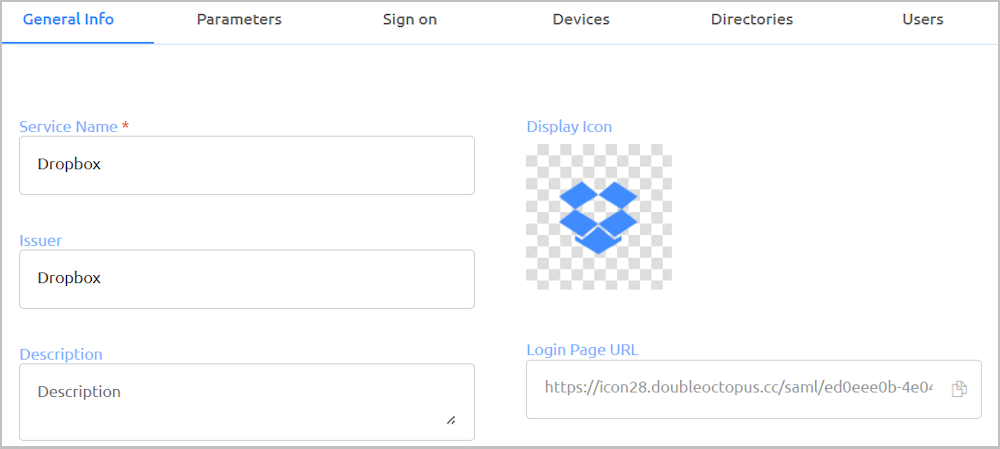
Review the settings in the General Info tab. If you add a description or update other settings, click Save.
Add directories, users and groups to the service. For details, refer to Creating a Service and Assigning Users.
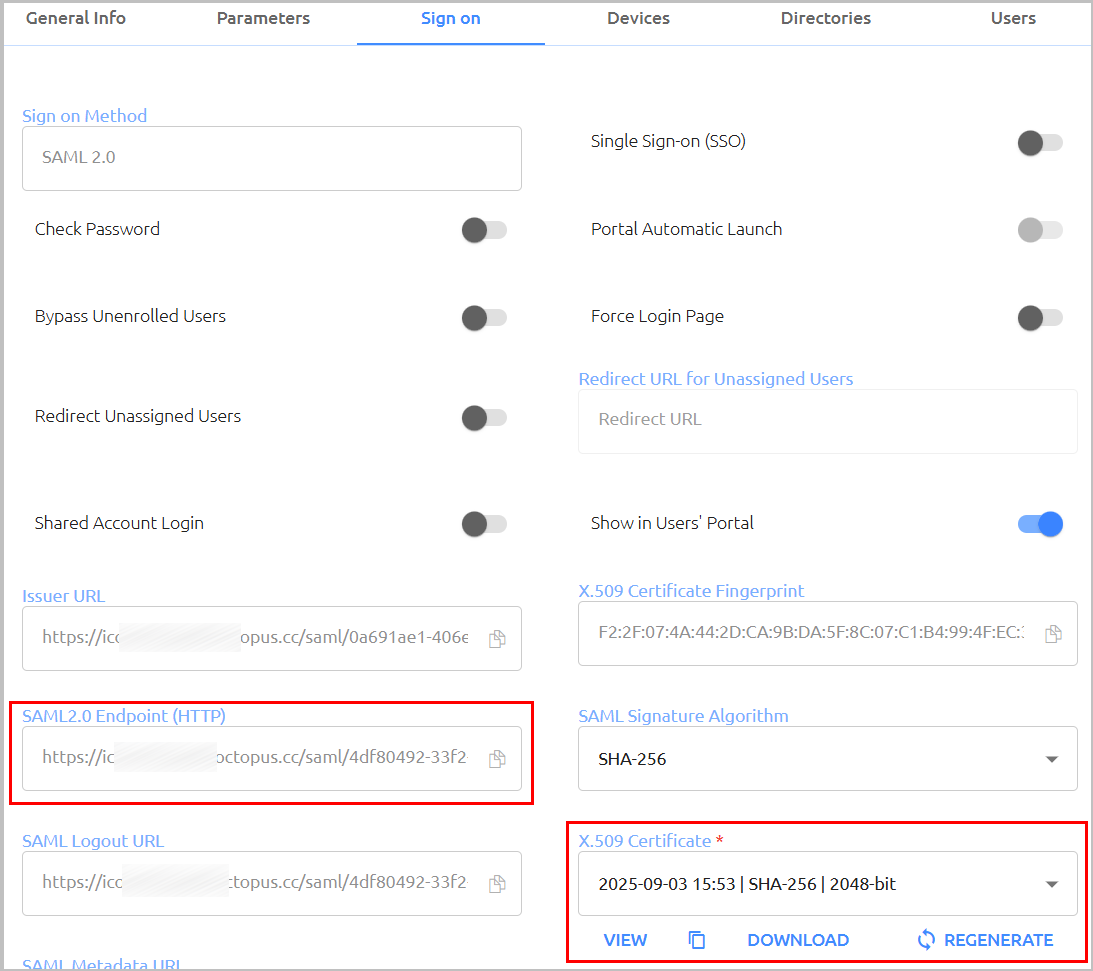
Open the Sign on tab and do the following:
Copy the value of the SAML2.0 Endpoint (HTTP) URL. This is the Octopus Authenticator Login page URL to which the Dropbox service provider will refer users for Octopus authentication. Click the Copy icon to copy the URL.
Under X.509 Certificate, click Download to download the cert.pem certificate.
You will use these elements while configuring the 3rd party Identity Provider (IdP)SSO in your Dropbox account.
Log into your Dropbox Admin account. From the Admin Console Dashboard, set up the 3rd party IdP SSO.
For details, refer to the integration document: How to Configure Octopus Authentication for Dropbox.
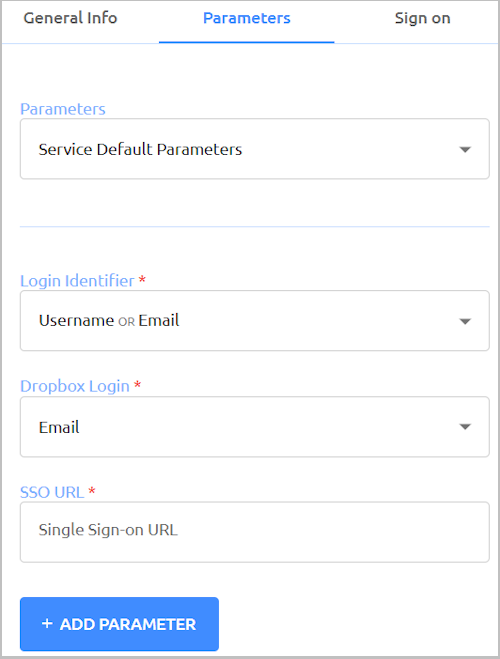
In the Octopus Management Console, open the service settings for the Dropbox SAML service you created. Select the Parameters tab and configure the following settings:
Setting
Value / Notes
Login Identifier
Select the login method(s) for the Octopus Authenticator Server.
Dropbox Login
Select the login method for Dropbox.
SSO URL
Copy the customized link from the SSO settings in your Dropbox account (SSO sign-in URL).
If you wish, you may click Add Parameter to create additional optional parameters that are commonly added to SAML services. For a list of these parameters, refer to Generic SAML Service Parameters.
Click Save. Then, from the toolbar at the top of the page, click PUBLISH and publish your changes.
Entra ID EAM service integration enables users to log into the Microsoft Entra admin center using the Octopus platform as a means of two-factor authentication. For successful integration, you need to create the service in the Octopus Management Console, and then perform the required configuration in your Entra ID environment.
The following procedure provides a summary of the integration process. For full details and instructions, please refer to the document Configuring an External Authentication Method in Microsoft Entra ID with Secret Double Octopus.
To configure Entra ID EAM integration:
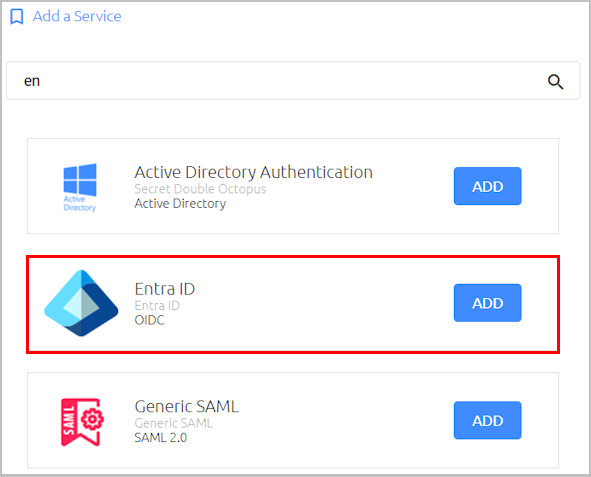
In the Octopus Management Console, open the Services menu and click Add Service. In the Entra ID tile, click Add.
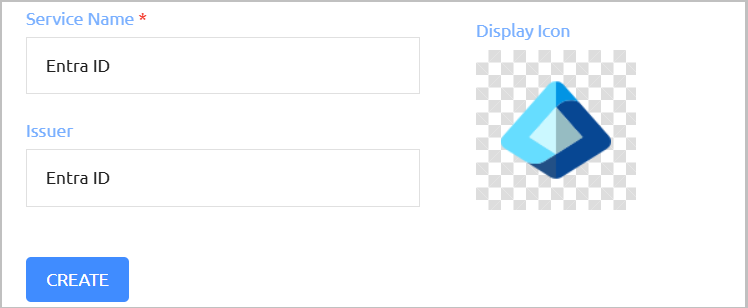
In the dialog that opens, update the default service name and issuer if desired. To change the display icon, click the tile and upload the logo of your choice (supported image size is 128x128 pixels). Then, click Create.
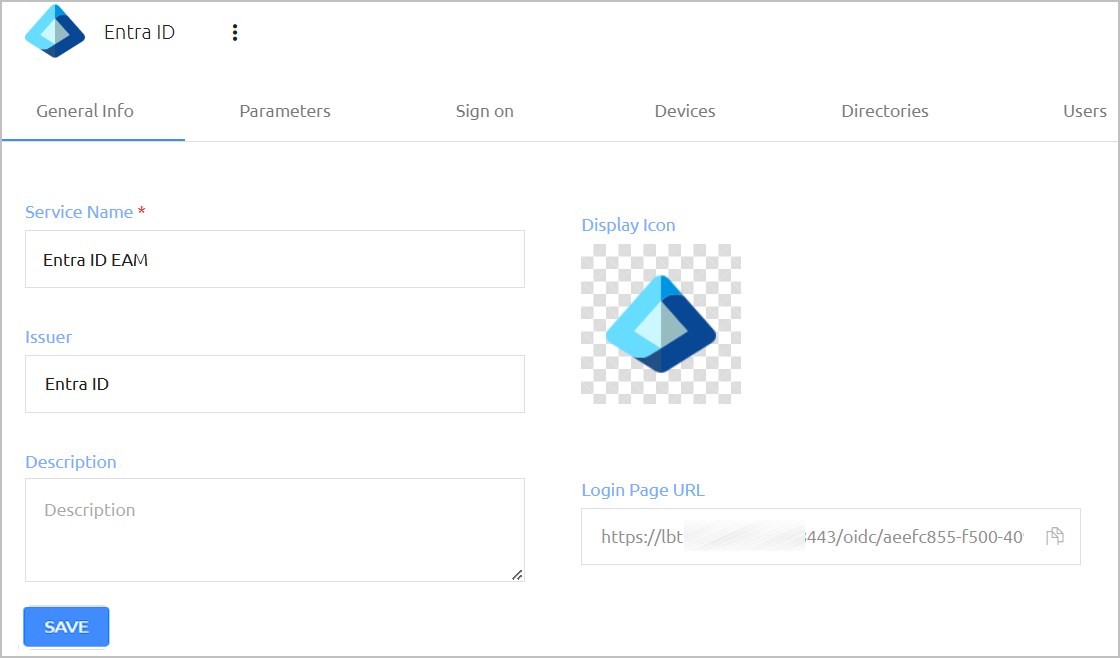
Review the settings in the General Info tab. If you add a description or update other settings, click Save.
Add directories, users and groups to the service. For details, refer to Creating a Service and Assigning Users.
Open the Parameters tab. From the Login Identifier list, select Username and Email.
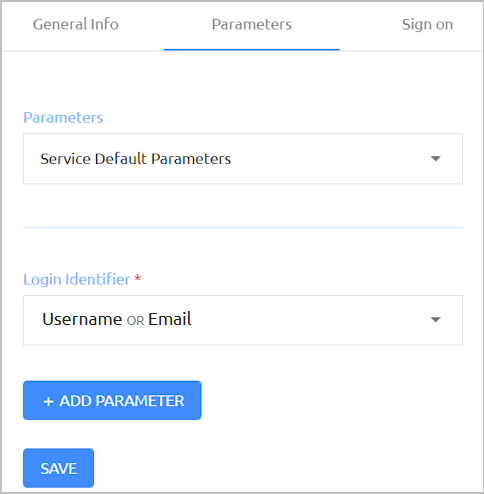
Then, click Save.
Open the Sign on tab and copy the following elements by clicking the Copy icons:
Discovery Endpoint: A URL pointing to a configuration document containing metadata about the OIDC provider, including URLs for authorization, token supply, user data and more.
Authorize Endpoint: A redirect URL allowing Entra ID to authorize use of the external identity provider for authentication.
Client ID: A unique identifier for the service called to handle the authentication request.
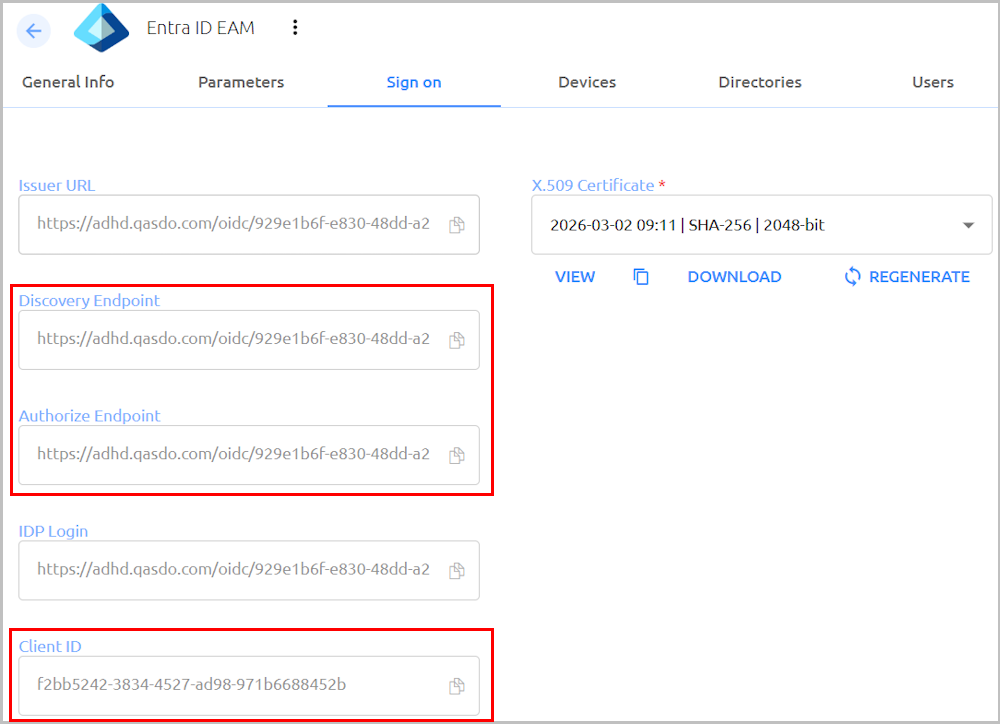
You will need these elements to configure your Entra ID environment.
Configure the Entra ID environment as described in the document Configuring an External Authentication Method in Microsoft Entra ID with Secret Double Octopus .
The Google G Suite SAML service enables SAML 2.0 integration between the Octopus Authenticator and G Suite web services. For successful integration, you need to create the service in the Octopus Management Console and set up the 3rd party identity provider SSO in your Google G Suite Admin account. The following procedure provides a summary of the integration process. For more detailed information, you may refer to the document How to Configure Octopus Authentication for G Suite Web Services.
To configure Google G Suite integration:
In the Octopus Management Console, open the Services menu and click Add Service. In the Google G-Suite tile, click Add.
In the dialog that opens, update the default service name and issuer if desired. To change the display icon, click the tile and upload the logo of your choice (supported image size is 128x128 pixels). Then, click Create.
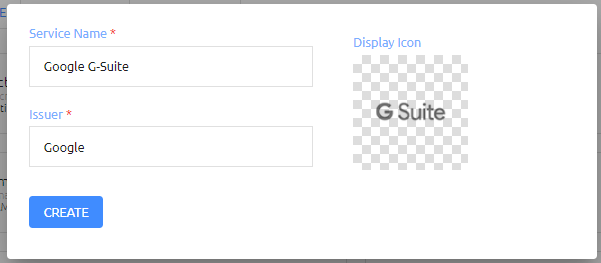
Review the settings in the General Info tab. If you add a description or update other settings, click Save.
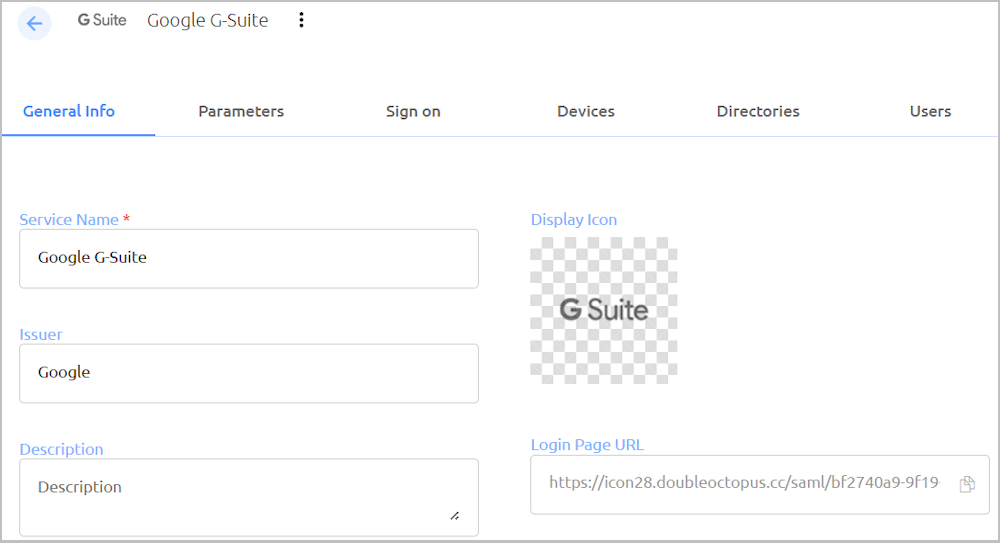
Add directories, users and groups to the service. For details, refer to Creating a Service and Assigning Users.
Open the Parameters tab and configure the following settings. Do not configure any additional parameters.
Setting
Value / Notes
Login Identifier
Login method for the Octopus Authentication Server (select Email).
G-Suite Email
Select Email.
G Suite Domain
Enter the domain URL.
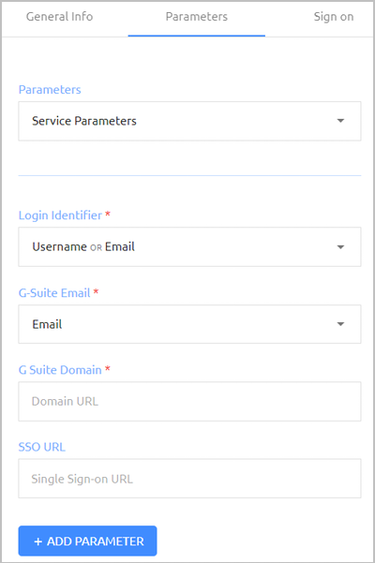
Click Save.
Open the Sign on tab and copy or download the following elements:
SAML2.0 Endpoint (HTTP): The Octopus Authenticator G Suite Login page URL to which the G Suite service provider will refer users for Octopus authentication. Click the Copy icon to copy the URL.
X.509 Certificate: Click Download to download the cert.pem file.
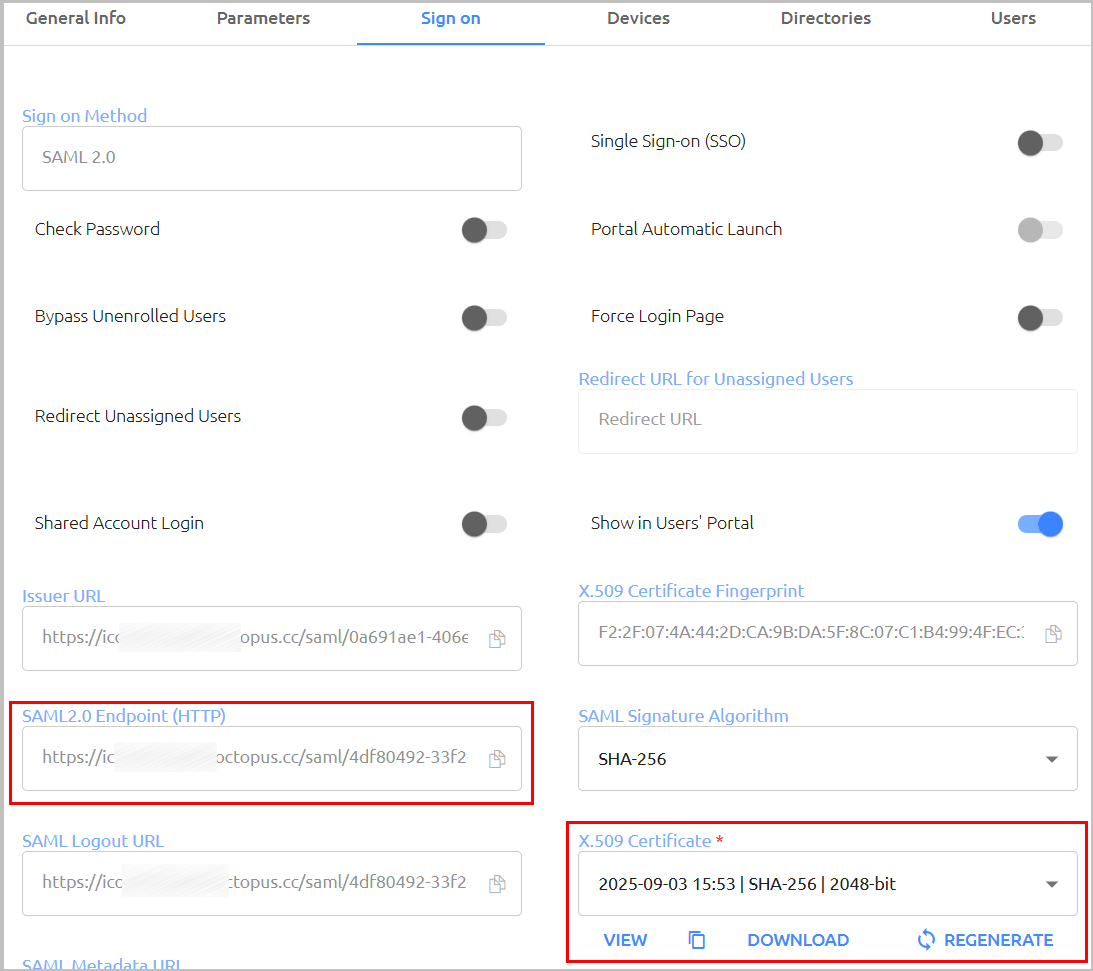
You will need these elements to configure the 3rd party identity provider SSO in your Google G Suite Admin account.
Log into your G Suite Admin account. From the Admin Console menu, select Security and complete the Setup SSO with third party identity provider configuration. For details, refer to the integration document: How to Configure Octopus Authentication for G Suite Web Services.
The Microsoft Office 365 SAML service enables SAML 2.0 integration between the Octopus Authenticator and the Microsoft Office 365 web service. For successful integration, you need to create the service in the Octopus Management Console and set up the appropriate configurations in the Office365 Web Service and the Mobile Outlook App. The following procedure provides a summary of the integration process.
IMPORTANT: For more detailed information, including concept, prerequisites and best practices, it is recommended to refer to the integration document How to Configure Octopus Authentication for Microsoft Office 365.
To configure Microsoft Office 365 integration:
In the Octopus Management Console, open the Services menu and click Add Service. In the Microsoft Office 365 tile, click Add.
In the dialog that opens, update the default service name and issuer if desired. To change the display icon, click the tile and upload the logo of your choice (supported image size is 128x128 pixels). Then, click Create.
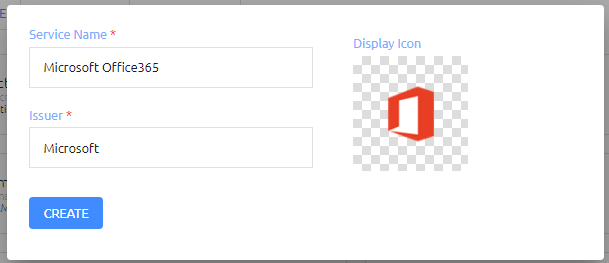
Review the settings in the General Info tab. If you add a description or update other settings, click Save.
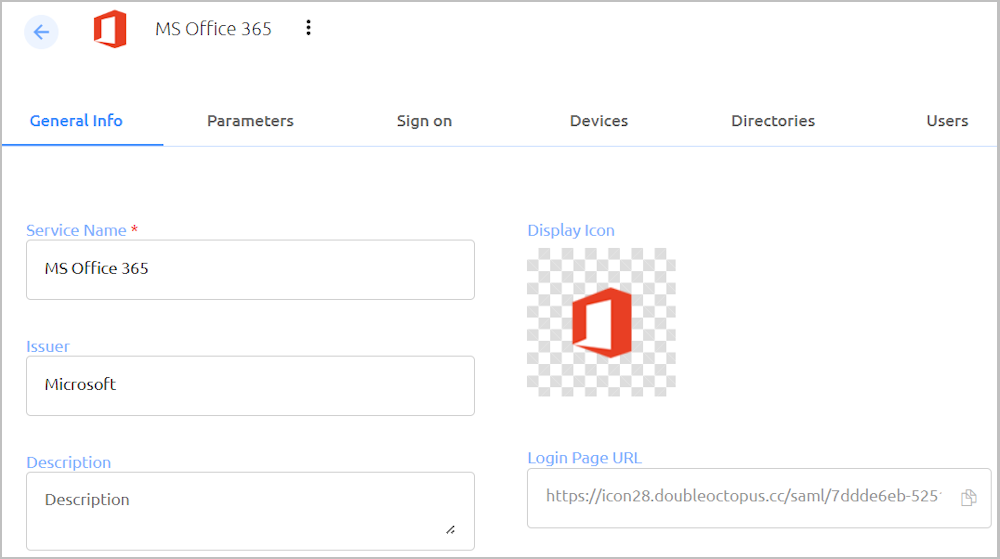
Add directories, users and groups to the service. For details, refer to Creating a Service and Assigning Users.
Open the Parameters tab and configure the following settings.
Setting
Value / Notes
Login Identifier
Login method for the Octopus Authentication Server. Select Email.
Office 365 Email
Select Email.
Name ID
Select Alias 1.
Office 365 Domain
Enter the Office 365 new Intermediary email domain.
Microsoft MFA
The default value is FALSE. When set to TRUE, after the user is successfully authenticated by Octopus Authenticator, Microsoft will request additional authentication on the Microsoft authenticator.
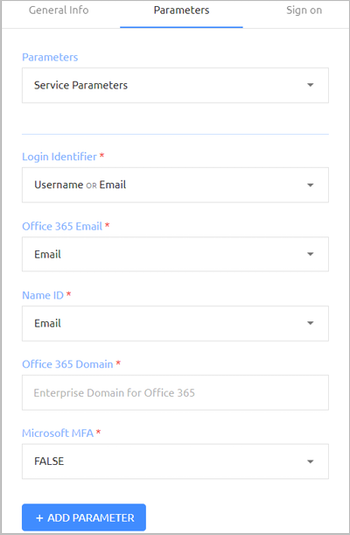
If you wish, you may click Add Parameter to create additional optional parameters that are commonly added to SAML services. For a list of these parameters, refer to Generic SAML Service Parameters.
IMPORTANT: To support FIDO authentication, add the windowsFidoLogin parameter with any value (e.g., TRUE).When using this parameter, the Check Password and Force Login Page options (on the Sign on tab) need to be enabled.
Click Save.
Open the Sign on tab and copy or download the following elements:
Issuer URL: The URL used by the Microsoft Office 365 service to connect to Octopus Authenticator. Click the Copy icon to copy the URL.
SAML2.0 Endpoint (HTTP): The Octopus Authenticator Office 365 Login page URL to which the Microsoft Office 365 service provider will refer users for Octopus authentication. Click the Copy icon to copy the URL.
X.509 Certificate: Click Download to download the cert.pem file.
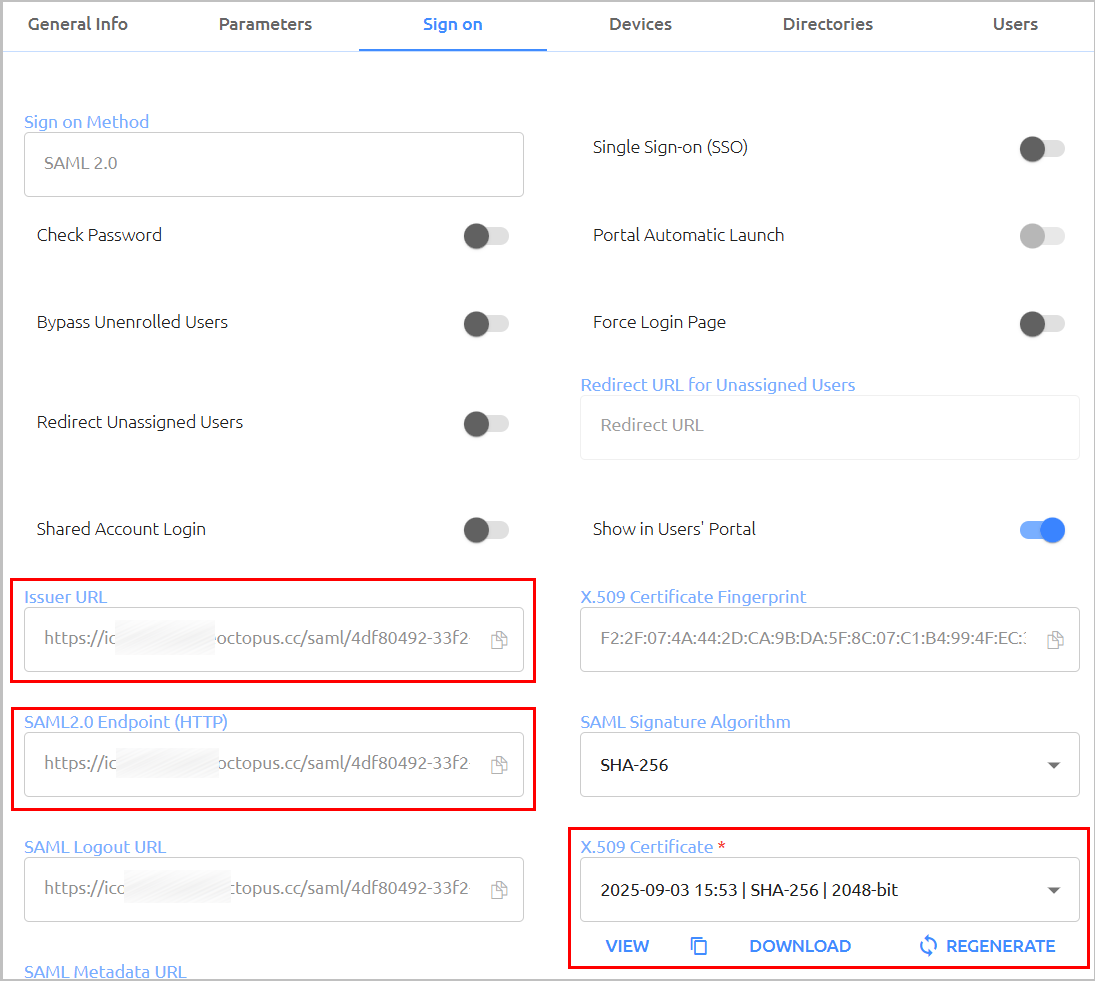
You will need these elements for the configurations in Office 365.
Set up SSO for the Office365 Web Service and the Mobile Outlook App using Octopus Authenticator as a third-party IDP. For details, refer to the integration document: How to Configure Octopus Authentication for Microsoft Office 365.
WS-Federation provides a general mechanism for allowing authentication across different security boundaries in various security realms, for the purpose of creating a federation of security realms. The WS- Fed service enables integration between the Octopus Authenticator and the WS-Federation mechanism. This process enables full-scale integration with Entra ID, allowing use of the Octopus platform on Entra ID domain-joined machines. It also supports integration with mobile device management systems, such as Microsoft Intune.
For successful integration, you need to create the service in the Octopus Management Console, and ther federate the Entra ID domain with WS-Federation to Secret Double Octopus. The following procedure provides a summary of the integration process. For full details and instructions, please refer to the document How to Configure Octopus Authentication for Microsoft Office 365.
To configure WS-Federation integration:
In the Octopus Management Console, open the Services menu and click Add Service. In the WS-Fed tile, click Add.
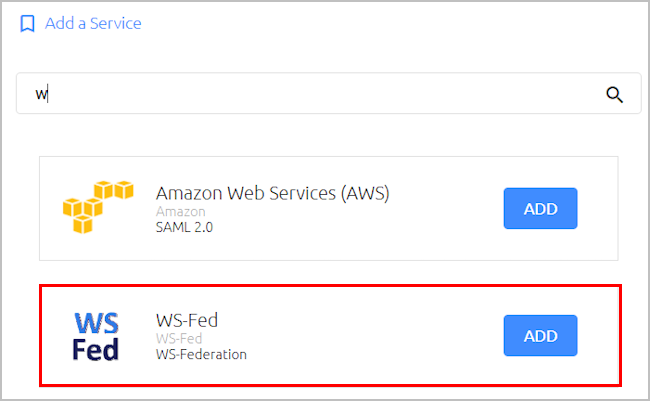
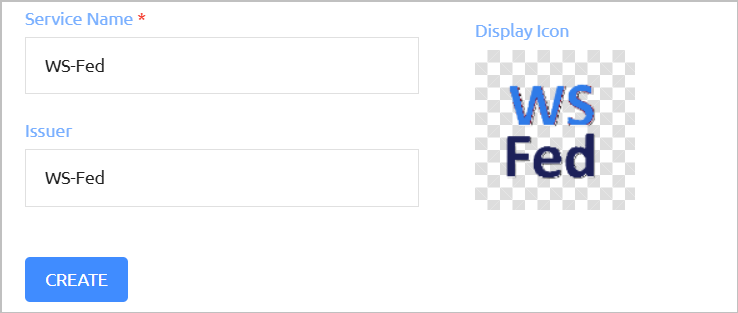
In the dialog that opens, update the default service name and issuer if desired. To change the display icon, click the tile and upload the logo of your choice (supported image size is 128x128 pixels). Then, click Create.
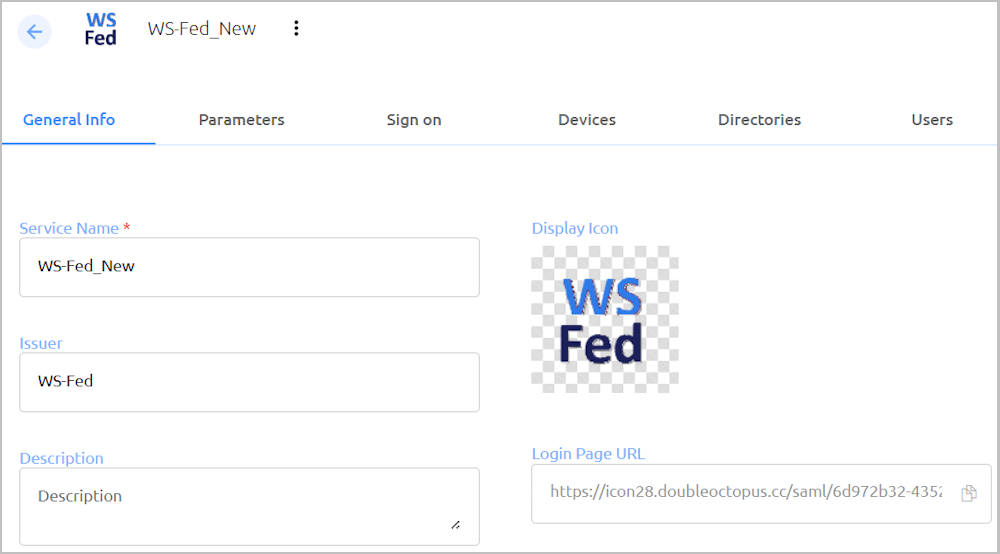
Review the settings in the General Info tab. If you add a description or update other settings, click Save.
Add directories, users and groups to the service. For details, refer to Creating a Service and Assigning Users.
Open the Parameters tab and configure the following settings.
Setting
Value / Notes
Login Identifier
Login method for the Octopus Authentication Server. Select Email.
Name ID
The attribute in the user's profile used for identifying the user. Select Email.
Email Address
Select Email.
Immutable ID
A unique attribute for identifying the user in Entra ID. Select Username. You will override this parameter with GUID in the next step.)
UPN A unique identifier for the user account. Select Username. (You will override this parameter with UPN in the next step.)
Office 365 Domain
Enter the Entra ID domain.
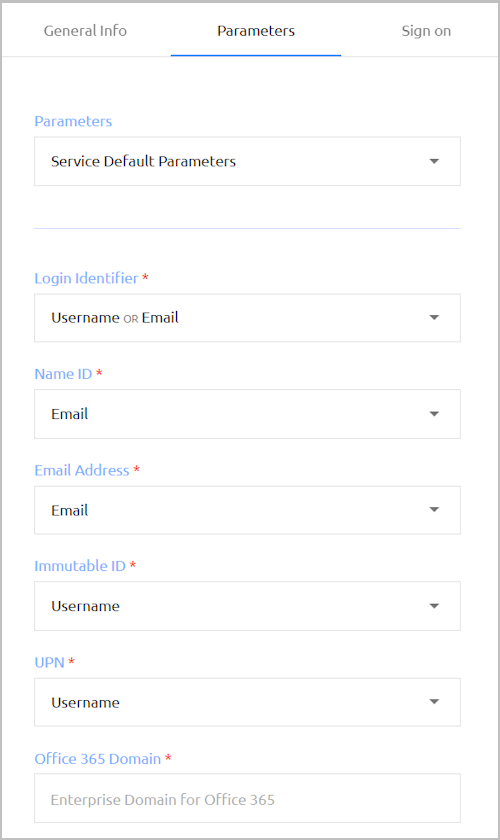
If you wish, you may click Add Parameter to create additional optional parameters that are commonly added to SAML services. For a list of these parameters, refer to Generic SAML Service Parameters.
Override the Name ID and UPN parameters:
a. At the top of the Parameters tab, open the Parameters list and select the relevant directory.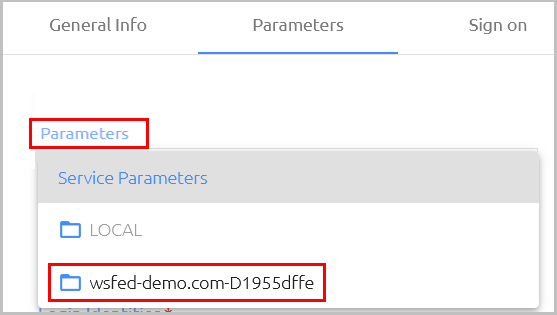
b. Select the checkbox next to the Name ID parameter. Then, open the dropdown list and selectObjectGUID.
c. Select the checkbox next to the UPN parameter. Then, open the dropdown list and select UserPrincipalName.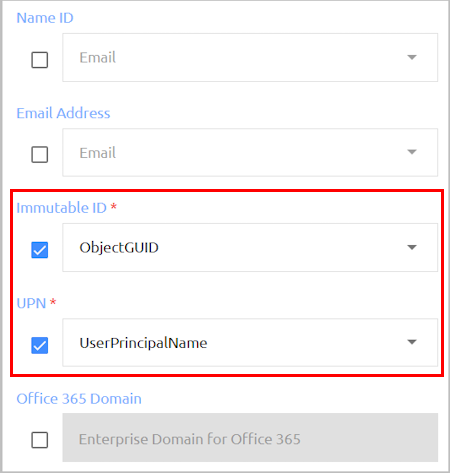
d. Click Save.Open the Sign on tab and copy or download the following elements:
Issuer URL: The URL used by the WS-Fed service to connect to Octopus Authenticator. Click the Copy icon to copy the URL.
Active Logon URL: The URL used for handling active user authentication traffic. Click the Copy icon to copy the URL.
Passive Logon URL: The URL used for handling authentication traffic in which the requester (e.g., a web browser) is not actively aware of the federation processes taking place. Click the Copy icon to copy the URL.
X.509 Certificate: Click Download to download the cert.pem file.
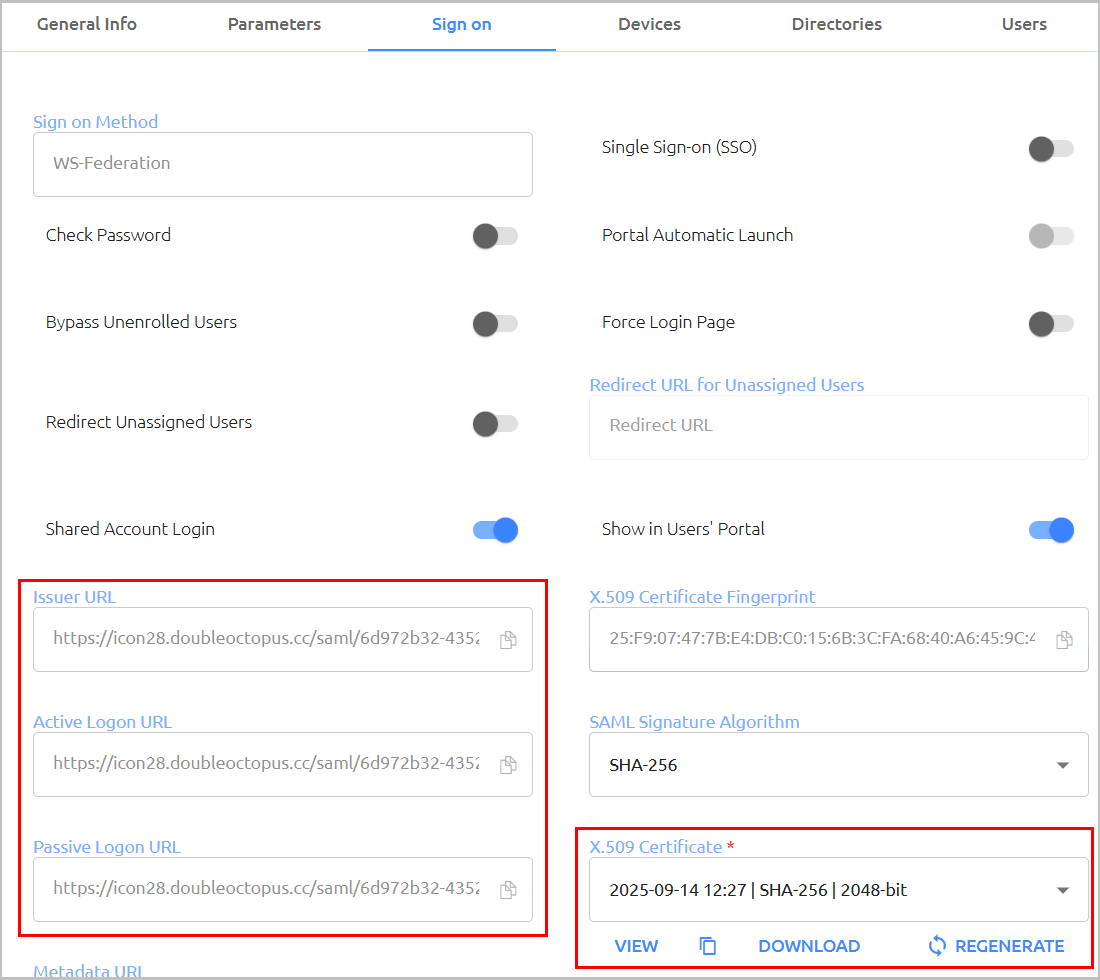
You will need these elements to federate your Entra ID domain.
Federate the Entra ID domain with WS-Federation to Secret Double Octopus. For details, refer to Appendix B of the document How to Configure Octopus Authentication for Microsoft Office 365.
Parameters are service-side settings that the Octopus Management Console needs for successful service integration. The set of required parameters are service-specific, and can be viewed in the Parameters tab of the service settings.
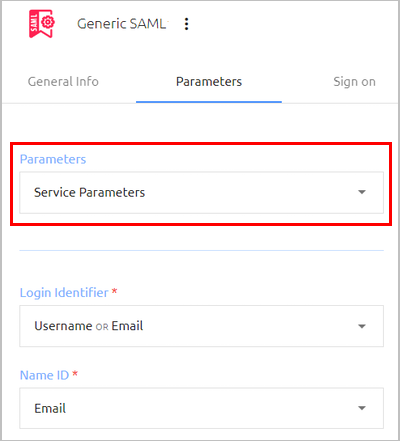
The settings that you specify for Service Parameters are the default parameters used for authentication to the service. In addition, the Octopus Management Console supports defining directory-specific parameters that override default service parameters.
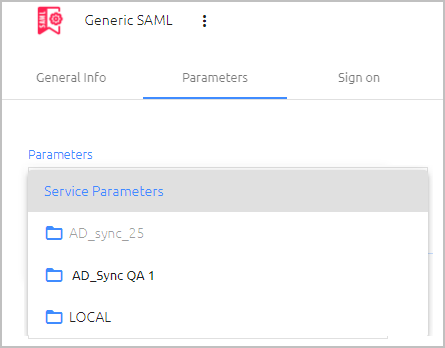
For example, let's say that in most directories, the user identifier sent to the service (the Name ID parameter) is Email. However, the identifier recognized for ForgeRock Cloud users is Username. In cases like this, you can define a Name ID parameter for the ForgeRock Cloud directory that is different from the default parameter. The procedure below explains how to do it.
To override default service parameters:
Open the settings of the relevant service. From the Parameters tab, open the Service Parameters dropdown list and check whether the directory for which you want to set override parameters is enabled.
If the directory is enabled, skip to Step 4.
If the directory is disabled in the Service Parameters list, select the Directories tab.
All the directories integrated with the Management Console are listed.
Select the directories for which you want to set override parameters. Then, click Save.
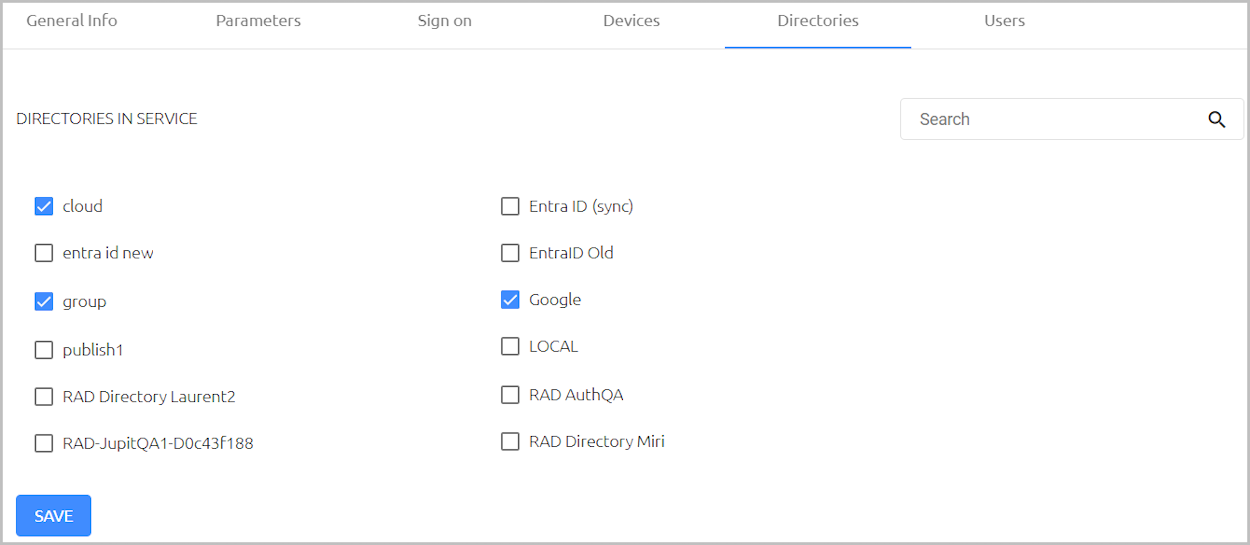
In the Parameters tab, the selected directories will now be enabled.
From the Service Parameters list, select the relevant directory.
A list of parameters is displayed.
To override a parameter, select its checkbox and then specify its value.
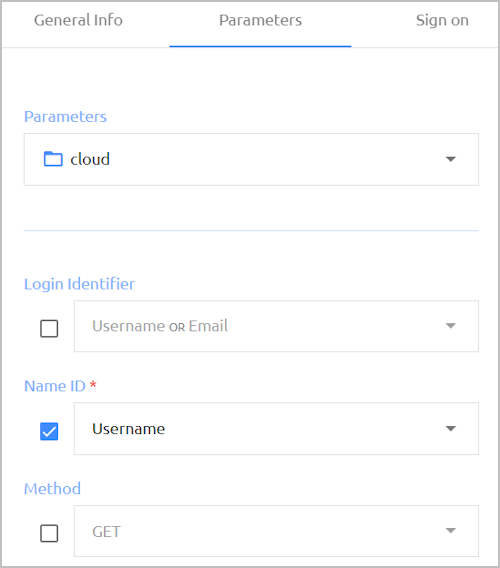
Click Save. Then, from the toolbar at the top of the page, click PUBLISH and publish your changes.
When default service parameters are displayed, parameters that have override settings are indicated by an Overridden By list. To view the override parameters, open the list and select the relevant directory.