TABLE OF CONTENTS
Citrix XenApp Integration: Overview
This document explains how to configure Citrix XenApp integration with Secret Double Octopus, using a NetScalar pass-through.
Integration Environment
The environment used for the integration described in this document is based on the following software versions:
- Octopus Authentication Server version 4.8
- Citrix NetScaler Gateway version 12.0
Prerequisites
Before beginning the integration process, verify that the following requirements are met:
- You have access to a unique enterprise certificate. The certificate can generally be downloaded from the Enterprise Root Certificate Authority server of your organization.
- The Citrix Federated Authentication Service (FAS) is installed. For detailed information about installing and configuring the FAS go to
https://www.carlstalhood.com/citrix-federated-authentication-service-saml/ - The Octopus Authentication client for Windows must be installed on the Citrix Master Image and configured with the corresponding AD Authentication Service (in the Octopus Management Console) in order to unlock the remote workstation.
Integration Workflow
Citrix XenApp integration involves the following sequential phases:
- Configuring XenApp on the Citrix NetScaler: Configure integration settings for XenApp from the Citrix ADC.
- Creating the Citrix SAML Service: Create a service in the Octopus Authenticator Management Console and configure parameters, sign on settings and users.
- Configuring Authentication for the Citrix NetScaler Gateway: Configure SAML authentication for the Citrix gateway virtual server.
- Configuring XenDesktop StoreFront Integration: Add the NetScaler gateway to the Citrix Storefront and configure the delivery controllers.
Configuring XenApp on the Citrix NetScaler
The following procedure explains how to configure XenApp in the Citrix ADC, using the XenApp/XenDesktop Setup Wizard.
To configure XenApp on the Citrix NetScaler:
1. From the Citrix ADC, select XenApp and XenDesktop.
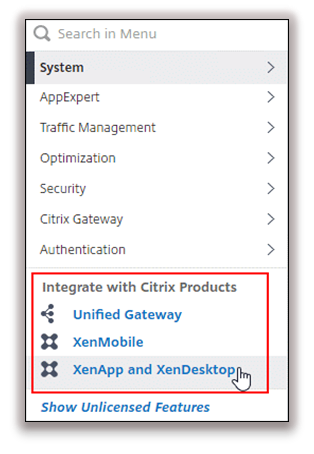
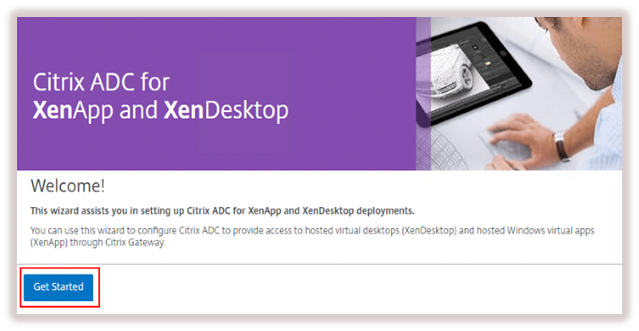
Then, click Get Started to open the wizard.
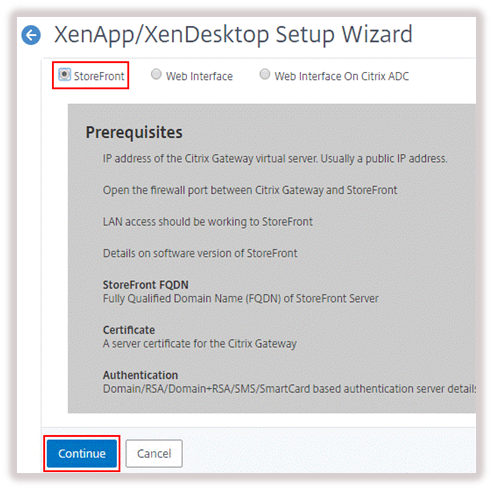
2. At the top of the setup wizard, select the StoreFront radio button. Then, click Continue.
3. In the Citrix Gateway section, enter the FQDN, the Virtual IP address, and the port for the new Gateway.
Below the Port field, select the Redirect requests from port 80 to secure port checkbox.
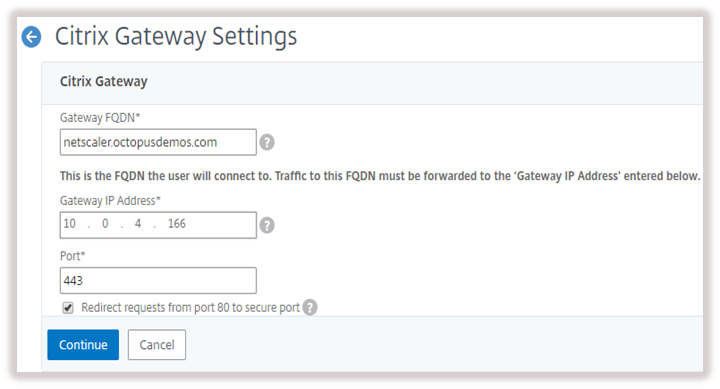
Then, click Continue.
4. In the Server Certificate section, select Use existing certificate, and then select the certificate that matches the new Gateway FQDN. If the certificate is not on the list, select Install Certificate, and upload the relevant .PFX file. (We recommend using a certificate from your enterprise CA or from a trusted root CA.)
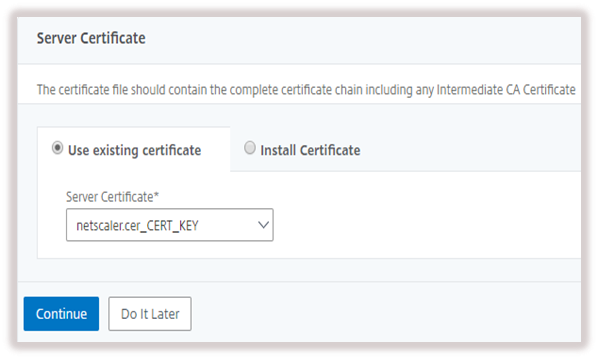
After uploading the certificate, click Continue.
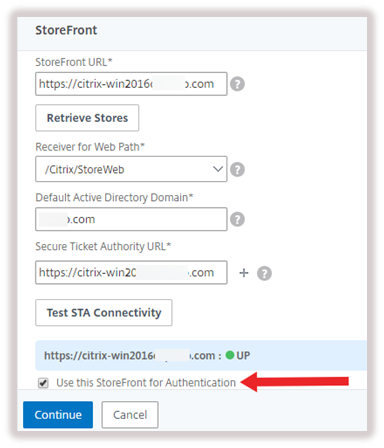
5. In the StoreFront section, enter the URL to the StoreFront and click Retrieve Stores. Then, from the Receiver for Web Path dropdown list, select the appropriate receiver.
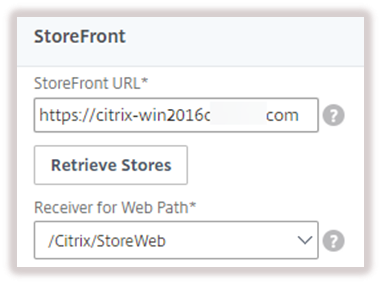
6. In the Default Active Directory Domain field, enter a domain name that your StoreFront server will accept.
7. Specify the Secure Ticket Authority (STA). STAs are usually your XenDesktop Controllers.
In the field, enter the URL of your STA, including http:// or https://. If you have more than one STA server, click the + icon to add them. Then, click Test STA Connectivity.
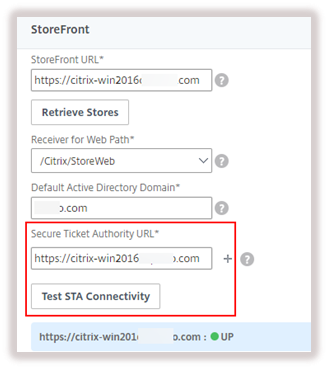
8. Select the Use this StoreFront for Authentication checkbox. Then, click Continue.
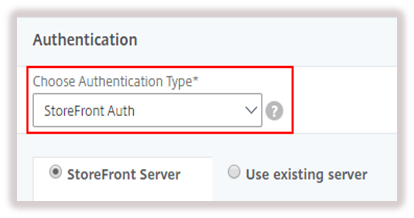
9. In the Authentication section, from the Choose Authentication Type dropdown list, select StoreFront Auth.
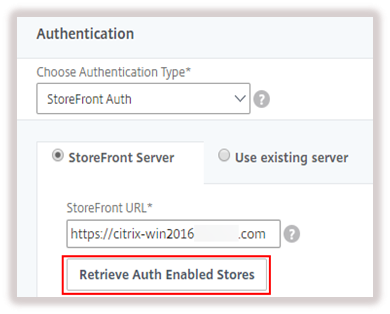
10. Verify that the StoreFront Server radio button is selected. Then, click Retrieve Auth Enabled Stores.
11. From the Authentication Service URI dropdown list, select a store. Then, enter a default domain in the Domain field. The domain name you enter here must match one of the domain names permitted by StoreFront.
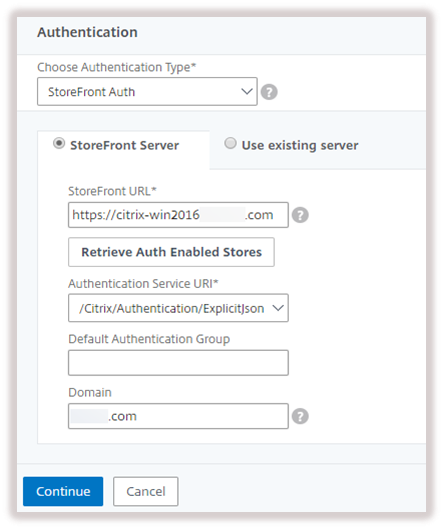
After entering the domain name, click Continue.
12. Review your settings in the summary screen. Then, click Done.
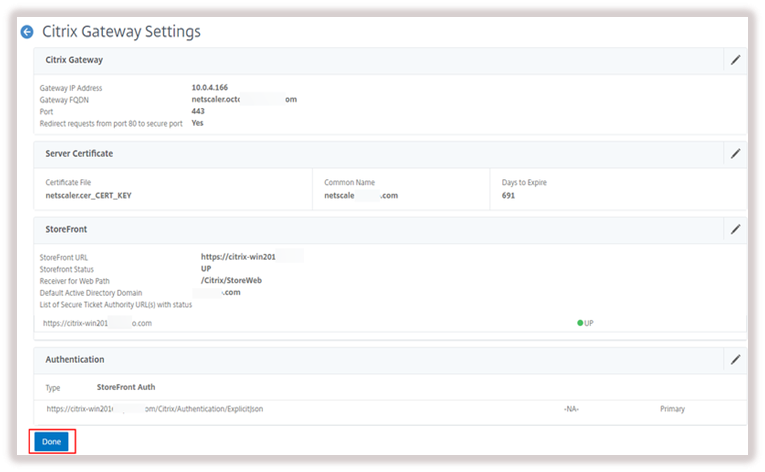
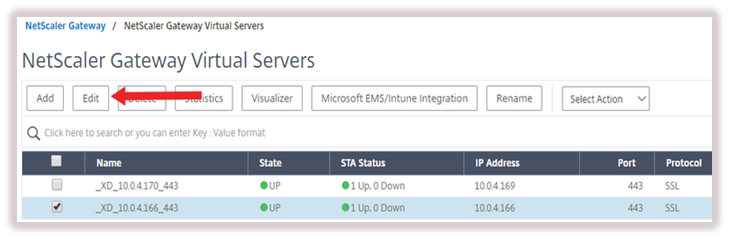
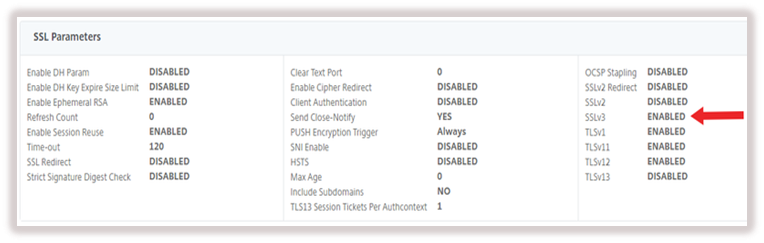
13. Perform this step only if default SSL Profiles are NOT enabled:
Navigate to Citrix Gateway > Virtual Servers. Then, click Edit and configure standard SSL vServer Settings.
Creating the Citrix SAML Service
This section explains how to create a service for Citrix NetScaler Gateway in the Octopus Management Console. The service data will be used later in the Citrix NetScaler Gateway configuration.
To add and configure the Citrix SAML service:
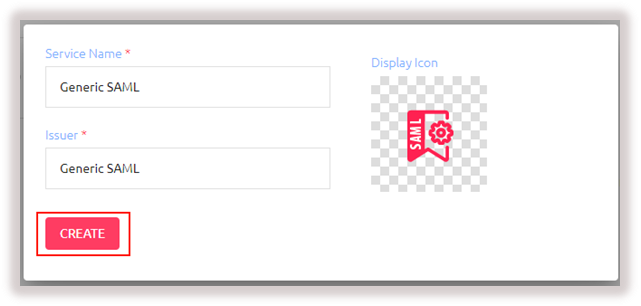
1. From the Octopus Management Console, open the Services menu and click Add Service. In the Generic SAML tile, click Add.
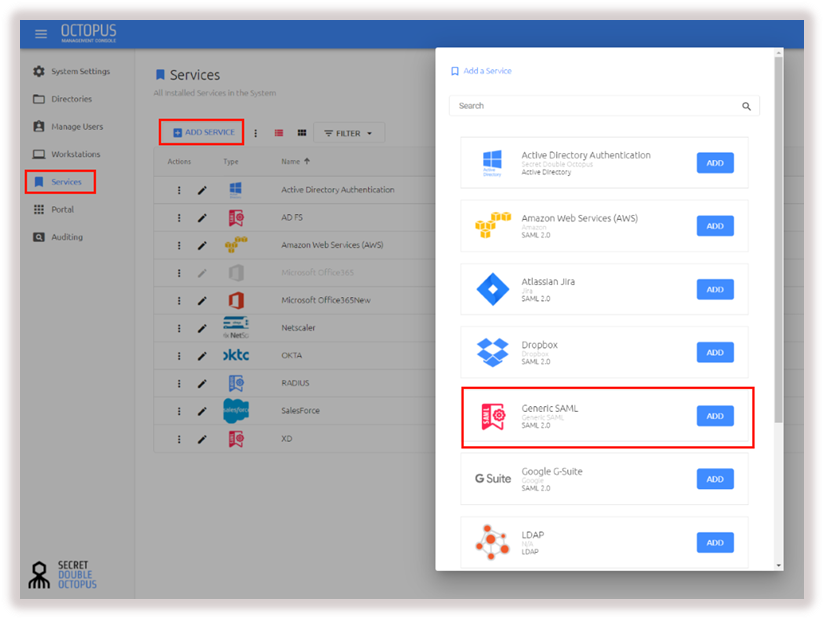
Then, in the dialog that opens, click Create.
2. Configure the following settings in the General Info tab:
Setting | Value / Notes | |
Service Name | Enter a display name to identify the Service Provider (e.g., Citrix XenApp). |
|
Issuer | Enter the issuer of the service (e.g., Citrix). |
|
Description | Enter a brief note about the service. |
|
Display icon | This icon will be displayed on the Login page for the service. To change the default icon, click and upload the image of your choice. |
|
Login Page URL | <https://<Enterprise Base URL>/generic-saml/<No.>/login> |
|
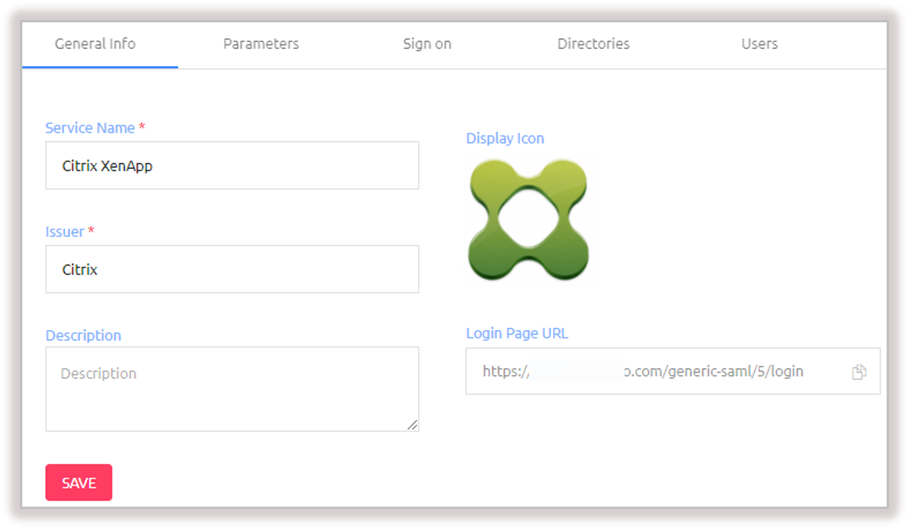
Then, click Save.
3. Open the Parameters tab, and configure the following settings:
Setting | Value / Notes | |
Octopus Authenticator Login | The identifier required for the Octopus Authentication Server. |
|
Name ID | The parameter required for Citrix NetScaler login. |
|
Method | POST |
|
ASC URL | https://<NetScaler Virtual Server FQDN>/cgi/samlauth |
|
Audience | Enter the issuer value. |
|
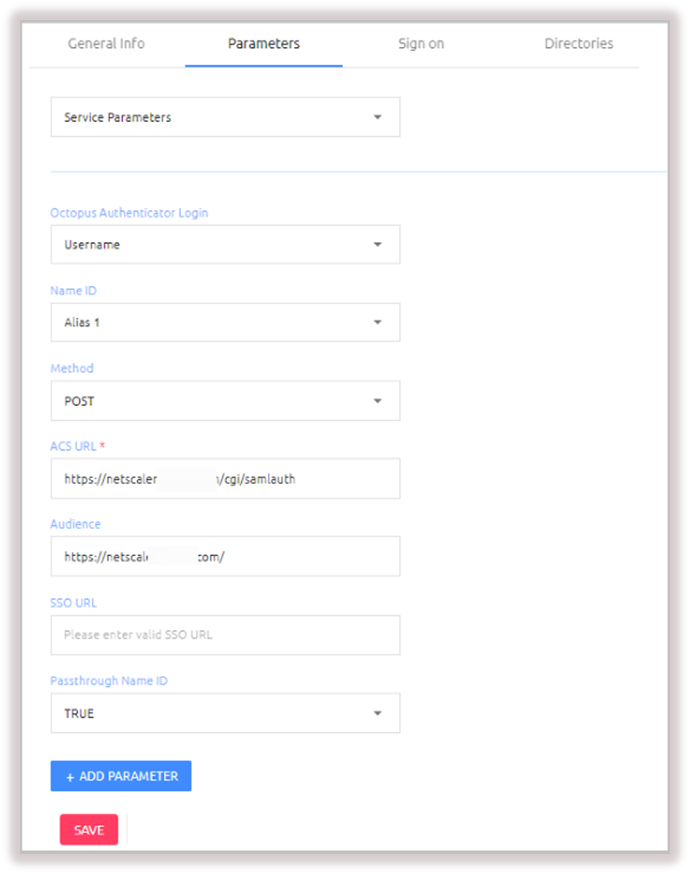
Then, click Save.
4. Open the Sign on tab and update the default message in the Custom Message field. (This is the message displayed to the user upon successful login.)
Then, under X.509 Certificate, click Download to download the certificate.
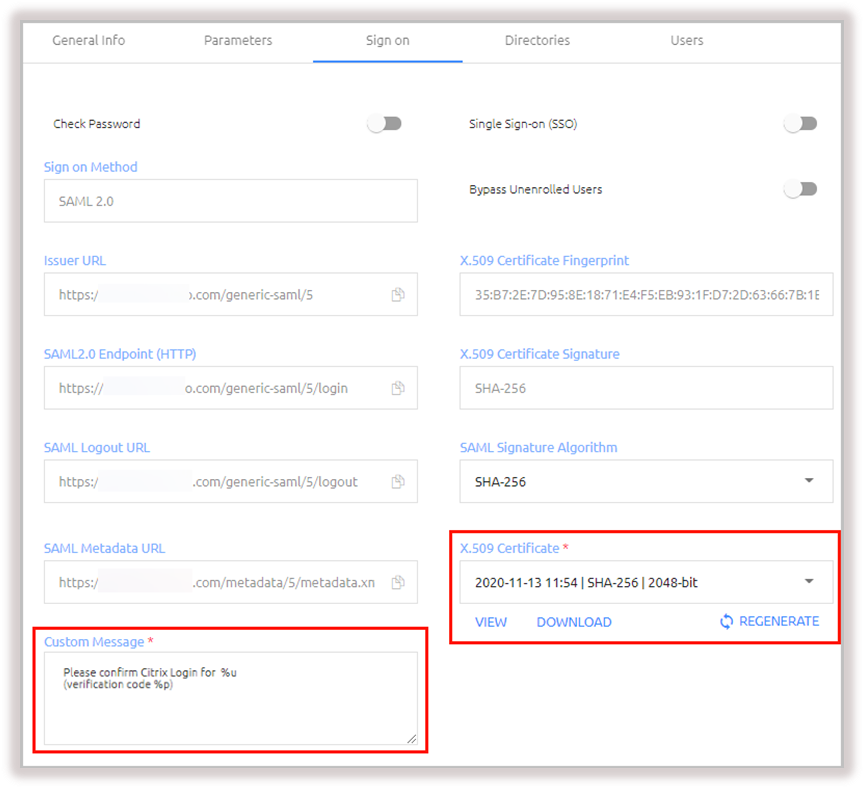
5. At the bottom of the Sign on tab, click Save.
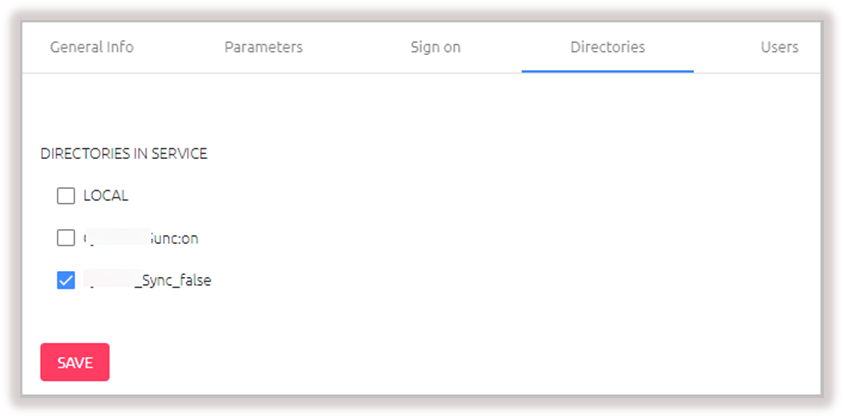
6. Open the Directories tab and select the checkboxes of the directories you want to integrate with the service. Then, click Save.
7. Open the Users tab and click Add.
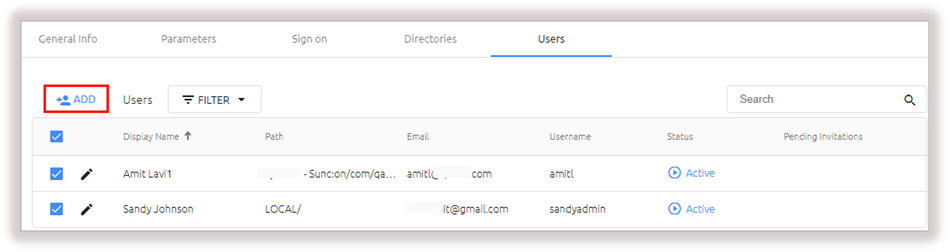
A popup opens, with a list of directories displayed on the left.
8. Expand the directories list and select the checkboxes of the groups and users that you want to add to the service. Then, click Save to close the popup.
The groups and users you selected are listed in the Users tab.
9. At the bottom of the Users tab, click Save. Then, from the toolbar at the top of the page, click PUBLISH and publish your changes.
Configuring Authentication for the Citrix NetScaler Gateway
For successful Citrix NetScaler integration, the Octopus Authentication Server has to be set as an Identity Provider in Citrix NetScaler. In order to do this, the following processes need to be carried out:
- Updating the Octopus Authentication SAML Certificate
- Configuring the 3rd Party SAML Authentication Server
- Creating the SAML Authentication Policy
- Assigning the Policy to the NetScaler Virtual Server
Updating the Octopus Authentication SAML Certificate
Follow the procedure below to install the SAML service certificate in Citrix NetScaler.
To update the Octopus Authentication SAML certificate:
1. In the Citrix NetScaler Admin Console, select the Configuration tab.
Then, navigate to Traffic Management > SSL > Certificates > CA Certificates, and click Install.
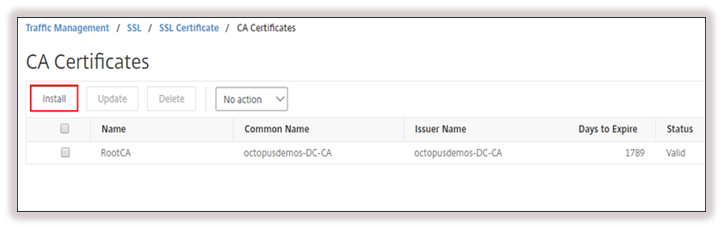
The Install CA Certificate window opens.
2. In the Certificate-Key Pair Name field, enter a name for the certificate.
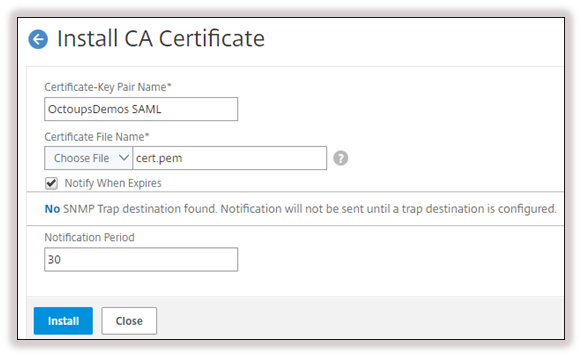
3. Under Certificate File Name, select local from the dropdown list. Then, navigate to and select the certificate that you downloaded when configuring Sign On settings for the Octopus Authenticator SAML Service (Creating the Citrix SAML Service).
4.Click Install.
Configuring the 3rd Party SAML Authentication Server
The following procedure explains how to configure the server in Citrix NetScaler.
To configure the SAML authentication server:
1. From the Configuration tab of the Citrix NetScaler Admin Console, navigate to NetScaler Gateway > Policies > Authentication > SAML.
Select the Servers tab, and click Add.
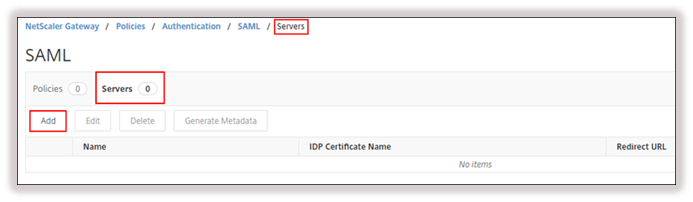
The Create Authentication SAML Server window opens.
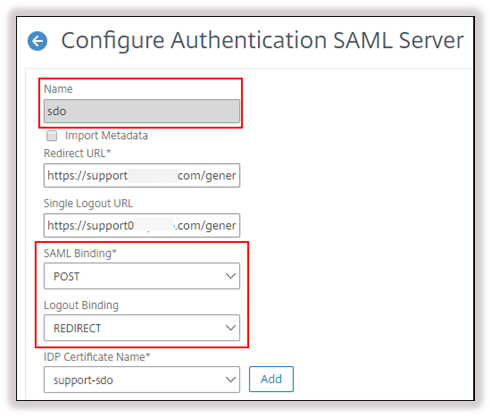
2. Configure the following settings:
Setting | Value / Notes | |
Name | Enter a name for the server (e.g., Octopus IDP). |
|
SAML Binding | POST |
|
Logout Binding | REDIRECT |
|
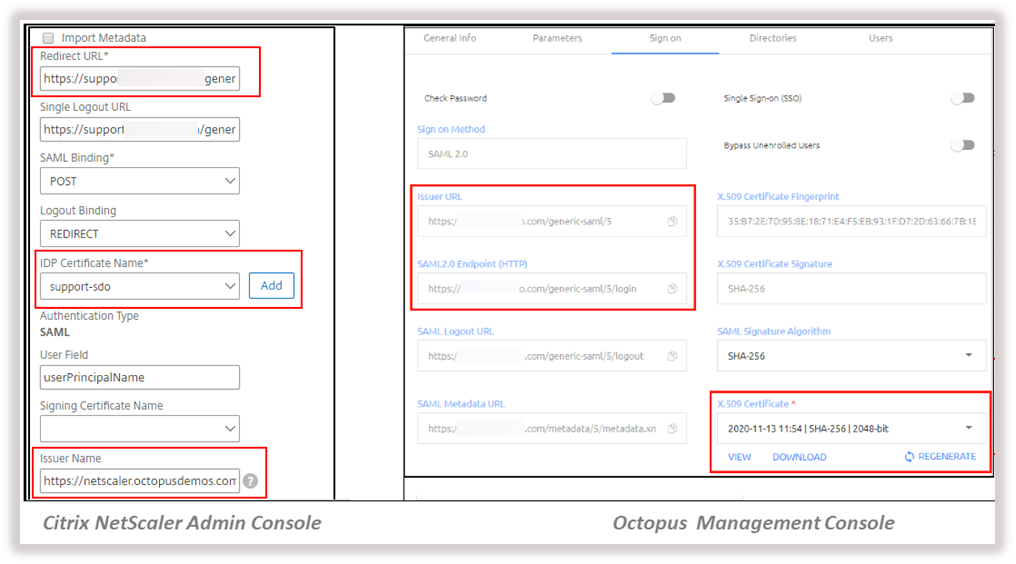
3. Configure the following settings. The values can be copied from the Sign on tab of the Citrix service that you created in the Octopus Management Console.
Setting | Value / Notes | |
Redirect URL | The identity provider login URL. Copy the value from the SAML 2.0 Endpoint (HTTP) field of the Sign on tab. |
|
IDP Certificate Name | Select the IDP certificate that you installed. This corresponds to the X.509 Certificate. |
|
Issuer Name | The NetScaler Virtual Server URL. Copy the value from the Issuer URL field of the Sign on tab. |
|
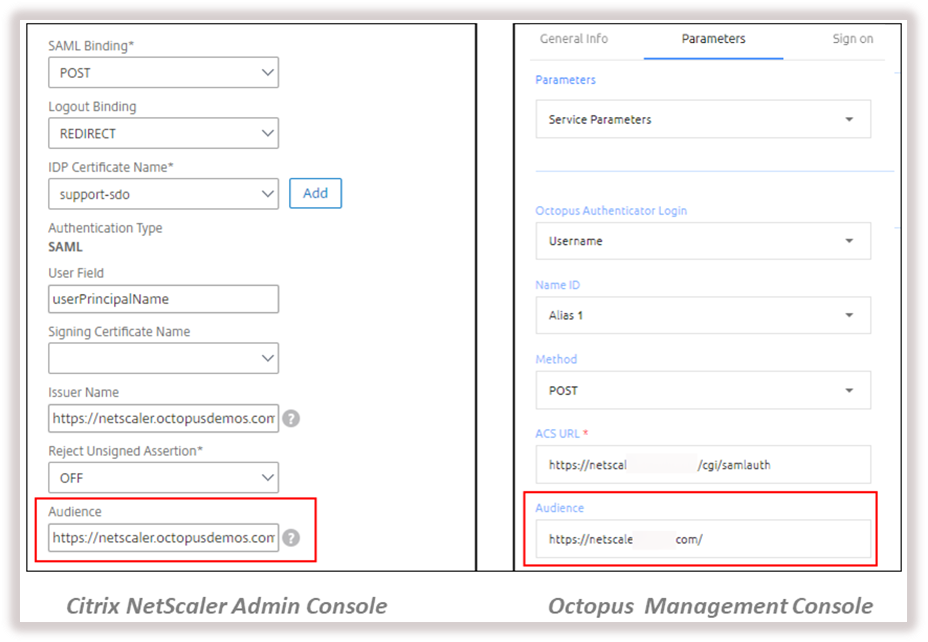
4. In the Audience field, enter the name or FQDN of the VIP. You can copy the value from the Audience field in the Parameters tab of the Citrix service.
5. At the bottom of the Create Authentication SAML Server window, click Create.
Creating the SAML Authentication Policy
Follow these steps to add and configure the authentication policy.
To create the SAML Authentication policy:
1. From the Configuration tab of the Citrix NetScaler Admin Console, navigate to NetScaler Gateway > Policies > Authentication > SAML.
Select the Policies tab, and click Add.
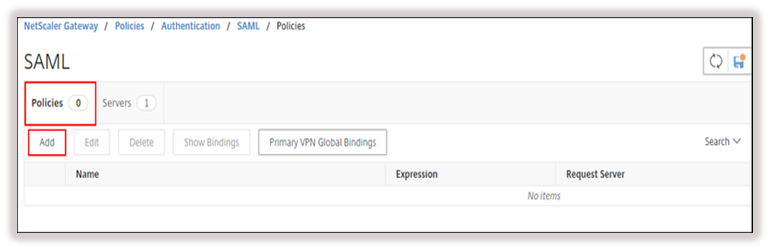
The Create Authentication SAML Policy window opens.
2. Configure the following settings:
Setting | Value / Notes | |
Name | Enter a name for the policy (e.g., Octopus SAML). |
|
Server | Select the SAML server that you added. |
|
Expression | Enter the required logical expression (e.g., ns_true). |
|
3. Click Create, and then click OK in the confirmation popup.
Assigning the Policy to the NetScaler Virtual Server
The procedure below explains how to bind the SAML authentication policy to the selected virtual server.
To assign the policy:
1. From the Configuration tab of the Citrix NetScaler Admin Console, navigate to NetScaler Gateway > Virtual Servers.
Select the checkbox of the virtual server to be assigned to the SAML policy, and then click Edit.
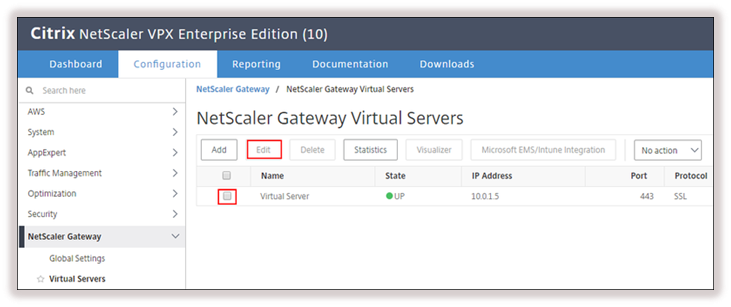
2. In the Basic Authentication portion of the VPN Virtual Server window, click the + icon to open the Choose Type dialog.
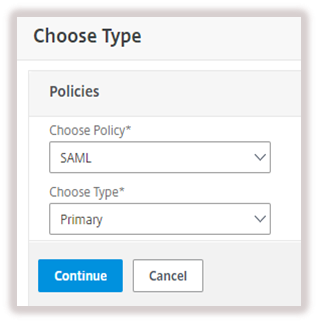
3. From the Choose Policy dropdown, select SAML, and from the Choose Type dropdown, select Primary.
Then, click Continue.
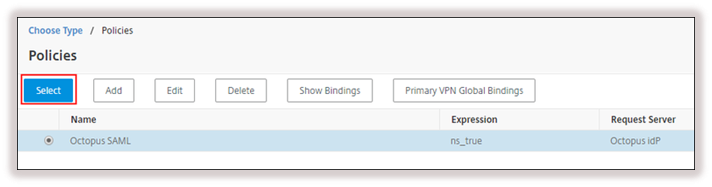
4. Click in the Select Policy field and choose the SAML authentication policy that you created.
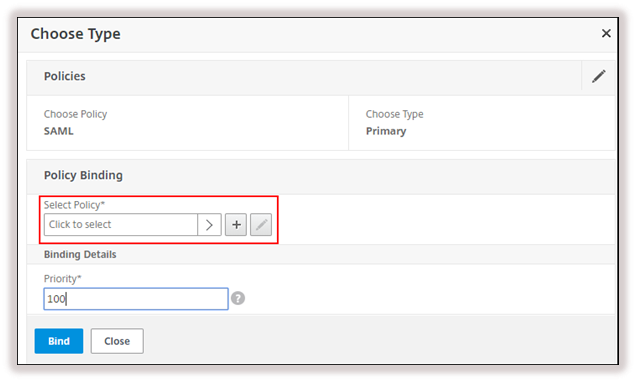
Then, click Select.
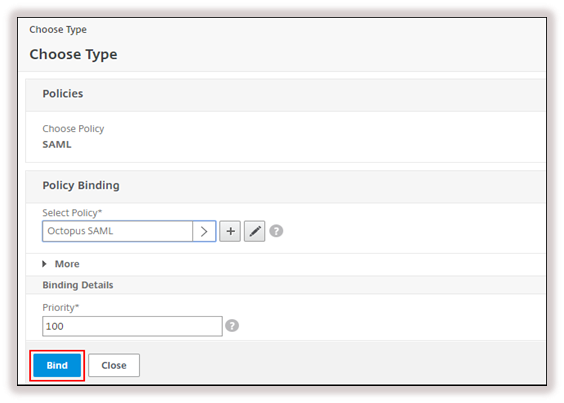
5. At the bottom of the Choose Type dialog, click Bind.
6. Click Done.
Then, in the upper right corner of the NetScaler Admin Console, click to save the running configuration.
Configuring XenDesktop StoreFront Integration
The following sections explain how to integrate the XenDesktop StoreFront with NetScaler and Secret Double Octopus:
- Adding the NetScaler Gateway
- Configuring the Base URL
- Configuring Delivery Controllers
Adding the NetScaler Gateway
Follow the procedure below to add and configure the NetScaler Gateway in the Citrix StoreFront.
To add and configure the NetScaler Gateway:
1. From the StoreFront console, right-click the Stores node and select Manage NetScaler Gateways.
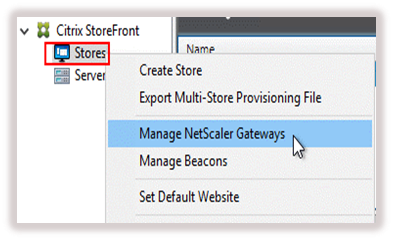
Then, in the dialog that opens, click Add.
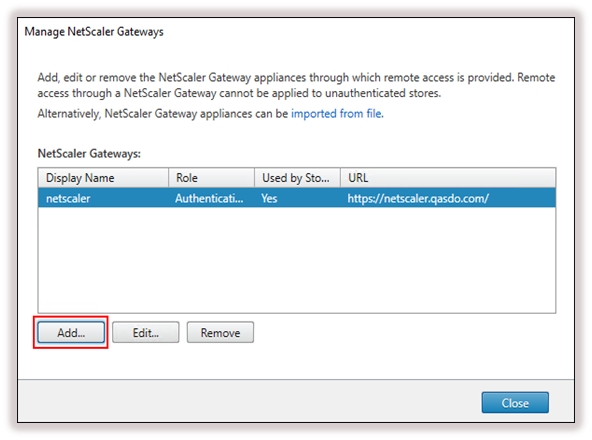
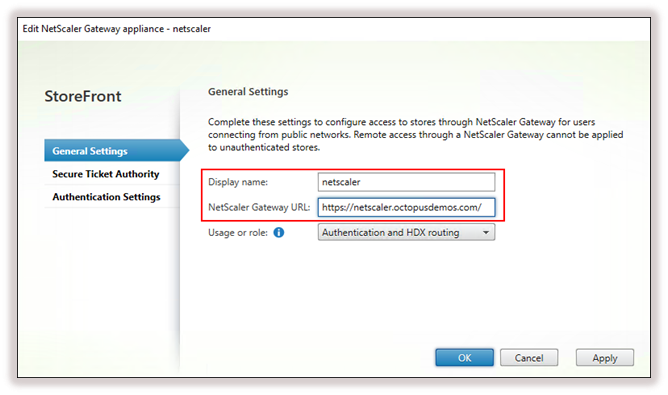
2. On the General Settings page, enter the name and the URL of the NetScaler virtual gateway.
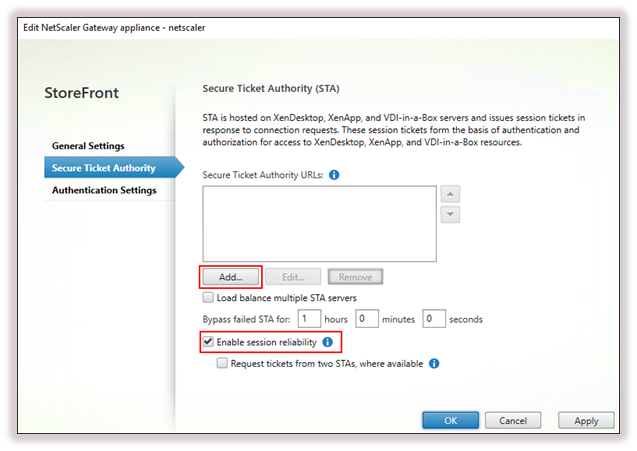
3. On the Secure Ticket Authority page, verify that the Enable session reliability checkbox is selected. Then, click Add.
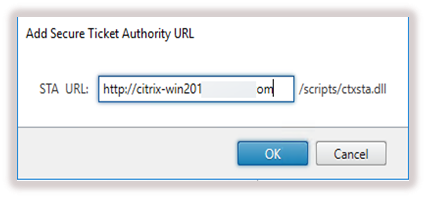
4. In the popup that opens, enter the URL of the STA, and then click OK.
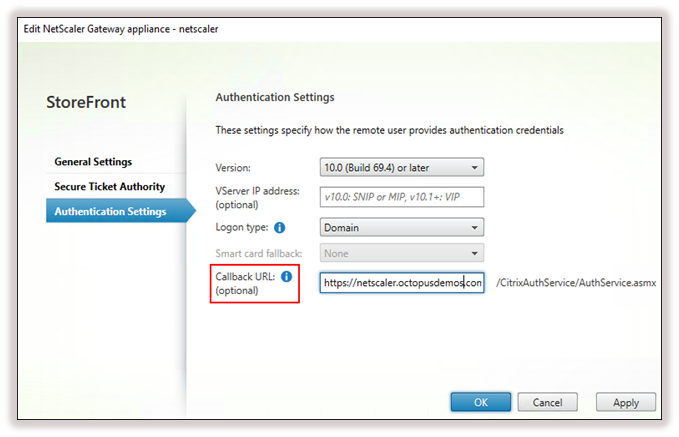
5. On the Authentication Settings page, enter the Callback URL. The callback should point to the NetScaler Virtual Server.
6. Click OK.
Configuring the Base URL
Follow the procedure below to change the base URL in the Citrix StoreFront to the URL of the NetScaler Virtual Server.
To configure the base URL:
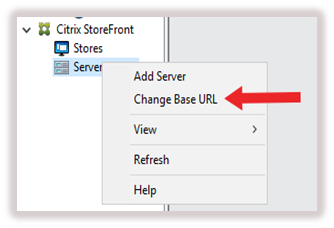
1. From the StoreFront console, right-click the Server Group node and select Change Base URL.
2. In the dialog that opens, enter the URL of the NetScaler Virtual Server. This URL represents the Store.
If you are using an external URL, you should set this URL to the address of the NetScaler Virtual Server.
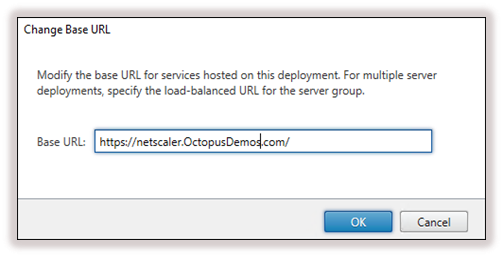
3. Click OK.
Configuring Delivery Controllers
The following procedure explains how to properly configure the delivery controllers in Citrix Studio.
To configure delivery controllers:
1. From the StoreFront console, navigate to Citrix StoreFront>Stores. On the right side of the page, under Store Service, select Manage Delivery Controllers.
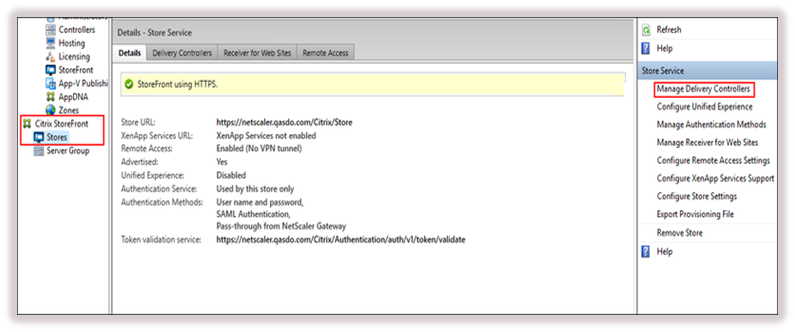
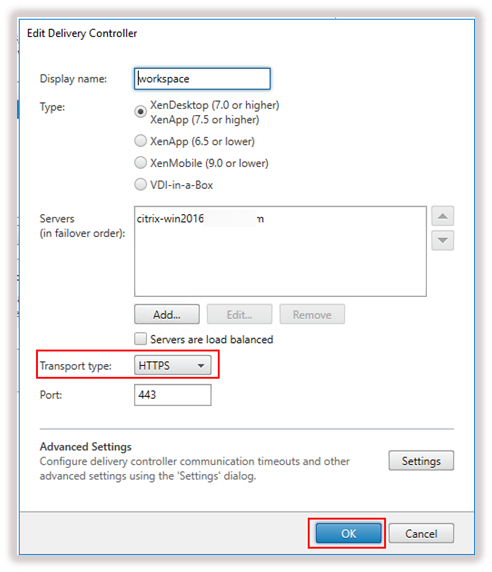
2. In the dialog that opens, click Edit to open the Edit Delivery Controller popup. In the Transport type dropdown list, verify that HTTPS is selected. Then, click OK.
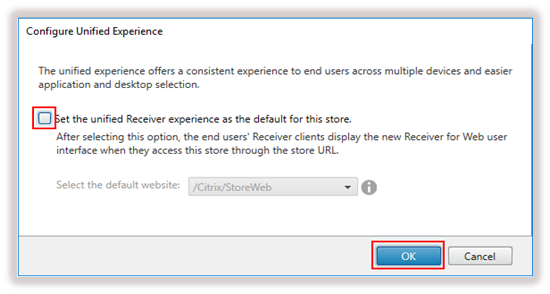
3. Under Store Service, select Configure Unified Experience. In the dialog that opens, verify that the checkbox is NOT selected. Then, click OK.
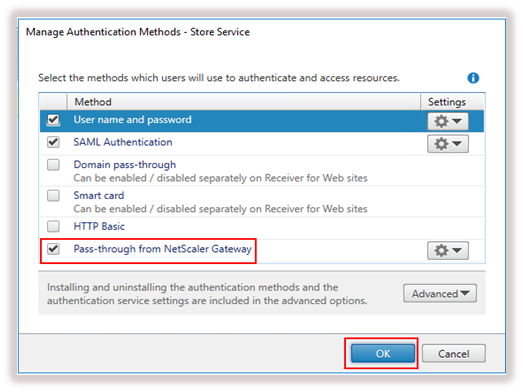
4. Under Store Service, select Manage Authentication Methods. In the dialog that opens, verify that the Pass-through from NetScaler Gateway checkbox is selected. Then, click OK.
5. Under Store Service, select Manage Receiver for Web Sites. In the dialog that opens, click Configure.
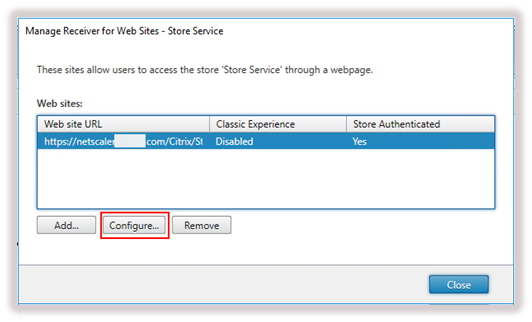
The Edit Receiver for Web Site dialog opens.
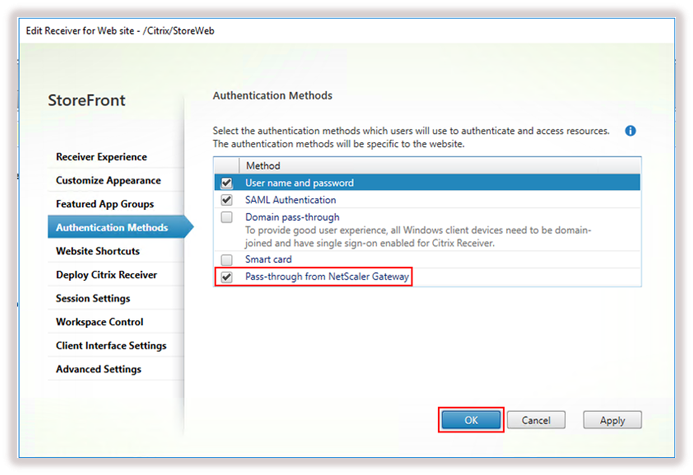
6. Click Authentication Methods, and verify that the Pass-through from NetScaler Gateway checkbox is selected. Then, click OK.
7. Under Store Service, select Configure Remote Access Settings and in the dialog that opens:
- Select the Enable Remote Access checkbox.
- Select the first radio button (No VPN Tunnel).
- Select the default appliance from the dropdown list at the bottom of the dialog.
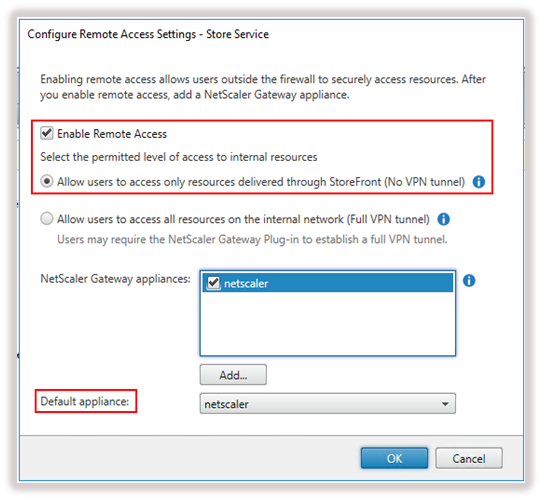
Then, click OK.
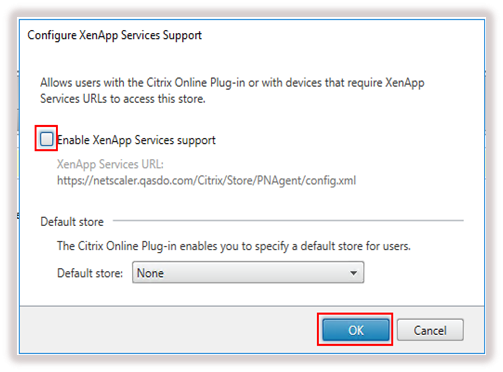
8. Under Store Service, select Configure XenApp Services Support. In the dialog that opens, verify that the checkbox is NOT selected. Then, click OK.
9. Under Store Service, select Configure Store Settings.
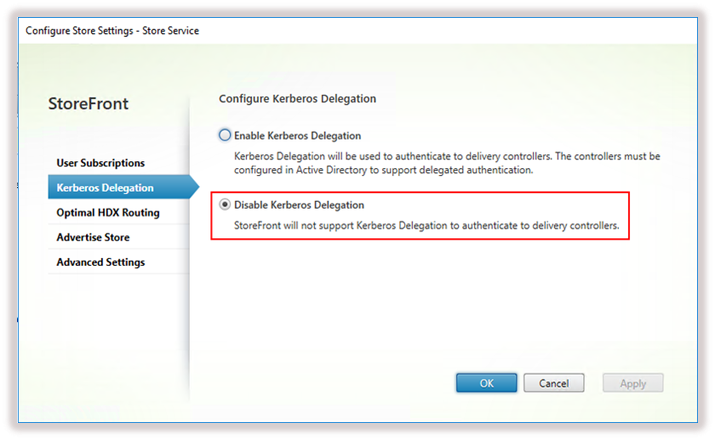
The Configure Store Settings dialog opens.
10. Click Kerberos Delegation, and select the Disable Kerberos Delegation radio button.
11. Click Optimal HDX Routing. Select NetScaler, and then click Manage Delivery Controllers.
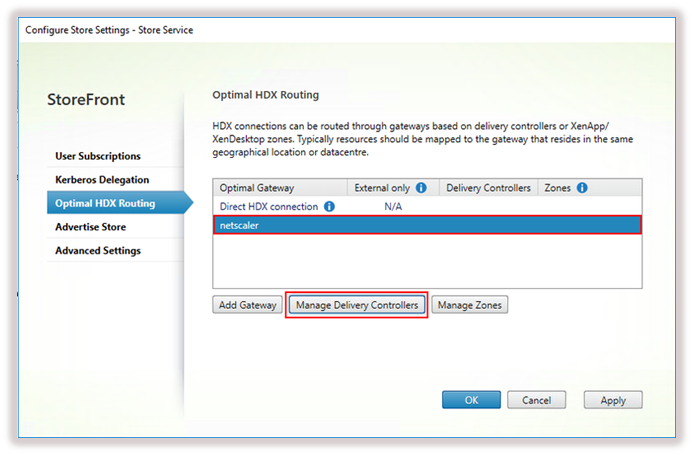
12. In the popup that opens, verify that the checkbox is NOT selected. Then, click OK.
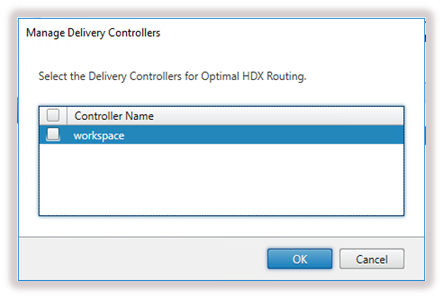
13. At the bottom of the Configure Store Settings dialog, click OK.
Running the Solution
This section describes the user experience of logging into Citrix StoreFront via the Octopus Authenticator. The authentication process is as follows:
1. From a browser, the user opens the FQDN of the Netscaler virtual server. The user is then redirected to the Double Octopus Authentication page.
2. The user enters a username and clicks Login.
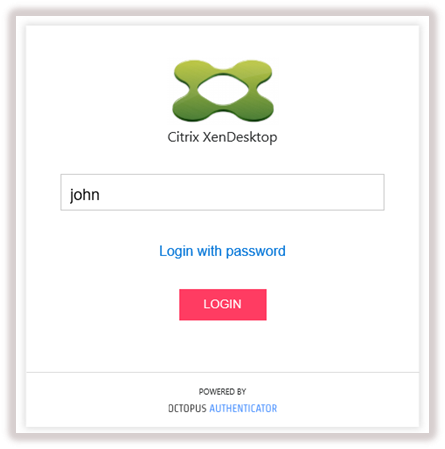
A verification code is generated and displayed.
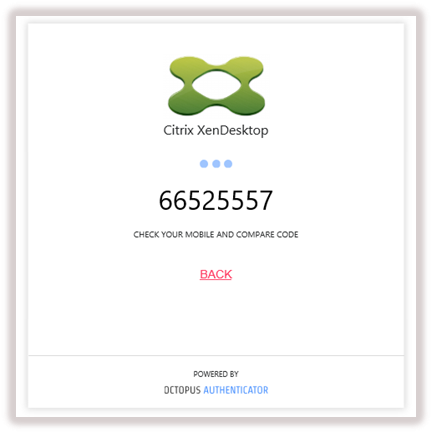
A notification with the verification code then appears on the user's Octopus Mobile App, asking for authentication approval.
3. The user taps Approve.
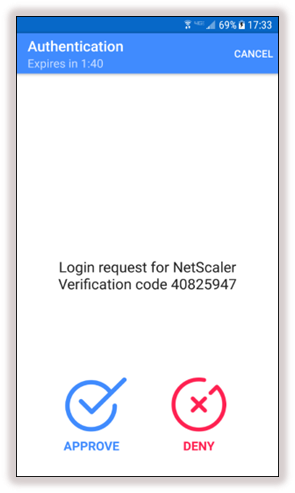
After successful authentication, the user is logged onto Citrix NetScaler Gateway. When Citrix StoreFront is configured, the user is redirected to the Citrix StoreFront page.