This document presents the configurations required for RADIUS integration between the Octopus Authenticator and Linux console SSH sessions.
The integration process generally involves the following stages:
Prerequisites
Before beginning the integration process, verify that you have installed the SDO RADIUS agent on an Active Directory member server.
Make sure that you:
Use the actual IP address of the server on which the agent is installed
Use port 1812 as the RADIUS connection port
Memorize the RADIUS secret or store it in a secure location
The following sections describe how to prepare your system to join AD using realmd and SSSD.
Follow these steps to configure your system:
Verify that the Linux server has a static IPV4 address.
Make sure the system is registered in the AD DNS with the FQDN of the server name and the static IP.
Make sure that the Linux NTP or chrony service is running, and that it is syncing with the same source as the AD environment.
Update the /etc/resolv.conf file to reflect the search AD domain and the server IP addresses of the AD DNS servers.
Edit the /etc/selinux/config file and make the changes shown below:
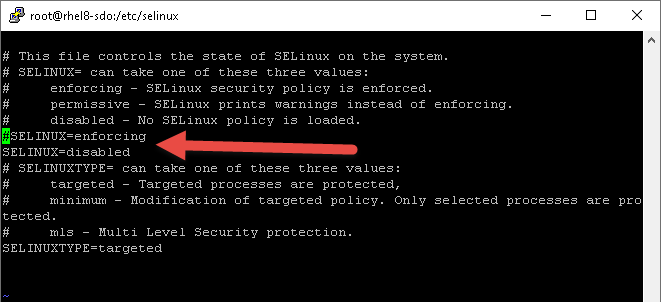
Install the minimum required packages by running the following commands:
a. yum install epel-release (for CentOS only)
b. yum install chkconfig
c. yum install gcc
d. yum install sssd realmd oddjob oddjob-mkhomedir adcli samba-common samba-common-tools krb5-workstation openldap-clients policycoreutils-python
The instructions below for building the library apply to the following Linux or Unix platforms:
Red Hat
CentOS
Note: For installation and configuration of PAM RADIUS on the SDO RADIUS Agent server, vim and vi are interchangeable.
To build the RADIUS authentication library:
Install required packages by running the following command:
$ sudo yum install gcc pam pam-devel make -y
Download the PAM RADIUS module, decompress and compile the code.
Note: The current PAM RADIUS version is 1.4.0.
$ sudo wget ftp://ftp.freeradius.org/pub/radius/pam_radius-x.x.x.tar.gz
$ sudo tar xvzf pam_radius-x.x.x.tar.gz
$ cd pam_radius-x.x.x
$ sudo -- bash -c ‘./configure; make’
Copy the result to the specified folder:
For 32-bit:
$ cp pam_radius_auth.so /lib/security/For 64-bit:
$ cp pam_radius_auth.so /lib64/security/
Open the following file for editing:
$ sudo vim /etc/ssh/sshd_config
Verify that:
ChallengeResponseAuthentication yes is enabled and is NOT preceded by a hash tag (#)
UsePAM yes is enabled and is NOT preceded by a hash tag
Open the following file for editing:
$ sudo vim /etc/pam.d/sshd
Edit the file to enable the PAM module for RADIUS authentication. The first several rows should appear as follows:
#%PAM-1.0
auth required pam_sepermit.so
auth sufficient pam_radius_auth.so
#auth substack password-auth
auth include password-auth
auth include postlogin
account required pam_sepermit.so
Open the following file for editing:
$ sudo vim /etc/pam.d/loginBecause of updated se_linux kernels, a hash tag ( # ) must be added if auth substack password-auth is present. The first several rows should appear as follows:
#%PAM-1.0
auth required pam_sepermit.so
auth sufficient pam_radius_auth.so
auth substack system-auth
auth include postlogin
If the gdm-password file exists, open it for editing and update it to use the PAM RADIUS module.
$ sudo vim /etc/pam.d/gdm-passwordThe first several rows should appear as follows:
#%PAM-1.0
auth required pam_sepermit.so
auth sufficient pam_radius_auth.so
#auth substack password-auth
auth include password-auth
auth include postlogin
Create the following directory:
$ sudo mkdir /etc/raddb
Open the following file for editing:
$ sudo vim /etc/raddb/server
Add the RADIUS server hostname or IP address, using the following syntax:
IP/FQDN{:PORT} {MyRadiusSecret} 60
IP or FQDN is that of the SDO RADIUS agent server.
Port needs to be specified only if you are using a port other than 1812.
MyRadiusSecret is the shared secret used by the SDO RADIUS agent.
60 is the number of seconds for communication between the servers.
Restart the sshd service:
systemctl restart sshd.service
Optionally, you can have the same SSH prompt invoked by the end user for two-factor authentication execute the sudo command:
Open the following file for editing:
$ sudo vim /etc/pam.d/sudo
Delete the first line of code (auth include system-auth) and replace it with the following line:
auth required pam_radius_auth.so
Restart the sshd service:
systemctl restart sshd.service
The following procedure explains how to create a RADIUS service in the Octopus Management Console. The service settings will be used later when performing SSH configuration in your designated server or device.
To add and configure the RADIUS service:
From the Octopus Management Console, open the Services menu and click Add Service. In the RADIUS tile, click Add.
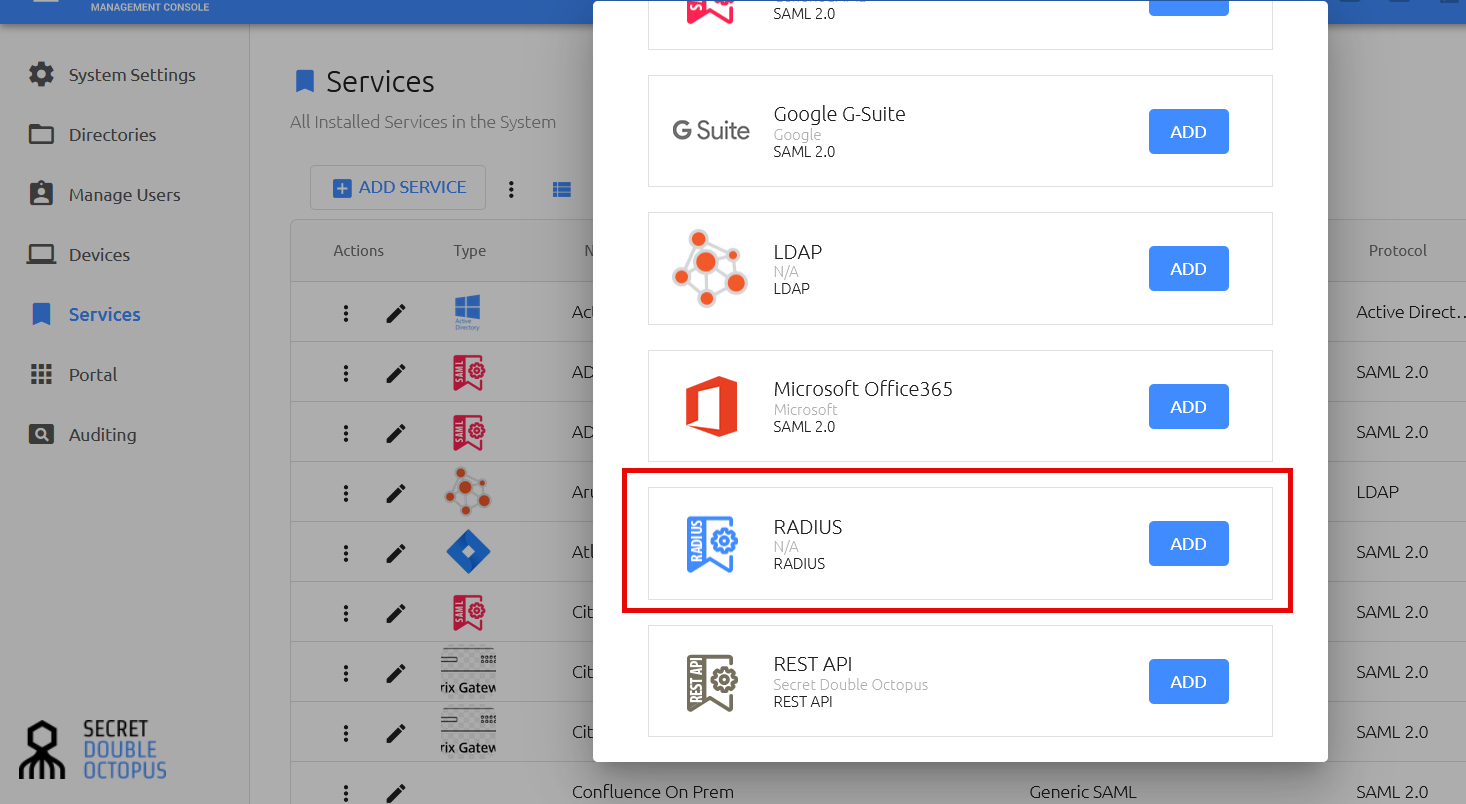
Then, in the dialog that opens, click Create.
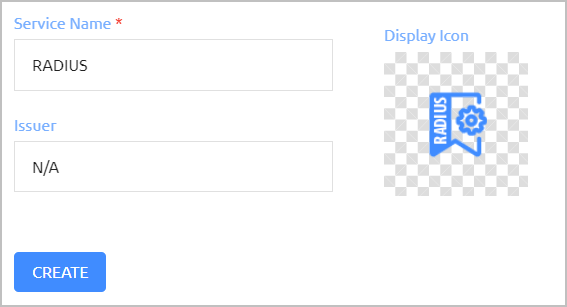
Review and configure the following settings in the General Info tab:
Setting
Value / Notes
Service Name
Enter a name for the service, e.g., RADIUS SSH
Issuer
Enter the issuer name, e.g., Linux SSH
Description
Enter a note about the service, e.g., RADIUS Octopus authentication
Display icon
The icon that appears on the Login page for the service. To change the default icon, click and upload the image of your choice. (Supported image size is 488x488 pixels.)
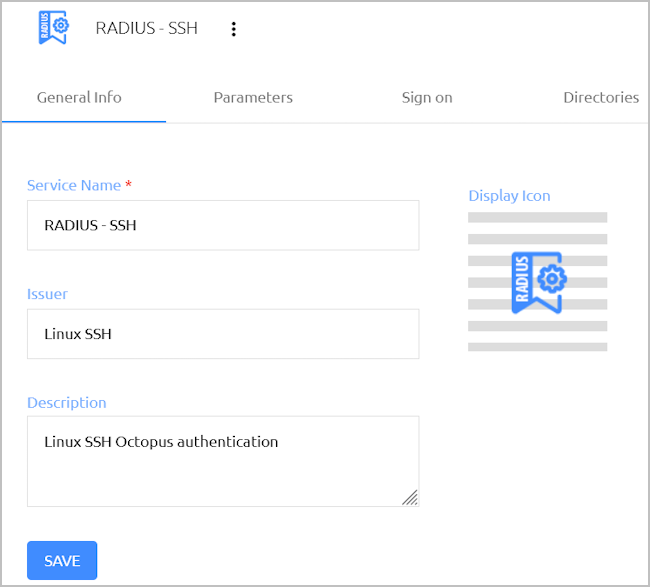
At the bottom of the tab, click Save.
Open the Parameters tab. From the Login Identifier dropdown list, select the identifier required to log into the RADIUS service. (You may select more than one identifier.)
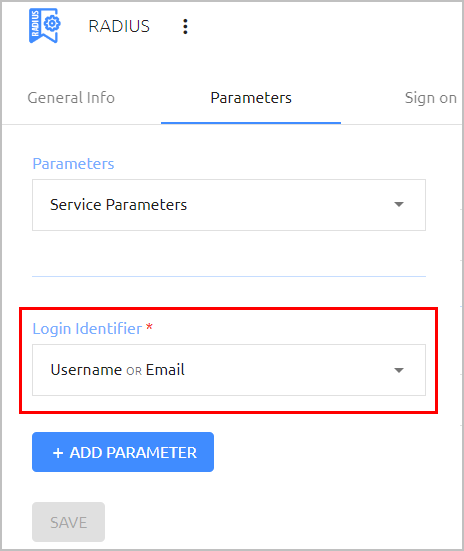
Create a parameter for the RADIUS key name:
Click Add Parameter.
In the Parameter Key field, enter NAS-Identifier.
From the Parameter Value list, select Free Text.
In the field to the right, enter sshd.
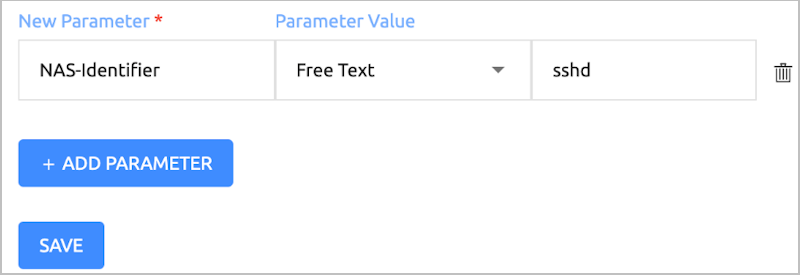
At the bottom of the Parameters tab, click Save.
Open the Sign on tab and configure the following settings:
Setting
Value / Notes
Check Password
When enabled, a password is required for authentication (in addition to the authentication methods used by Octopus Authenticator).
Two-step Authentication
This option is available when the Check Password setting is active. When the setting is enabled, users first enter their credentials, and then enter the one-time code in a separate step. By default, two-step authentication is not enabled, and users enter both credentials and the code in the same field.
Bypass Unassigned Users
When enabled, users not assigned to the service are allowed to login with username and password (without MFA). By default, this option is disabled, and unrecognized users are refused authentication. This setting is generally used on a temporary basis, during gradual rollouts of Octopus Authenticator.
Bypass Unenrolled Users
When enabled, users who are known to the system but have not yet enrolled are allowed to login with username and password (without MFA).
Secret
The RADIUS secret key required for communication between the RADIUS service and Octopus Authenticator. Click the Show Secret toggle button to unmask and mask the secret.
Port
The port used for communication with the RADIUS server.
Custom Message
The message displayed to the user upon successful authentication.
Session Management
When enabled, multiple authorization requests for a single authorization are ignored.
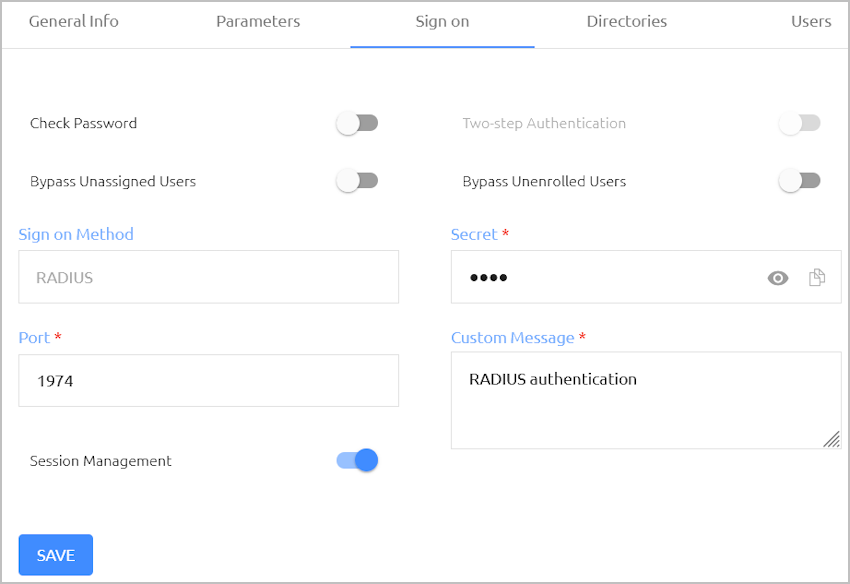
At the bottom of the Sign on tab, click Save.
Open the Directories tab and select the checkbox of the directory to be integrated with the service. (Local or LDAP).
Then, click Save.
Open the Users tab and click Add.
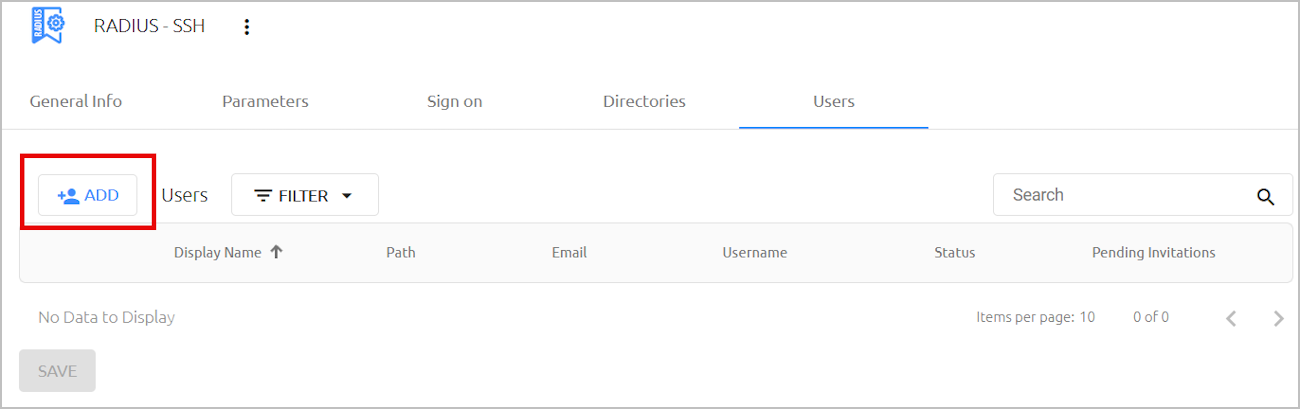
A popup opens, with a list of directories displayed on the left.
Expand the relevant directory and select the checkboxes of the groups and users that you want to add to the service. Then, click Save to close the popup.
The groups and users you selected are listed in the Users tab.
Click Save and publish your changes.
The sections below explain how to perform SSH configuration of the designated Linux server to support integration with Octopus Authenticator:
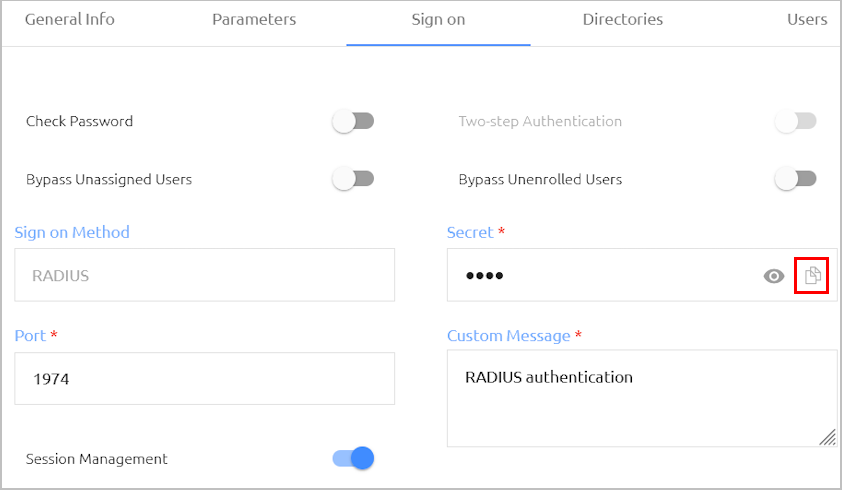
Before you begin, make sure that you have access to the RADIUS secret key required for communication between the RADIUS service and Octopus Authenticator. Click the Copy icon to copy the value from the Sign on tab of the RADIUS service that you created in the Octopus Management Console.
 |
Follow these steps to join your system to the AD:
Log into the Linux system as a privileged user.
Enter the following command:
realm join --user=[privileged AD account] [domain name]

Note that there will be a short delay in the resulting response. You can add -v to the command to view the verbose output.
When the prompt returns, enter the following command:
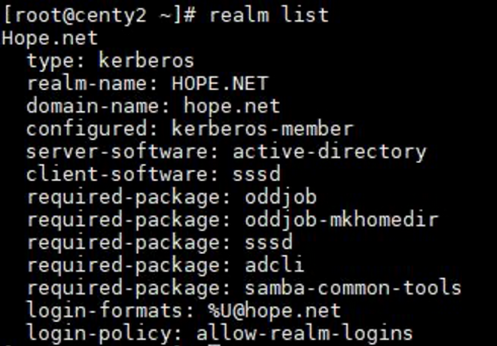
realm list
The output should be similar to the following example:
This section explains how to edit the the /etc/sssd/sssd.conf file to further tighten the AD integration. The configuration file is separated into the following parts:
Global section, under [sssd)
Domain-specific options section, under [domain/[domain name]]
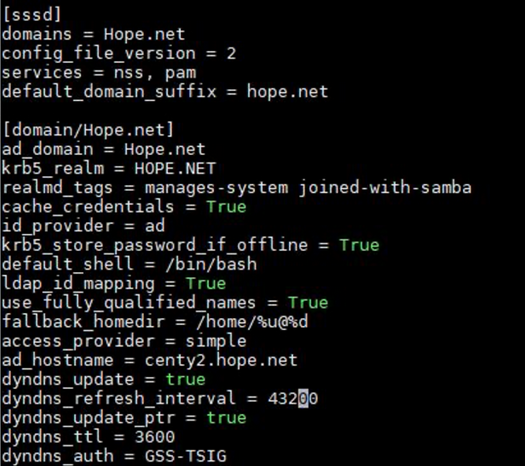
The global section contains elements that affect the general behavior of sssd, such as version information and related services.
TIP: To avoid having to enter the entire user account name when logging in, set default_domain_suffix to the domain name. For example, instead of always having to type fkorea@hope.net, you can simply type fkorea and the password. This timesaving technique is especially useful in cases of long domain names.
The domain-specific section contains parameters that are particular to the domain you have joined. Key parameters are described in the table below.
Parameter | Description / Notes |
|---|---|
access_provider | Specify a provider optimized and used for interacting with AD servers for authentication purposes. The value should be set to ad. Alternate values are ldap and ipa (if you use those directory services). |
id_provider | Specify a provider optimized and used for interacting with AD servers for identification purposes. The value should be set to ad. |
ad_hostname | The fully qualified hostname of the server. Set this parameter if the system's hostname differs from the fully qualified domain name. If the parameter is not set and the sssd does not have access to the fully qualified hostname, dynamic updates will fail. |
ad_domain | The full domain name (hope.net in our example). |
cache_credentials | Enables AD users to log in when the domain controller is offline. When the value is set to true, credentials are cached for a certain period so authentication does not fail when the back end is offline. The storage period is also configurable. |
fallback_homedir | Helps you set a home directory for AD users who don’t have a home directory attribute in AD. (This is different from the override_home parameter that is used when a home directory is set in AD for users.) |
dyndns_update | Enables dynamic DNS updates (values can be true or false). When dynamic updates are enabled, updates occur primarily when:
|
dyndns_refresh_interval | The interval is set in seconds and configured with integer values. The practical minimum is 60 seconds, and the default value is 24 hours (86400s). In our example, the interval is set to 12 hours. |
dyndns_update_ptr | This boolean specifies whether the associated PTR record (used for reverse lookups) is updated with every update cycle. Under most circumstances, the value should be set to true. |
dyndns_auth | Specifies whether dynamic updates are done securely. The parameter is configured according to the mode accepted by AD. If AD is set to Accept Secure Updates Only, the value should be set to GSS-TSIG. If not, and you choose not to benefit from secure dynamic updates (despite the strong warning in AD), the value can be set to none. |
This section describes the sequence of events involved in SSH login using Octopus authentication. Test your configuration by following the steps below.
To perform SSH login:
Open an SSH connection towards the designated Linux server.
You will be prompted to enter login credentials.
Enter your username in the Login as field. Then, leave the Password field blank, and press <Enter>.
You will receive a message from the Octopus Authentication App on your mobile device, alerting you that you have an authentication request.
On your mobile device, tap Approve.
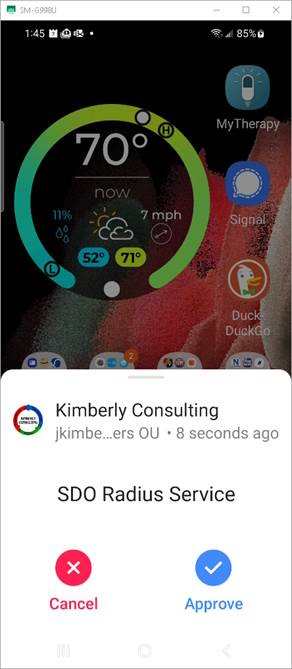
Verify that you have been successfully logged into the SSH session.
Users to whom you have granted access have unprivileged access to the Linux server. In general, all Active Directory accounts are accessible to the Linux system, in the same way that natively-created local accounts are accessible to the system. You can now proceed with the regular sysadmin tasks of adding users to groups, making them owners of resources, and configure other required settings.
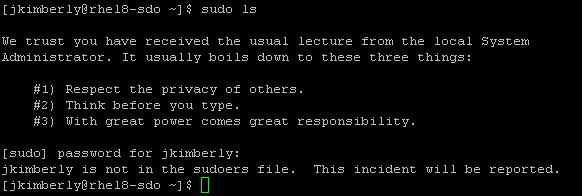
If a user attempts any activity that requires sudo access, an error is presented. As shown in the following example, our user is not in the sudoers file.
 |
To grant elevated privileges on a Linux system, you need to edit the sudoers capabilities. Details are beyond the scope of this document, but the simplest way to achieve this is to add the specific users to the wheel group, so their accounts will be available for use by the system.
Afterwards, the transaction will appear similar to the following example:
 |
Now, you simply need to press <Enter> and approve the push notification sent to your mobile.
|
After approving the authentication request, you will receive the result of the sudo command.
 |
Note: Once you have approved a sudo elevation, the elevation is enabled for the duration of the session.