Octopus Tenant Manager Admin Guide
Version 6.8.3 • Dec. 10, 2025
Welcome to the Octopus Tenant Manager
The Octopus Tenant Manager is a tool that enables system administrators to manage multiple tenants within a Managed Service Provider (MSP). Each administrator who can access the Tenant Manager has an MSP role, and for each tenant they work with, a Tenant role that defines their permissions in that tenant’s Octopus Management Console (MC).
MSP roles control platform-wide activities (like creating tenants), while Tenant roles control what a manager can do inside a specific tenant (such as managing users or viewing audit logs).
In This Guide
- Accessing the Octopus Tenant Manager
- Accessing the Octopus Management Console
- Tenant Manager Features Overview
- Understanding Manager Roles and Permissions
- Viewing and Managing Tenants
- Handling Tenant Managers
- Working with MSP Managers
- Viewing the Audit Records
Accessing the Octopus Tenant Manager
The Tenant Manager is accessed using the Octopus Authenticator mobile app. Before logging in, make sure the app is installed on your mobile device and that you have completed the enrollment process described in your enrollment email.
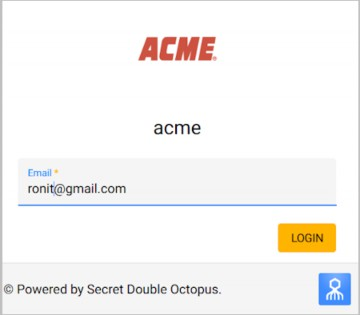
- In your browser, enter the access URL provided for your tenant / enterprise and domain (for example:
https://acme.doubleoctopus.cc/mt). - On the login screen, enter the email address used in your enrollment invitation and click Login.
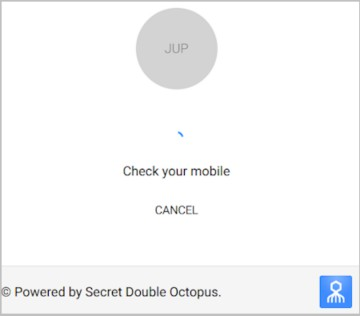
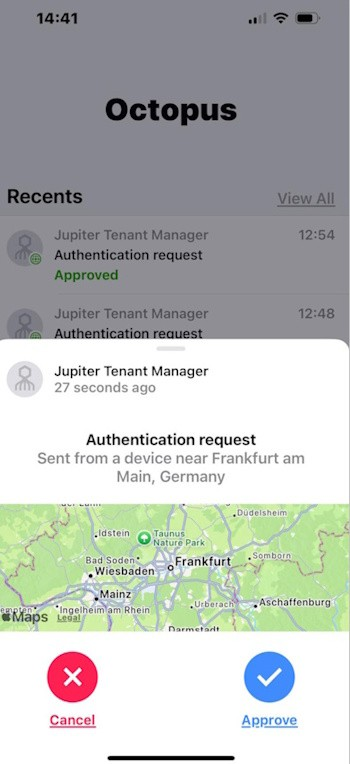
- Approve the authentication request sent to your mobile device using the Octopus Authenticator app.
- If prompted, enter the verification code shown in the app.
After successful authentication, the Tenant Manager opens and you can begin working with your assigned tenants.
Accessing the Octopus Management Console
From the Tenant Manager, you can sign in to the Octopus Management Console (MC) of a specific tenant using single sign-on (SSO).
- Open the Tenants menu and select the row of the relevant tenant.
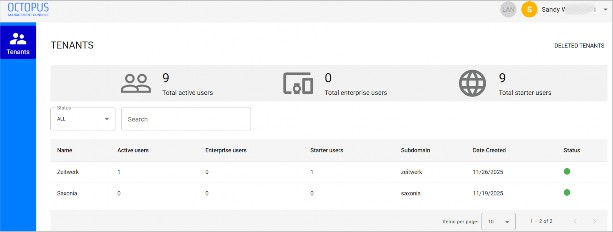
- The Tenant details page opens.
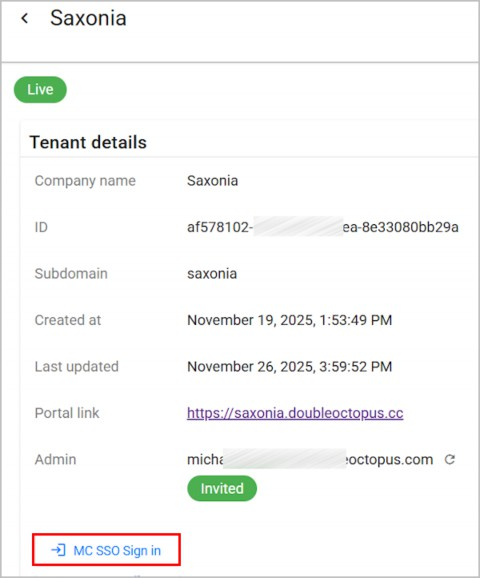
- At the bottom of the page, click MC SSO Sign in. The tenant’s Management Console opens in a new browser tab.
MSP Users must be assigned to a tenant and given an appropriate Tenant role in order to access the MC for that tenant.
Tenant Manager Features Overview
The Tenant Manager interface includes shared components that appear across most pages:
- Menu bar – Navigation between the Tenants, Managers, and Audit menus.
- Menu title – Displays the name of the active menu.
- Account options – Accessed via the arrow next to your username; use this to sign out.
- Navigation tools – Control the number of rows per page and move between pages in long lists.
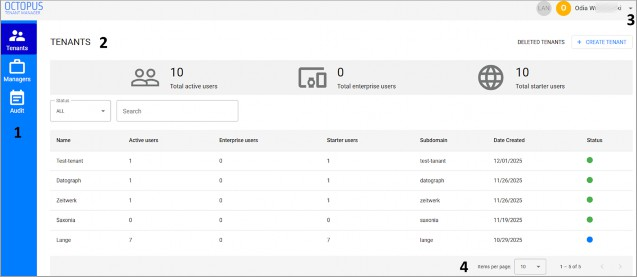
| Number | Component | Description / Notes |
| 1 | Menu bar | Provides access to the various menus of the Tenant Manager. For more information, refer to Menu Bar. |
| 2 | Menu title | Name of the currently displayed menu. |
| 3 | Account options menu | Click the arrow next to your username and select Sign out to end your Tenant Manager session. |
| 4 | Navigation tools | Enable you to control the number of items displayed on the page (10, 20, 50 or 100) and scroll to other pages of the list. |
Understanding Manager Roles and Permissions
The Tenant Manager uses a two-tier role-based access control (RBAC) model. Each user is assigned:
- An MSP role – defines what they can do across the MSP platform (for example, creating tenants or viewing MSP-wide audit logs).
- A Tenant role for each tenant they manage – defines what they can do inside that tenant’s Management Console.
MSP Roles
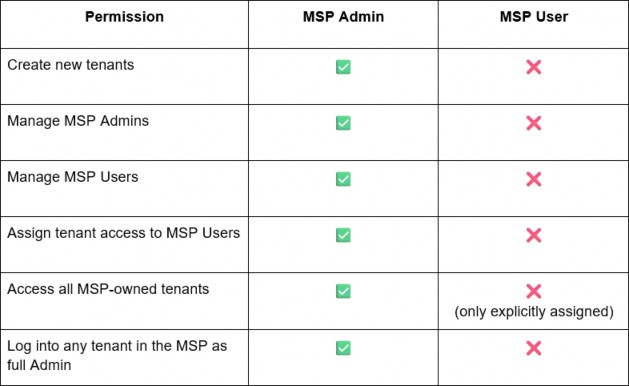
A user’s MSP role can be either MSP Admin or MSP User:
- MSP Admin – Full control over the MSP environment. Typically used by MSP owners or primary administrators.
Example permissions:- Create and manage tenants
- Add and manage MSP Admins and MSP Users
- Sign in to the MC of any tenant owned by the MSP with administrative privileges
- MSP User – No authority to manage the MSP platform itself. Cannot create tenants or manage MSP users.
To work with a tenant’s MC, an MSP User must be explicitly assigned to that tenant, and their actual capabilities in that tenant are determined by the Tenant role.
Tenant Roles
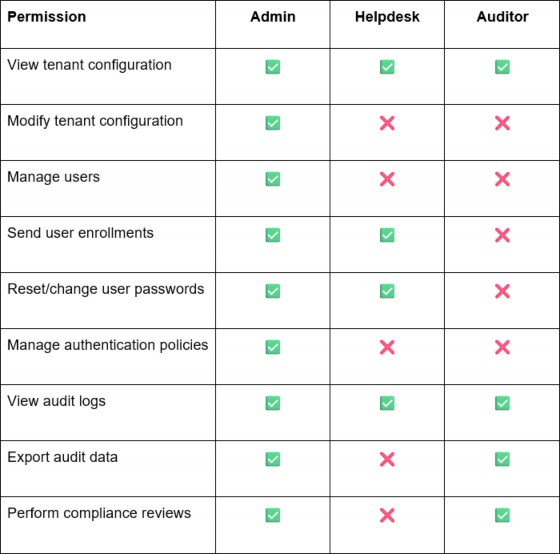
Tenant roles determine what a user can do inside an individual tenant. A manager may have different Tenant roles for different tenants.
- Admin – Full control within the tenant. Examples: managing users, managing policies, updating configuration.
- Helpdesk – Limited operational permissions for daily support. Examples: sending user enrollments, resetting or changing passwords, performing other approved support actions.
- Auditor – Read-only permissions. Examples: viewing configuration, reviewing audit logs and activity, performing compliance or security reviews.
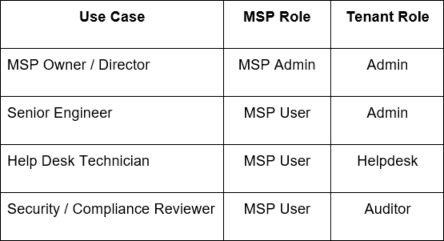
The guide also presents example role combinations for common use cases (e.g., MSP owner, tenant support technician, or compliance reviewer), showing how MSP roles and Tenant roles can be combined for different responsibilities.
Role Combination Examples
The chart below provides several use cases (according to organizational responsibility) and presents typical role combinations for each.
Viewing and Managing Tenants
The Tenants menu displays information about all tenants in the MSP and allows authorized managers to perform administrative tasks such as creating new tenants or updating tenant details.
Tenants Page and Global Statistics
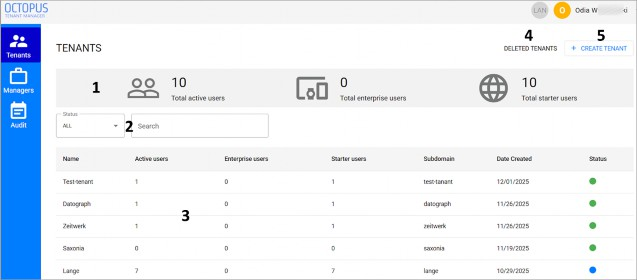
The Tenants page includes:
- Global statistics snapshot – totals for Starter users, Enterprise users, and Active users across all tenants.
- Filtering tools – filter the list by tenant status and/or tenant name.
- Tenants list – shows each tenant’s name, subdomain, user statistics, and status.
- Deleted Tenants button – opens the list of removed tenants.
- Create Tenant button – adds a new tenant.
Tenant Status and Primary Tenant
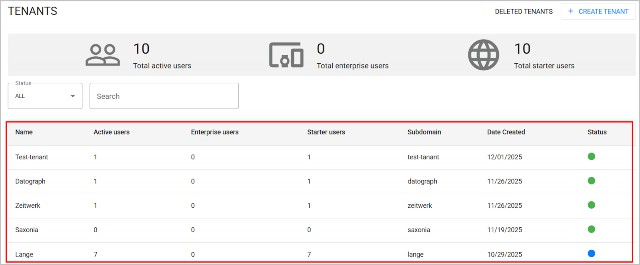
The Tenants list provides general data about every tenant, such as user statistics, subdomain and more. The list can be sorted in ascending or descending order according to tenant name, Active / Starter users, or tenant creation date.
Tenant status can be:
- Live (green) – Tenant is enrolled, connected, and enabled.
- Suspended (gray) – Tenant is temporarily disabled.
- Error (red) – Tenant has invalid parameters or connection failures.
A blue indicator identifies the Primary tenant, which usually carries the MSP’s name and has special authority to manage itself and all other tenants. All managers integrated with the Tenant Manager must be users of the Primary tenant.
Viewing and Updating Tenant Details
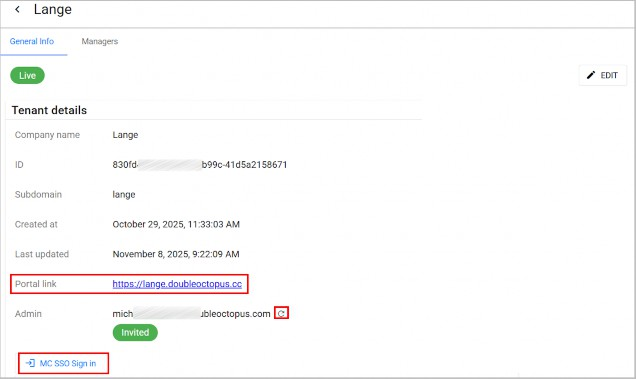
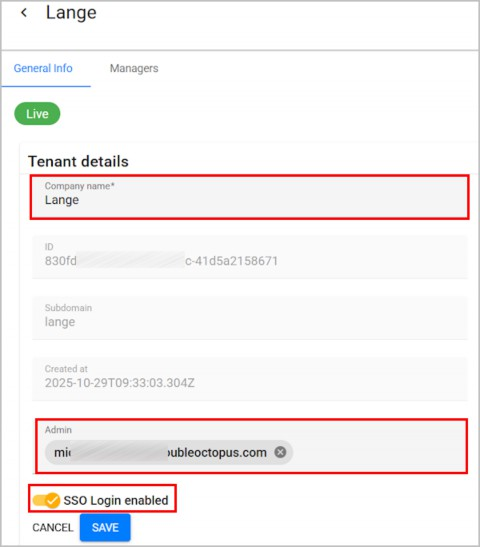
Selecting a tenant row opens the Tenant details page (General Info tab), where you can:
- Access the tenant’s User Portal via the Portal link
- Resend an enrollment invitation to the tenant Admin
- Access the MC using MC SSO Sign in (when enabled)
Clicking Edit in the upper right corner of the page allows MSP Admins to:
- Change the company (tenant) name
- Add or remove tenant administrators (managers)
- Enable or disable the SSO Login toggle, which controls whether the MC SSO Sign in button appears on this page
Suspending, Deleting, and Viewing Deleted Tenants
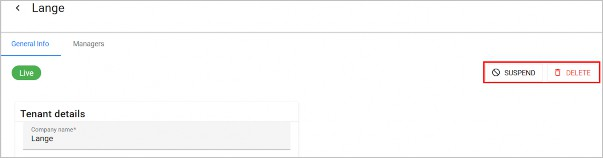
In Edit mode of the Tenant details page, MSP Admins can:
- Suspend – Temporarily inactivate the tenant (can later be restored).
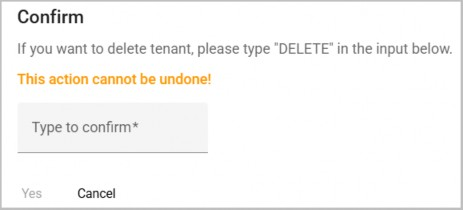
- Delete – Remove the tenant from the Tenants list. Deleted tenants appear in the Deleted Tenants list.
The Deleted Tenants list shows each deleted tenant’s name and creation/deletion dates. Selecting a deleted tenant opens a read-only Tenant details page, where some manager-related data is still available.
Viewing Deleted Tenant
A list of tenants that have been deleted can be viewed by clicking the Deleted Tenants button in the upper right corner of the Tenants menu.
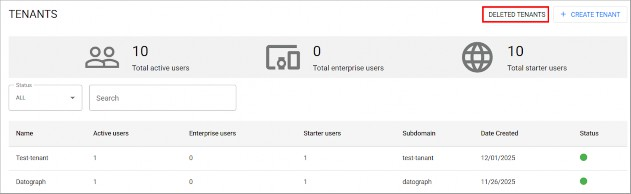
The Deleted tenants list displays each tenant name and some general information, including deletion date. You can sort the list according to tenant name or creation / deletion date.
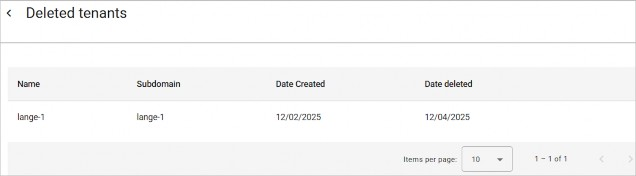
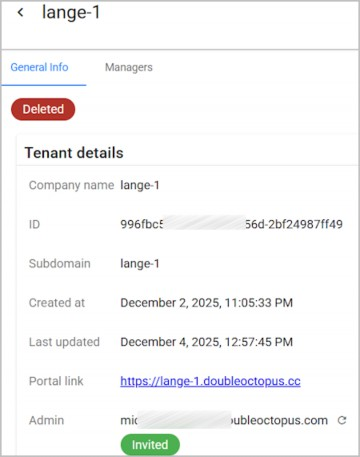
To view additional data about a deleted tenant, select the row of the relevant tenant. The Tenant details page that opens is read-only. The data cannot be edited, and no actions can be performed from this page.
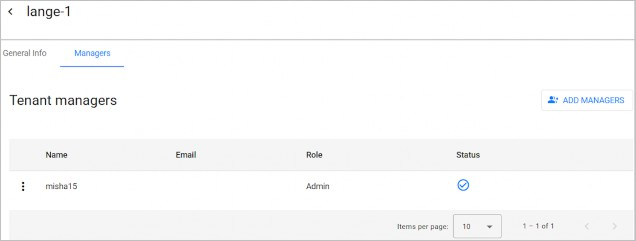
Some functionality is available from the Managers tab of a deleted tenant. For more information about handling managers, refer to Working with Managers.
Adding a New Tenant
- In the Tenants menu, click Create Tenant.
- Enter the organization (tenant) name and subdomain, then click Next.
- On the Add administrator page, enter the administrator’s name and email address, then click Add Admin.
A confirmation message is displayed. The new tenant is added to the Tenants list, and an enrollment email is sent to the specified administrator.

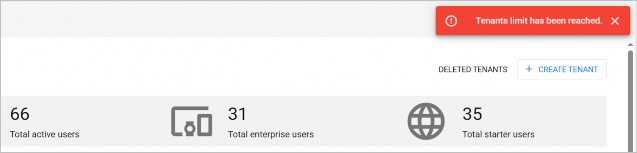
When the MSP contains the maximum allowed number of tenants, an error message is displayed on attempting to add another tenant.
Handling Tenant Managers
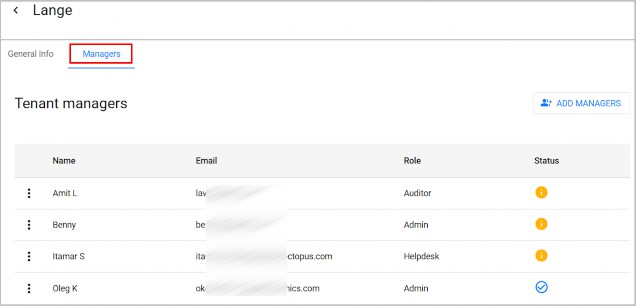
Each tenant has a Managers tab listing all administrators assigned to that tenant, along with their email address, Tenant role (MC permissions), and status.
Manager status can be:
- Active – The manager completed the enrollment process successfully.
- Inactive – The manager has not started or not completed enrollment.
Performing Actions on Tenant Managers
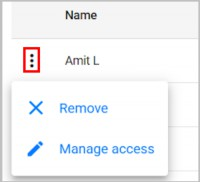
Clicking a tenant manager row allows you to:
- Remove – Unassign the manager from the tenant.
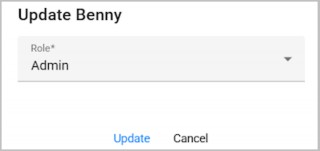
- Manage access – Update the manager’s Tenant role (Admin, Helpdesk, Auditor) for the selected tenant.
Adding Tenant Managers
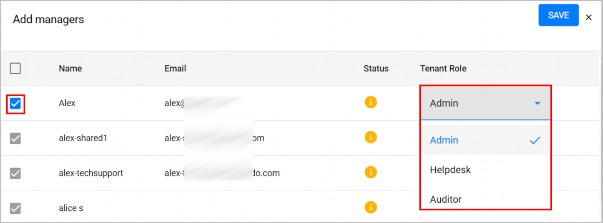
- On the tenant’s Managers tab, click Add Managers.
- In the popup, select the checkboxes for the required managers, and choose the appropriate Tenant role for each.
- Click Save to add them to the tenant.
The managers displayed in this popup are users who have already been integrated with the Tenant Manager at the MSP level. If a user is missing, you must first add them via the MSP Managers menu (see below).
Working with Managers (MSP Level)
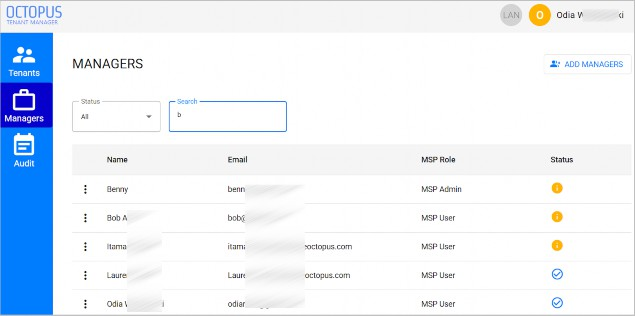
The Managers menu lists all administrators associated with the MSP and shows each manager’s name, email address, MSP role, and status (Active / Inactive).
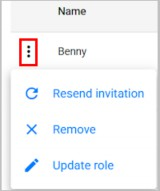
From this list you can:
- Resend invitation – Send another enrollment email.
- Remove – Remove the manager’s integration with the Tenant Manager tool.
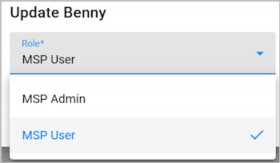
- Update role – Change the manager’s MSP role (MSP Admin / MSP User).
Adding Managers to the MSP
All managers in the Tenant Manager are users in the Primary tenant’s organization. They can be imported from the Local directory or from any corporate directory integrated with the Primary tenant’s Management Console.
Before adding managers:
- Ensure relevant directories are integrated in the Primary tenant’s Management Console.
- Ensure users have been sent enrollment invitations for the Octopus Authenticator. Alternate authentication methods (such as FIDO) are not supported.
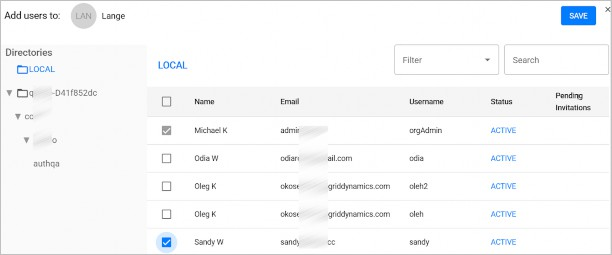
- In the Managers menu, click Add Managers.
- In the popup, expand the relevant directory and select the checkboxes for the users you want to import.
- Repeat for additional directories if needed, then click Save.
Viewing the Audit Records
The Audit menu provides a log of actions performed by users and system components in the Tenant Manager. You can use these logs for troubleshooting, security investigations, and compliance reporting.
From the Audit page you can:
- View events in chronological order
- Sort events by date (ascending/descending)
- Filter events by severity, timeframe, tenant, subdomain, user, and action type
- Export the filtered event list to CSV via Generate CSV
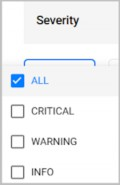
Event severity levels:
- Critical – Events that interfere with system functioning (for example, failed system setup attempts or invitation enrollment errors).
- Warning – Events that affect management and administrative operations (for example, unsuccessful admin logins).
- Info – Routine actions and operations.
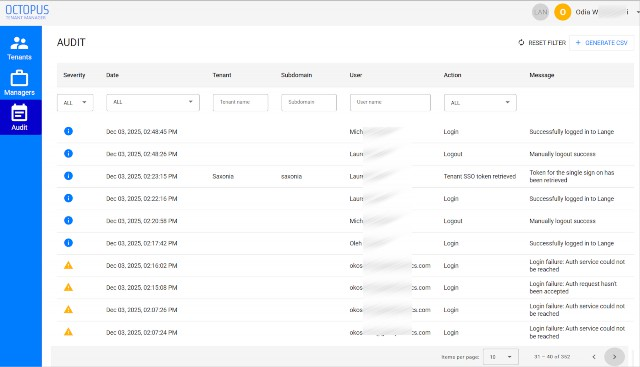
Filtering the Events List
The filtering options above the events list let you narrow down events using multiple criteria:
- Severity – Select one or more severity levels.
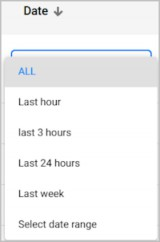
- Date – Choose a preset range, or select Select date range and specify start and end dates in the calendar popup.
- Tenant / Subdomain / User – Enter all or part of the name(s) in the relevant field(s).
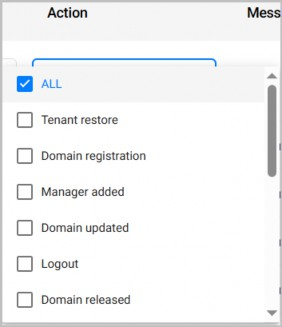
- Action – Select the relevant action(s) from the list.
The following example shows events filtered according to severity, timeframe and username:
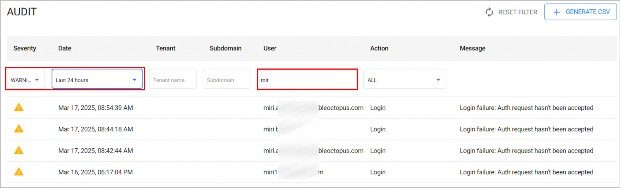
Click Reset Filter to return to the default, unfiltered events view.