This document provides step-by-step installation instructions for Octopus Desk for Mac with Active Directory integration.
Secret Double Octopus replaces passwords altogether with a high assurance, password-free authentication paradigm. Using the MAC Authentication Provider in conjunction with standard interfaces to Active Directory, the password-free solution seamlessly replaces AD passwords with a stronger, more secure alternative. As a result, the security posture of the AD domain is enhanced, user experience and productivity improve, and password management costs are dramatically lowered.
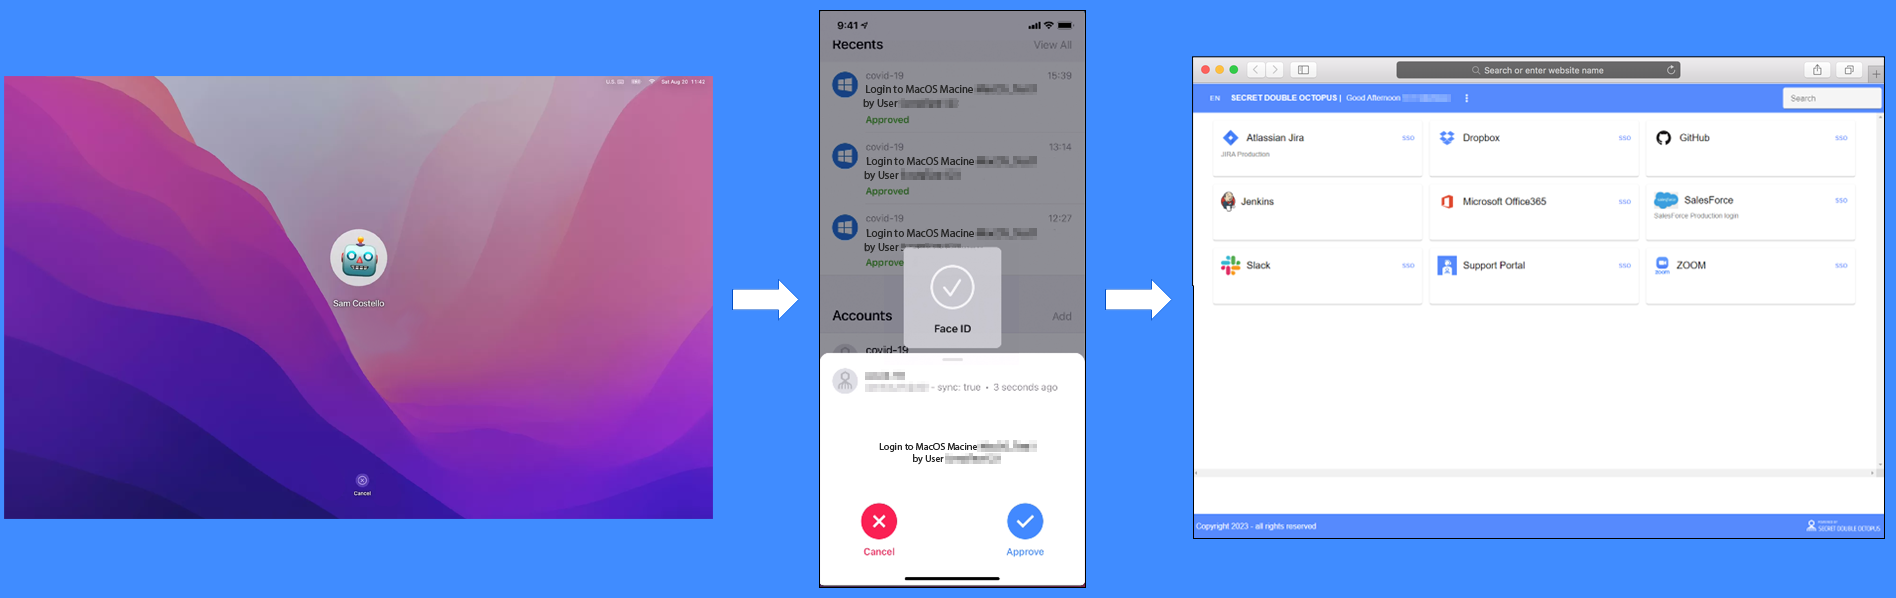
Octopus Desk for Mac supports the following operating systems:
macOS Tahoe
macOS Sequoia
macOS Sonoma
Before beginning installation, verify that:
Octopus Authentication Server version 6.4.2 (or above) is installed and operating with a valid enterprise certificate.
Your Corporate Directory Server is operating with Admin rights and is integrated with the Octopus Management Console. For more information about directory integration, please refer to the Octopus Management Console Admin Guide.
Octopus Desk for MAC installation and the Configuration XML file are ready to be deployed for all Corporate macOS machines.
The fingerprint setup is completed (for Mac PCs that support fingerprint).
Users are enrolled with one or more authenticators on the Octopus Server. These can include the Octopus Authenticator, FIDO or supported third party authenticators.
Note: The Octopus Desk for macOS installation and XML template will be provided by the Secret Double Octopus team.
To enable installation of Octopus Desk for Mac, the Active Directory Authentication service needs to be created in the Octopus Management Console. Follow the steps below to add the AD service and configure service settings.
IMPORTANT: Before starting this procedure, verify that you have integrated your Corporate Active Directory (or third-party directory) with the Octopus Management Console. Refer to the Octopus Management Console Admin Guide for detailed instructions on integrating Active Directory and other directory types.
To create the Active Directory Authentication service:
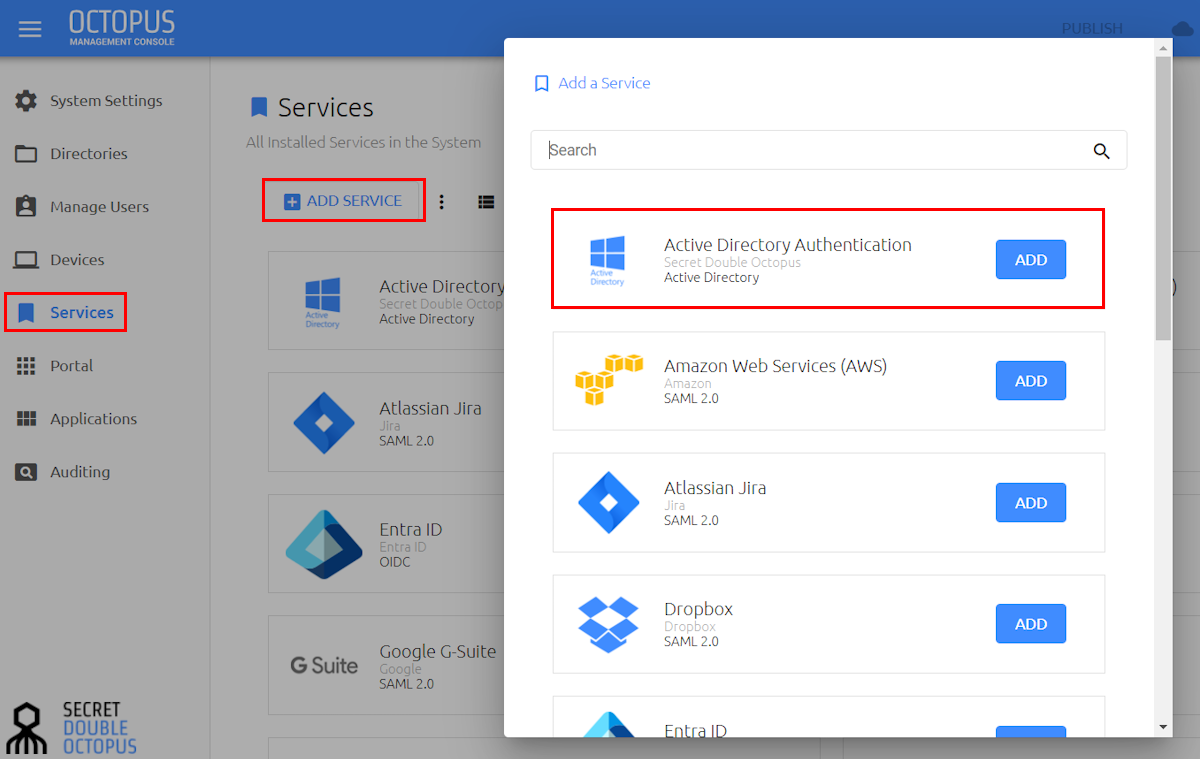
From the Octopus Management Console, open the Services menu and click Add Service.
In the Active Directory Authentication tile, click Add.
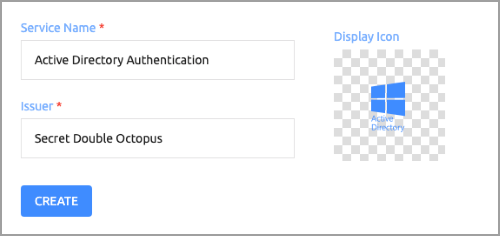
Then, in the dialog that opens, click Create.
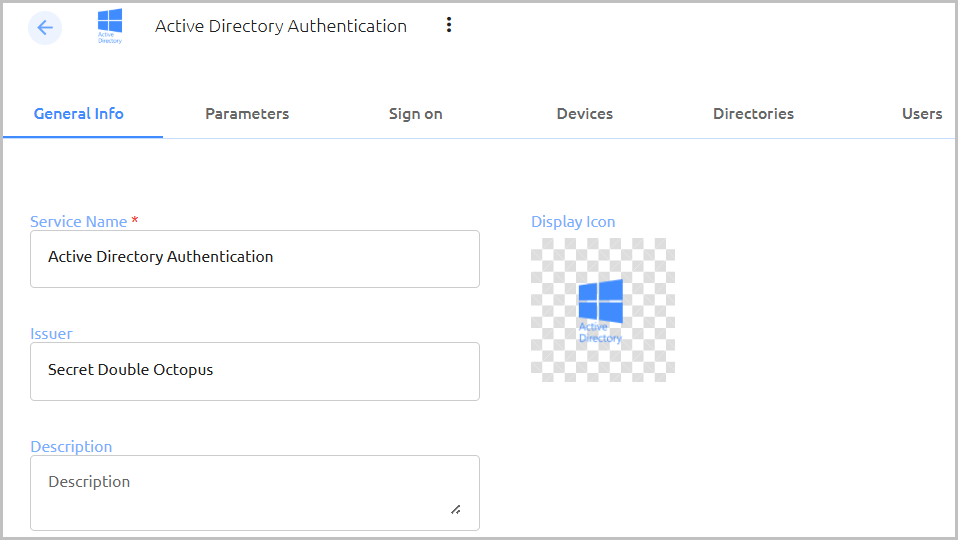
Review the settings in the General Info tab. If you make any changes, click Save.
Setting
Value / Notes
Service Name / Issuer
Change the default values if desired.
Description
Enter a brief note about the service if desired.
Display Icon
This icon will be displayed on the Login page for the service. To change the default icon, click and upload the icon of your choice (JPG or PNG format). Supported image size is 128x128 pixels.
Open the Parameters tab. From the Login Identifier dropdown list, select the credential type that will be sent by the user for the authentication (usually Username for AD and UPN for Entra ID).
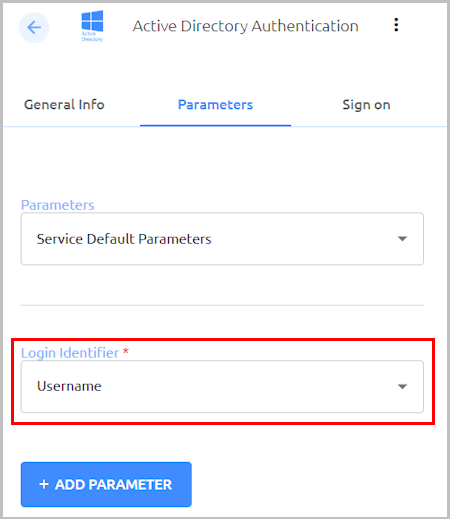
Then, click Save.
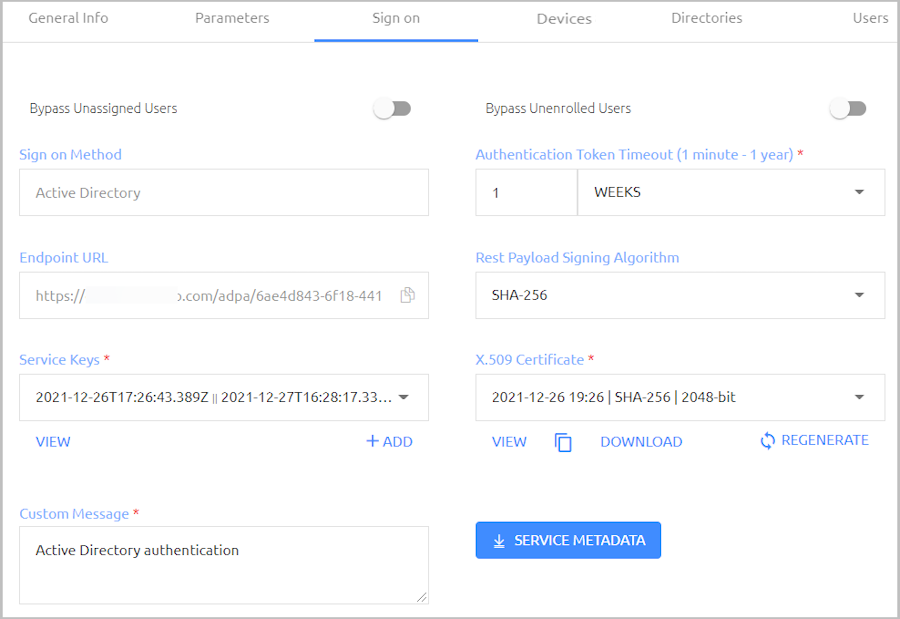
Open the Sign on tab and review / configure the following settings. If you make any changes, click Save.
Setting
Value / Notes
Bypass Unassigned Users
When enabled, users who are not assigned to the service will be allowed to login with username and password (without MFA). By default, this option is disabled. The option is usually used on a temporary basis only, during gradual rollouts of Octopus Authenticator.
Bypass Unenrolled Users
When enabled, users who are known to the system but have not yet enrolled a mobile device or workstation will be allowed to login with username and password (without MFA).
Sign on Method
The authentication method used for the service (not editable).
Endpoint URL
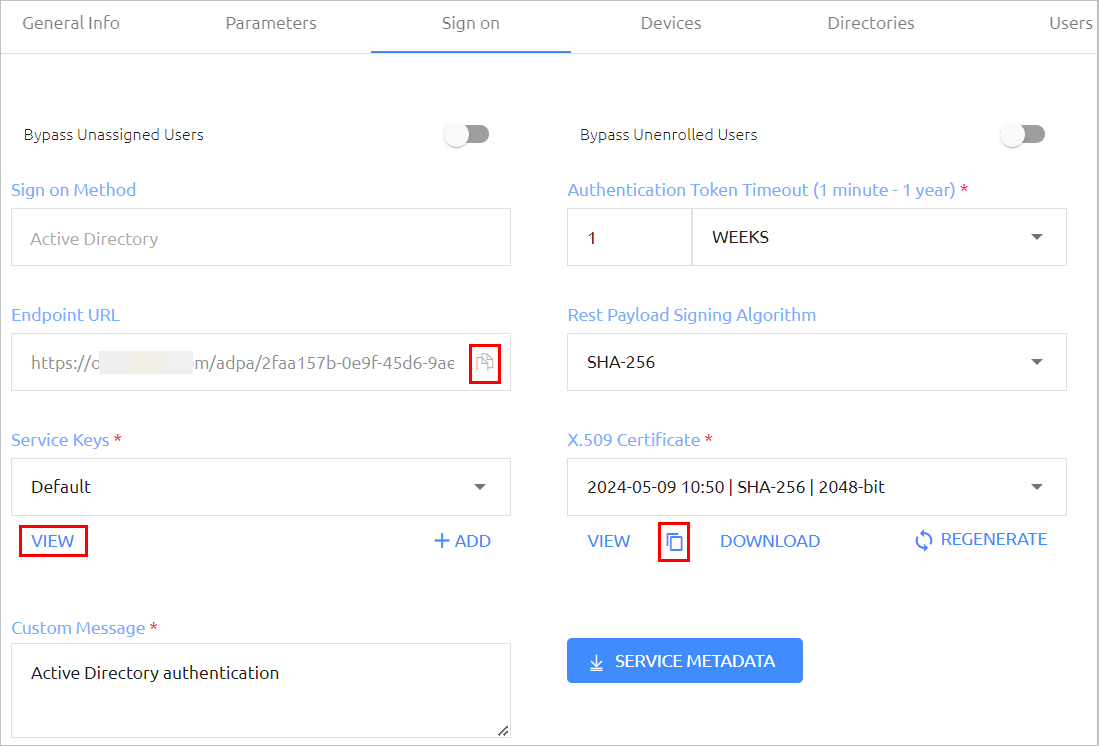
The access URL from the Mac client to the Octopus Authentication Server (not editable). Click the Copy icon to copy the value.
Service Keys
Key(s) used by the service to authenticate with Octopus Authenticator. Click View to display the content of the key(s) in a popup window. The Copy icon in the popup lets you easily copy the content.
Custom Message
Message shown to the user on successful authentication.
Authentication Token Timeout
Time period after which the authentication token becomes invalid. The value can range from one minute to one year.
Rest Payload Signing Algorithm
Signature of the generated X.509 certificate. Select SHA-1 or SHA-256.
X.509 Certificate
The public certificate used to authenticate with Octopus Authenticator.
Click View to display the content of the certificate in a popup.
Click Download to download the certificate as a .PEM file.
Click Regenerate to replace the certificate. You will be prompted to select the signature algorithm and size before regenerating.
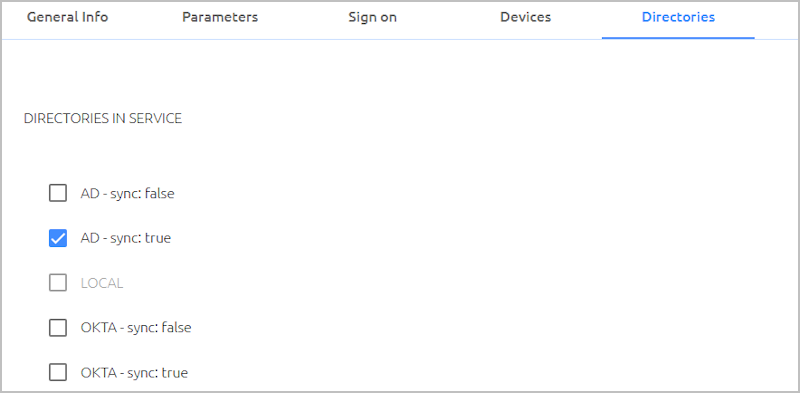
Open the Directories tab and select the directories that will be available for the service. Then, click Save.
Open the Users tab and click Add.
A popup opens, with a list of directories displayed on the left.
For each directory, select the groups and users to be added to the service.
After making your selections, click Save (in the upper right corner) to close the dialog.
The groups and users you selected are listed in the Users tab.From the toolbar at the top of the page, click PUBLISH and publish your changes.
The following sections describe the installation process:
The following files are required for installation:
octopus-desk.pkg: The installer file
octopus-desk.xml: The configuration file for the installation
For successful installation, these files must be stored in the same folder and use the same name.
Before beginning installation, open the XML file and set the parameters described below. After updating parameters, save the XML file.
IMPORTANT: For the installation to work properly, octopus-desk.xml should have the same name as the installation package file, and both files must be placed in the same folder.
Mandatory Parameters
Four parameters are required: server, domain, service and certificate.
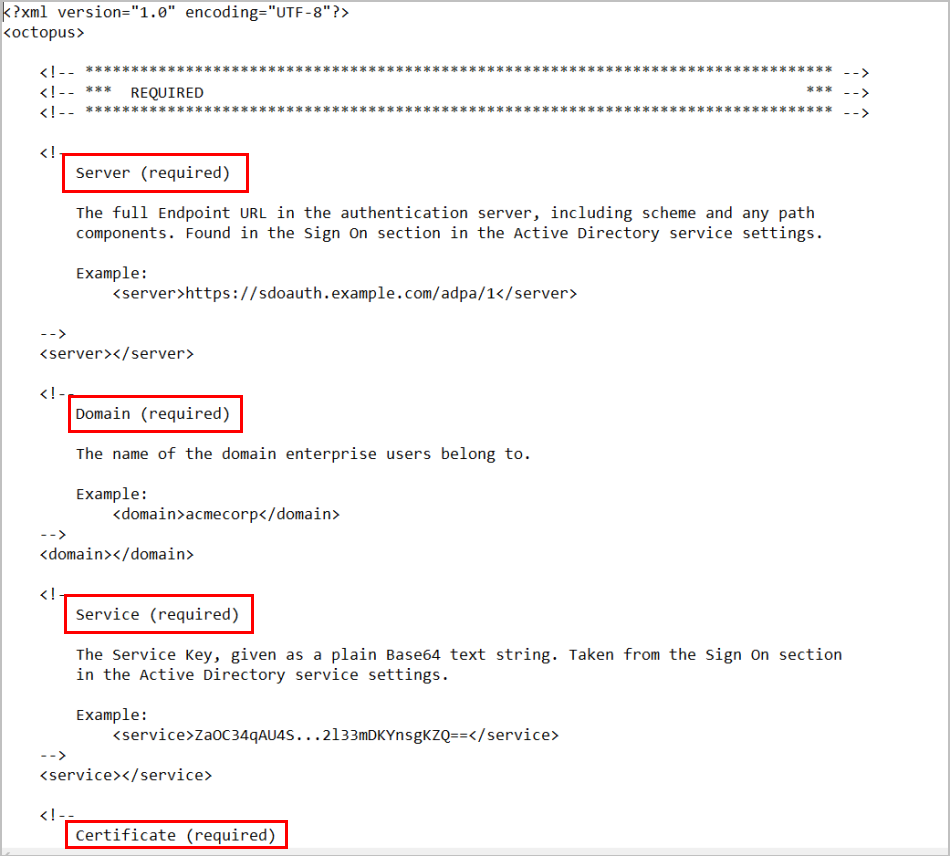 |
domain is the name of the domain to which enterprise users belong, for example: <domain>acmecorp</domain>
The other required values can be copied from the Octopus Management Console. From the Services menu, select your Active Directory Authentication service and open the service settings. Then, select the Sign on tab.
server: The Endpoint URL. Click the Copy icon and paste into the XML file.
service: The Service Key: Click View and then click the Copy icon of the relevant key. Paste into the XML file.
certificate: The X.509 Certificate: Click the Copy icon and paste into the XML file.
Optional Parameters
The following additional parameters may be defined or updated, as required:
Parameter | Description | Example / Notes |
|---|---|---|
| Features | ||
| Sudo sudo | Enables/Disables authentication on command line sudo. Default value is false (disabled). | <sudo>true</sudo> |
| Silent Sudo silentsudo | Can be defined when sudo is set to true. When set to true (default value), a push authentication request is sent immediately. When set to false, users need to press <Enter> in an additional password field to get the push request. | <silentsudo>true</silentsudo> |
Kerberos Realm kerberosrealm | When this parameter is defined, a Kerberos ticket is retrieved automatically upon login / unlock, and the Kerberos menu appears in Octopus Desk Preferences. The value should be the organization domain name in all uppercase letters. | <kerberosrealm>ACMECORP.COM</ kerberosrealm> |
Kerberos Automatic Sync automatickerberossync | When set to true (default value), Kerberos tickets renew automatically as long as the user is logged into the workstation. | <automatickerberossync>true</automatickerberossync> |
| Authentication | ||
| Allow Authentication with a Password validPasswordIsSufficient | Determines whether users will be able to log in using a valid password even when Passwordless mode is set. Default value is false. | <validPasswordIsSufficient>true</validPasswordIsSufficient> |
| Allow Authentication with a Password while Offline validPasswordIsSufficientForOffline | Determines whether users will be able to log into / unlock offline machines using standard password login. | <validPasswordIsSufficientForOffline>true</validPasswordIsSufficient> |
MFA mfa | Enables/Disables MFA. Default value is false (disabled). | When MFA is enabled, users are required to enter username + Password, and then the selected MFA authenticator (Octopus or 3rd party will be used). <mfa>true</mfa> |
| Force Lock after Offline Login forceLockAfterOfflineLogin | When set to true (default value), users who have logged in using offline authentication are required to reauthenticate when the workstation goes back online | <forceLockAfterOfflineLogin>true</forceLockAfterOfflineLogin> |
| Password Free Experience passwordfree | Enables/Disables the Password Free Experience. Default value is false (disabled). | When the Password Free Experience is enabled, users deploy the Mac agent while maintaining control over the password. After the first login, all authentication is Passwordless. <passwordfree>true</passwordfree> |
Third Party thirdparty | Determines whether users will have to approve authentication requests using a third party service. Default value is false (disabled). | <thirdparty>true</thirdparty> The specific third party service used is defined in the Octopus Management Console, in the Authenticators tab of the Directory settings. |
| Single Sign On | ||
Single Sign On URL ssourl | If the value is a valid URL, Octopus for Mac automatically opens the SSO portal in a browser window after user login to the Mac. | <ssourl>https://sso.example.com/webportal </ssourl> |
Single Sign On Browser ssobrowser | When ssourl is defined, this parameter determines which browser is used to open the SSO portal. The default value, system, uses the default browser configured for the user. | Valid values are:
<ssobrowser>firefox</ssobrowser> |
| Password Sync | ||
| Automatic Password Sync autoPasswordSync | When set to true (default value), passwords are automatically synced when the server rotates the user's password. Auto password sync occurs in both login and unlock operations. When the value is set to false, users are presented with the sync password popup screen. | <autoPasswordSync>true</autoPasswordSync> |
| Force Password Rotation | ||
| Force Password Rotation forcePasswordRotation | When set to true, periodic password rotation is automatically performed for users who authenticate with the Mac Agent infrequently (e.g., users who routinely unlock the machine using Touch ID). The default value is false. | <forcePasswordRotation>true</forcePasswordRotation> For more details about this feature, refer to Configuring Force Password Rotation. |
| Force Password Rotation Period passwordRotationPeriod | Determines the frequency (in days) of automatic password rotation. | <passwordRotationPeriod>3</passwordRotationPeriod > |
| FileVault Login | ||
FileVault Login filevaultlogin | Determines mode of operation for the FileVault Login feature. When set to client (default value), users can create their own password for FileVault Login. When set to server, the password is created and managed by the server. | Valid values are:
<filevaultlogin>server</filevaultlogin> For more details, refer to Handling FileVault Login. |
| FileVault fileVault | Controls support for FileVault activation (default value is true). When set to false, the FileVault option is hidden in the Octopus configuration. | <fileVault>true</fileVault> |
| FileVault User fileVaultUser | Allows configuration of a friendly name for the Octopus FileVault account. When left empty, the default account name of _octopusfilevault is used. | <fileVaultUser>FileVault</fileVaultUser> |
| Direct Login directLogin | Determines the flow for FileVault Login. When set to false (default value), the Octopus Login screen appears after users provide FileVault credentials (username and password from Octopus). When set to true, the Login screen does not appear and users immediately receive an authentication request after entering FileVault credentials. | <directLogin>true</directLogin> |
| Direct Login Passthrough directLoginPassthrough | Determines FileVault login flow when Direct Login is set to true. When set to false (default value), the Login screen does not appear and users immediately receive an authentication request after entering FileVault credentials. When set to true, Octopus authentication is completely bypassed, and the desktop opens immediately after users provide FileVault credentials. | <directLoginPassthrough>true</directLoginPassthrough> |
| Custom UI | ||
| Custom Unlock Screen customUnlockScreen | When set to true, a custom Unlock screen is displayed to support authentication for either the default user or a guest user. This parameter must be set to true to support shared accounts. For more information, refer to Enabling Shared Account Login. The default value is false. | <customUnlockScreen >true</customUnlockScreen> IMPORTANT: Touch ID is not supported when the customized Unlock screen is used. |
| Authentication Methods authenticationMethods | An element containing a list of supported methods of authentication as well as configuration options for the Login and Custom Unlock screens. For more information, refer to Configuring Authentication Methods. | For some sample configurations, refer to Configuring Authentication Methods. |
| Shared Account Support | ||
| Shared Accounts Support sharedaccounts | When set to true, the Mac Agent is able to handle authentication of multiple designated users to a single generic shared account. The default value is false. | <sharedaccounts>true</sharedaccounts> For more details about this feature and its setup, refer to Enabling Shared Account Login. |
| Allow Switching Between Regular and Shared Account showSharedAccountLink | When set to true (default value), the Mac Login screen will support both the shared account login flow and the standard authentication flow (to a non-shared account). | <showSharedAccountLink>true</showSharedAccountLink> This parameter is enabled only when the sharedaccounts parameter is set to true. |
| Use Regular Account as Default defaultToRegularAccount | When set to true (default value), the standard authentication flow (to a non-shared account) is displayed on the Mac Login screen initially by default. However, if the last login / unlock was to a shared account, the shared account login flow continues to be displayed for the next login / unlock. | <defaultToRegularAccount>true</defaultToRegularAccount> This parameter is enabled only when the showSharedAccountLink parameter is set to true. |
Name for Use Shared Account link nameForUseSharedAccountLink | Enables you to customize the text for the Use Shared Account link on the Login and Unlock screens. When the parameter is defined, the default text is replaced with the specified value. | <nameForUseSharedAccountUnk>Shared Account Logon</nameForUseSharedAccountLink> This parameter is enabled only when the showSharedAccountLink parameter is set to true. |
Name for Remove Shared Account link nameForRemoveSharedAccountLink | Enables you to customize the text for the Remove Shared Account link on the Login and Unlock screens. When the parameter is defined, the default text is replaced with the specified value. | <nameForRemoveSharedAccountUnk>Regular Logon</nameForRemoveSharedAccountLink> This parameter is enabled only when the showSharedAccountLink parameter is set to true. |
| Other | ||
| Size of Audit Log file maxAuditFileSize | Sets the maximum limit (in kilobytes) for the size of the octopus-audit.log file. When this limit is reached, file content is deleted and replaced with new audit records. | <maxAuditFileSize>5000</maxAuditFileSize> |
| Size of Log file maxLogFileSize | Sets the maximum limit (in kilobytes) for the size of the octopus-log.log file. When this limit is reached, file content is deleted and replaced with new log records. | <maxLogFileSize>5000</maxLogFileSize > The default value is 10,000. |
logging | Controls number and detail level of logging messages written by Octopus for Mac. | Valid values are:
<logging>info</logging> |
Configuring Authentication Methods
Octopus Desk for Mac features a custom Login screen that enables users to choose a preferred authentication method.
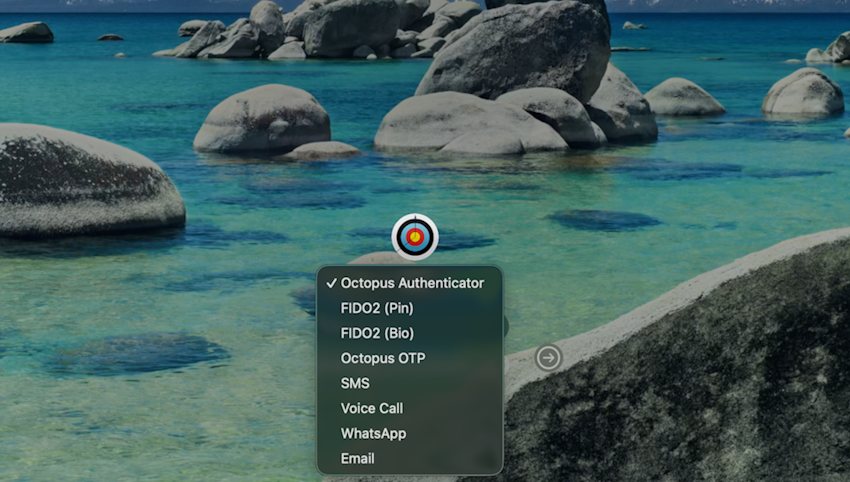
When the Custom Unlock screen is enabled, the list of authentication methods is displayed there as well.
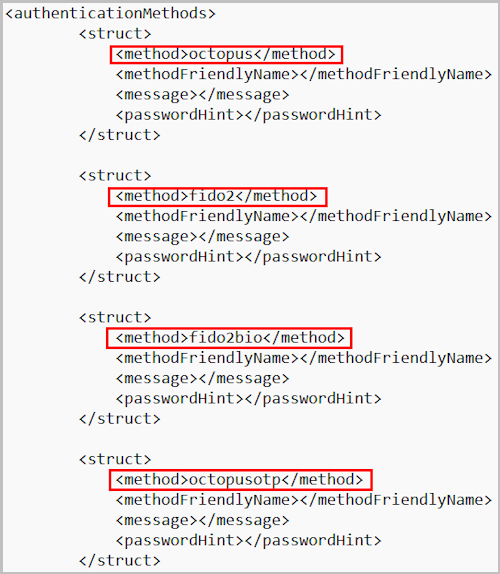
The methods displayed on these screens are defined in the authenticationMethods element of the XML configuration file. Default supported methods are Octopus Authenticator, FIDO PIN, FIDO BIO, and Octopus OTP.
In addition, the following methods are supported by default for MFA only: SMS, voice call, email and WhatsApp. In these authentication scenarios, users first enter their passwords. Then, in order to complete the login process, they need to provide a code that is sent to them via text message, voice call, email or WhatsApp.
For users to successfully login with these methods, the MFA parameter in the XML file (Authentication section) needs to be set to true, and the Twilio third-party authenticator needs to be configured in the Management Console. (For details, refer to the Octopus Management Console Admin Guide.)
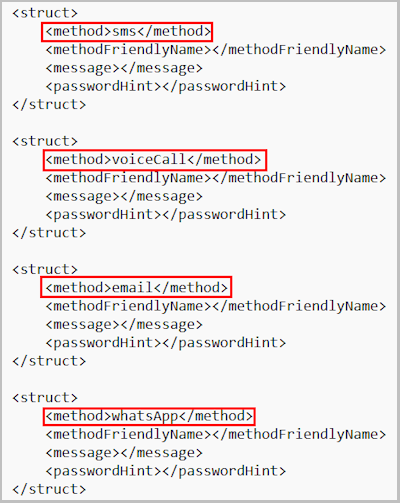
IMPORTANT: If there is any authentication method that you do NOT want to include, be sure to delete that entire sub-element from the XML file.
You can define the following optional parameters for each supported authentication method:
- methodFriendlyName: A customized name or term for the authentication method. When this parameter is defined, the default name for the method (Octopus Authenticator / FID02 (Pin) / FID02 (Bio) / Octopus OTP) is replaced by the specified string.
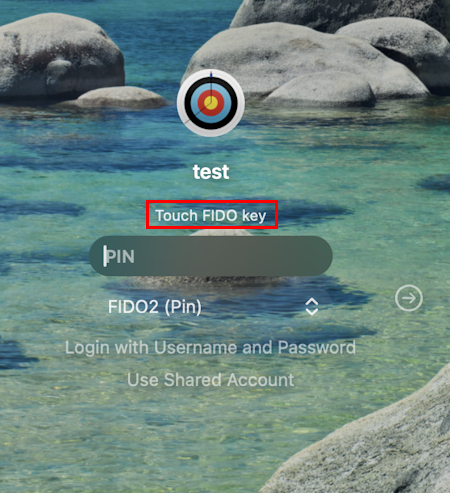
For example: <methodFriendlyName>FIDO token</methodFriendlyName> - message: Notes or instructions for the user that appear on the Custom Unlock screen, above the Username field.
For example: <message>Touch FIDO key</message>
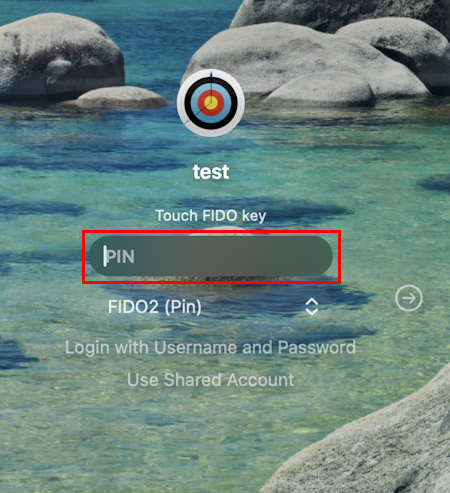
passwordHint: Customized text for the hint (prompt) displayed in the Password field. When the parameter is defined, the default hint is replaced with the specified string.
For example: <passwordHint>PIN</passwordHint>
Configuring Force Password Rotation
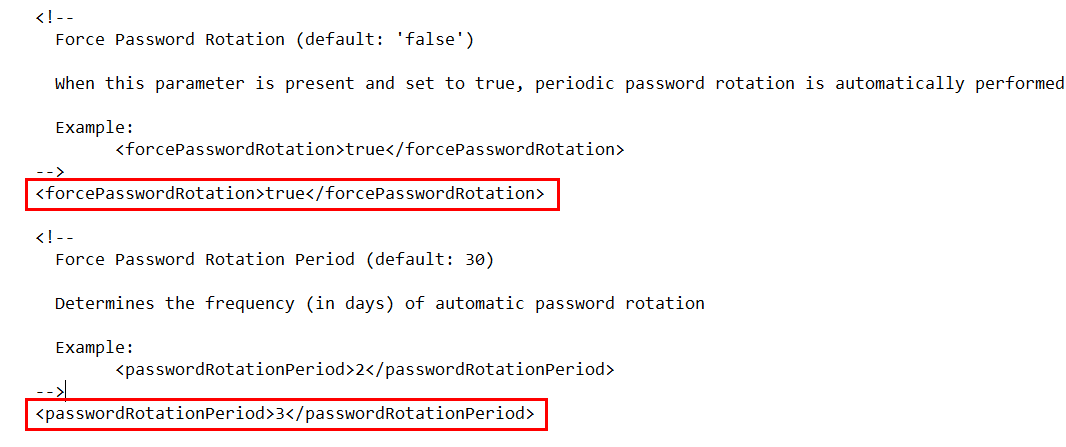
The Force Password Rotation feature allows periodic rotation of the AD password for users who authenticate with the Mac Agent infrequently (e.g., users who routinely unlock the machine with Touch ID). To activate the feature, the following parameters need to be configured in the Password Sync section of the XML file:
- forcePasswordRotation: Determines whether the feature is enabled. The value needs to be set to true.
- passwordRotationPeriod: Determines the frequency (in days) at which the password is rotated. For example:
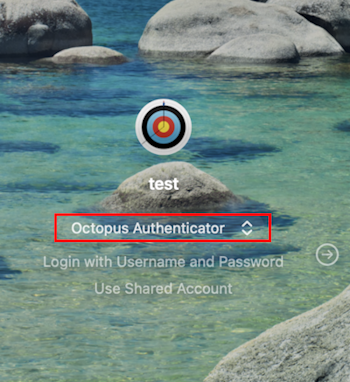
When the rotation period expires, users are automatically presented with the Octopus Custom Unlock screen instead of the native Unlock screen. Users then need to select and use one of the Octopus authentication methods (Octopus Authenticator, FIDO, etc.) to unlock the machine, forcing AD password rotation.
IMPORTANT: When Force Password Rotation is enabled, the Custom Unlock screen appears at the designated intervals, even when the customUnlockScreen parameter in the XML file is set to false (default value).
Note: The Force Password Rotation feature is not relevant when MFA or the Password Free Experience is configured.
The following procedure explains how to use the installation wizard to install Octopus Desk for Mac. Before you begin, make sure that you have configured the XML file, as described above.
To install Octopus Desk for Mac:
As an Administrator, run the octopus-desk.pkg file to open the installer.
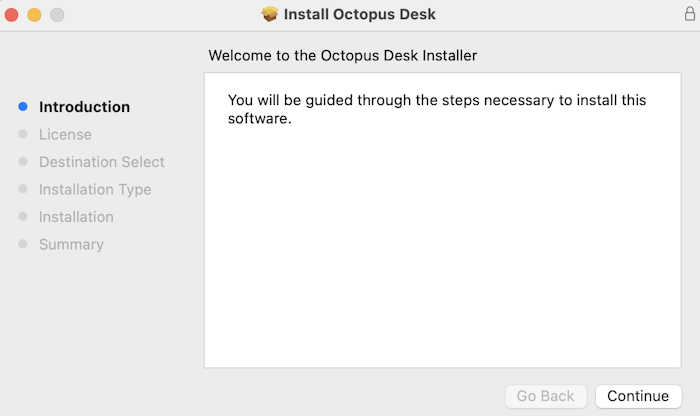
On the Introduction page, click Continue.
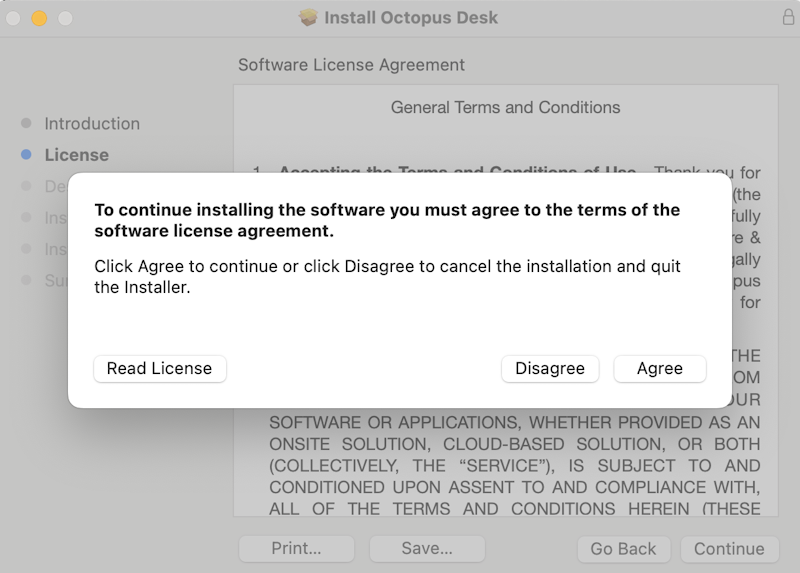
In the license agreement popup, click Agree.
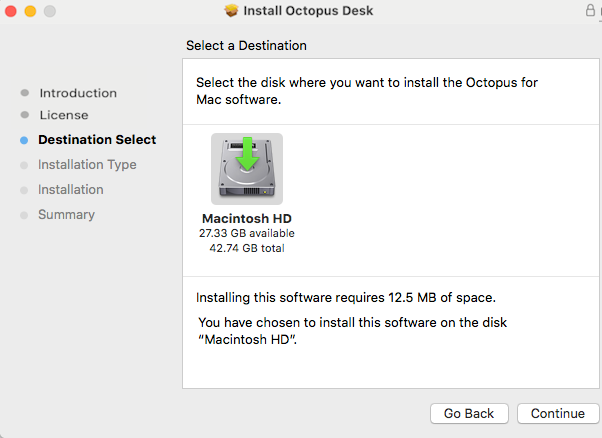
Then, click Continue.On the Destination Select page, click Continue.
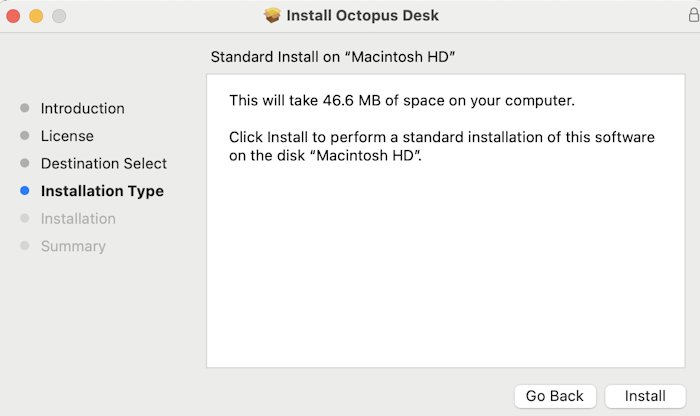
On the Installation Type page, click Install.
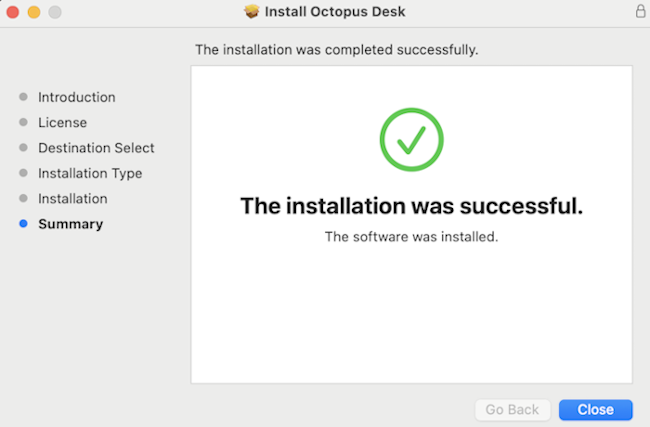
When installation completes, a confirmation message is displayed. To exit the installer, click Close.
To verify installation, look for the Octopus icon on the top bar.

Active Directory Domain users are enabled by default and will be able to authenticate immediately after Octopus for Mac installation. The system will enforce MFA authentication with the authenticator set in the XML (default is Octopus Authenticator mobile app).
Note: If installation was successful but you are unable to use the Octopus client, the machine may not be integrated with the corporate Active Directory. For more information, refer to Adding Your Machine to the Active Directory.
Non-domain users need to be onboarded manually. Refer to the next section for details.
The accounts of Local (non-domain) users need to be manually enabled before those users can log into their machines using Octopus Authenticator, third party authenticators, FIDO authenticators or OTP authentication. When planning onboarding, keep the following guidelines in mind:
- Users successfully enabled for Octopus authentication are automatically enabled for FIDO as well. (It is not necessary to perform separate onboarding for FIDO authentication.)
- Users successfully enabled for FIDO authentication are automatically enabled for Octopus authentication as well. (It is not necessary to perform additional onboarding.)
- When Octopus OTP is included as an authentication method in the configuration XML, OTP authentication is automatically enabled once users are onboarded for Octopus authentication. Separate onboarding for OTP is not necessary.
IMPORTANT: Before starting the onboarding process, verify that the relevant authentication methods are defined in the authenticationMethods element of the configuration file. Methods not listed in the XML file will not be provided as authentication options on the Login screen.
The procedures in the sections below explain how to onboard each Local user:
Enabling the Octopus Authenticator / Third-party Authenticators
Follow the steps below to enable Local users to log into their machines using the Octopus Authenticator or a third-party authenticator.
To onboard a Local user:
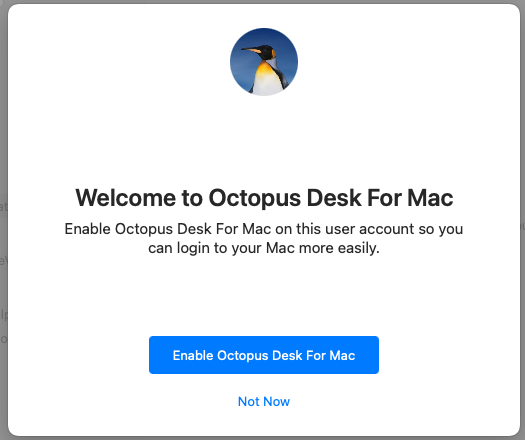
From the Welcome dialog, click Enable Octopus Desk For Mac. (This dialog opens automatically after installation completes on machines of Local users.)
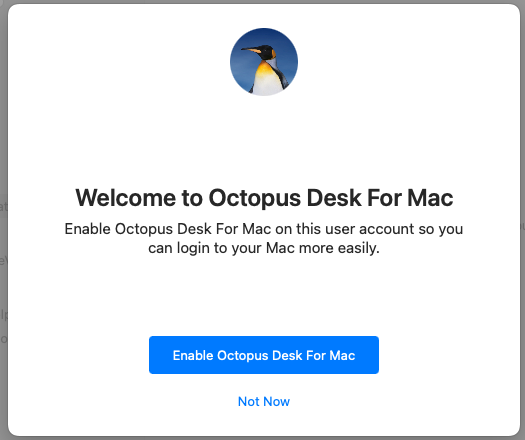
When both Octopus Authenticator and FIDO are defined as authenticators in the configuration XML file, you will be prompted to select a method.
If the screen below appears, click Authenticator app. If you are using a third-party authenticator, the server will redirect the call to the required authenticator.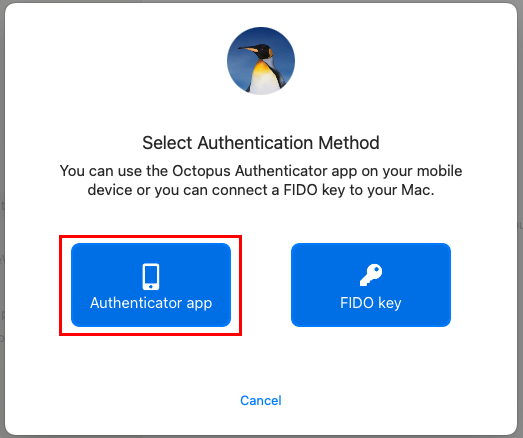
To enable Octopus for Mac Authentication, enter the relevant username and domain in the appropriate fields. Then, click Next.
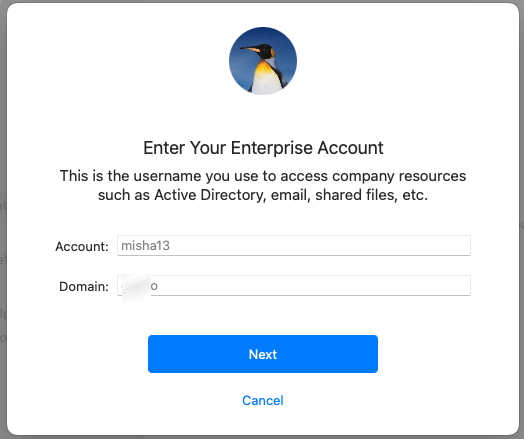
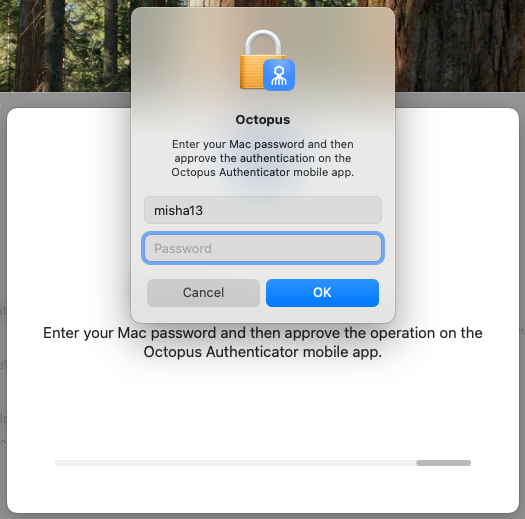
In the popup that opens, enter the Mac password and then click OK.
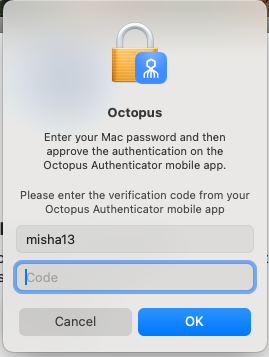
After approving the authentication request on the mobile app, enter the one-time code displayed in the app. Then, click OK.
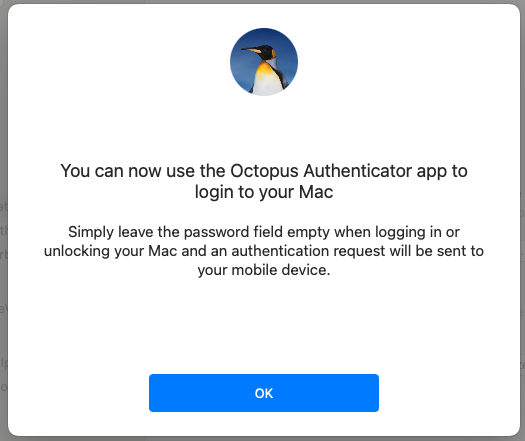
When onboarding is complete, a confirmation message is displayed with instructions on how to use Octopus Authenticator.
Follow the steps below to enable Local users to log into their machines using a FIDO Authenticator.
IMPORTANT: Before you begin, make sure that the FIDO key is enrolled with the user on the Octopus Authentication Server.
To onboard a Local user:
From the Welcome dialog, click Enable Octopus Desk For Mac. (This dialog opens automatically after installation completes on machines of Local users.)
When both FIDO and Octopus Authenticator are defined as authenticators in the configuration XML file, you will be prompted to select a method.
If the screen below appears, click FIDO key.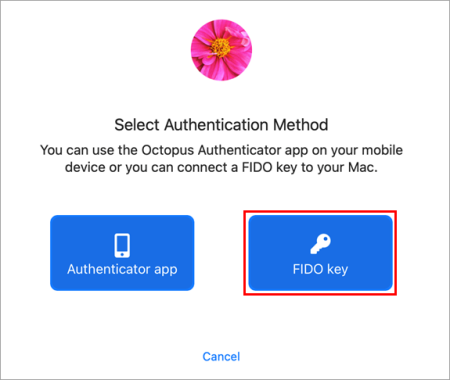
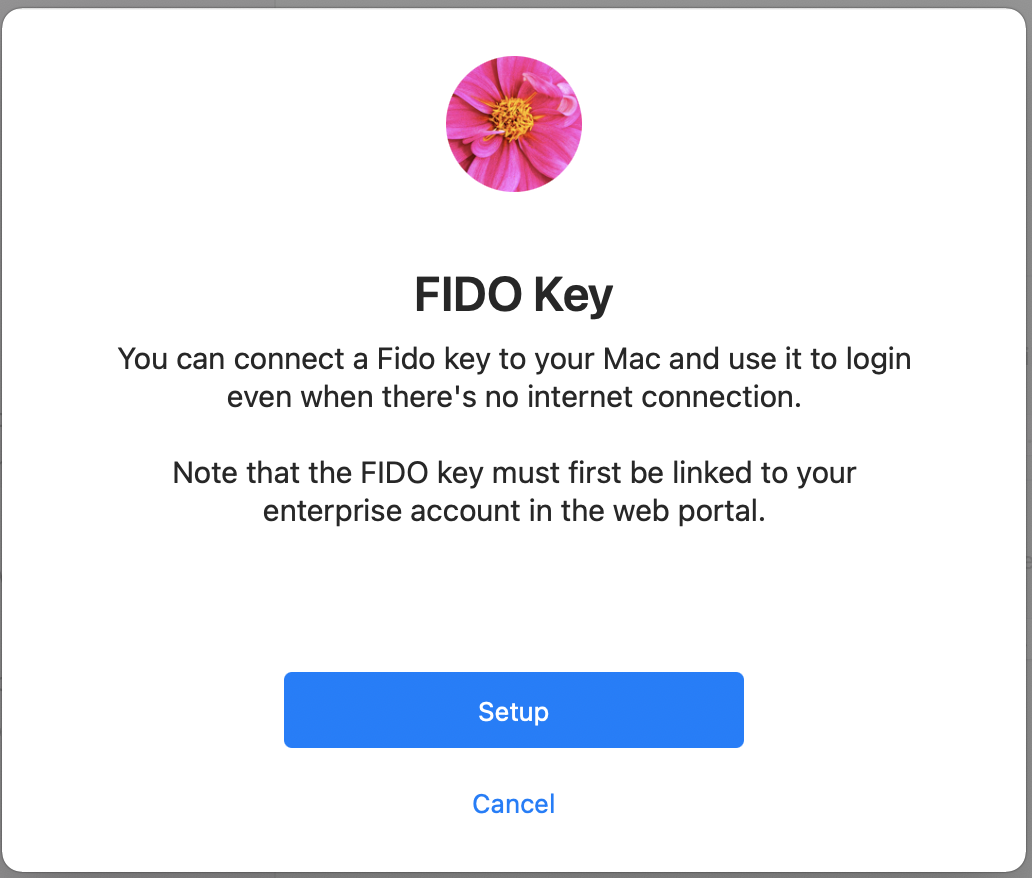
Insert the FIDO key into the machine to enable the Setup button. Then, click Setup.
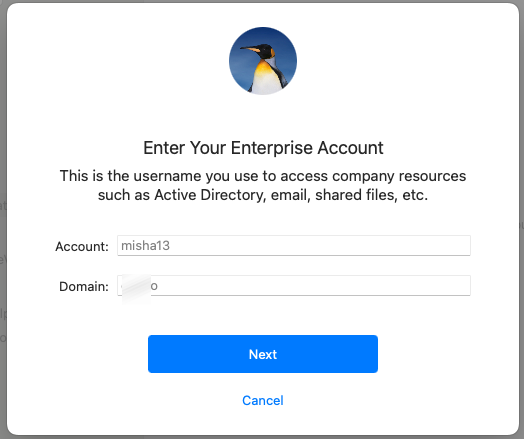
To enable Octopus for Mac Authentication, enter relevant username and domain in the appropriate fields. Then, click Next.
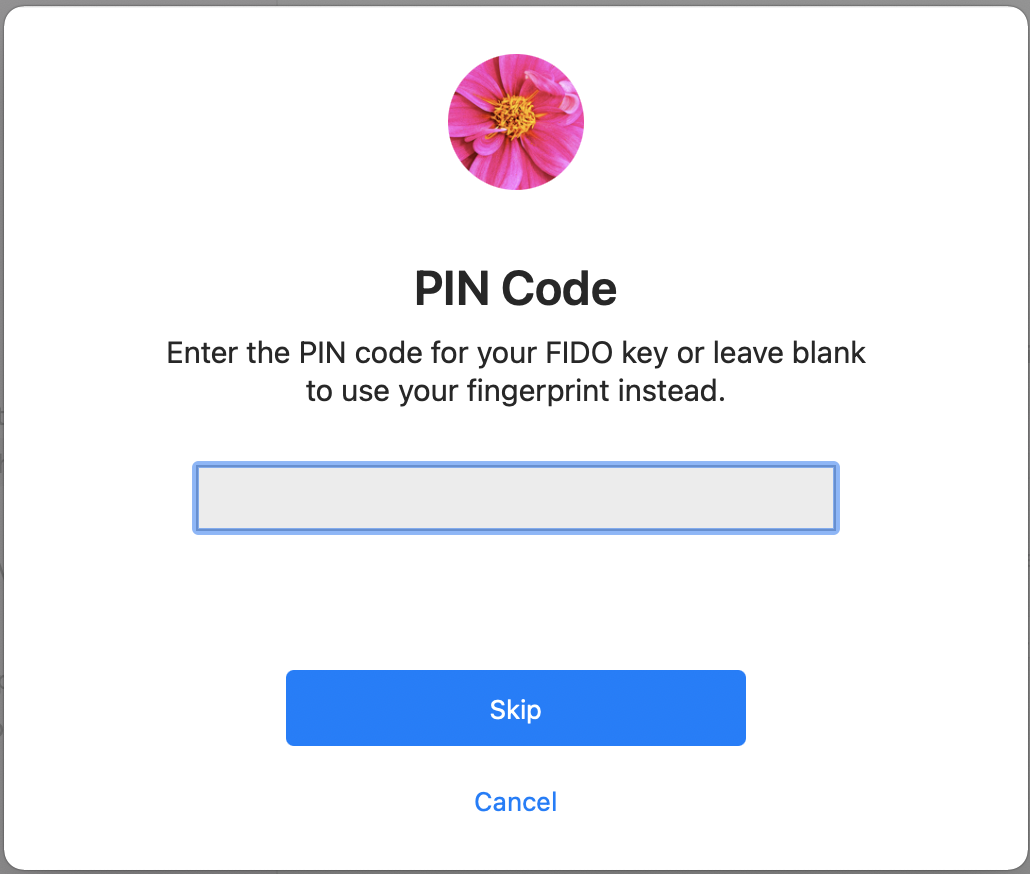
If the FIDO key requires a PIN (non-biometric key), enter the PIN code now.
For biometric keys, leave the field blank and click Skip.
When the key begins to blink, the user should touch the key (non-biometric) or place the enrolled fingerprint (biometric).
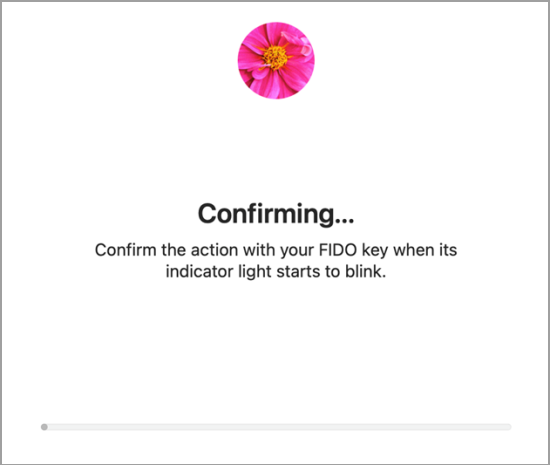
When onboarding is complete, a confirmation message is displayed. The user can now use the FIDO key as the main authenticator for login, lock and system preferences (if the user has Admin permissions).
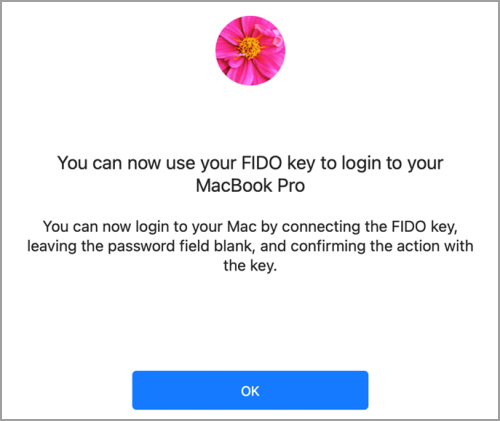
Using the FIDO Key for Authentication
To use FIDO as the default authenticator, the key needs to be inserted into the Mac before beginning the authentication process. When users have more than one authenticator enrolled, Octopus Desk will choose the FIDO key as primary only if it is inserted.
If the FIDO key is not inserted before starting authentication, a push notification is sent to the mobile app (Octopus Authenticator or relevant third party).
Enabling the Password Free Experience
The Password Free Experience enables customers to start deploying the Mac agent while maintaining control over the password, so they can continue to use it for other applications. In the Password Free flow, users will be required to enter the password for the first login. After one successful login, all other authentication will be Passwordless (the user simply selects the Octopus Authenticator or a FIDO security key, and does not need to provide a password for each login).
When the Password Free Experience is enabled, Octopus Desk does not manage the password, and users need to replace the password according to enterprise policy. Once users change the password, they will again be required to enter it for the first login only.
The passwords set by users will be captured on the mobile app, and users will be able to view their passwords on the Octopus Authenticator mobile app.
To enable the Password Free Experience, some configuration needs to be done in the octopus-desk.xml file and in the Octopus Management Console.
XML File Configuration
To enable support for the Password Free Experience in Octopus Desk for Mac, the passwordfree parameter needs to be set to true.
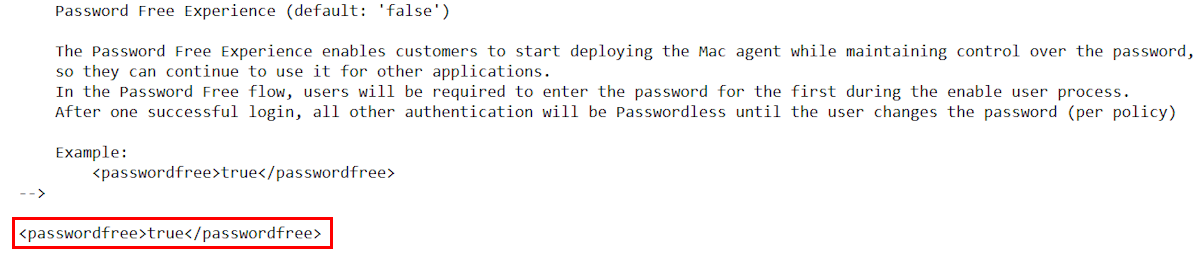
For more information about configuration file parameters, refer to Configuring the XML File.
Management Console Configuration
To support the Password Free Experience, the Password Settings of the directory need to be configured correctly so the system does NOT rotate the AD password. The configuration required varies depending on whether Compatibility Mode is ON or OFF (as explained in the procedure below). For more information about Compatibility Mode, please refer to the Octopus Management Console Admin Guide.
To configure Password Settings:
From the Octopus Management Console, select the Directories menu. Then, open the settings of the relevant directory.
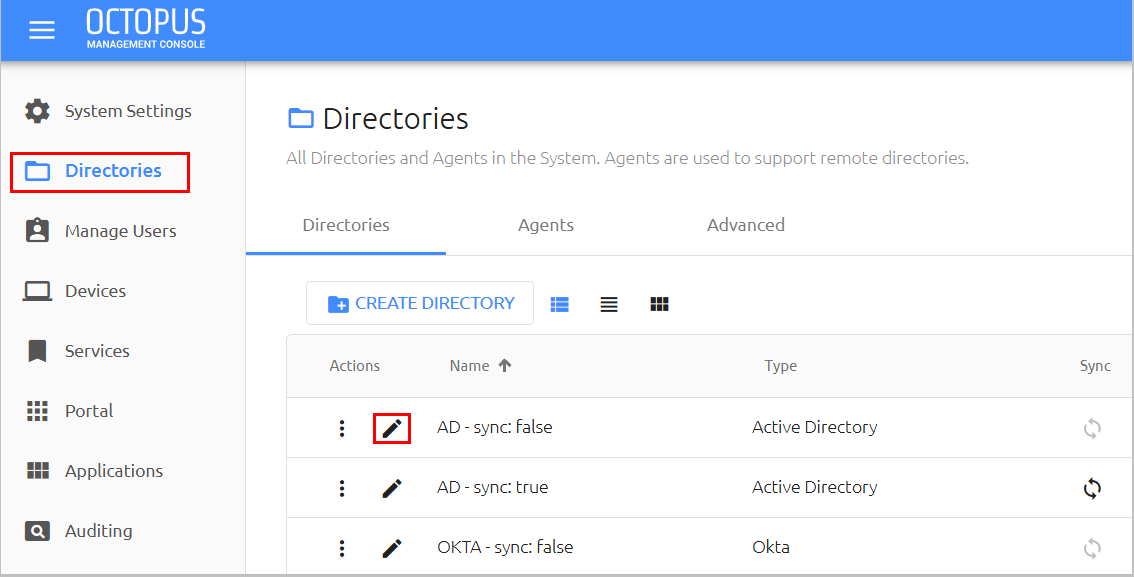
Select the Policy tab.
If Compatibility Mode is OFF, make sure that the Password-Free Experience toggle is enabled (blue).
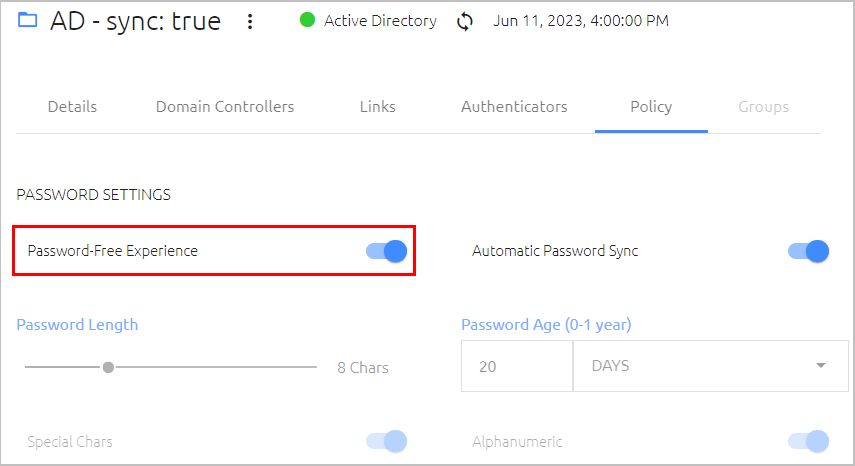
Then, go to Step 5 (below).
If Compatibility Mode is ON, set the Password Age to 0.
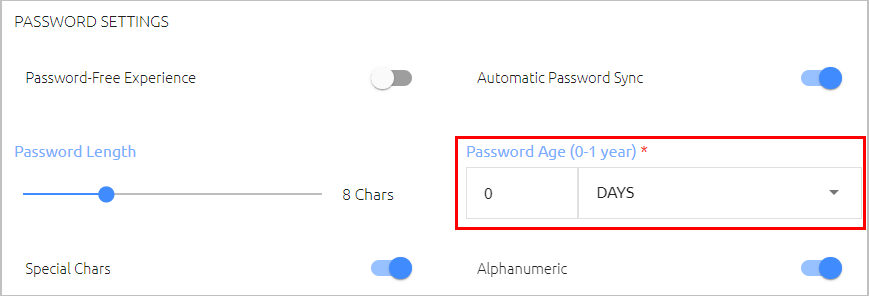
When the value is 0, the system never rotates the password, and the password is managed directly on
the directory or the AD.
At the bottom of the Policy tab, click Save and publish your changes.
Password-free Mode: User Experience
When the Password Free Experience feature is enabled, the following message is displayed upon installation of Octopus Desk:
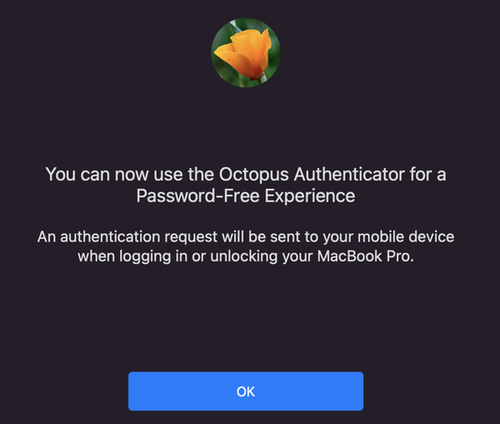
In addition, the mode of the Octopus Agent is shown in the Status screen.
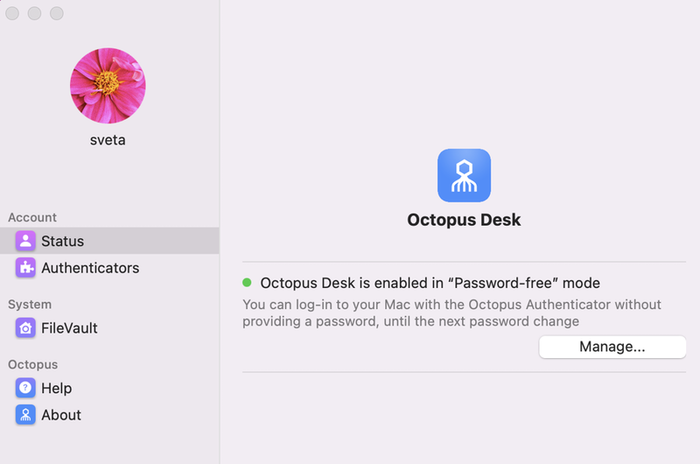
The user provides a password for the first login. This password is shared on the vault and sent to the mobile app. Until the next password change, users authenticate with a standard passwordless flow.
Octopus Desk never changes or manages the AD password when set to Password-free mode. Users can always change the password manually or according to AD policy. Once the password changes, users will again be required to enter it for the first login only. FIDO users will need to enter Password + PIN together when the password is changed locally.
Handling FileVault Login
When using Octopus Authentication, it is important that the FileVault Login password is different from passwords set for domain users and Local users. This allows rotation of the AD password (to enable passwordless authentication) without affecting the FileVault Login password.
Octopus Desk for Mac supports the following configurations for FileVault login:
Server configuration: The FileVault Login password is set and automatically managed by the system. The password is rotated when the system rotates the user password (AD password). New passwords are stored on the Server Vault and sent to the user as necessary on an enrolled mobile device.
Client configuration: The FileVault Login password is set and managed by the Mac user.
The configuration is set before installation, in the filevaultlogin parameter of the octopus-desk.xml file.
Several additional FileVault parameters enable some customization and control of the login flow. For more details, refer to Configuring the XML File.
The following sections describe the workflows for setting up and handling FileVault login:
Enabling FileVault Login (All Configurations)
Configuring FileVault Login on the Mac (Client Configuration)
Working with the FileVault Password (Server Configuration)
Follow the steps below to enable FileVault Login and set the password.
Important: If you are working with the Server configuration, the procedure needs to be done by a system admin.
To enable FileVault login:
From the Octopus configuration, select FileVault and click Setup.
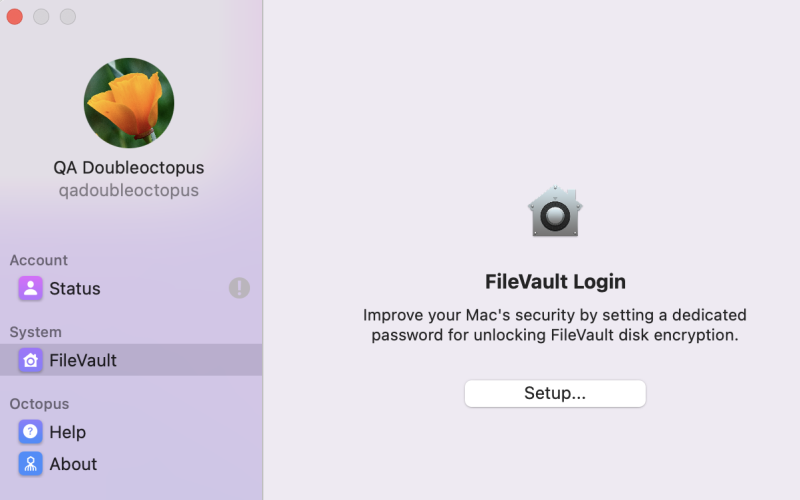
If FileVault is turned on, skip to Step 3.
If FileVault is turned off, the following popup opens:
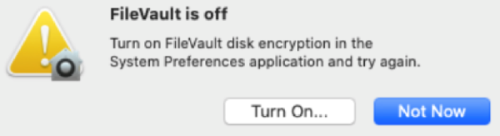
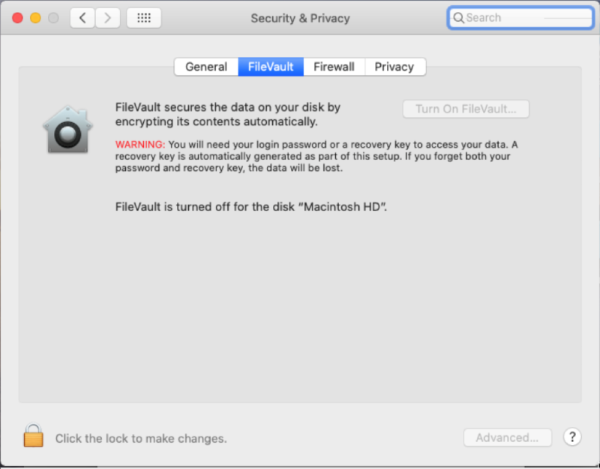
Click Turn On and then enable FileVault in the Security & Privacy settings.
From the FileVault Login dialog, click Continue.
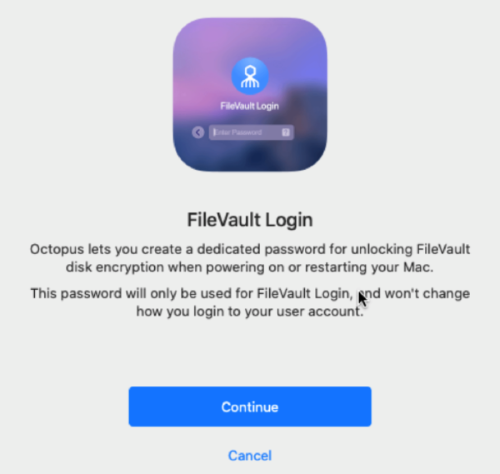
The Create a Password dialog opens.
Enter a password for FileVault Login, and then click Next.
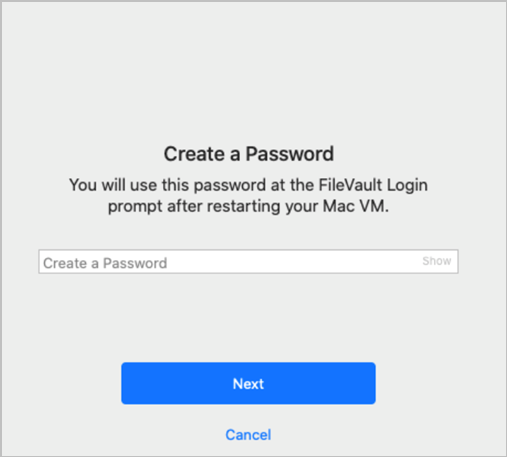
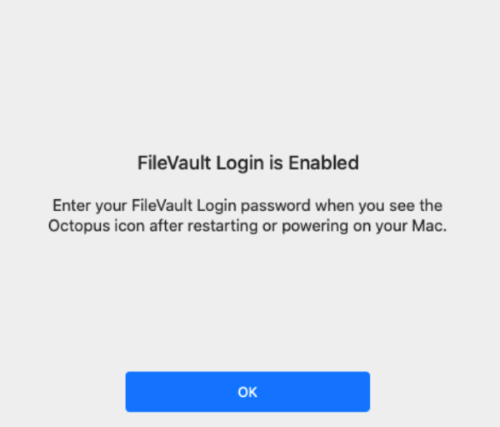
A confirmation message is displayed on the Mac.
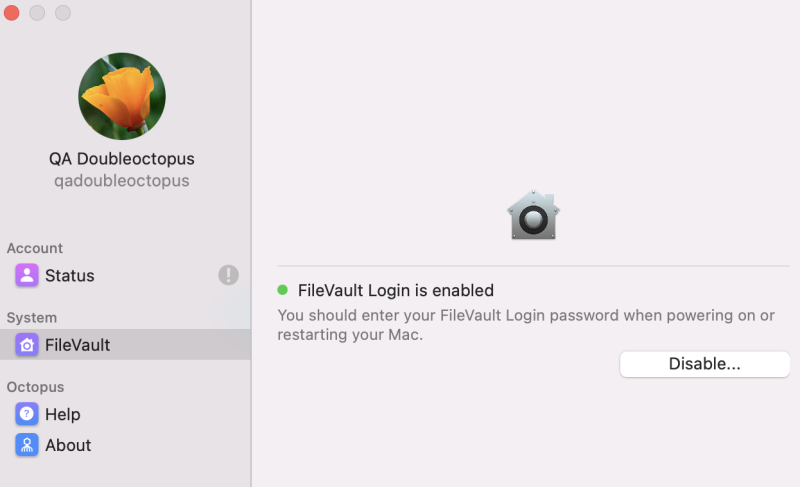
After successfully enabling FileVault Login, the Octopus configuration will appear as follows:
Configuring FileVault Login on the Mac (Client Configuration)
When the Client configuration is used, the user account needs to be configured manually in order to successfully use FileVault Login.
To configure FileVault Login:
From the Octopus configuration, select FileVault and click Configure.
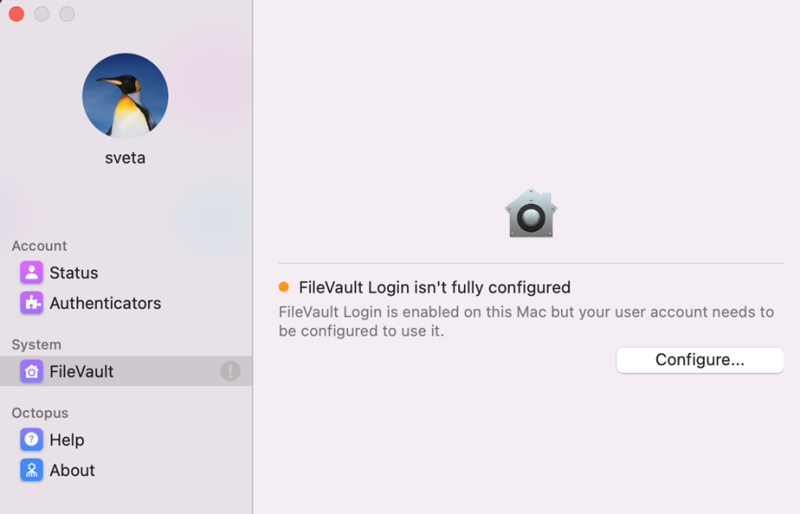
A message is displayed prompting you to approve the operation on your mobile device.
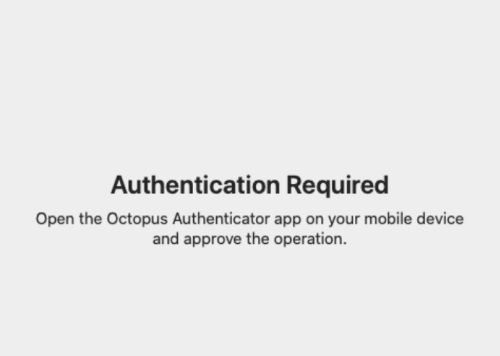
From the Octopus Authenticator app, tap Approve.
A confirmation message is displayed on the Mac.
Working with the FileVault Password (Server Configuration)
When the Server configuration is used, FileVault Login is automatically enabled and configured for local users, and no additional setup procedures are necessary. When passwords are rotated by the system, they are sent to the user on an enrolled mobile device. The passwords are displayed in the Octopus Authenticator app on the Show Credentials screen (Account > Show Credentials).
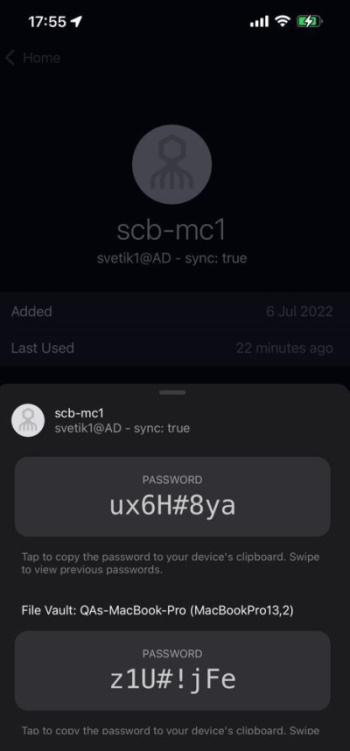 |
The following settings and actions related to the FileVault password are available in the Octopus Management Console:
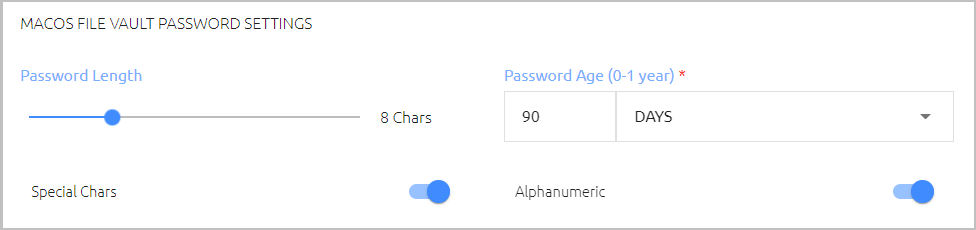
macOS FileVault Password Settings: These settings (in System Settings > Devices) allow the admin to set the password’s length, expiration time and other requirements.
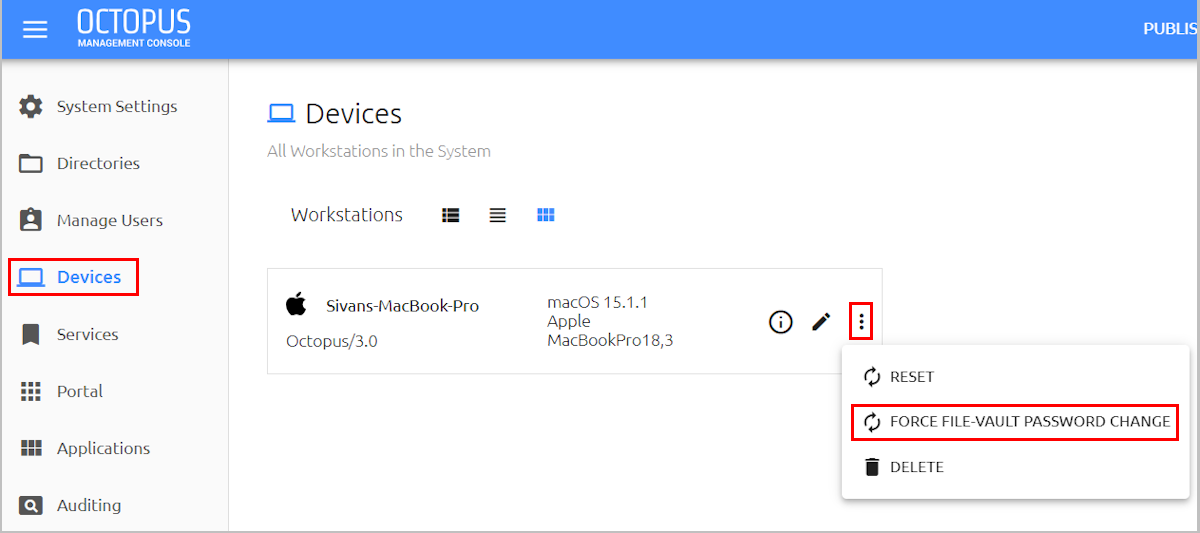
Force FileVault Password Change: Enables the admin to initiate an immediate password rotation. This setting is found in several locations in the Management Console.
For more information, please refer to the Octopus Management Console Admin Guide.
A Kerberos ticket is created when users log into the Mac or perform Lock screen authentication, and is renewed automatically. The ticket allows users to authenticate with Kerberos SSO to all internal web applications and shared repositories that require user authentication to Active Directory.
Important: To enable Kerberos authentication, the following conditions are required:
The kerberosrealm parameter must be defined in the octopus-desk.xml file. For details, refer to Configuring the XML File.
If the workstation is NOT domain-joined, the local password must match the AD password. For details about making the workstation domain-joined, refer to Adding Your Machine to the Active Directory.
Viewing Kerberos Ticket Status
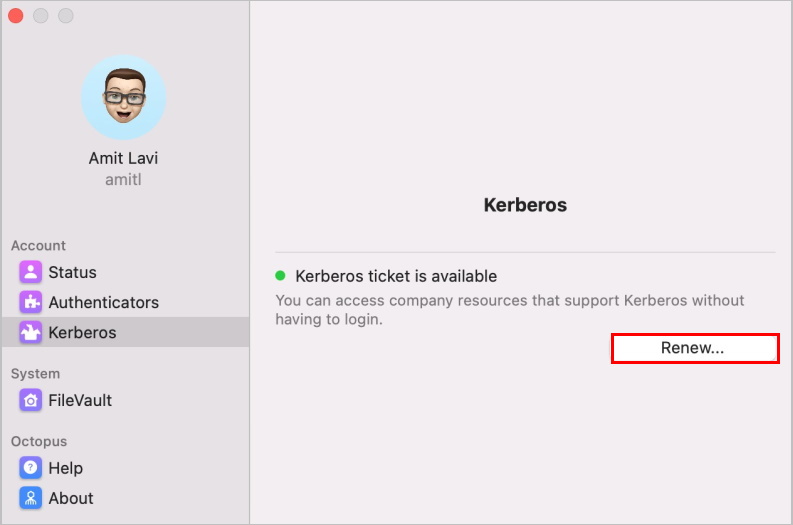
The current status of the Kerberos ticket is displayed in the Kerberos menu of the Octopus Desk Preferences. An active ticket is indicated by a green icon, as shown in the example above.
If the ticket needs to be renewed, the icon is orange.
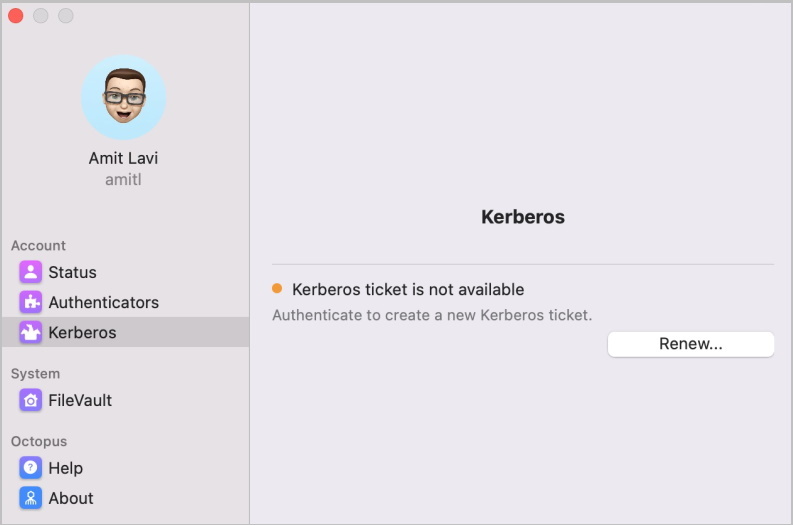 |
A red icon indicates that the most recent Kerberos login failed. The cause of the login failure is described below the status.
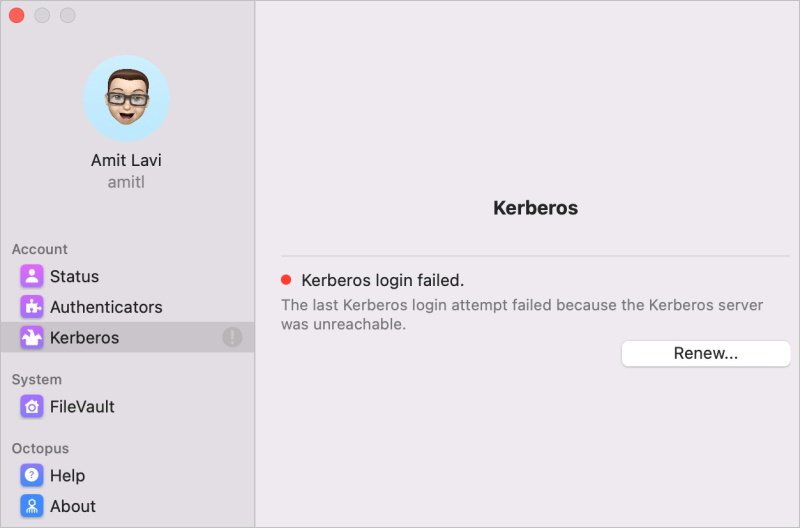 |
Renewing the Ticket
This section explains how users can renew the Kerberos ticket in the event that the automatickerberossync flag in the octopus-desk.xml configuration file has been set to false.
When the Kerberos ticket is expired, the following popup opens, allowing users to renew it:
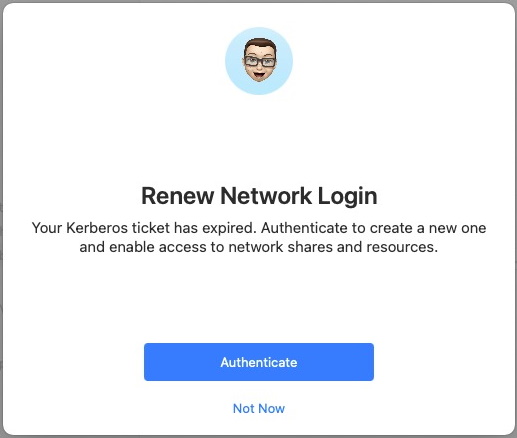 |
Users can also renew the ticket manually at any time, either from the Octopus options menu or from the Octopus Desk Preferences.
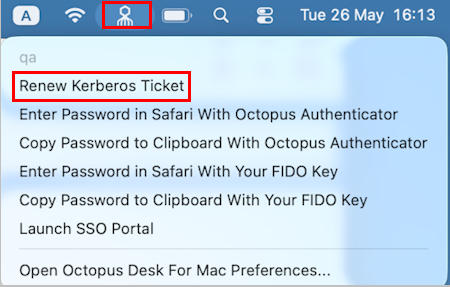
 |
Enabling Shared Account Login
The Shared Account feature enables designated users to log into a generic account on a workstation using their personal credentials and devices. Account sharing is particularly useful for specific groups of personnel who require occasional access to user workstations (e.g., the IT team).
When account sharing is activated, users who are authorized to access the account enter two usernames on a customized Login screen: the name by which the shared account is known, and their own username. They then complete the login process by authenticating with their personal mobile device, FIDO key, etc.
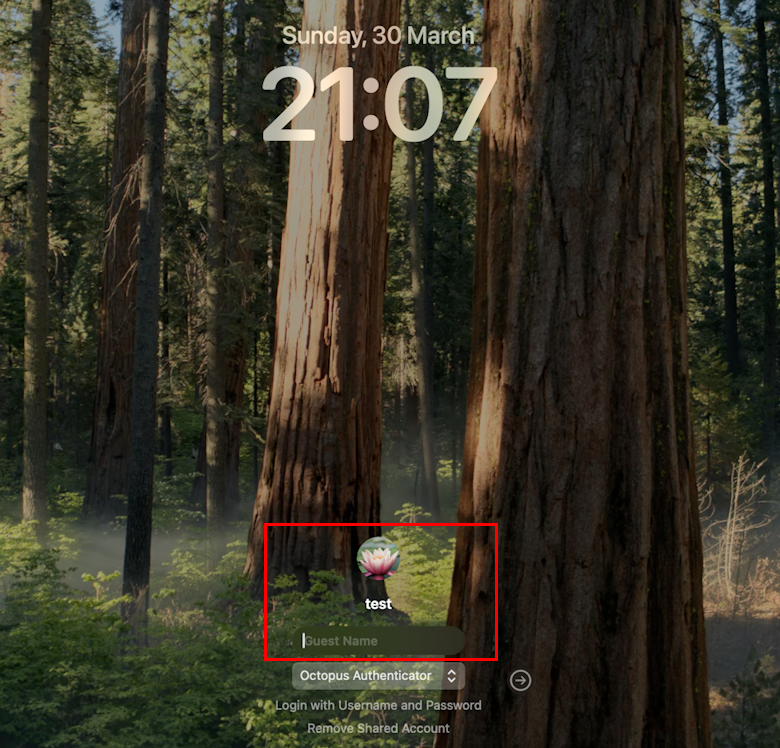
The same presentation is displayed on the Custom Unlock screen.
To enable support of shared accounts, some updates need to be done in the Agent configuration file and in the Octopus Management Console, as described in the following sections.
IMPORTANT: To support shared account login to the workstation, FileVault needs to be disabled or unlocked.
Mac Agent Configuration
To enable shared account login, make the following updates in the octopus-desk.xml configuration file:
- In the Custom Ul section, set the customUnlockScreen parameter to true. For more information about the Custom Unlock screen and related configuration options, refer to Configuring the XML File.
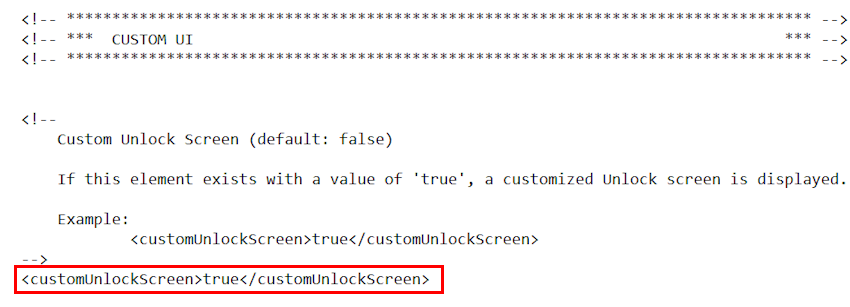
IMPORTANT: Touch ID is not supported when the Custom Unlock screen is used. - In the Shared Accounts Support section, set the sharedaccounts parameter to true.
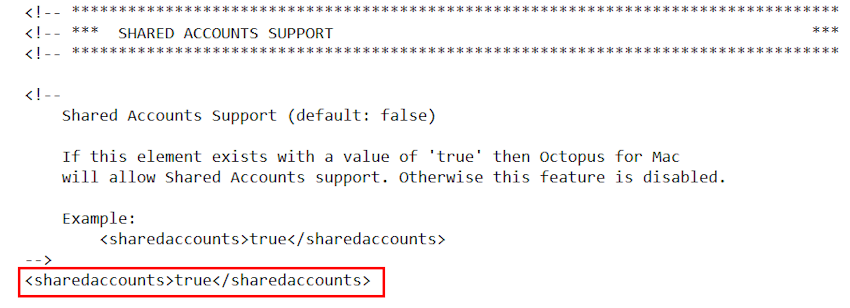
IMPORTANT: BOTH of these parameters must be set to true to support shared account login.
The following additional parameters related to the Shared Account feature are optional:
- showSharedAccountLink: When set to true, the Login screen supports both the shared account login flow and the standard login flow (to a non-shared account). By default, when switching is allowed, the Login screen presents the shared account login flow. A link at the bottom of the screen enables users to switch between the two login options.
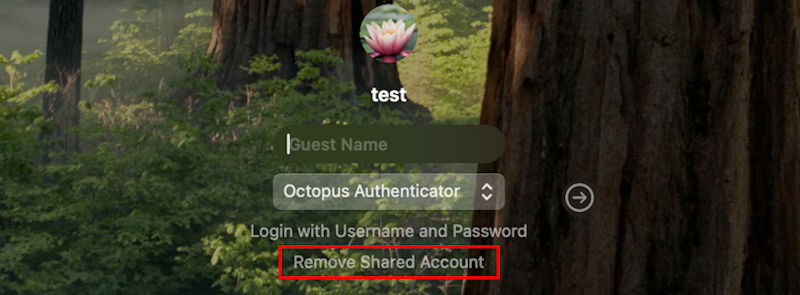
It is possible to customize the text of the Remove Shared Account link. For details, refer to Configuring the XML File. - defaultToRegularAccount: When set to true, the standard authentication flow (to a non-shared account) is displayed on the Mac Login screen initially by default.
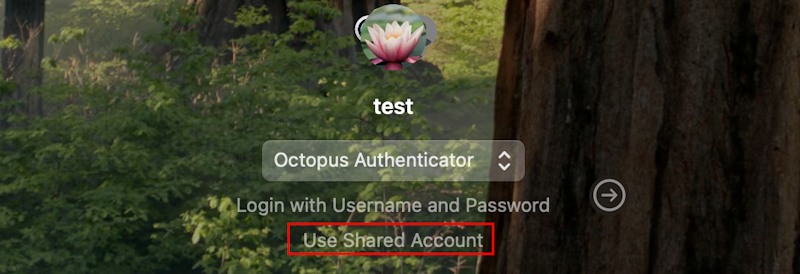
If the most recent login / unlock was to a shared account, the shared account login flow continues to be displayed for the next login / unlock.
Management Console Configuration
Shared user accounts are designated and managed from the user details of the relevant account.
To activate account sharing:
- From the Manage Users menu of the Octopus Management Console, navigate to the relevant user and click the Edit (pencil) icon to open the user details.
- From the Account Sharing tab, select the Enable sharing toggle button.
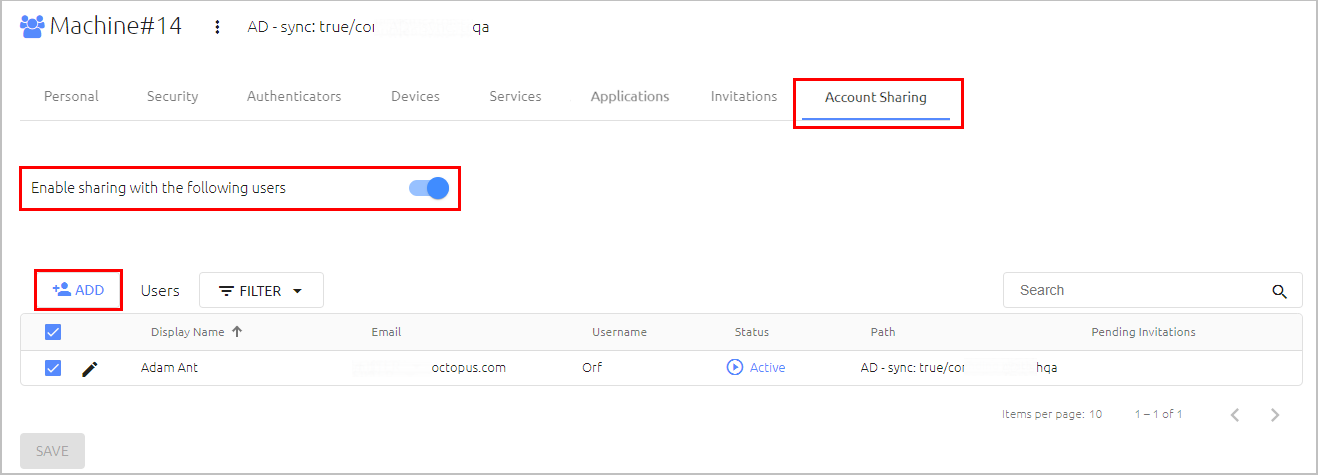
To allow users to log into the shared account, click Add and select the relevant user(s) from the dialog that opens.
Once users are added, you can temporarily block their access to the account when required, by clearing the checkbox in the row of the relevant user(s).
You can also temporarily disable account sharing when necessary by deselecting the Enable sharing toggle. The list of approved users will remain intact while sharing is disabled, so you can quickly and easily reactivate account sharing with those users.
For more details about shared accounts, refer to the Octopus Management Console Admin Guide.
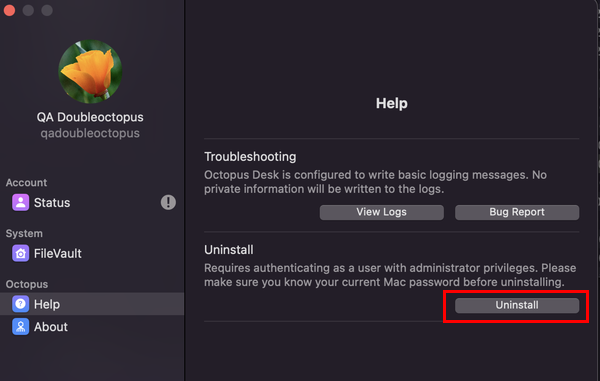
If it becomes necessary to uninstall the Octopus Authenticator client, open the Octopus icon on the top bar and click Help. Then click Uninstall.
Note: if you have user/s enabled on the Mac you need to disable them first before uninstalling
This section provides guidelines for understanding the audit records and for handling issues that you may encounter when working with Octopus Desk for Mac.
Octopus Preferences Help Menu
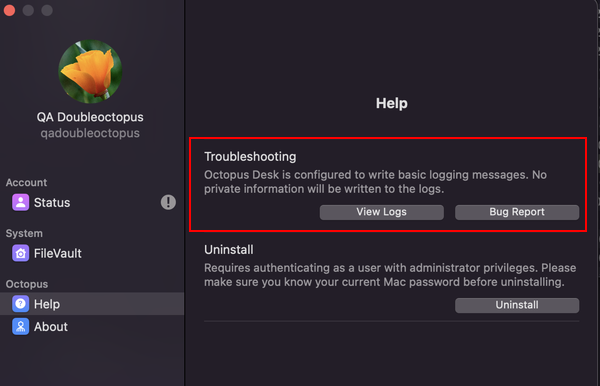
The Help menu of the Octopus Desk Preferences provides the following troubleshooting options:
View Logs: Displays the Octopus Desk logs in a new window
Bug Report: Opens a new email message with the log files automatically attached. By default, the message is sent to
<feedback@doubleoctopus.com>
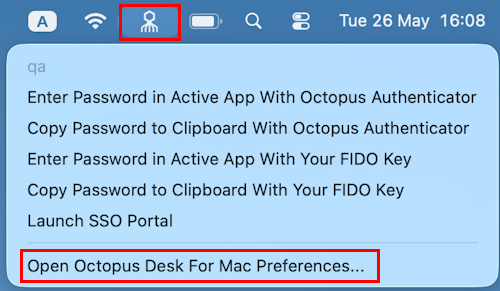
To access these options, click the Octopus icon and select Open Octopus Desk For Mac Preferences.
Then, select the Help menu.
Viewing Mac Agent Events
You can view the Mac Agent logs at any time. The following files are stored in the /var/log directory:
- octopus-audit.log
- octopus-log.log
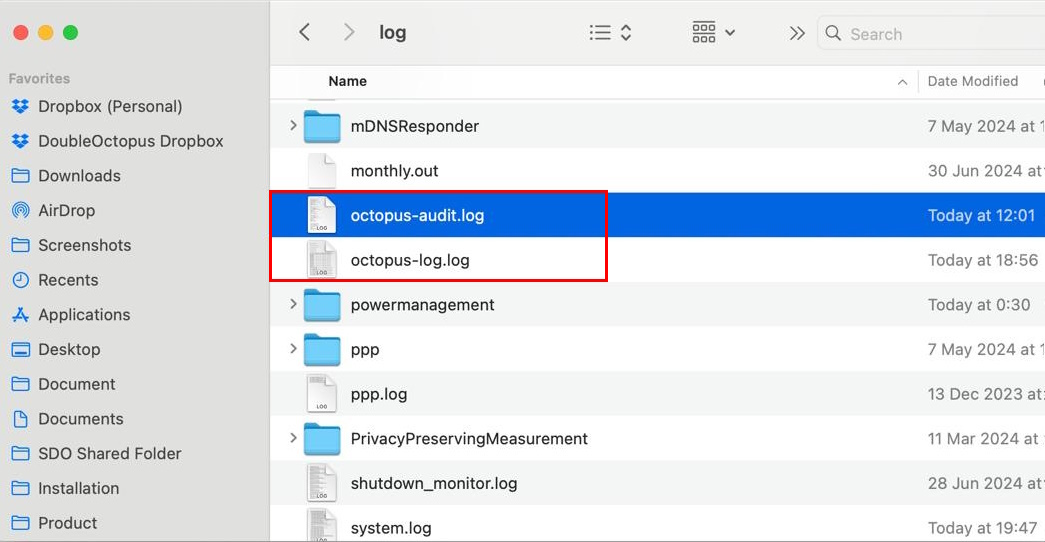
Events in the octopus-audit.log file are displayed together with specific codes and clear descriptions, enabling you to quickly and easily trace the entire flow of events that occurred during an authentication session. The maxAuditFileSize parameter in the Octopus Desk configuration file allows you to control the file size. (Default maximum size is 10 MB.)
List of Event Codes
The following table lists the event codes and their descriptions. If you require more advanced troubleshooting and/or debugging, please reach out to the Secret Double Octopus support team.
| Event Code | Event Description |
|---|---|
| 5020 | Logon initiated |
| 5021 | Logon succeeded |
| 5022 | Logon failed |
| 5041 | Unlock initiated |
| 5042 | Unlock succeeded |
| 5043 | Unlock failed |
| 5051 | Sudo initiated |
| 5052 | Sudo succeeded |
| 5053 | Sudo failed |
| 5061 | Manual password retrieval initiated |
| 5062 | Manual password retrieval succeeded |
| 5063 | Manual password retrieval failed |
| 5064 | Password copied to clipboard |
| 5065 | Password removed from clipboard |
| 5071 | Manual password sync started |
| 5072 | Manual password sync succeeded |
| 5073 | Manual password sync failed |
| 5081 | Automatic password sync started |
| 5082 | Automatic password sync succeeded |
| 5083 | Automatic password sync failed |
| 5091 | Account password changed |
| 5101 | Kerberos login initiated |
| 5102 | Kerberos login succeeded |
| 5103 | Kerberos login failed |
| 5104 | Kerberos session renew initiated |
| 5105 | Kerberos session renew succeeded |
| 5106 | Kerberos session renew failed |
| 5121 | FileVault setup initiated |
| 5122 | FileVault setup succeeded |
| 5123 | FileVault setup failed |
| 5124 | FileVault disabling initiated |
| 5125 | FileVault disabling succeeded |
| 5126 | FileVault disabling failed |
| 5127 | FileVault password changed |
| 5131 | Enabling Offline OTP initiated |
| 5132 | Enabling Offline OTPsucceeded |
| 5133 | Enabling Offline OTP failed |
| 5141 | Enabling Octopus initiated |
| 5142 | Enabling Octopus succeeded |
| 5143 | Enabling Octopus failed |
| 5144 | Disabling Octopus initiated |
| 5145 | Disabling Octopus succeeded |
| 5146 | Disabling Octopus failed |
| 5151 | FIDO setup started |
| 5152 | FIDO setup succeeded |
| 5153 | FIDO setup failed |
| 5161 | SSO Portal launched |
| 5164 | Manual SSO portal launch initiated |
| 5165 | Manual SSO portal launch succeeded |
| 5166 | Manual SSO portal launch failed |
| 5181 | Password rotation enforcement - SDO Unlock Screen enabled |
| 5182 | Password rotation enforcement - Native Unlock Screen restored |
| 5201 | Online connection detected - locking the workstation |
| 5202 | Credentials expiration detected - locking the workstation |
| 5221 | FIDO authentication initiated |
| 5222 | FIDO authentication succeeded |
| 5223 | FIDO authentication failed |
| 5301 | Online authentication initiated |
| 5302 | Online authentication succeeded |
| 5303 | Online authentication failed |
| 5304 | Authentication challenge received |
| 5307 | Pre-authentication initiated |
| 5308 | Pre-authentication request succeeded |
| 5309 | Pre-authentication request failed |
| 5311 | Adaptive authentication initiated |
| 5312 | Adaptive authentication succeeded |
| 5313 | Adaptive authentication failed |
| 5321 | Get Password request initiated |
| 5322 | Get Password request succeeded |
| 5323 | Get Password request failed |
| 5331 | Change Password request initiated |
| 5332 | Change Password request succeeded |
| 5333 | Change Password request failed |
| 5401 | BLE authentication initiated |
| 5402 | BLE authentication succeeded |
| 5403 | BLE authentication failed |
| 5411 | Offline authentication initiated |
| 5412 | Offline authentication succeeded |
| 5413 | Offline authentication failed |
| 5422 | Bypass success |
The following sections present various scenarios related to user experience:
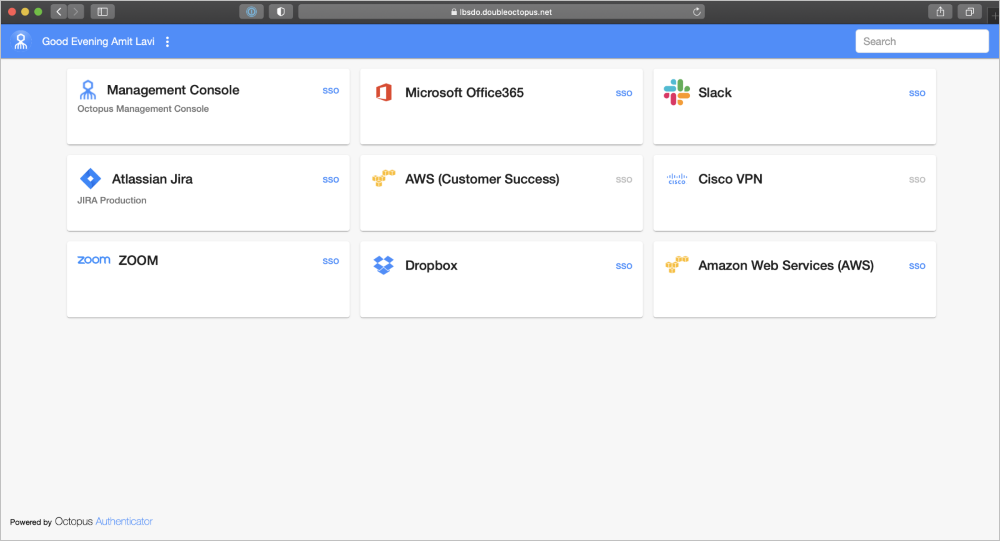
Octopus Desk for Mac supports automatic launch of the SSO portal in a browser window after user login to the machine.
If the ssourl parameter of the configuration XML file is defined, that URL is used (Configuring the XML File.) If that parameter is empty, the target URL is taken from the Octopus Server.
 |
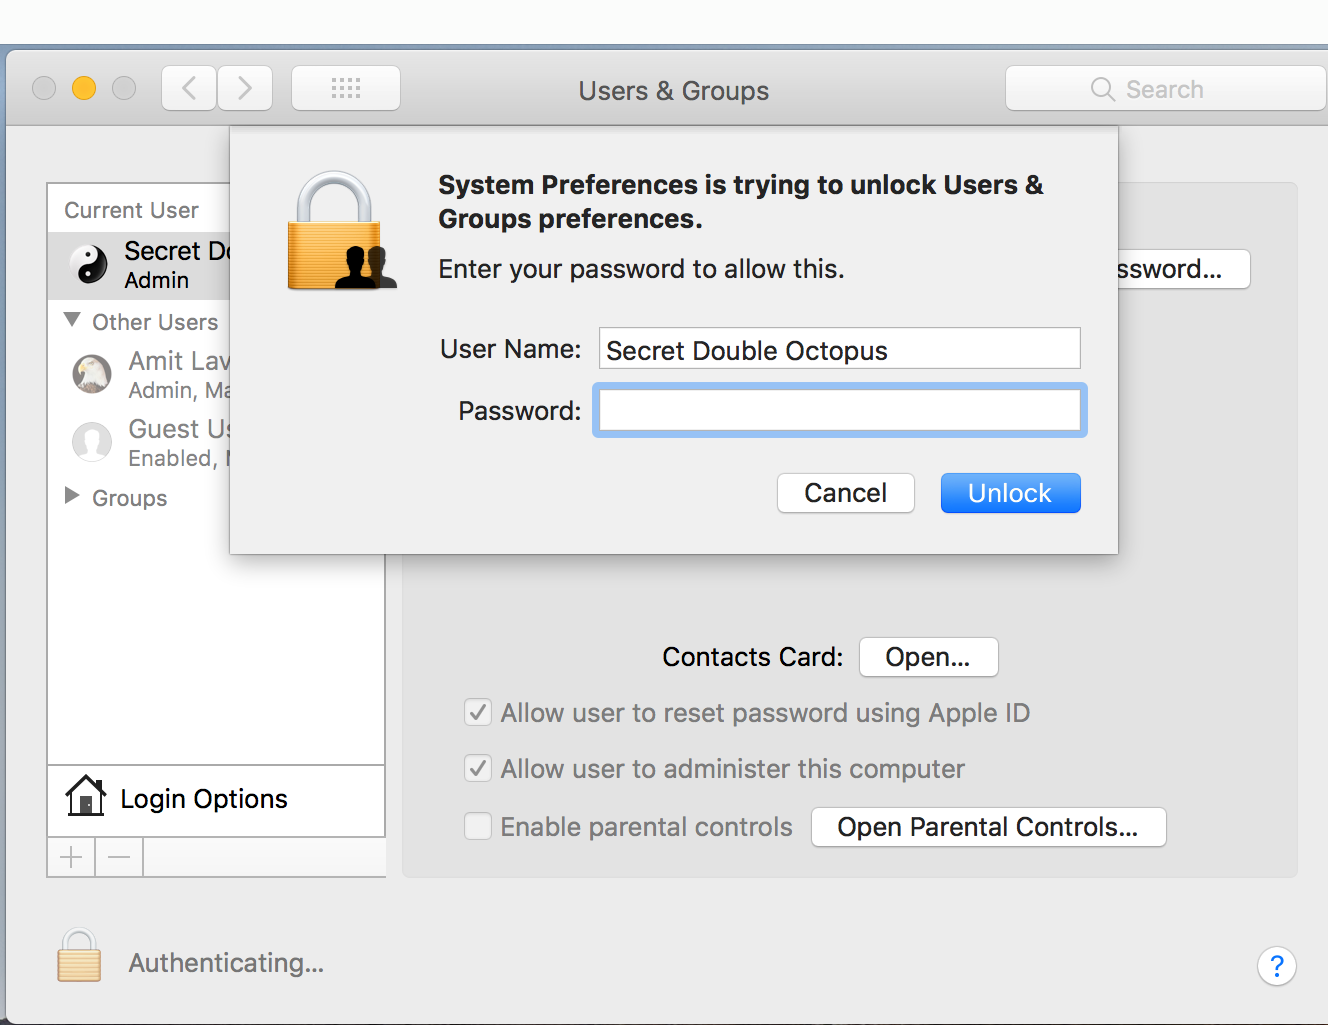
Octopus Authentication is enabled on all System Preferences settings for which authentication is required.
To unlock the preferences, the user press the Lock icon, enters the password and approves the authentication operation on the Octopus Authenticator mobile app.
 |
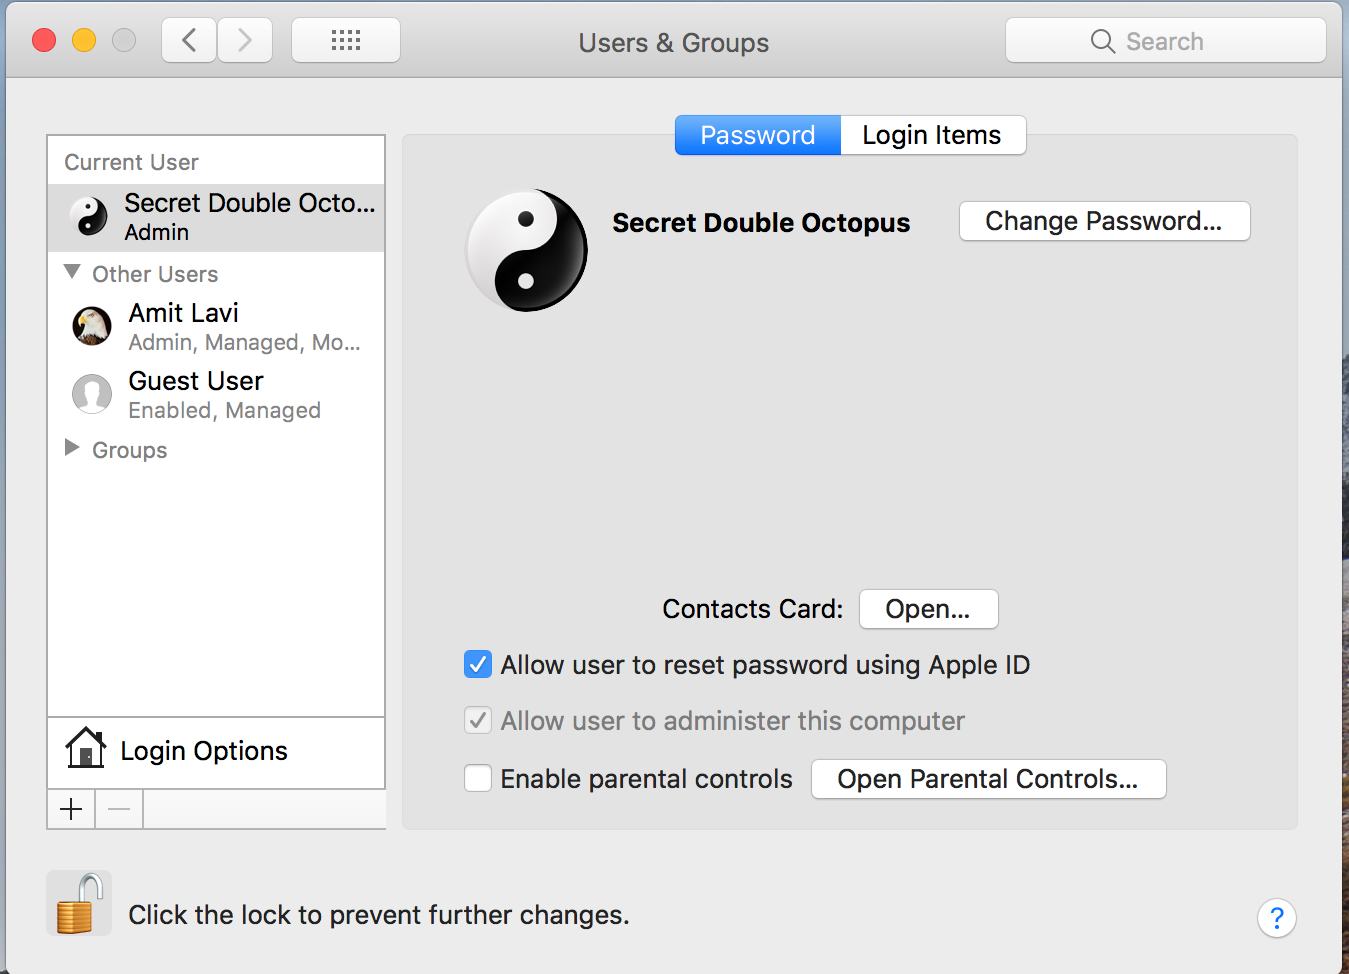
After successful authentication, the Lock icon opens and the user may update System Preferences.
 |
The following procedure describes how to add your Mac to the corporate Active Directory.
To add your machine to the AD:
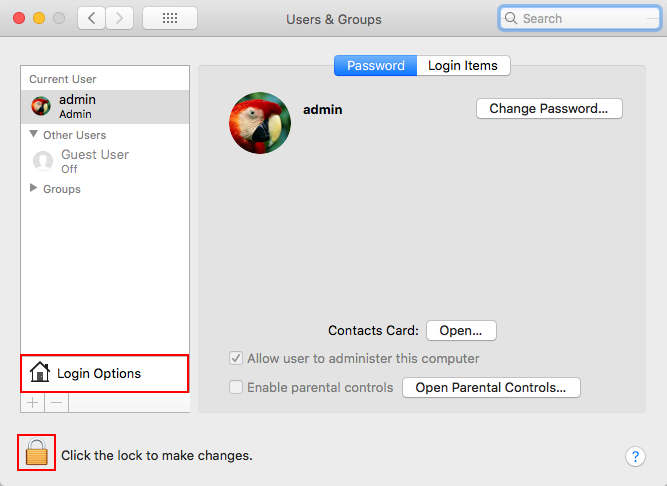
Open System Preferences and select Users & Preferences.
The Users & Preferences dialog opens.
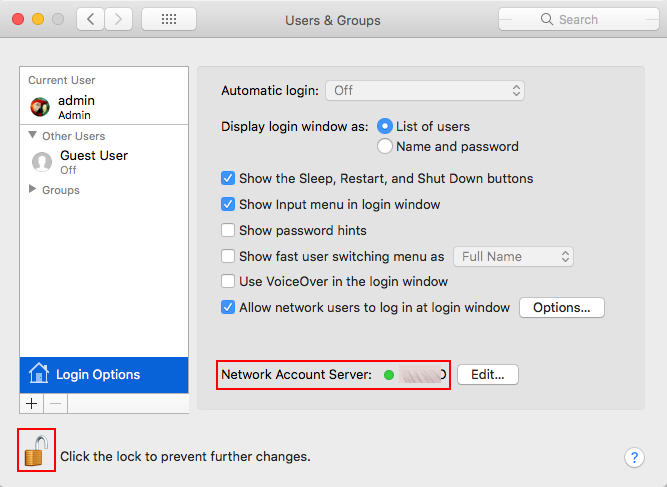
Click the Lock icon to enable editing mode. Then, click Login Options.
Next to Network Account Server, click Join.
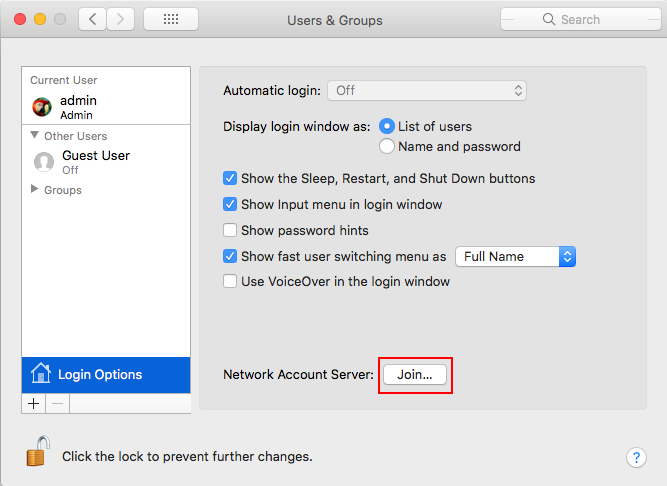
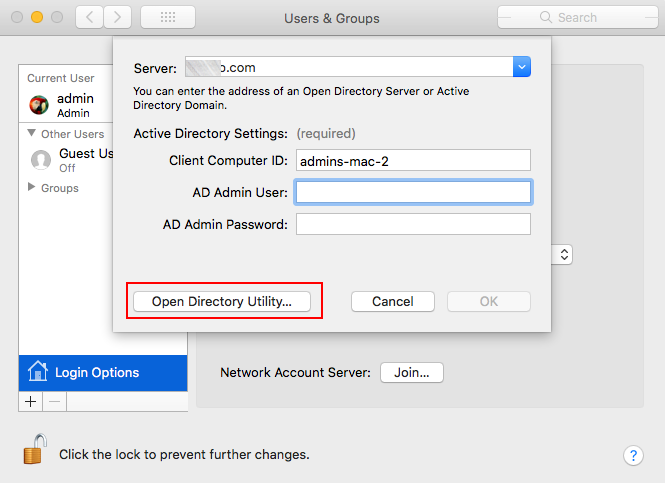
In the popup that opens, enter the address of the AD server and the credentials of the AD Admin. Then, click Open Directory Utility.
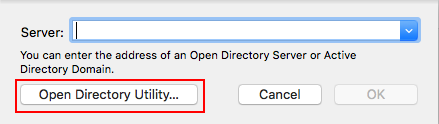
In the second popup that opens, re-enter the address of the server and then click Open Directory Utility.to open the Directory Utility dialog.
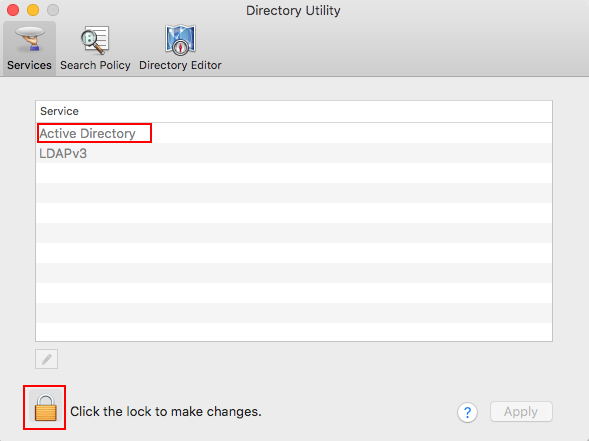
From the Directory Utility dialog, click the Lock icon to enable editing mode. Then, select Active Directory.
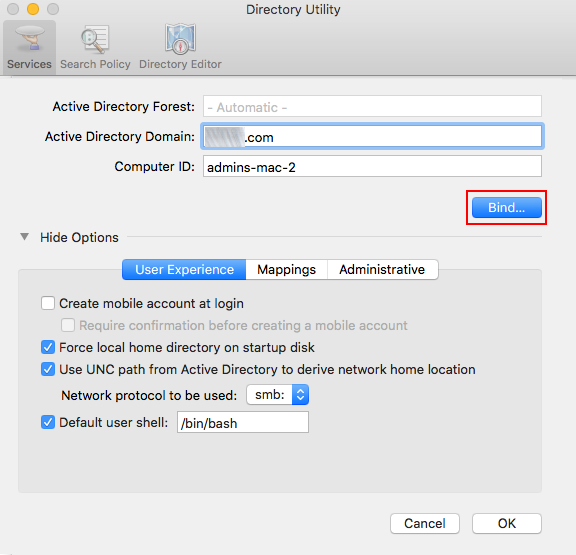
In the dialog that opens, click Bind.
The Network Administrator Required popup opens.
Enter the credentials of the AD Admin and then click OK.
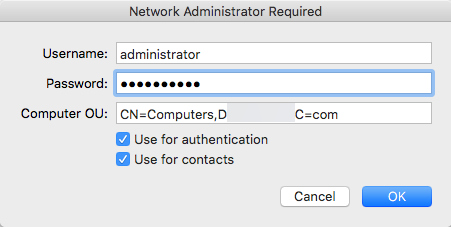
The popup closes. In the Users & Groups dialog, the name of the AD server is displayed as the Network Account Server, and a green LED indicates a successful connection.
Click the Lock icon to disable Edit mode.
The following issues, discovered during software testing, will not be resolved in version 4.4:
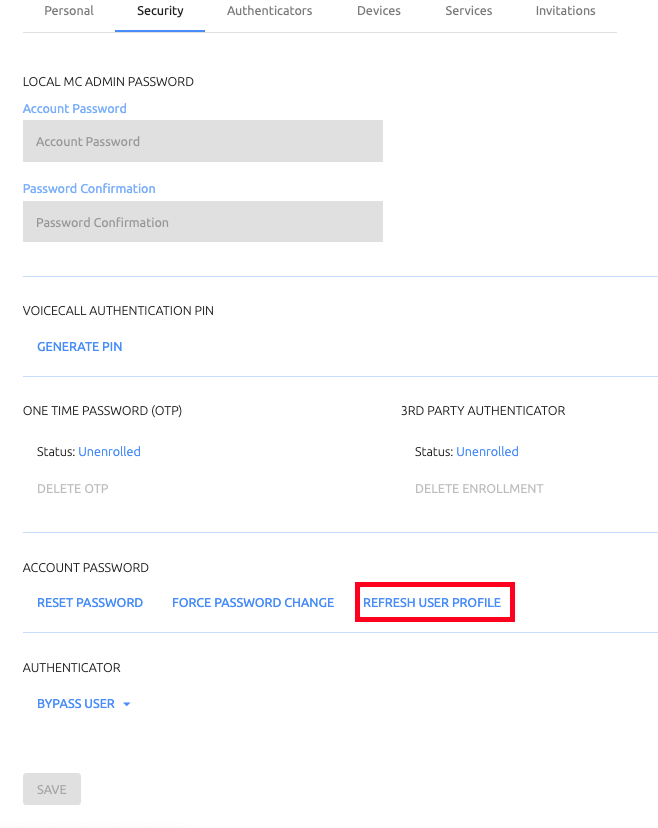
Refresh User Profile does not work for Local users: This option, in the Security tab of the user details in the Octopus Management Console, does not work properly on the Mac. Clicking Refresh User Profile deletes the password history and the correct local password will not be successfully retrieved to the Mac.
Mac users are advised not to use this option.
Jamf policy issues: In some cases when Jamf is installed on the Mac, Octopus Desk for Mac is unable to sync the password. Users may need to disable Jamf password policies in order to resolve this issue.
BLE issues: BLE authentication can be used to unlock the Mac, but does not work as expected for login.
sudo for Bypass users: A password is currently required for users in Bypass mode to run sudo.
Password sync failure related to multiple user accounts: Passwords do not automatically update when there is switching between accounts. Users need to lock and unlock the machine to initiate the password sync.
Post-upgrade FileVault issue: When FileVault was enabled in previous versions and a customized FileVault user is configured during upgrade, FileVault becomes deactivated and needs to be re-enabled after the upgrade.