Secret Double Octopus replaces passwords altogether with a high assurance, password-free authentication paradigm. Using the Secret Double Octopus Windows Credential Provider in conjunction with standard interfaces to Active Directory, the password-free solution seamlessly replaces AD passwords with a stronger, more secure alternative. As a result, the security posture of the AD domain is enhanced, user experience and productivity improve, and password management costs are dramatically lowered.
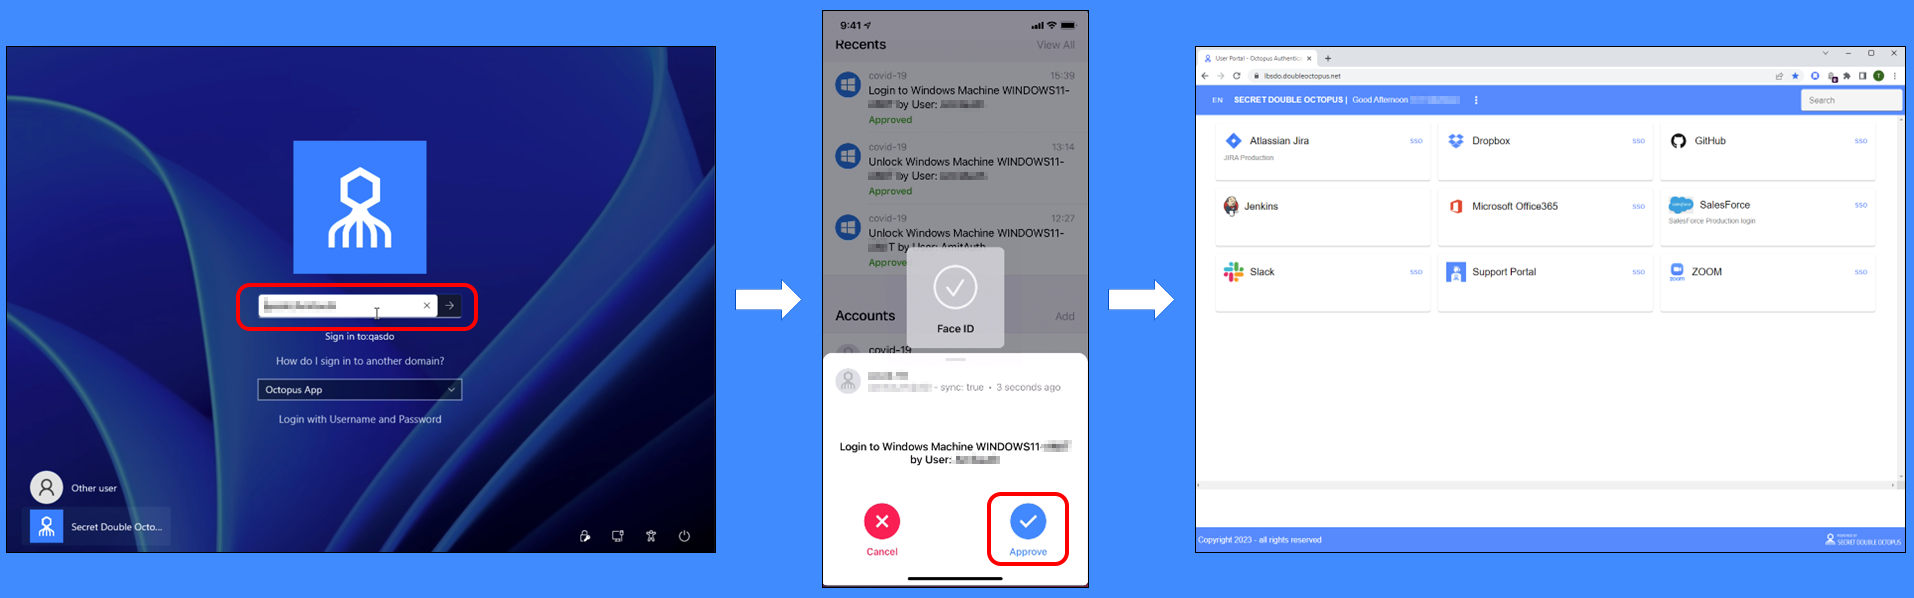
The standard flow for passwordless authentication to Windows via the Octopus Authenticator mobile app is summarized in the diagram below.
Before beginning installation, verify that:
Octopus Authentication Server v5.8.2 (or higher) is installed and operating with a valid enterprise certificate.
Please install (or upgrade to) the latest Server version before installing Octopus Desk for Windows.For Active Directory or Entra ID:
Your Corporate Active Directory Server or Entra ID Server is operating with Admin rights and an AD LDAP root certificate to establish a secure LDAPS connection.
Corporate domain Windows machines (user PCs) are available.
For other Directory types: Windows machines with local users are set to work with a non-AD directory (e.g., Okta, Oracle).
Enrolled users are assigned to use one or more authentication methods -- Octopus Authenticator, FIDO Authenticator, a 3rd party authenticator (e.g., PingID), or SMS / Email OTP from Twilio
Workstations support TPM version 2.0
The Octopus Desk for Windows MSI and MSIUpdater packages have been obtained from the Secret Double Octopus team
Visual C++ 2022 (or later) Redistributable (x64)/(x86) - 14.32.31332 is installed
Octopus Desk for Windows supports the ability to control availability of the Octopus Authentication credential provider after installation, allowing for gradual deployment of the solution within your organization. For more information, refer to Appendix C: Enabling / Disabling the Octopus Authentication CP Post-installation.
Octopus Desk for Windows supports Windows 10 and 11 and Windows Servers 2016, 2019 and 2022.
To enable installation of Octopus Desk for Windows, you need to create an Active Directory Authentication service in the Octopus Management Console, as described in the procedure below.
IMPORTANT: Before starting this procedure, verify that you have integrated your Corporate Active Directory (or third-party directory, e.g., Okta) with the Octopus Management Console. Refer to the Octopus Management Console Admin Guide for detailed instructions on integrating Active Directory and other directory types.
To create the Active Directory Authentication service:
From the Octopus Management Console, open the Services menu and click Add Service.
In the Active Directory Authentication tile, click Add.
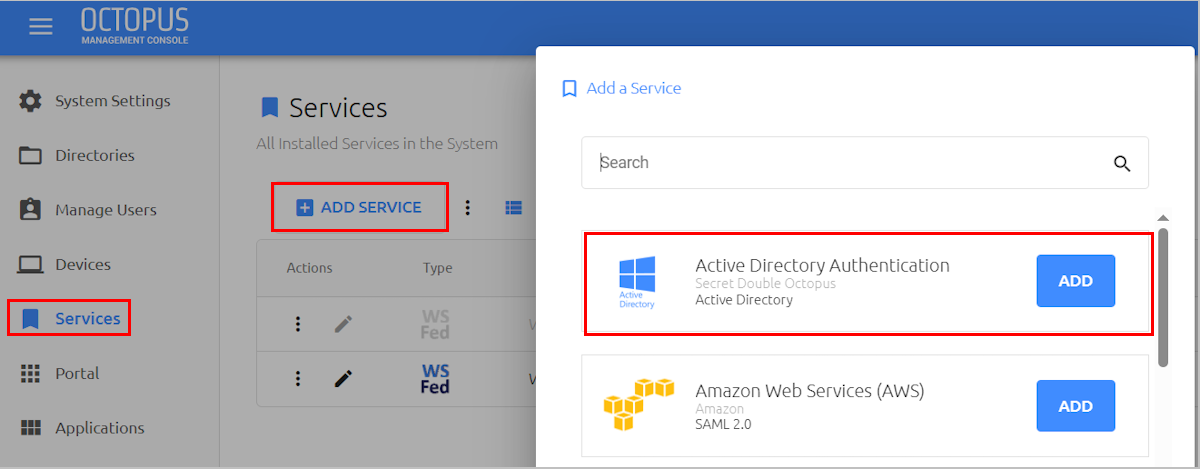
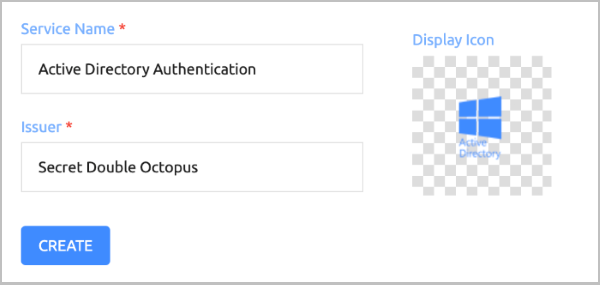
Then, in the dialog that opens, click Create.
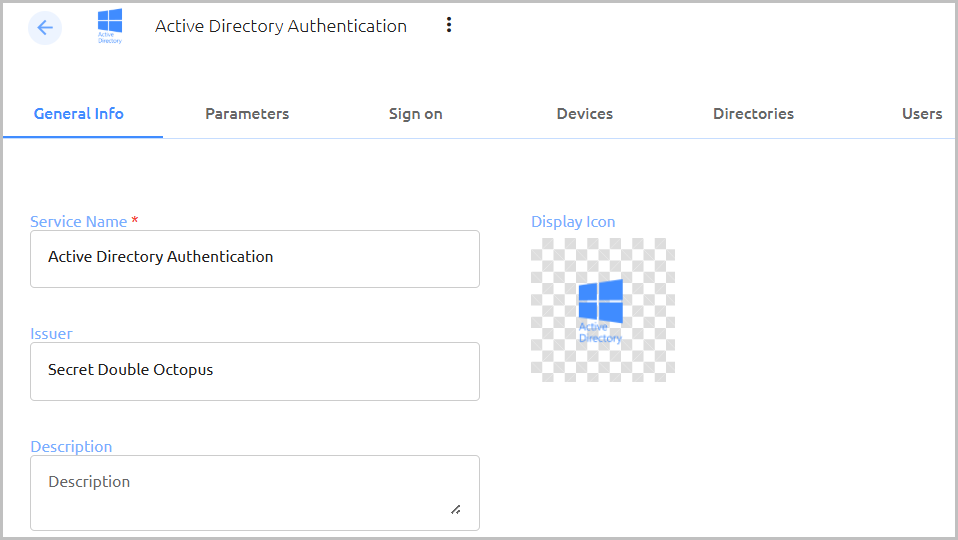
Review the settings in the General Info tab. If you make any changes, click Save.
Setting
Value / Notes
Service Name / Issuer
Change the default values if desired.
Description
Enter a brief note about the service if desired.
Display Icon
This icon will be displayed on the Login page for the service. To change the default icon, click and upload the JPG or PNG file of your choice. Supported image size is 128x128 pixels.
Open the Parameters tab. From the Login Identifier (formerly Octopus Authentication Login) dropdown list, select the credential type that will be sent by the user for the authentication (usually Username for AD and UPN for Entra ID).
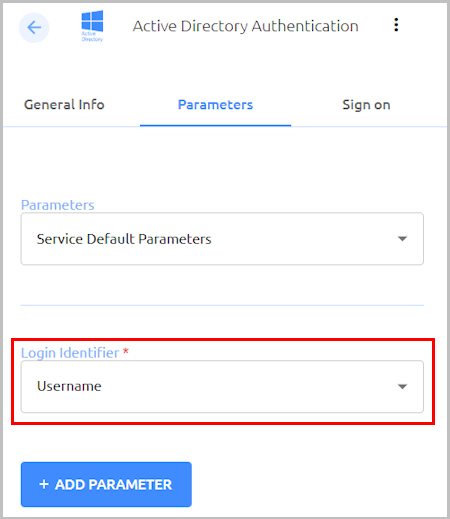
Then, click Save.
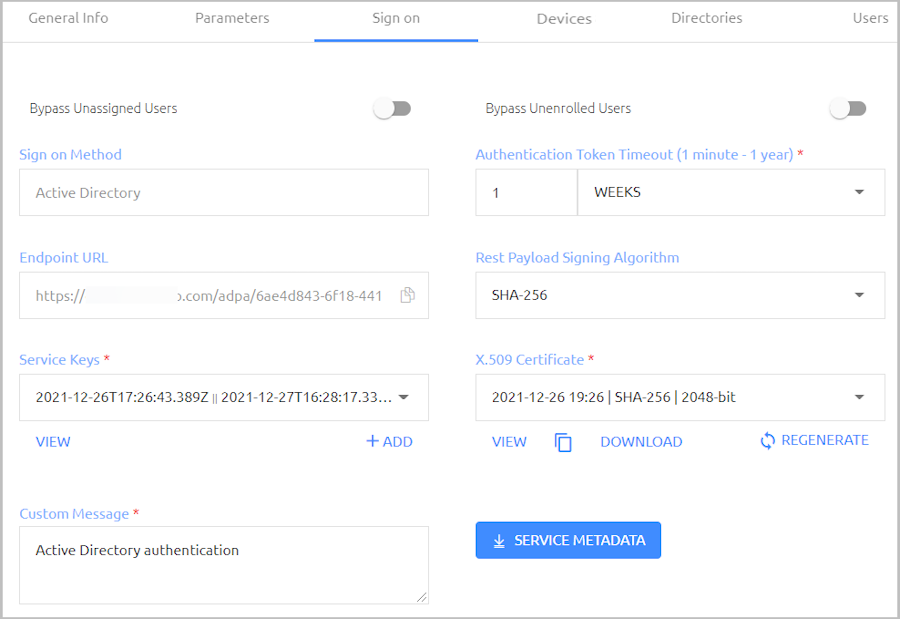
Open the Sign on tab and review / configure the following settings. If you make any changes, click Save.
Setting
Value / Notes
Bypass Unassigned Users
When enabled, users who are not assigned to the service will be allowed to login with username and password (without MFA). By default, this option is disabled. The option is usually used on a temporary basis only, during gradual rollouts of Octopus Authenticator.
Bypass Unenrolled Users
When enabled, users who are known to the system but have not yet enrolled a mobile device or workstation will be allowed to login with username and password (without MFA).
Sign on Method
The authentication method used for the service (not editable).
Endpoint URL
The access URL from the Windows client to the Octopus Authentication Server (not editable). Click the Copy icon to copy the value.
Service Key
Key used by the service to authenticate with Octopus Authenticator. Click View to display the content of the key in a popup window. The Copy icon in the popup lets you easily copy the content.
Custom Message
Message shown to the user on successful authentication.
Authentication Token Timeout
Time period after which the authentication token becomes invalid. The value can range from one minute to one year.
Rest Payload Signing Algorithm
Signature of the generated X.509 certificate. Select SHA-1 or SHA-256.
X.509 Certificate
The public certificate used to authenticate with Octopus Authenticator.
Click View to display the content of the certificate in a popup.
Click Download to download the certificate as a .PEM file.
Click Regenerate to replace the certificate. You will be prompted to select the signature algorithm and size before regenerating.
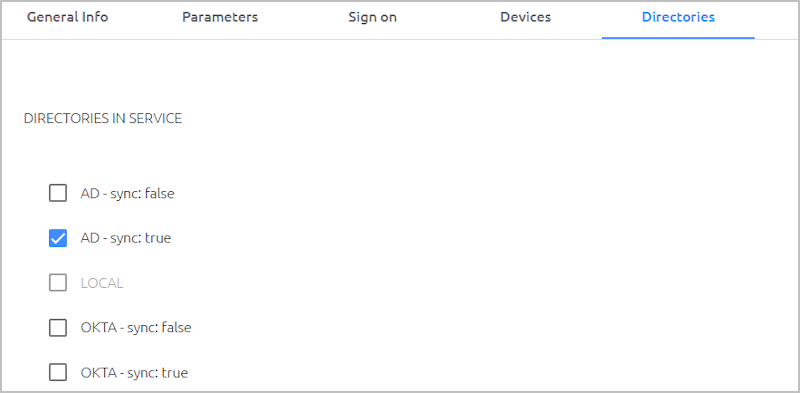
Open the Directories tab and select the directories that will be available for the service. Then, click Save.
Open the Users tab and click Add.
A popup opens, with a list of directories displayed on the left.
For each directory, select the groups and users to be added to the service. After making your selections, click Save (in the upper right corner) to close the dialog.
The groups and users you selected are listed in the Users tab.
From the toolbar at the top of the page, click PUBLISH and publish your changes.
Guidelines for VDI Installations
Octopus Desk for Windows supports authentication to VDI machines. It is strongly recommended to create a dedicated ADPA service for your VDI desktops.
Setting up support for VDI authentication varies according to the Octopus Authentication Server version you are working with:
- Version 6.8.6 and higher: In the Sign on tab of the ADPA service, enable the VDI setting and select the relevant assignment type.

- Versions lower than 6.8.6: In the Parameters tab of the ADPA service, add the vdiReuseMachine parameter.
For more details, refer to the Octopus Management Console Admin Guide.
Windows Client Installation with MSIUpdater
MSI is a tool that allows you to deploy Octopus Desk for Windows in a silent installation that can be pushed to all clients by IT. This installation type should be used for enterprise and other large-scale deployments.
The following sections present the actions required for a successful deployment with MSI:
The MSIUpdater client provides an update tool for basic MSI with the Corporate Octopus AD Authentication configuration. This enables MSI silent installation to corporate Windows clients.
MSIUpdater can run on any Windows client running the following versions: Windows 10, Windows 11 and Windows Server 2016, 2019 or 2022.
Before beginning, verify that all system requirements and prerequisites are met. For details, refer to Prerequisites.
To install the MSIUpdater client:
Run MSIUpdater.exe
If the Microsoft .NET Framework is not installed, an installer opens.
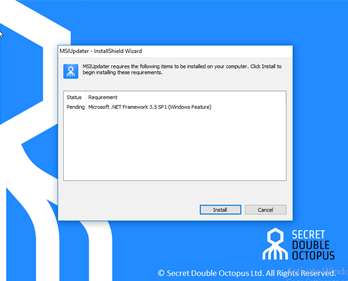
To launch the wizard, click Install.
On the Welcome page, click Next.
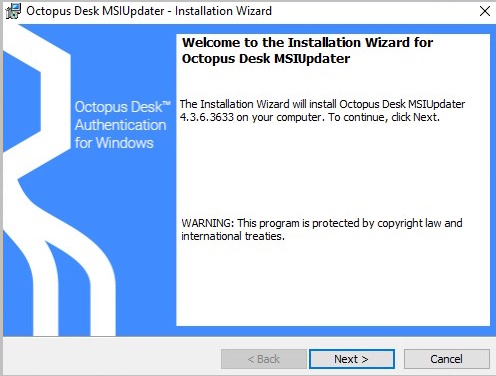
On the page that opens, accept the license agreement, and then click Next.
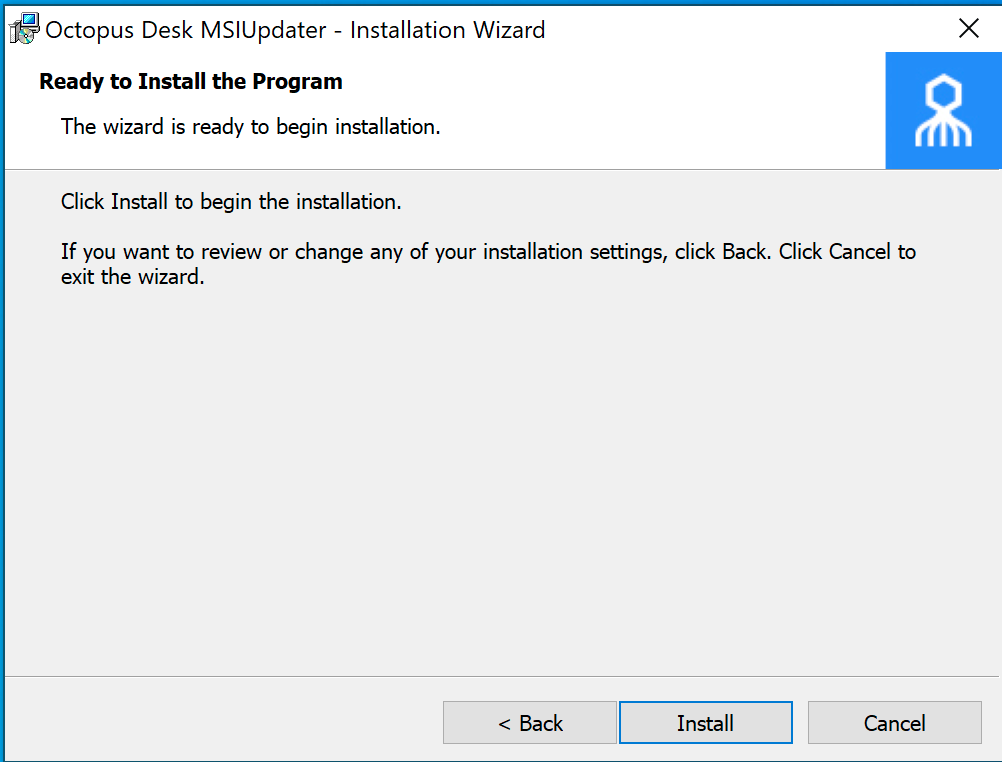
To start installation, click Install.
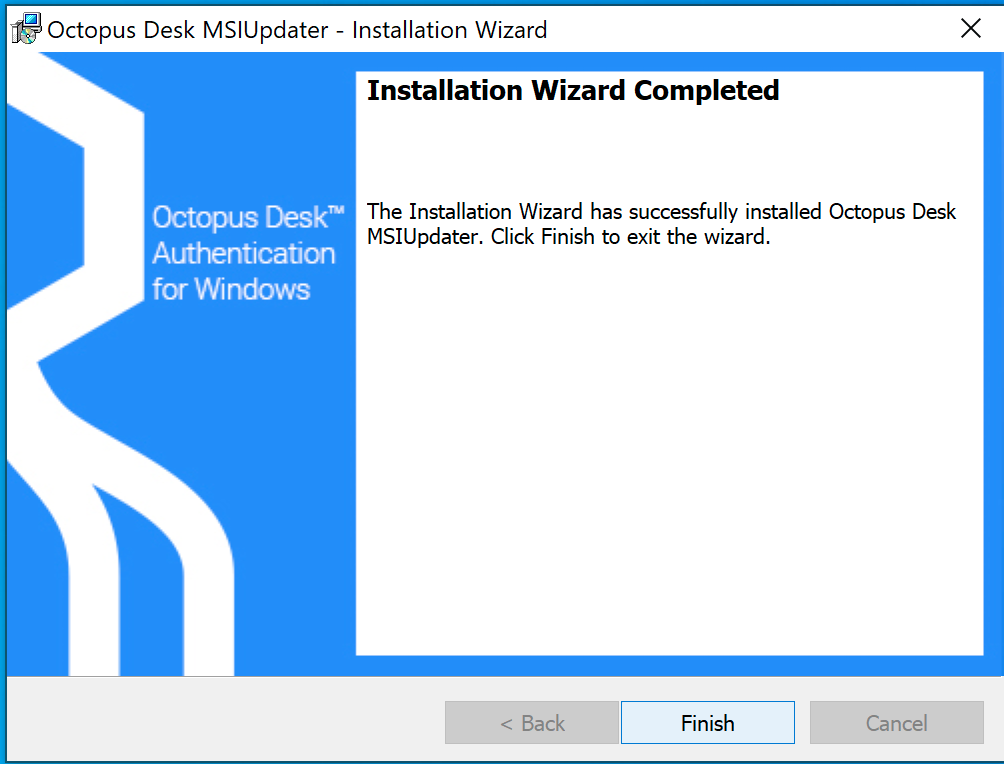
A confirmation is displayed when installation is complete.
To exit the wizard, click Finish.
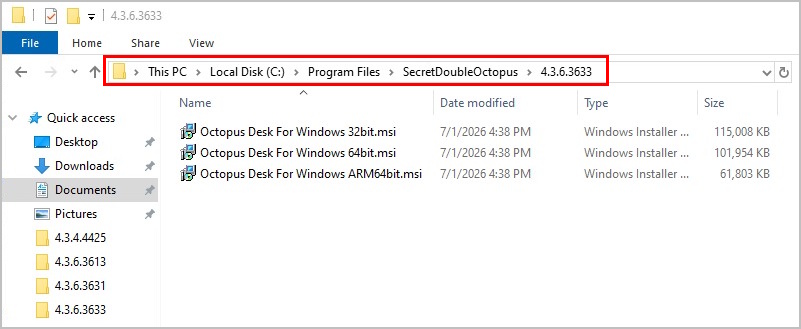
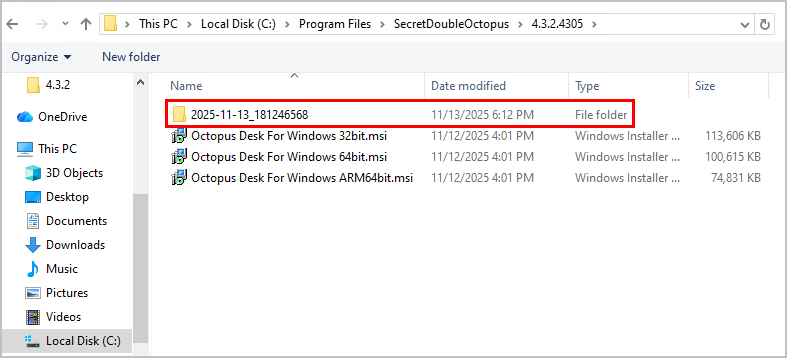
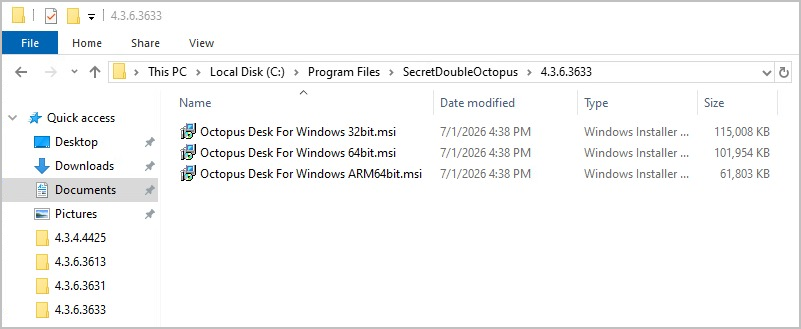
Upon successful installation, a folder named with the installed version number is created under C:\Program Files\SecretDoubleOctopus. This folder contains the Octopus Desk for Windows MSI files for 32-bit and 64-bit architecture.
When you quit the wizard, the MSIUpdater Client will auto launch, allowing you to configure the Octopus Desk for Windows.msi with the corporate Octopus Active Directory Authentication Sign-on details. For more information, refer to Configuring the MSIUpdater Client (below).
The MSIUpdater, which launches automatically after you quit the MSIUpdater installer, updates the Octopus Desk for Windows MSI file with the corporate Octopus Active Directory Authentication Sign-On details and allows you to configure various settings related to authentication and the Windows login experience.
Specifying the MSI Configuration
Octopus Desk for Windows supports the ability to create multiple MSI configurations for the same version. This allows you to deploy a customized configuration of Octopus Desk for different target groups. You can create as many configurations as you need, and then use the relevant configuration for each deployment.
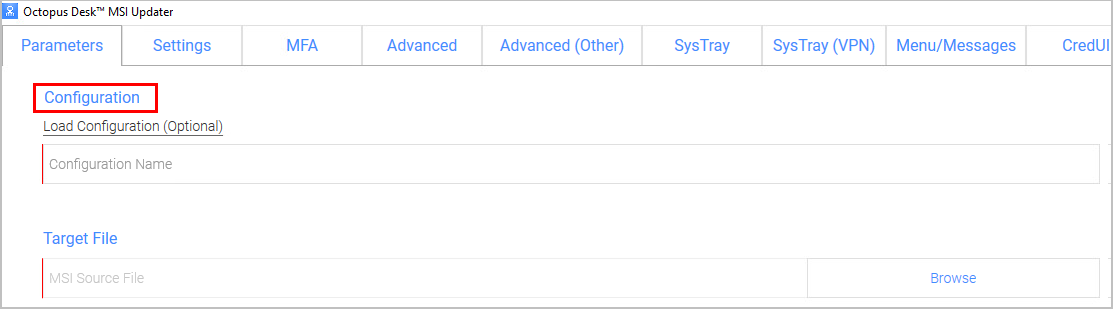
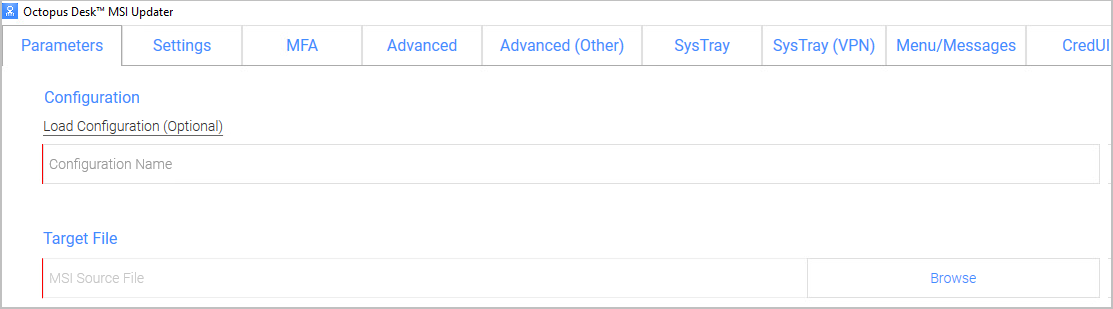
The MSI configuration is set in the Parameters tab of the MSIUpdater. When configuring MSIUpdater client settings for the first time, a name for the initial configuration needs to be entered in the Configuration Name field.
After setting the configuration and generating the updated MSI file (as explained in the procedure below), a new folder is created in the version installation folder. This folder is automatically named with the timestamp of its creation. For example:
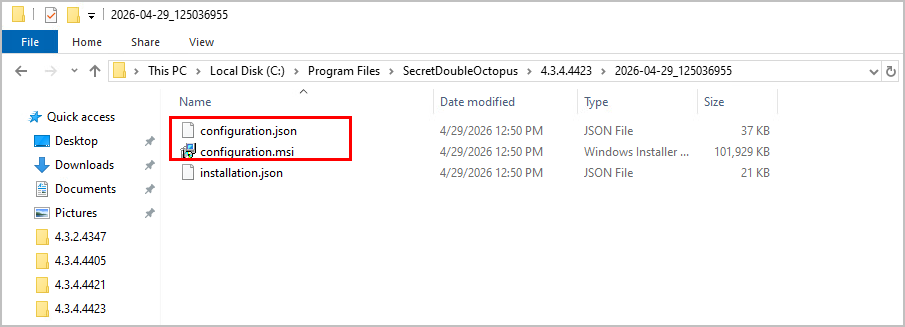
The timestamp folder contains the installation file as well as a JSON file that delineates the associated MSIUpdater configuration. Both files are named according to the Configuration Name that was entered in the Parameters tab of the MSIUpdater. For example:
To create additional configurations for the version, simply configure the MSIUpdater Client again with the required settings. If you need another configuration that is similar to one you've already created, you can click the Load Configuration link in the Parameters tab and then open the appropriate JSON file.
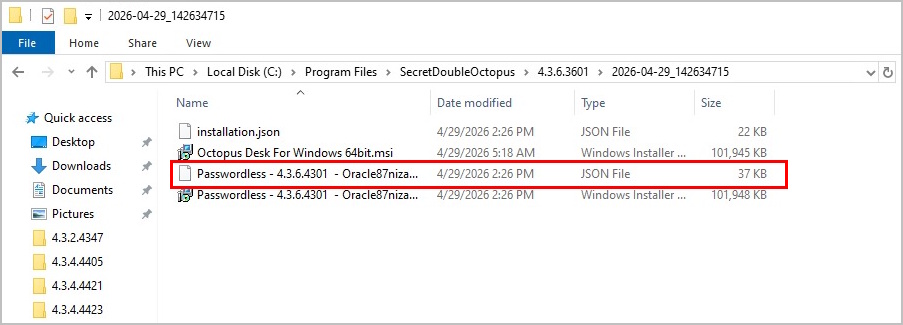
This loads the settings of the selected configuration into the MSIUpdater, so you can quickly make the required changes and generate the modified file. Each configuration you create is automatically saved in its own timestamped folder to maximize clarity and avoid errors.
Preparing Service Settings
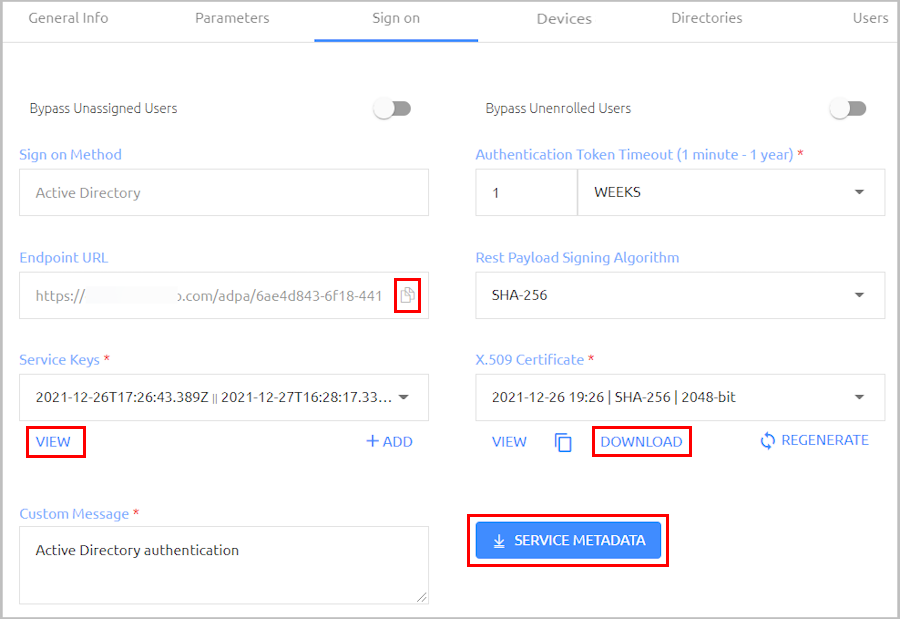
Before you begin working with the MSIUpdater, verify that you have access to the following elements. They can be copied or downloaded from the Sign on tab of the Active Directory Authentication service that you created in the Octopus Management Console.
Endpoint URL: Click the Copy icon to copy the URL.
Service Key: Click View. Then, in the popup that opens, click the Copy icon to copy the key.
X.509 Certificate: Click Download to download the cert.pem file.
Alternatively, you can download all the service metadata at once by clicking SERVICE METADATA. The metadata will be saved in the Metadata.xml file.
Creating the MSIUpdater Configuration
You are now ready to begin working with the MSIUpdater. Keep in mind that although the MSIUpdater tool can appear complicated, most of the options presented are not mandatory, and in general it is not necessary to change any of the default settings. The procedure below explains how to choose the settings required to set up the standard passwordless authentication flow. A few of the most commonly configured optional features are also presented. For details about the many additional options available, refer to Understanding MSIUpdater Advanced Settings.
To configure the MSIUpdater client:
At the top of the Parameters tab, under Configuration, enter a name for the new configuration. To
load settings of a saved configuration, click Load Configuration and select the relevant JSON file.
If the JSON file you select was created in an earlier version of Octopus Desk, you will be prompted to specify the source of the Systray and Error messages to be loaded into the MSIUpdater client. If you want to load messages from your previous configuration (e.g., that configuration contains translated or otherwise modified messages), click Yes. Message strings unique to the new version will be automatically added to the Menu/Messages and Errors tabs of the MSIUpdater, in the default language and syntax.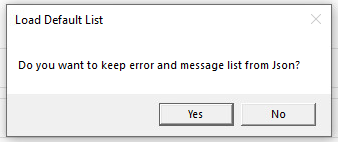
Under Target File, click Browse and then select the Octopus Desk for Windows MSI file to be updated (32bit or 64bit).
Under Parameters, configure the following mandatory parameters:
Setting
Value / Notes
EndPoint URL
The Endpoint URL copied from the Active Directory Authentication service.
Service Key
The Service Key copied from the Active Directory Authentication service.
X509 Certificate
Click Browse and select the downloaded X.509 certificate file.
Important: If you downloaded a Metadata.xml file from the Active Directory Authentication service, you can populate these settings automatically by clicking Load from XML. If the XML file contains a client certificate, the Certificate Endpoint URL field will also be populated.
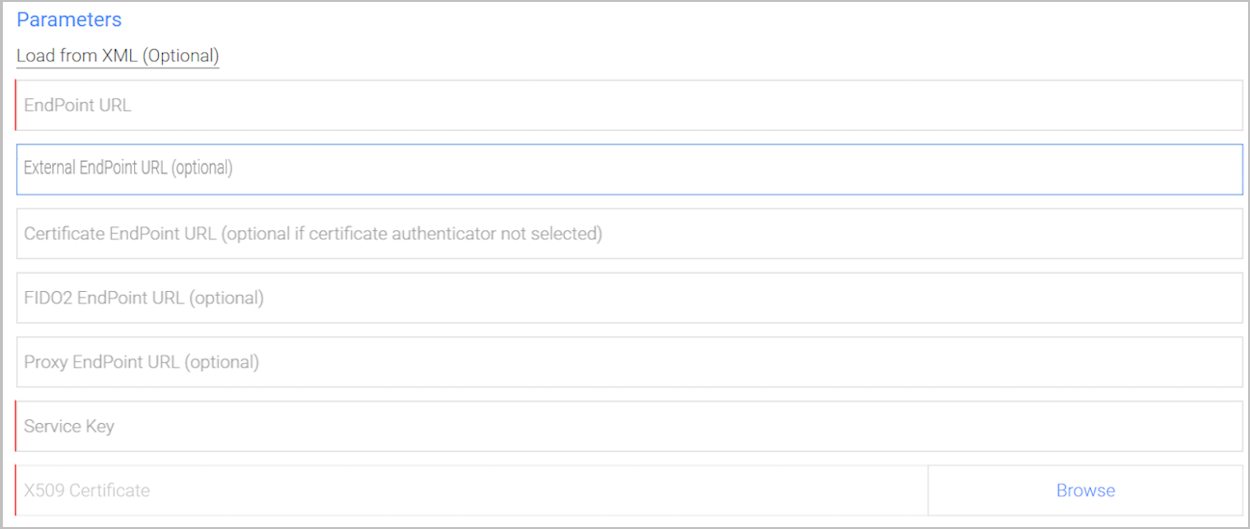
If relevant, enter the following optional parameter(s):
External EndPoint URL: Allows the Windows agent to access different URLs according to connection type (within the organization or outside of it). Enter the External Endpoint URL in the field.
Certificate EndPoint URL: Allows the Windows agent to access client certificates (relevant for smart card authentication). Enter the full address of the load balancer where your root certificate is stored, followed by the listening port.
FIDO2 EndPoint URL: Allows the Windows agent to access an alternate URL for FIDO enrollment.
Proxy EndPoint URL: Allows the Windows agent to connect via web proxy. You can use a static or dynamic proxy.
Static proxy: Enter the address of the proxy server in the field.
Dynamic proxy: Enter the full address of the location where your proxy configuration file (proxy.pac, wpad.dat, etc.) is stored, followed by the listening port.
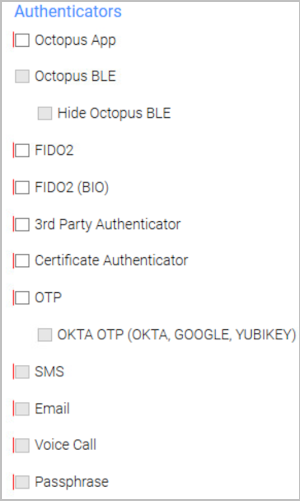
At the bottom of the Parameters tab, select at least one authenticator. The most commonly used authenticators are Octopus App and FIDO2 / FIDO2 (BIO).
Note: To enable the SMS, Email, Voice Call and Passphrase options, open the MFA tab of the MSIUpdater and select the Enable Multi-Factor Authentication checkbox.Authenticator
Description / Notes
Octopus App
Octopus Authenticator mobile app (iOS/Android)
Octopus BLE
Select this checkbox to enable Octopus Bluetooth authentication. (Octopus App must be selected to enable this option.)
If you do not the BLE options to be displayed on the Windows Login screen, select the Hide Octopus BLE checkbox.FIDO2
FIDO authenticator from Yubico or Feitian
FIDO2 (BIO)
FIDO authenticator with biometric fingerprint
IMPORTANT: Select this checkbox to support performance of Systray actions using Windows Hello.
3rd Party Authenticator
Select this checkbox to enable login to Windows using third party authentication. (It is not necessary to select specific authenticators.)
Certificate Authenticator Select this checkbox to enable authentication using smart cards signed by your organization's root Certificate Authority (CA).
NOTE: This feature requires configuration of relevant settings in the Octopus Management Console.
OTP
Select this checkbox to enable authentication with hardware OTP tokens, ForgeRock OTP or Octopus-generated OTP.
To enable authentication with Okta OTP, select the OKTA OTP checkbox in addition to the OTP checkbox. This option enables use of OTP with Okta Verify, Google Authenticator, and YubiKey.
SMS
Select this checkbox to enable authentication with OTP over SMS.
Email
Select this checkbox to enable authentication with OTP over email.
Voice Call
Select this checkbox to enable two-factor authentication over voicecall.
Passphrase
Select this checkbox to enable two-factor authentication with a user-selected passphrase.
Important: If you configured an External Endpoint URL (in Step 2), users will need to enroll FIDO devices using the internal URL only. Following enrollment, they may authenticate using either the internal or external URL.
If desired, configure single sign-on to the User Portal:
At the top of the Advanced tab, select the Enable SDO SSO checkbox. Then, enter the URL of the User Portal in the field to the right.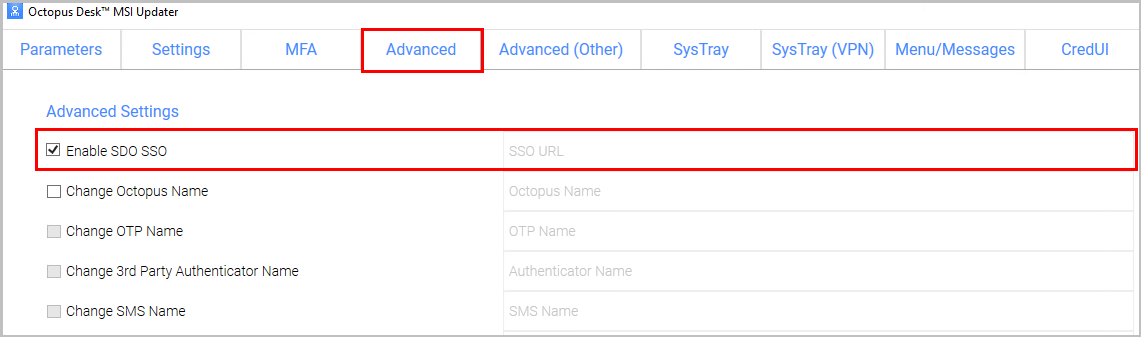
In runtime, the portal will open in the default browser. Users will be automatically logged in and be able to view all assigned services.Optionally, use the features of the Advanced (Other) tab to customize the Windows login experience by replacing the default logo and icons with your own images.
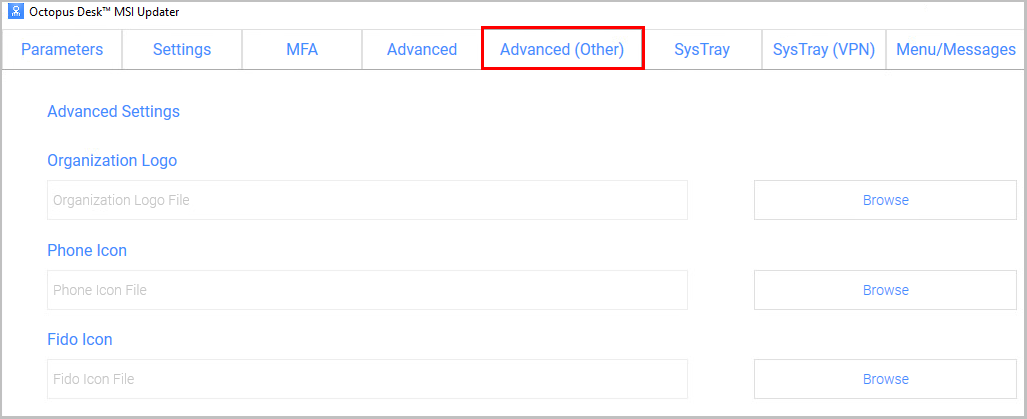
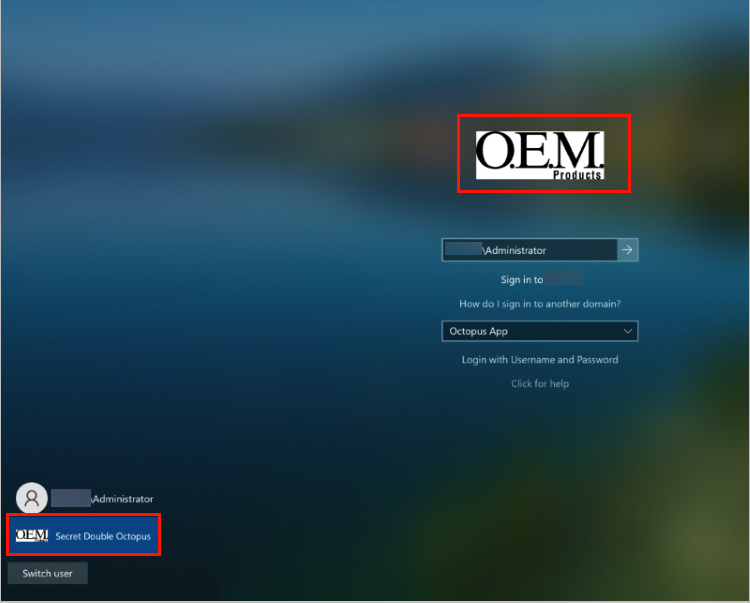
IMPORTANT: The images must be 448x448, in 24-bit BMP format. For Windows Servers, the images must be 448x448, in 16-bit BMP format.The following options are available:
Organization Logo: Displays your company’s logo on the Windows Login screen instead of the default Secret Double Octopus logo. For example:
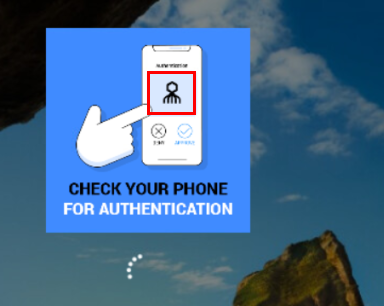
Phone Icon: Displays the icon of your choice on the Check Your Phone prompt instead of the default Secret Double Octopus icon.
Fido Icon: Displays the icon of your choice on the prompt to touch the Fido key.
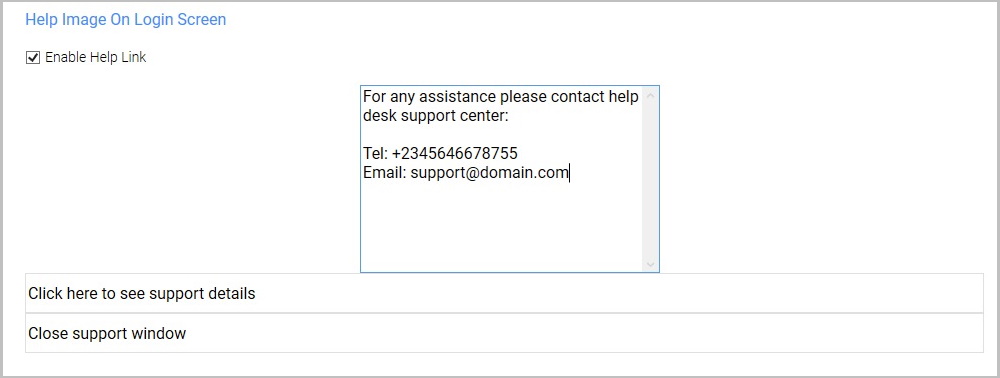
To display support resources on the Windows Login screen, select the Enable Help Link checkbox. Then complete the following free text fields:
Help Message: Instructions about how to obtain assistance
Open Help Message Text: Prompt for showing the Help Message
Close Help Message Text: Prompt for hiding the Help Message
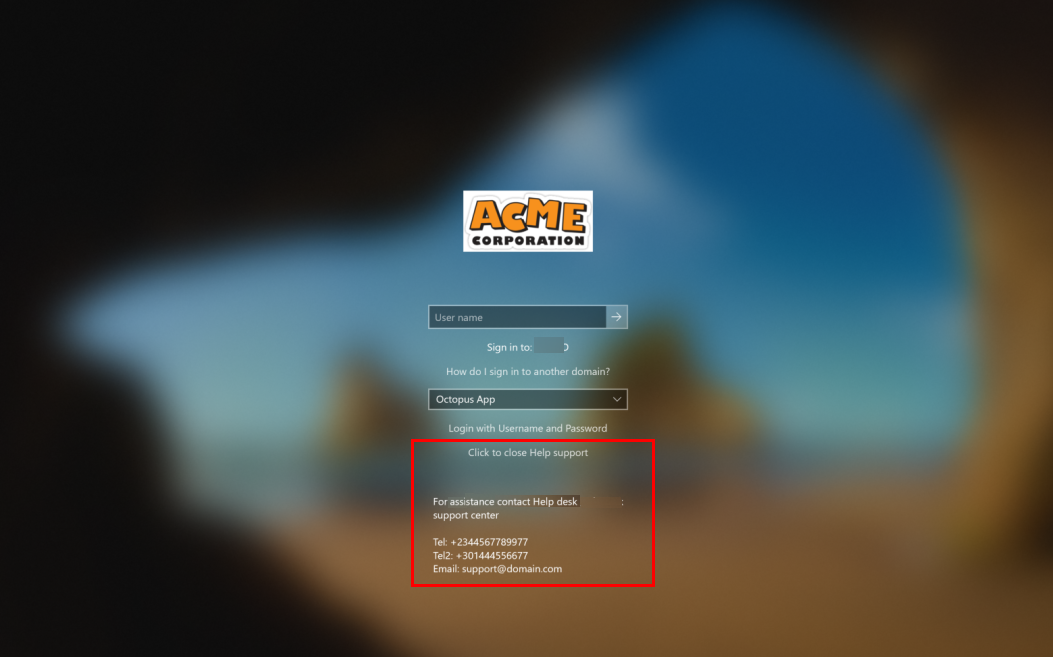
For example:
In runtime, users will be able to open, view and close the Help Message.
If desired, configure the ability for users to copy the AD password from the Windows systray:
At the top of the SysTray tab, select the Enable SysTray checkbox AND the Retrieve Password with SDO Authenticator/Admin Bypass Token checkbox.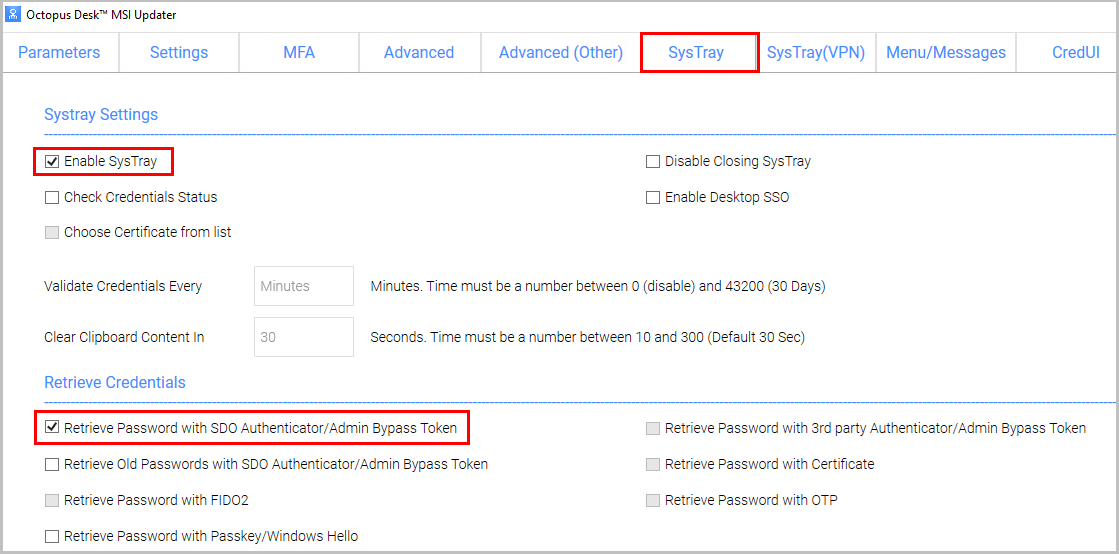
In runtime, users will be able to view and copy the AD password after performing authentication on the Octopus Authenticator mobile app. Admin users in Bypass mode will need to enter the temporary token to retrieve the password. (For more information about Bypass mode, refer to the Octopus Management Console Admin Guide.)IMPORTANT: If you enable the systray, it is strongly recommended to follow the best practice of disabling Microsoft Office Clipboard to prevent sensitive data from being exposed.
Select the Errors tab. At the bottom of the tab, click Apply.
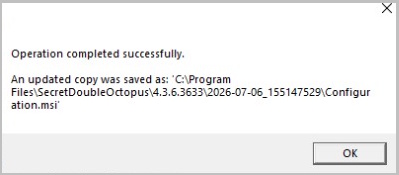
A new JSON file and MSI file are created and stored in a folder named with the timestamp of creation.
The files are named according to the Configuration Name assigned in the MSIUpdater. (In the
example below, the name is Monitor Prefix.) Verification messages are displayed upon creation of
each of these files. Click OK to close the popups.
Troubleshooting Tips
- If one or more mandatory settings are missing from the MSIUpdater client, the Apply button will be disabled. Hover over the button to view a list of the missing settings. For example:
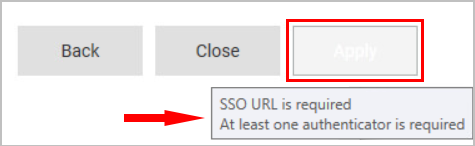
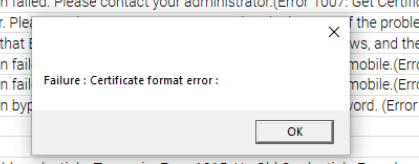
After correcting the settings, the Apply button is enabled, and a No errors tooltip is displayed. - If you receive a Certificate Format error (as shown below), download the service metadata again using any browser except Firefox. If the error continues to be generated, please contact our support team.
Understanding MSIUpdater Advanced Settings
The MSIUpdater client offers a very extensive selection of options for configuring and controlling various aspects of the authentication flow. However, the vast majority of these options are not mandatory, and some are not even relevant for most customers (as they were designed to accommodate specific organizational requirements). The following sections (organized according to the tabs of the MSIUpdater tool) can be used as a reference to familiarize yourself with the optional features provided in the MSIUpdater. For more information about any feature, please reach out to Secret Double Octopus support.
Settings Tab
This tab contains numerous options, mostly relating to login flow, security features and troubleshooting. Enable the settings as required by selecting the relevant checkboxes.
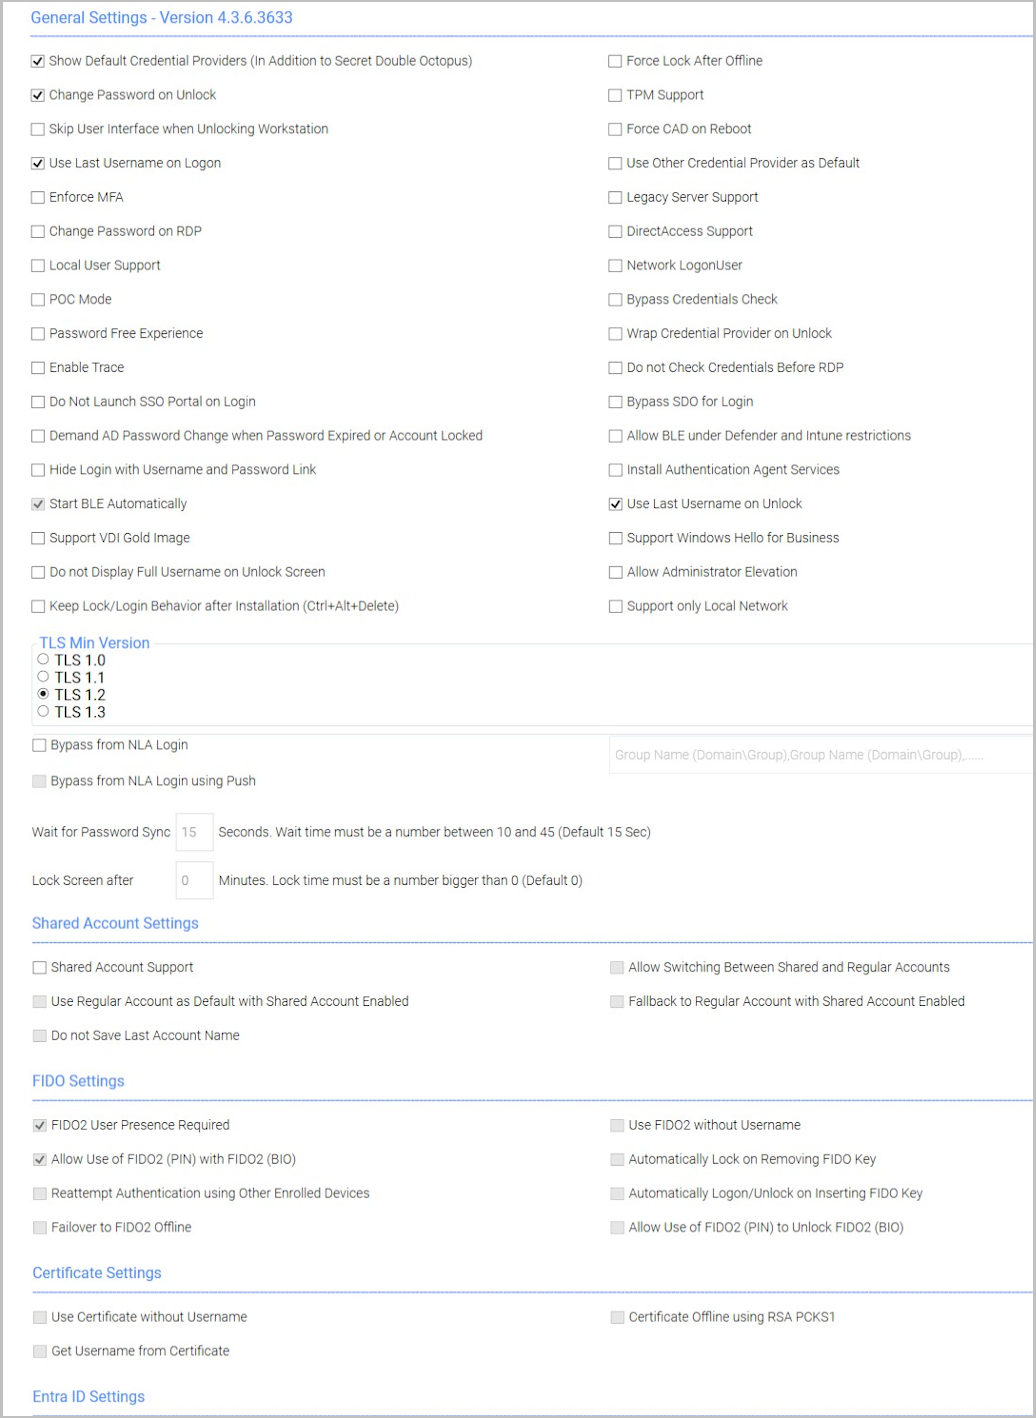
For convenience, settings are divided into relevant categories. The settings are:
Setting | Description / Notes |
| General Settings | |
Show Default Credential Providers | Determines whether Windows default credential providers (Windows and Active Directory) are displayed when logging into Windows. |
Change Password on Unlock | When selected, password changes are allowed on Unlock as well as on Login to the workstation. This option is relevant for Passwordless only. |
Skip User Interface when Unlocking Workstation | Determines whether there is Auto Login for AD users from the Lock screen. When the setting is enabled, AD users receive a push notification from Octopus, ForgeRock or Okta Authenticators immediately after pressing <Ctrl> <Alt> <Del>. |
Use Last Username on Logon | When selected, the username of the user who logged in most recently is saved and automatically presented for the next login. |
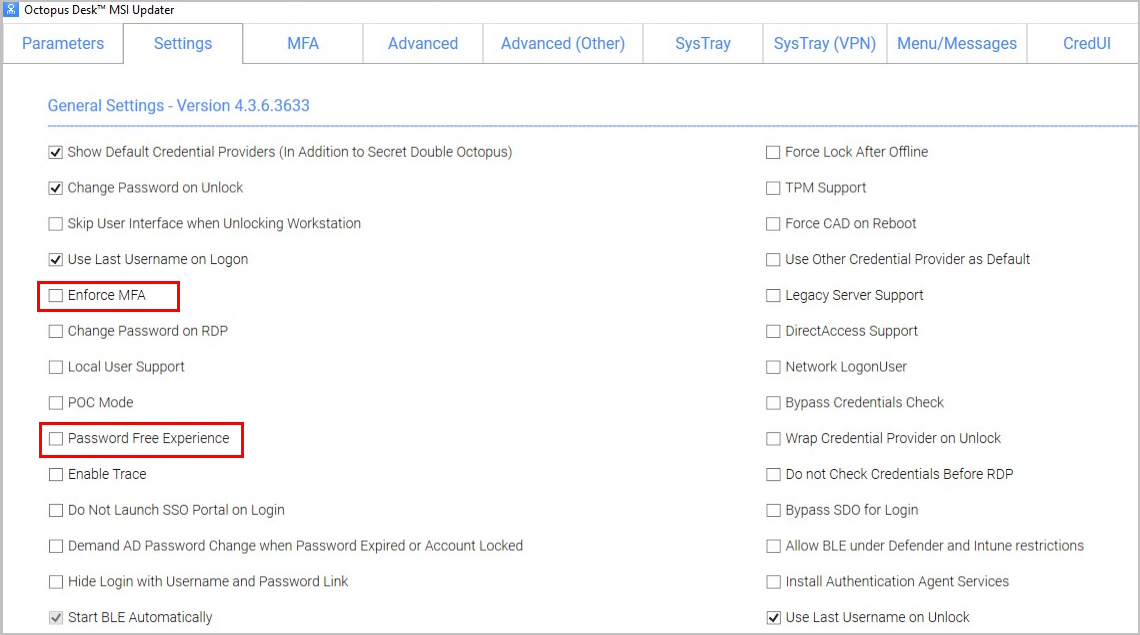
Enforce MFA | When selected, users must authenticate with mobile (2nd factor) when using domain username and password. This setting is relevant for users with Octopus, ForgeRock or OKTA authenticators only (not FIDO). |
Change Password on RDP | When selected, password changes on RDP sessions are allowed. This option, which is relevant for Passwordless only, is used mainly for admin users using RDP sessions that do not login to Windows machines. |
Local User Support | When selected, Octopus Desk for Windows will be enabled for Local users and will verify that the Local user matches the mapping with Octopus Authentication Server user. Note: This setting is relevant for non-domain users only. |
POC Mode | When selected, Octopus Desk for Windows will not check the certificate with the server. This setting is used mainly for POC, when using a self-signed certificate on the Octopus Authentication Server. |
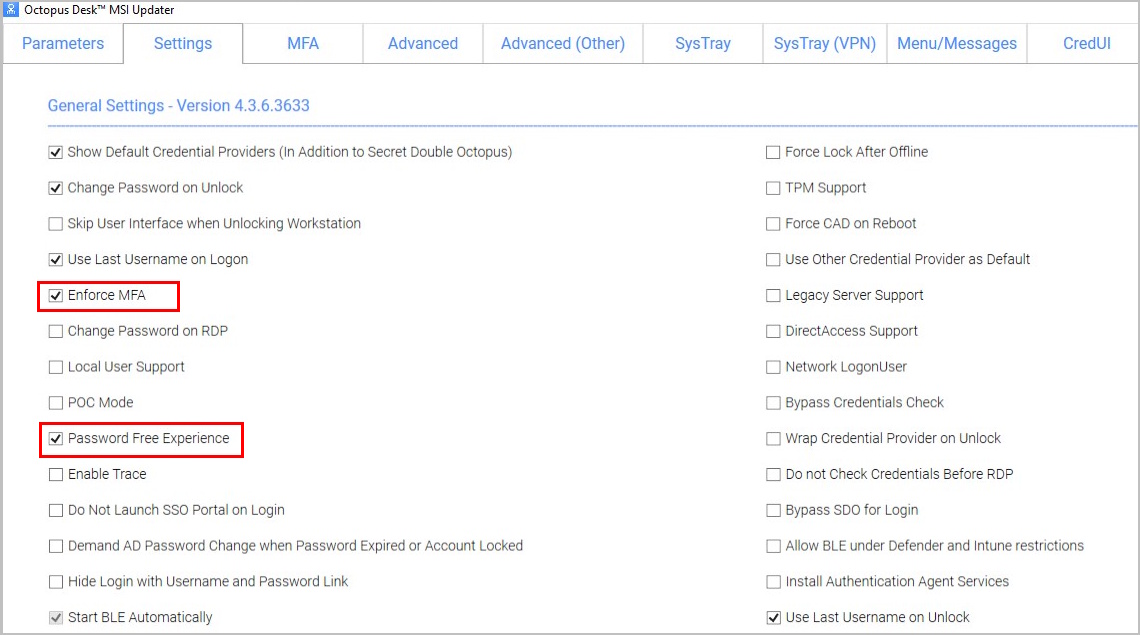
Password Free Experience | Select this checkbox to enable a Passwordless authentication experience for MFA users. When selected, users are required to provide a password for the first authentication. Subsequent authentications will be Passwordless, until the password is changed. Note: To use this feature, the Enforce MFA checkbox must also be selected. For more details about this feature and its configuration, refer to Enabling the Password Free Experience. |
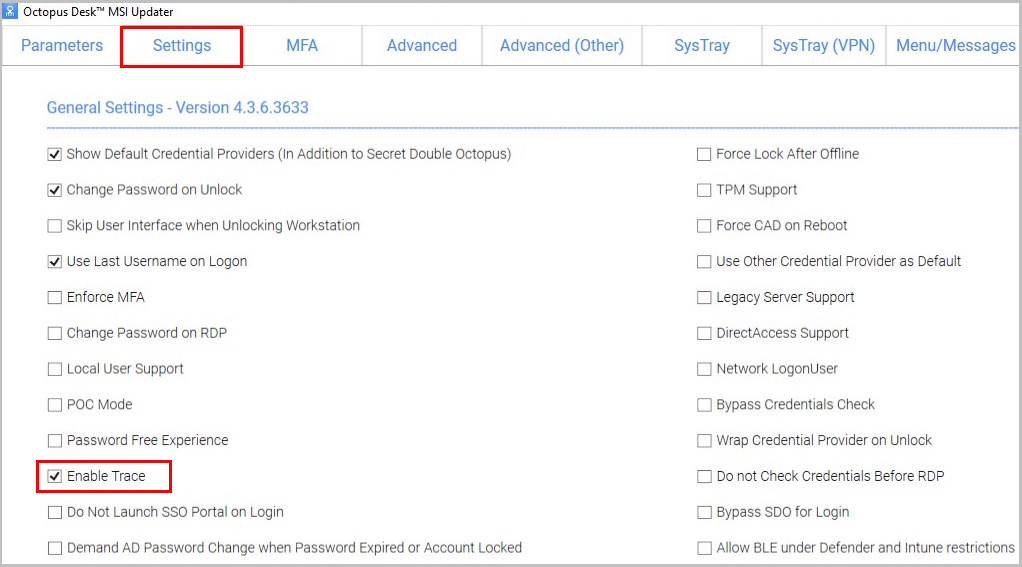
| Enable Trace | Select this checkbox to enable the logs by default immediately after installation. |
| Do Not Launch SSO Portal on Login | When selected, the User Portal is not automatically opened after login. |
Demand AD Password Change when Password Expired or Account Locked | When selected, the Octopus Agent sends a password reset request to the Octopus Authentication Server if the password has expired / is due to expire, or if the user's account is locked. The user must then approve an additional strong authentication request in order to successfully login. Important: This feature requires that the Automatic Password Sync toggle in the settings of the relevant directory in the Octopus Management Console be enabled. (This toggle is enabled by default.) |
| Hide Login with Username and Password Link | When selected, the Login with Username and Password option does not appear on the Windows Login screen. |
| Start BLE Automatically | In default system operation, BLE on the workstation starts upon a BLE login attempt, even when BLE was previously turned off by the user. To prevent BLE from starting under these circumstances, make sure that the Start BLE Automatically checkbox is cleared. |
| Support VDI Gold Image | Select this checkbox to enable deployment of Octopus Desk when utilizing a VDI golden image. |
| Do not Display Full Username on Unlock Screen | When selected, the full name of the Login User is hidden on the Unlock screen. |
| Keep Lock/Login Behavior after Installation | When selected, the configured Lock / Login screen behavior (CTRL+ALT+DEL vs. mouse click / key touch) is retained after installation of Octopus Desk. |
| TLS Min Version | The default selection is TLS 1.2. Select TLS 1.3 to enforce a higher level of security. Note that if you select TLS 1.3, users will not be able to authentication to workstations running versions lower than 1.3. |
| Bypass from NLA Login | When selected, users who are members of the Bypass Group(s) will not require authentication when using NLA login. For more information, refer to Configuring NLA Login Bypass (below the table). |
| Bypass from NLA Login Using Push | This setting is available when the Bypass from NLA Login checkbox is selected. When selected, members of the Bypass Group(s) will not be presented with the Login screen, but they will need to authenticate via push notification. |
| Wait for Password Sync | This setting is relevant when the Octopus Agent detects a password mismatch and sends a password reset request to the Octopus Authentication Server. The setting determines how many seconds the Agent waits before sending a second request to the Server in the event that no response is received. If the second request also receives no response, no additional requests are sent and authentication fails. |
| Force Lock After Offline | When selected, workstations of users working offline are automatically locked when they go back online, to force users to perform online authentication. |
| TPM Support | If TPM 2.0 is enabled, selecting this option allows TPM to store the private key for BLE password encryption. |
| Force CAD on Reboot | When selected, users must press Ctrl + Alt + Del upon system reboot only. In other scenarios (e.g., to unlock the machine), the CAD action is done automatically. |
| Use Other Credential Provider as Default | When selected, the standard Windows credential provider is displayed on the Login screen as the default authentication option. |
| Legacy Server Support | Select this checkbox only when recommended by the Octopus support team, to enable backward compatibility with Octopus Authentication Server version 5.4.4. |
| DirectAccess Support | Select this checkbox to enable support of the DirectAccess VPN. |
| Network LogonUser | Select this checkbox to use an alternate Windows API in certain rare circumstances. (Contact the support team for details.) |
| Bypass Credentials Check | When selected, an alternate Windows API will be used in the event of rare timeout issues in Password-free mode. |
| Wrap Check Point Credential Provider | Select this checkbox to enable Octopus Authenticator to work together with the Check Point Full Disk Encryption credential provider. |
| Do not Check Credentials Before RDP | This setting is relevant for handling Event Viewer issues on very specific workstations. Select the checkbox only when recommended by the Octopus support team. |
| Bypass SDO for Login | When selected, the Octopus Authenticator option is hidden on the Windows Login screen. (Only the default credential provider is displayed.) |
| Allow BLE under Defender and Intune restrictions | When selected, Windows Defender and Microsoft Intune are automatically configured to allow BLE. |
| Use Last Username on Unlock | When selected (default setting), the username of the user who logged in most recently is automatically presented on the Unlock screen and cannot be changed to a different user. If the checkbox is cleared, the functionality is set according to default Microsoft behavior. |
| Support Windows Hello for Business | When selected, users are able to perform various Systray actions using the Windows Hello sign-in configured for their workstations. For details, refer to Configuring Windows Hello Support for Systray Actions. |
| Allow Administrator Elevation | When selected, users belonging to designated groups are able to get temporary Admin privileges to perform specific operations on a workstation. The groups are specified in the settings of the Active Directory Authentication service, in the Octopus Management Console. This feature is supported for Authentication Server version 6.8.2 and higher. For more details, refer to the Octopus Management Console Admin Guide. |
| Support only Local Network | This setting enables deployment of Octopus Desk to workstations that are not part of an AD domain and do not have access to the internet. (In this configuration, the Authentication Server is installed on a local network.) Select this option only if your workstations are required to operate within a specific internal network. |
| Shared Account Settings | |
| Shared Account Support | When selected, the Windows Agent is able to handle authentication of multiple users to a single generic shared account. This configuration is useful when groups of personnel (such as IT, DevOps, manufacturing floor workers, etc.) use a shared workstation. For more details about this feature and its setup, refer to Enabling Shared Account Login. |
| Allow Switching Between Shared and Regular Accounts | When selected, the Windows Login screen will support both the shared account login flow and the standard authentication flow (to a non-shared account). This setting is enabled only when the Shared Account Support checkbox is selected. |
| Use Regular Account as Default in Shared Account Enabled | When selected, the standard authentication flow (to a non-shared account) is displayed on the Windows Login screen initially by default. However, , if the last login / unlock was to a shared account, the shared account login flow continues to be displayed for the next login / unlock, unless the Fallback to Regular Account with Shared Account Enabled checkbox is also selected. |
| Fallback to Regular Account with Shared Account Enabled | When selected, the Windows Login display always returns to the standard (regular account) login flow, even when the last login / unlock was to a shared account. Note that the initial display will show the shared account flow, unless the Use Regular Account as Default in Shared Account Enabled checkbox is also selected. IMPORTANT: Fallback behavior is activated by clicking the Remove Shared Account link. (The link needs to be clicked only once to enable regular account fallback.) If you want the standard login flow to always be displayed, we recommend selecting all the checkboxes in the Shared Account Settings. |
| Do not Save Last Account Name | When selected, the username of the guest user who most recently accessed the shared account will be hidden on the Login and Unlock screens. (Guest users will need to enter a username every time they access the account.) |
| FIDO Settings | |
| FIDO2 User Presence Required | When selected (default setting) , FIDO2 users are required to touch the token after entering their PIN. To disable this requirement, verify that the checkbox is NOT selected. The checkbox is enabled only when the FIDO2 authenticator is selected in the Parameters tab. NOTE: This feature requires configuration of relevant settings in the Octopus Management Console. |
| Allow Use of FIDO2 (PIN) with FIDO2 (BIO) | By default, if fingerprint identification fails for three consecutive attempts, users are prompted to authenticate using a PIN code. If you do not want the PIN option to be presented after biometric failure, make sure this checkbox is NOT selected. |
| Use FIDO2 without Username | When selected, users authenticating with an enrolled FIDO token will be able to perform login without entering a username. |
| Automatically Lock on Removing FIDO Key | When selected, the workstation becomes locked when the FIDO token used for the most recent login or unlock is taken out or dislodged. If a FIDO key not used for the last login / unlock is removed, or if the last login / unlock was done with an authentication method other than FIDO, the workstation will not be locked. |
| Automatically Logon/Unlock on Inserting FIDO Key | When selected and a FIDO token is inserted, the CTRL + ALT + DEL flow is skipped, and users are immediately prompted to use the FIDO key to unlock the workstation. IMPORTANT: The flow described takes place only when the most recent login was done using FIDO authentication. If a different method was used for the last login, the CTRL + ALT + DEL flow is skipped and users then need to choose an option from the list of authentication methods. |
| Reattempt authentication using other enrolled devices | When selected, and the inserted token fails authentication, the system automatically tries to authenticate against additional keys with which the user is enrolled. |
| Allow Use of FIDO2 (PIN) to unlock FIDO2 (BIO) | When selected, a PIN code can be used to unlock a FIDO key that automatically locks after three consecutive failed fingerprint identification attempts. This setting can be selected only when Allow Use of FID02 (PIN) with FID02 (BIO) is selected. |
| Certificate Settings | |
| Use Certificate without Username | When selected, users authenticating with an integrated smart card will be able to perform login without entering a username. |
| Get Username from Certificate | When selected, the Username field on the Login screen is populated automatically with the username associated with a selected certificate (relevant for shared accounts). |
| Certificate Offline using RSA PCKS1 | This setting is required for certain smart card configurations. Select the checkbox when advised by the Secret Double Octopus support team. |
| Entra ID Settings | |
| Entra ID Joined Machine | Select this checkbox when the workstations are configured to connect with the Entra ID domain. When the setting is selected, users will be prompted to login with UPN and not Username. |
| Support AD joined RDP on Entra ID joined | When selected, Entra ID joined machines are able to connect to RDPs outside of the Entra ID domain. This setting is enabled only when the Entra ID Joined Machine checkbox is selected. |
Configuring NLA Login Bypass
When the Bypass from NLA Login checkbox is selected, users who are members of the specified bypass group(s) will not be required to authenticate when establishing a remote session. If the second checkbox is selected as well, members of the bypass group(s) will need to authenticate via push notification, but they will not need to enter credentials on a Login screen.

To configure NLA login bypass:
Select the Bypass from NLA Login checkbox, and enter the group name(s) in the required syntax in the field to the right.
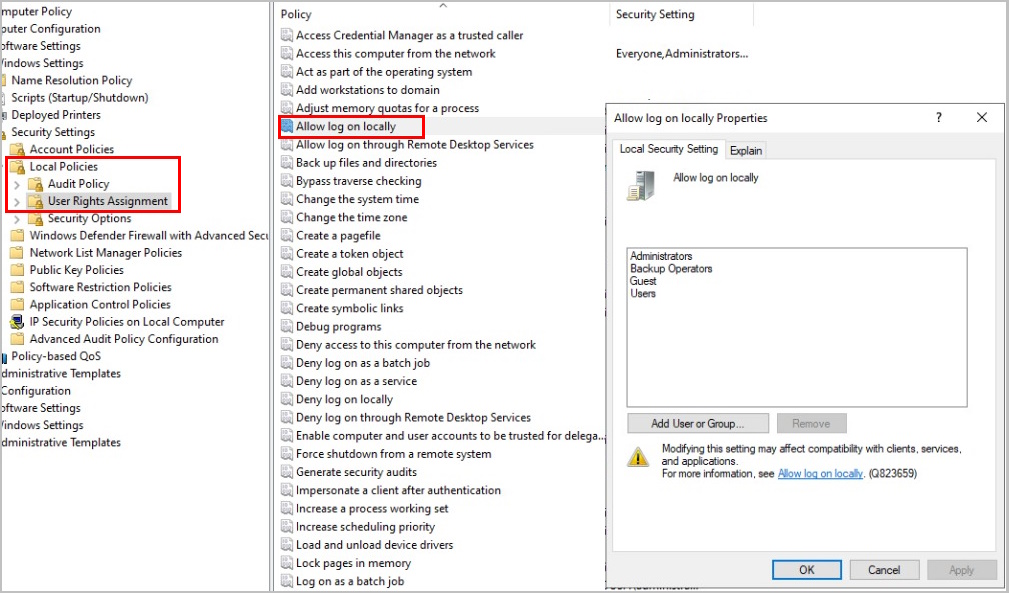
If relevant, select the Bypass from NLA Login using Push checkbox.After the Windows Agent is successfully installed, grant local access permissions to members of the bypass groups:
In the Active Directory, navigate to Security Settings > Local Policies > User Rights Assignment, and select the Allow log on locally policy.
In the dialog that opens, add the relevant groups to the policy.
MFA Tab
When multi-factor authentication (MFA) is enabled, users need to enter their AD passwords in order to receive a push notification from Octopus, ForgeRock or Okta Authenticators. If you want to use MFA for logging into Windows, select the Enable Multi-Factor Authentication (MFA) checkbox. (When the checkbox is not selected, Windows login will be Passwordless.)
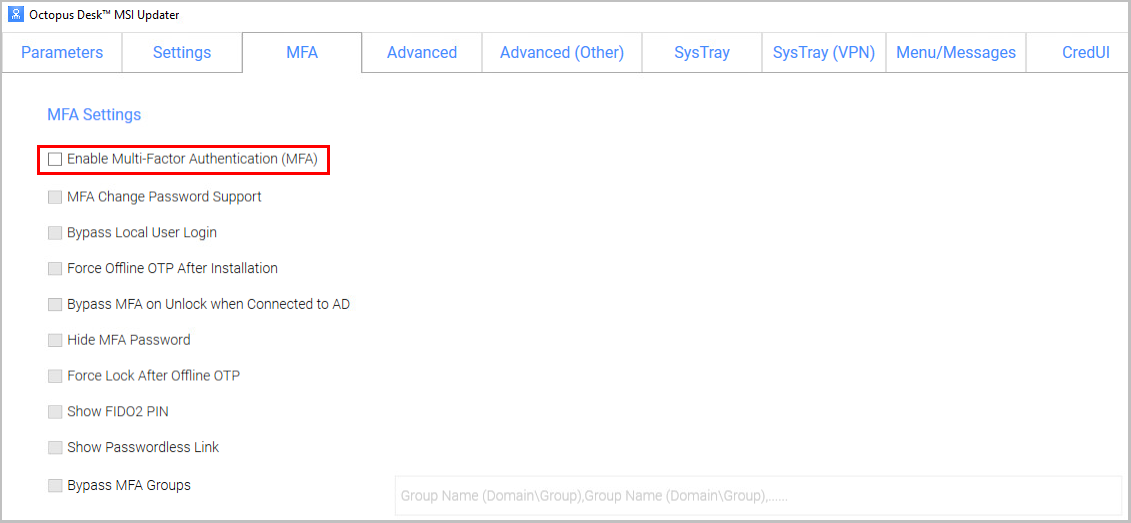
When MFA is activated, you may enable the following options as required by selecting the relevant checkboxes:
Setting | Description / Notes |
|---|---|
MFA Change Password Support | When selected, users are able to change the password on the Windows workstation without the Octopus credential provider (CP) intercepting the process. When the checkbox is cleared, the Octopus CP controls the password change process. |
Bypass Local User Login | When selected, administrators with a Local user account bypass Octopus Authentication and login with username and password. |
Force Offline OTP After Installation | When selected, users are unable to perform offline authentication until they have had at least one successful online login. |
Bypass MFA on Unlock when Connected to AD | When selected, users connected to the enterprise network who have already authenticated with MFA are not required to authenticate with 2nd factor again when unlocking the workstation. This will work as long as you are inside the network (no time limit). IMPORTANT: When selecting this option, verify that the Bypass MFA Groups checkbox is NOT selected. |
Hide MFA Password | When selected, the Windows Agent does not send the password to the server. This option is used when a third party authenticator does not require the password. |
Force Lock After Offline OTP | When selected, workstations that were unlocked using an Offline OTP and then connected back to enterprise network (online) are automatically locked and the user is asked to authenticate. This setting prevents users from using weak authentication to log into the enterprise network (online). |
| Show FIDO2 PIN | When selected, an additional field is displayed on the Windows Login screen to enable users to enter the PIN associated with the FIDO key used for authentication. IMPORTANT: If your users have PINs set for their FIDO keys, this checkbox must be selected to enable them to successfully login using MFA. |
| Show Passwordless Link | When selected, an Administrator Access Only link appears on the Login screen. This link enables authorized users to login with Passwordless authentication (instead of MFA). |
Bypass MFA Groups | When selected, you may specify ONE group in the AD that will not require MFA authentication. Enter <Domain>\>Group Name> in the field to the right. IMPORTANT: When selecting this option, verify that the Bypass MFA on Unlock when Connected to AD checkbox is NOT selected. |
Miscellaneous Advanced Options
The Advanced tab is divided into the following sections:
- Advanced Settings: Contains settings for controlling presentation of authentication methods and other features displayed on the Windows Login screen
- Trace: Contains settings related to various aspects of log file storage management
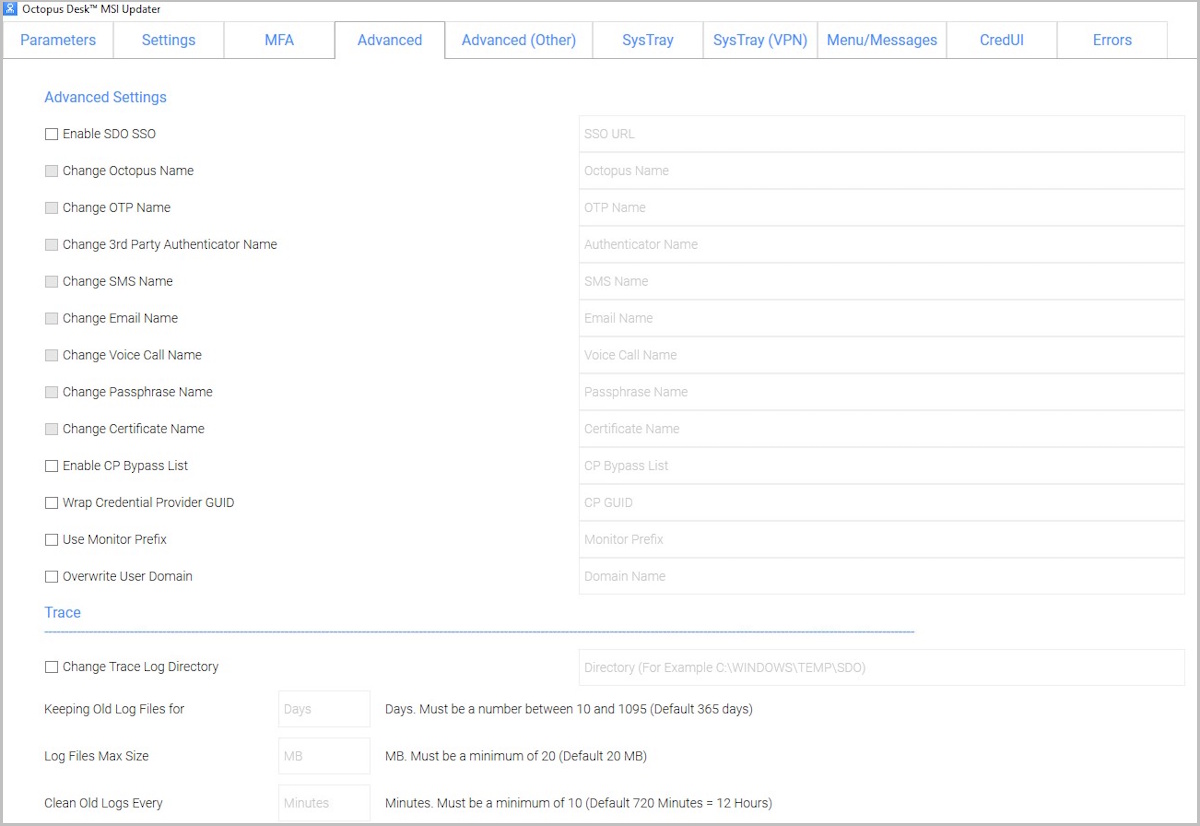
The Advanced (Other) tab is a separate tab containing options allowing you to customize the Windows Login screen with your organization's logo, icons and support information. For details, refer to Creating the MSIUpdater Configuration.
Managing Login Screen Labels and Features
The upper portion of the Advanced tab contain the following settings:
Setting | Description / Notes | |
|---|---|---|
Enable SSO | After selecting the checkbox, enter the portal URL. In runtime, the portal will open in the default browser. Users will be automatically logged in and be able to view all assigned services. | |
Change OTP Name | Allows you to change the default name of the OTP displayed in the Windows credential provider’s login authentication method selection list. After selecting the checkbox, enter the desired name in the field (e.g., ForgeRock OTP). This setting is available only when the OTP checkbox in the Parameters tab is selected. | |
Change 3rd Party Authenticator Name | Allows you to change the default name of the third party authenticator displayed in the Windows credential provider’s login authentication method selection list. After selecting the checkbox, enter the desired name in the field. This setting is available only when the 3rd Party Authenticator checkbox in the Parameters tab is selected. | |
Change SMS Name | Allows you to change the default name of the SMS option displayed in the Windows credential provider’s login authentication method selection list. After selecting the checkbox, enter the desired name in the field. | |
Change Email Name | Allows you to change the default name of the Email option displayed in the Windows credential provider’s login authentication method selection list. After selecting the checkbox, enter the desired name in the field. | |
Change Voice Call Name | Allows you to change the default name of the Voice Call option displayed in the Windows credential provider’s login authentication method selection list. After selecting the checkbox, enter the desired name in the field. | |
Change Passphrase Name | Allows you to change the default name of the passphrase option displayed in the Windows credential provider’s login authentication method selection list. After selecting the checkbox, enter the desired name in the field. | |
| Change Certificate Name | Allows you to change the default name of the certificate option displayed in the Windows credential provider’s login authentication method selection list. After selecting the checkbox, enter the desired name in the field. | |
Enable CP Bypass List | Allows you to specify credential providers (in addition to Octopus Authenticator) that will available for Windows login. After selecting the checkbox, paste the registry key(s) representing the relevant credential provider(s) in the field to the right. The specified providers will be displayed as login options on the Windows Login screen. | |
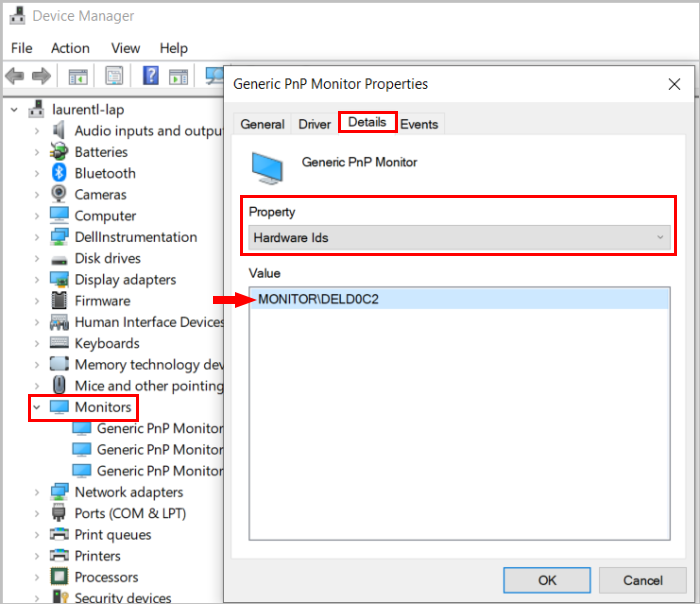
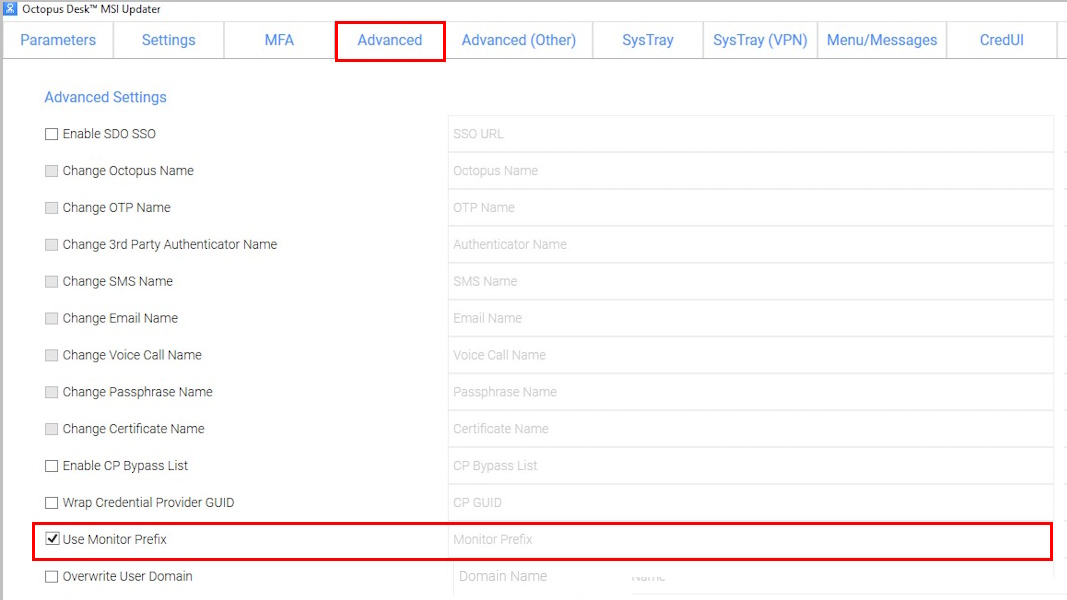
Use Monitor Prefix | When selected (and when there is a prefix match), the Windows Login screen presents users with the Octopus Authenticator login option only. If a prefix is specified but there is no match, users are presented with the FIDO2 (BIO) or FIDO Bypass login option. After selecting the checkbox, enter the monitor prefix in the field to the right. You can find the prefix in the Windows Device Manager. Under Monitors, open the properties of the monitor. Then, in the Details tab, select the Hardware Ids property.
| |
| Overwrite User Domain | When selected, a specified domain is prepopulated in the Username field of the Windows Login screen. After selecting the checkbox, enter the relevant domain name in the field to the right. |
Configuring Trace Log Storage Settings
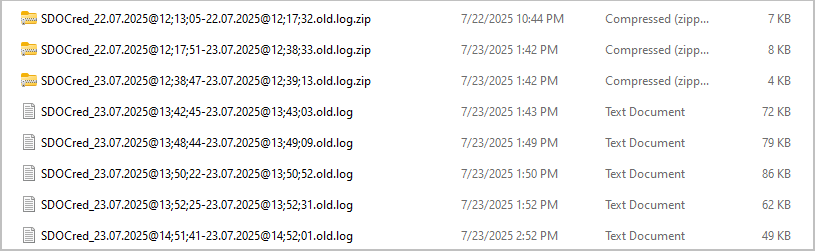
In the lower portion of the Advanced tab, you can configure settings related to log file storage management. You can change the default storage location and define a maximum size for the directory. In addition, you can create a schedule for automatically cleaning log files. In this process, .log files are converted to .oldlog files after a configurable number of minutes. The old logs are then compressed to save disk space, and are removed from the system after a specified period of time.
To manage trace log storage:
- From the Settings tab, select the Enable Trace checkbox.
- At the bottom of the Advanced tab, configure all or some of the settings in the Trace section.
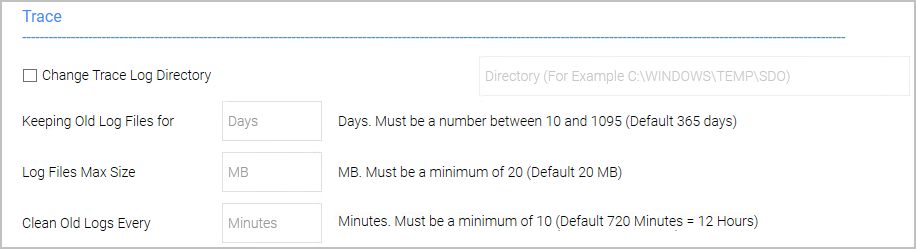
The settings are:
- Change Trace Log Directory: To change the default log file location, select the checkbox and enter the desired file path (e.g., C:\temp\logs) in the field to the right.
- Keep Old Log Files For: The period of time (in days) after which old compressed log files (logs with a file format of .oldlog.zip) are deleted. The supported range is 10 - 1095.
- Log Files Max Size: The maximum size (in MB) of the directory in which the log files are stored. The minimum supported value is 20.
- Clean Old Logs Every: The period of time (in minutes) after which a log file is designated as an older file by changing the format from .log to .oldlog. The minimum supported value is 10. The default value is 720 (12 hours).
SysTray Tab
The Enable SysTray setting (at the top of the SysTray tab) determines whether users will be able to access self-service actions from the Windows systray. When this setting is activated, you can choose which actions will be available.
When users initiate a systray action, the systray is automatically locked for 30 seconds. (Multiple actions are not supported.)
IMPORTANT: If you enable the systray, it is strongly recommended to follow the best practice of disabling Microsoft Office Clipboard to prevent sensitive data from being exposed.
The SysTray tab contains a variety of user self-service actions, such as password and token retrieval, User Portal access, and more. VPN connection options are offered in the separate Systray (VPN) tab (Configuring Systray VPN Access Options).
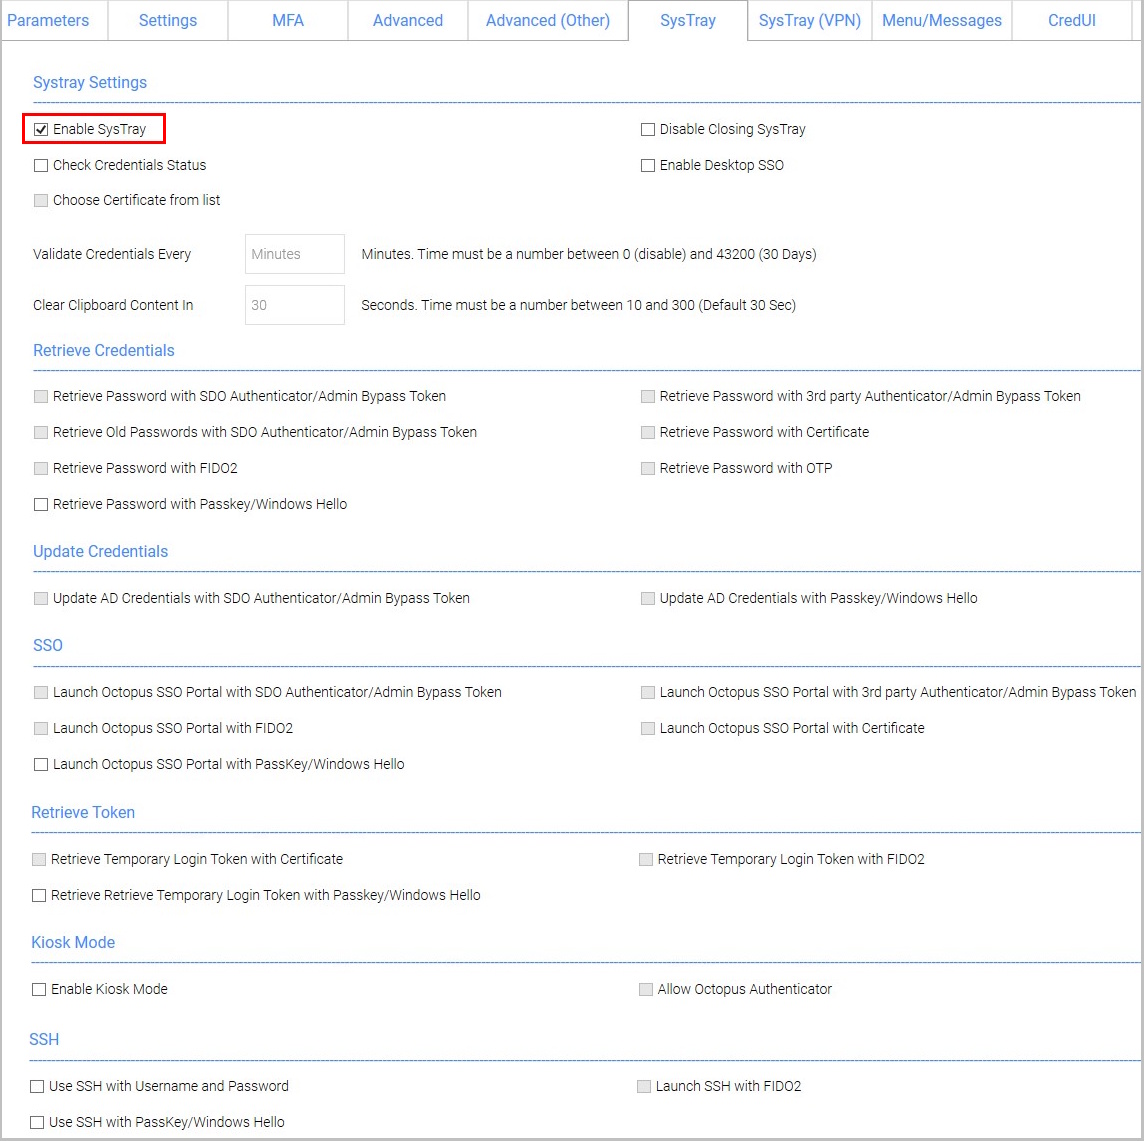
For convenience, systray settings are divided into relevant categories. The options are:
Action | Description / Notes |
|---|---|
| Systray Settings | |
| Check Credentials Status | When selected, users are able to view the time remaining until password expiration. |
| Choose Certificate from List | When selected, users are able to select any certificate integrated with the system, and are not required to use the one utilized for the initial logon. This setting is useful in cases where users sharing an account need to access legacy applications after login. The checkbox is enabled when Certificate Authenticator is selected as an authenticator in the Parameters tab. |
| Disable Closing SysTray | When selected, the Close App systray action is hidden. |
| Enable Desktop SSO | When selected, users are able to access specific applications that are integrated with the Octopus platform without having to reauthenticate. The applications and other relevant settings are configured in the Applications menu of the Octopus Management Console. IMPORTANT: Desktop SSO is supported for Octopus Authentication Server version 6.6 (and higher). For further information, please refer to the Octopus Management Console Admin Guide. |
| Validate Credentials Every | Allows you to specify a value (in minutes) for the frequency at which the system tray checks whether the user is connected to AD and whether the password is still valid. Valid values can range from 0 (disabled) to 43200 (30 days). Once the password expires, users will need to login within the organization network or via the VPN in order to reauthenticate. |
| Clear Clipboard Content in | Allows you to specify the number of seconds for which the AD password / login token is available for viewing / copying. |
| Retrieve Credentials | |
Retrieve Password with SDO Authenticator/Admin Bypass Token | When selected, users are able to view and copy the AD password after performing passwordless authentication on the Octopus Authenticator mobile app. Admin users in Bypass mode need to enter the temporary token to retrieve the password. |
| Retrieve Old Passwords with SDO Authenticator/Admin Bypass Token | When selected, users are able to view and copy previously used AD passwords after performing passwordless authentication on the Octopus Authenticator mobile app. Admin users in Bypass mode need to enter the temporary token to retrieve the passwords. |
Retrieve Password with 3rd Party Authenticator/Admin Bypass Token | When selected, users are able to view and copy the AD password after performing passwordless authentication on the mobile app of a third party authenticator. Admin users in Bypass mode need to enter the temporary token to retrieve the password. |
Retrieve Password with FIDO2 | When selected, users are able to view and copy the AD password after performing passwordless authentication using a FIDO key. |
| Retrieve Password with Certificate | When selected, users are able to view and copy the AD password after performing authentication with a smart card signed by the organization's root CA. |
| Retrieve Password with Passkey/Windows Hello | When selected, users are able to view and copy the AD password either using the Windows Hello sign-in configured for the workstation, OR after performing authentication using a passkey that is integrated with the user's workstation or smartphone. To use this feature, the following conditions need to be met:
|
| Retrieve Password with OTP | When selected, users are able to view and copy the AD password after performing authentication by means of a software OTP code or a hardware OTP token. This checkbox is enabled when OTP is selected as an authenticator in the Parameters tab. |
| Update Credentials | |
| Update AD Credentials with SDO Authenticator/Admin Bypass Token | This setting allows users working in Password Free Experience mode to update the password stored in the SDO Cloud Vault with the user-managed password. The user is prompted to enter the password and verify it using Octopus Authenticator. If the password matches the one stored in the Windows Vault, it is written to the SDO Cloud Vault for that user. |
| Update AD Credentials with Passkey/Windows Hello | This setting allows users working in Password Free Experience mode to update the password stored in the SDO Cloud Vault with the user-managed password. The user is prompted to enter the password and verify it using Windows Hello. If the password matches the one stored in the Windows Vault, it is written to the SDO Cloud Vault for that user. |
SSO | |
Launch Octopus SSO Portal with SDO Authenticator/ Admin Bypass Token | When selected, users are able to open the User Portal from the desktop after performing passwordless authentication on the Octopus Authenticator mobile app. Admin users in Bypass mode need to enter the temporary token to launch the Portal. |
Launch Octopus SSO Portal with FIDO2 | When selected, users are able to open the User Portal from the desktop after performing passwordless authentication using a FIDO key. |
| Launch Octopus SSO Portal with Passkey/Windows Hello | When selected, users are able to open the User Portal from the desktop using the Windows Hello sign-in configured for the workstation. For details about setting up Windows Hello integration, refer to Configuring Windows Hello Support for Systray Actions. |
| Launch Octopus SSO Portal with Certificate | When selected, users are able to open the User Portal from the desktop after performing authentication using a smart card signed by the organization's root CA. |
Launch Octopus SSO Portal with 3rd Party Authenticator/Admin Bypass Token | When selected, users are able to open the User Portal from the desktop after performing passwordless authentication on the mobile app of a third party authenticator. Admin users in Bypass mode need to enter the temporary token to launch the Portal. |
Retrieve Token | |
| Retrieve Temporary Login Token with Certificate | When selected, users are able to retrieve the temporary token required for RADIUS login after performing authentication with a smart card signed by the organization's root CA. |
| Retrieve Temporary Login Token with FIDO2 | When selected, users are able to retrieve the temporary token required for RADIUS login after authenticating with a FIDO key. |
| Retrieve Temporary Login Token with Passkey/Windows Hello | When selected, users are able to retrieve the temporary token required for RADIUS login using the Windows Hello sign-in configured for the workstation. For details about setting up Windows Hello integration, refer to Configuring Windows Hello Support for Systray Actions. |
| Enable Kiosk Mode | When selected, users in the organization are able to perform the following actions from a workstation to which they are not currently logged in:
|
| Allow Octopus Authenticator | When selected, users working in Kiosk Mode are able to retrieve their AD passwords after authenticating with the Octopus mobile app. |
| SSH | |
| Launch SSH with FIDO2 | When selected, users will be able to authenticate to a selected PuTTY profile. To use this feature, the following conditions need to be met:
|
| Use SSH with Username and Password | When selected, users will be able to authenticate to a selected PuTTY profile by entering Username + Password. |
| Use SSH with Passkey/Windows Hello | When selected, users will be able to authenticate to a selected PuTTY profile using the Windows Hello sign-in configured for the workstation. For details about setting up Windows Hello integration, refer to Configuring Windows Hello Support for Systray Actions. |
Configuring SysTray VPN Access Options
The SysTray (VPN) tab contains settings related to connecting to the Check Point, Cisco and F5 VPNs.
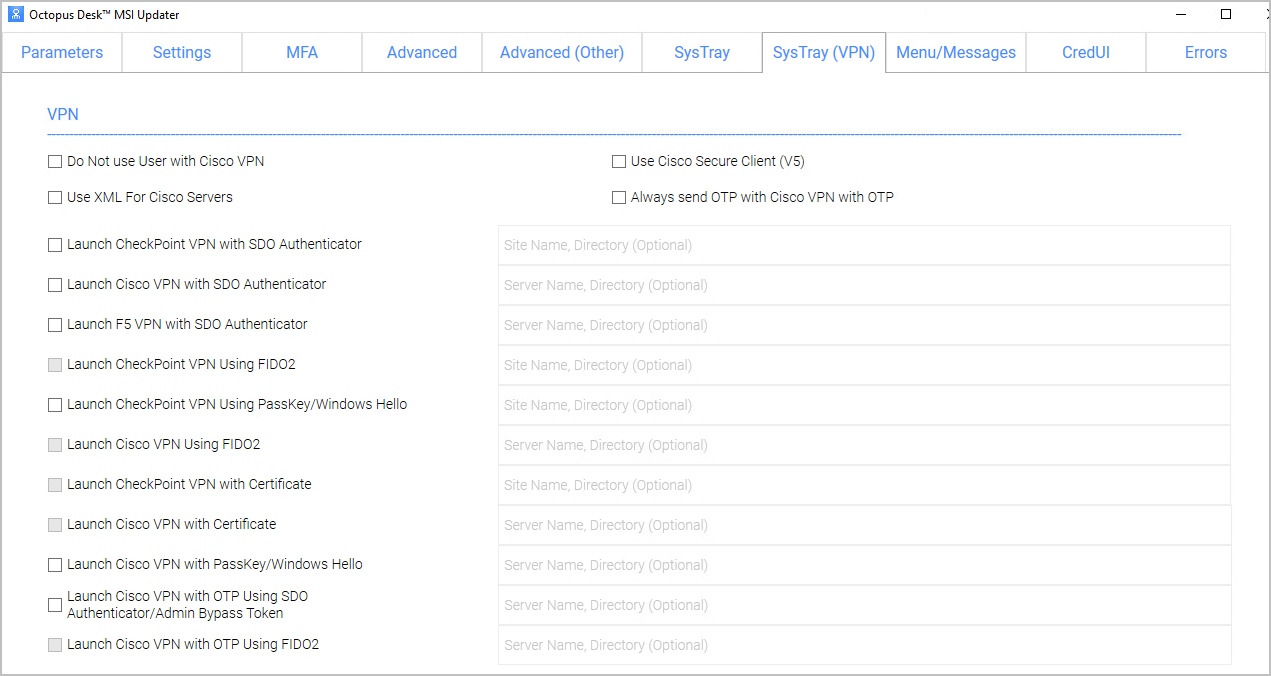
The settings are:
| Setting | Description / Notes |
|---|---|
| Do Not use User with Cisco VPN | When selected, the Cisco username needs to be provided manually. |
| Use Cisco Secure Client (V5) | Select this checkbox to use Cisco Secure Client 5. When the checkbox is not selected, the previous version (V4) will be used. |
| Use XML for Cisco Servers | When selected, servers from XML files (instead of from registry) are used. |
| Always Send OTP with Cisco VPN with OTP | When selected, the OTP code is sent to the VPN server (in addition to the username and password) when users log in using an online MFA flow. |
| Launch Check Point VPN with SDO Authenticator | When selected, users are able to connect to the Check Point VPN directly from the desktop after performing passwordless authentication on the Octopus Authenticator mobile app. In the field to the right, enter the site/profile name of the Check Point VPN, as set on the Check Point client. Important: If users work with Check Point Harmony, or if your VPN is installed in different locations, enter a comma after the name, followed by the full path of the VPN client. For example: office,C:\Program Files (x86)\CheckPoint\Endpoint Security\Endpoint Connect |
| Launch Cisco VPN with SDO Authenticator | When selected, users are able to connect to the Cisco VPN directly from the desktop after performing passwordless authentication on the Octopus Authenticator mobile app. In the field to the right, enter the site/profile name of the Cisco VPN, as set on the Cisco client. |
| Launch F5 VPN with SDO Authenticator | When selected, users are able to connect to the F5 VPN directly from the desktop after performing passwordless authentication on the Octopus Authenticator mobile app. In the field to the right, enter the site/profile name of the F5 VPN, as set on the F5 client. |
| Launch Check Point VPN Using FIDO2 | When selected, users are able to connect to the Check Point VPN directly from the desktop after performing passwordless authentication using a FIDO key. In the field to the right, enter the site/profile name of the Check Point VPN, as set on the Check Point client. |
| Launch Check Point VPN Using Passkey/Windows Hello | When selected, users are able to connect to the Check Point VPN directly from the desktop using the Windows Hello sign-in configured for the workstation. In the field to the right, enter the site/profile name of the Check Point VPN, as set on the Check Point client. |
| Launch Cisco VPN Using FIDO2 | When selected, users are able to connect to the Cisco VPN directly from the desktop after performing passwordless authentication using a FIDO key. In the field to the right, enter the site/profile name of the Cisco VPN, as set on the Cisco client. |
| Launch Check Point VPN with Certificate | When selected, users are able to connect to the Check Point VPN directly from the desktop after performing authentication using a smart card signed by the organization's root CA. In the field to the right, enter the site/profile name of the Check Point VPN, as set on the Check Point client. |
| Launch Cisco VPN with Certificate | When selected, users are able to connect to the Cisco VPN directly from the desktop after performing authentication using a smart card signed by the organization's root CA. In the field to the right, enter the site/profile name of the Cisco VPN, as set on the Cisco client. |
| Launch Cisco VPN with Passkey/Windows Hello | When selected, users are able to connect to the Cisco VPN directly from the desktop using the Windows Hello sign-in configured for the workstation. In the field to the right, enter the site/profile name of the Cisco VPN, as set on the Cisco client. |
| Launch Cisco VPN with OTP Using SDO Authenticator/ Admin Bypass Token | When selected, users are able to connect to the Cisco VPN directly from the desktop after performing OTP authentication on the Octopus Authenticator mobile app. Admin users in Bypass mode need to enter the temporary token to launch the Portal. In the field to the right, enter the site/profile name of the Cisco VPN, as set on the Cisco client. |
| Launch Cisco VPN with OTP Using FIDO2 | When selected, users are able to connect to the Cisco VPN directly from the desktop after performing OTP authentication using a FIDO key. In the field to the right, enter the site/profile name of the Cisco VPN, as set on the Cisco client. |
Configuring Windows Hello Support for Systray Actions
Octopus Desk for Windows provides the option for performing some Systray actions using the Windows Hello sign-in configured for the workstation. To enable support for this option, make sure that the following conditions are met:
- In the Parameters tab of the MSIUpdater, the FIDO (BIO) authenticator is selected.
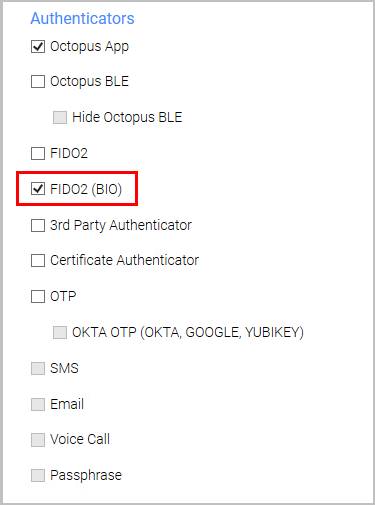
- In the Settings tab of the MSIUpdater, the Support Windows Hello for Business checkbox is selected.
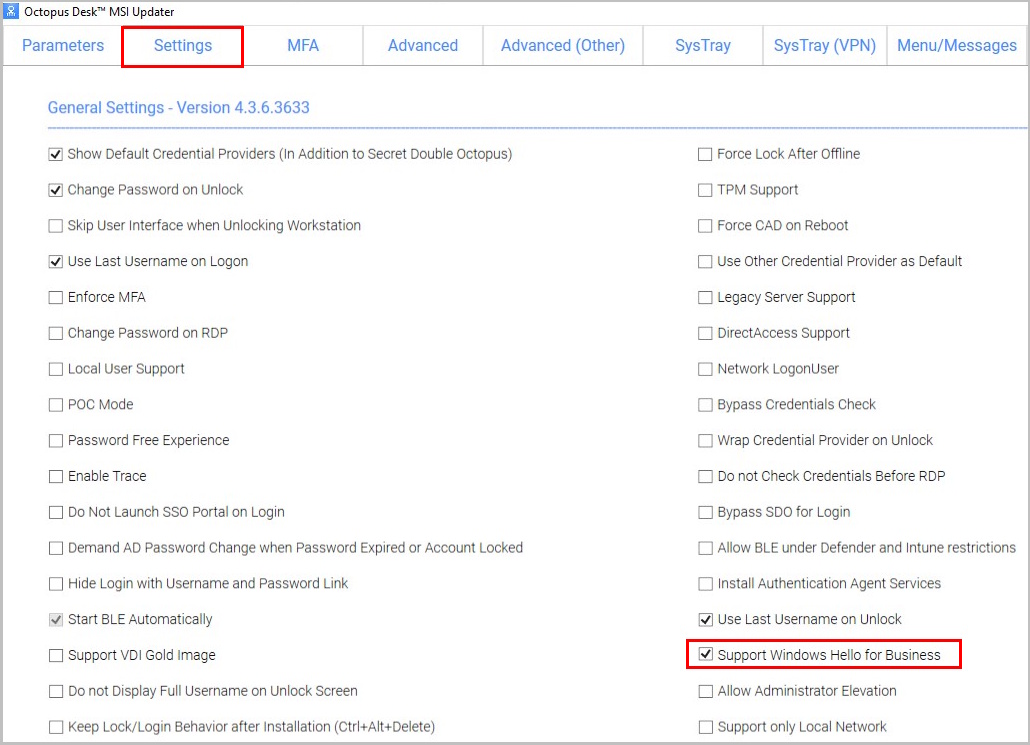
- In the SysTray and SysTray (VPN) tabs of the MSIUpdater, the relevant systray actions are selected (e.g., Retrieve Password with Passkey/Windows Hello).
- Users have configured Windows Hello as a Sign-in option for their workstations.
- Users have enrolled in the Octopus platform using FIDO device registration.
Windows Hello Enrollment
The authentication process for Windows Hello is based on the workflow for FIDO authentication. Therefore, users should be sent FIDO Authenticator enrollment invitations, and they perform FIDO Authenticator registration (as described below).
IMPORTANT: Users do NOT need to possess a FIDO key to successfully perform systray actions using Windows Hello.
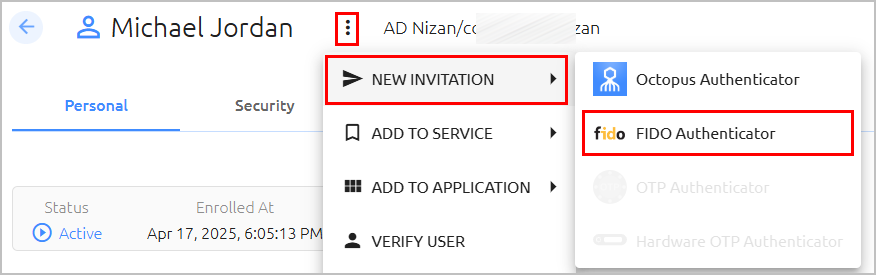
The enrollment flow is as follows:
- The user opens the invitation email sent and clicks the Click to Enroll link.
The user is then redirected to the User Portal, in registration mode. The user clicks Register.
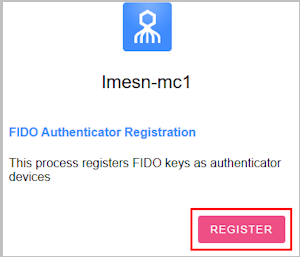
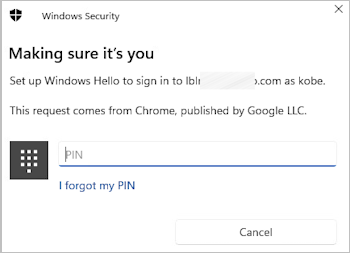
The user is prompted to authenticate using the Windows Hello Sign-in option configured for the workstation. For example:
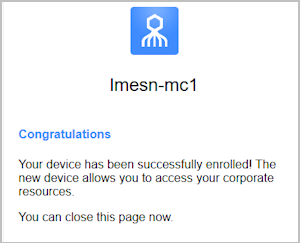
Upon successful authentication, a confirmation message is displayed.
Customizing Systray Messages
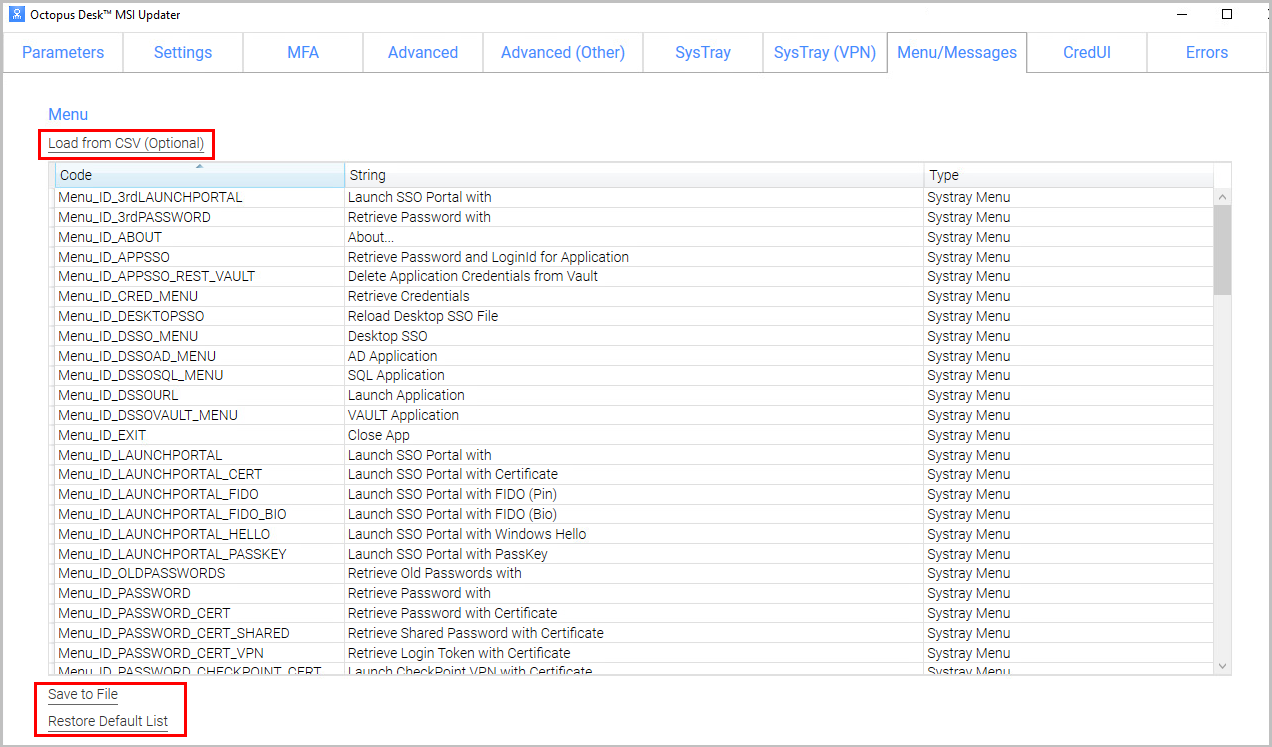
In the Menu/Messages tab, you can review and modify the default strings for actions and messages that will be displayed to users in the systray. The strings can be customized as required, or entered in language other than English. (The codes are not editable.)
For convenience, the following options are available:
- Save to File: Downloads the Strings list to a CSV file, for backup and editing purposes.
- Load from CSV: Populates the Strings list with data from an uploaded CSV file.
- Restore Default List: Resets the Strings list with the original default texts.
CredUI Tab
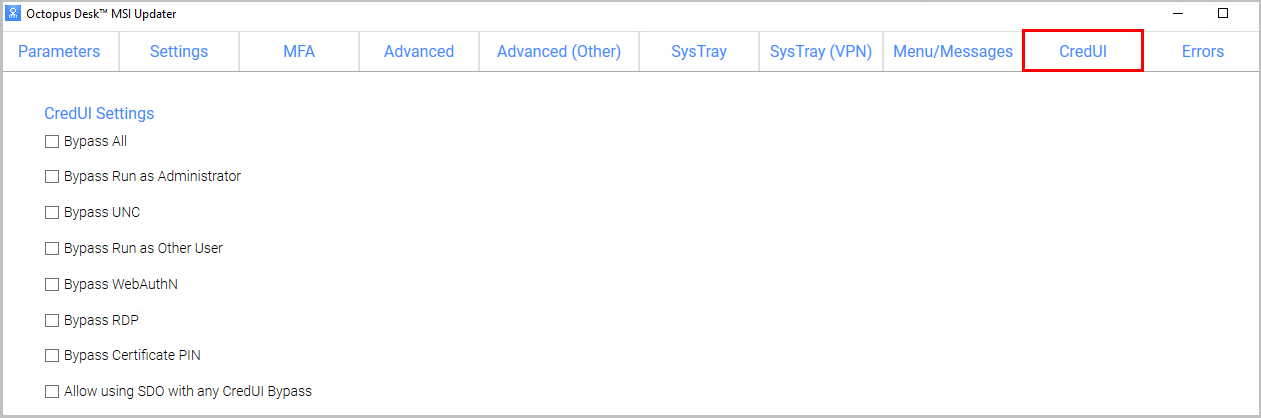
This tab allows you to select scenarios in which the Octopus Authentication mechanism is hidden, and users perform the login by entering Username + Password. Selecting Bypass All (at the top of the tab) activates bypass for all the scenarios.
If you select Allow using SDO with any CredUl bypass (at the bottom of the tab), the Octopus Authentication mechanism is presented together with additional login options.
Errors Tab
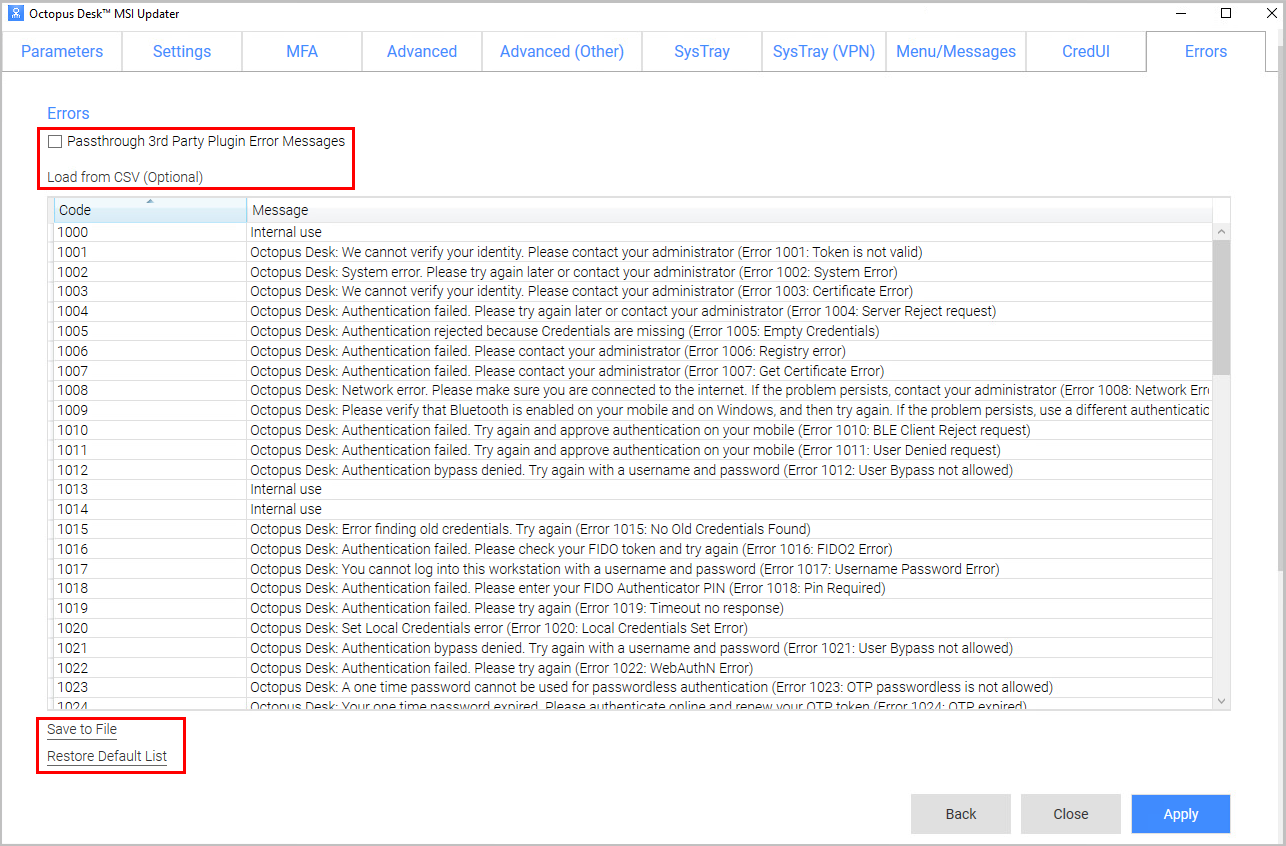
In this tab, you can review the default messages that will be displayed to users when errors occur and customize the message text where relevant. (The error codes are not editable.)
For convenience, the following options are available:
- Passthrough 3rd Party Plugin Error Messages: When this checkbox is selected, error messages returned from a 3rd party authenticator to the server are sent to the Windows agent and displayed to the user. (The content of these messages can be configured and customized during authenticator plugin development.)
- Save to File: Downloads the Errors list to a CSV file, for backup and editing purposes.
- Load from CSV: Populates the Errors list with data from an uploaded CSV file.
- Restore Default List: Resets the Errors list with the original default texts.
MSI Deployment of Octopus Desk for Windows
The following sections explain how to deploy and upgrade using the MSI tool.
Silent installation allows administrators to manually install Octopus Desk or push the installation to all client machines from a central tool (e.g., GPO).
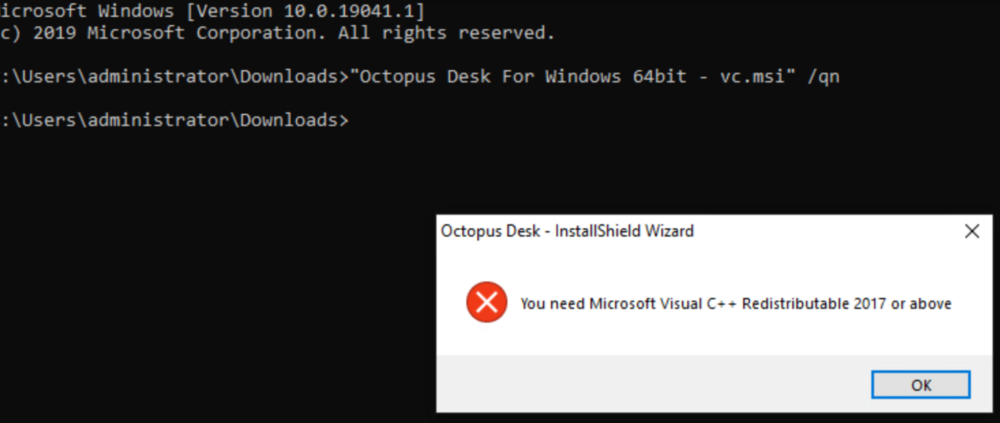
Before performing installation with software distribution tools, make sure the Visual C++ 2017 (or later) Redistributable (x64)/(x86) - 14.30.30704.0 is installed. If this package is not installed, the installation will abort and the following error message will be displayed:
 |
Note: Administrator permissions are required to run the Octopus Desk for Windows MSI.
To perform silent installation:
Open the command prompt as Admin, and run Octopus Desk For Windows 64bit.msi
Run Octopus Authentication for windowsxx.msi /qn:
C:\> Octopus Desk For Windows 64bit – xx_xxx_xx.msi /qn

If you want the Octopus Authentication credential provider to be disabled on some machines after installation (allowing for gradual deployment), refer to Enabling / Disabling the Octopus Authentication CP Post-installation.
Performing Deployment Using RUNFROMFILE
The installation.json file is automatically created on generation of the updated MSI file and stored in the timestamped version installation folder. For example:
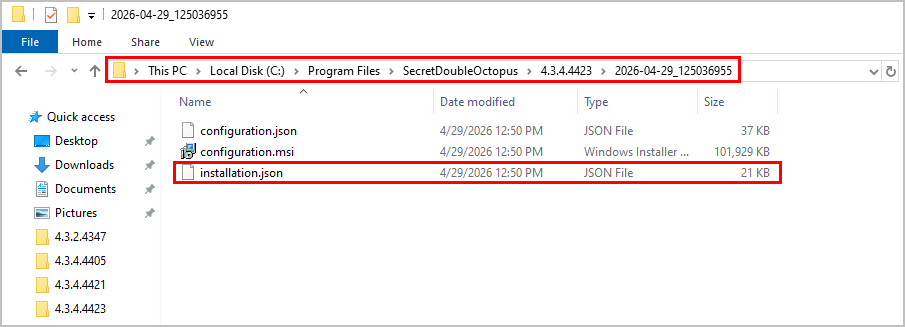
The installation.json file enables RUNFROMFILE installation, which allows you to deploy Octopus Desk without reconfiguring the MSIUpdater.
IMPORTANT: Do not change the name of the installation.json file.
To perform deployment using RUNFROMFILE:
- Copy the relevant MSI file (64-bit or 32-bit), and paste it into the folder where the installation.jsonfile was generated. For example:
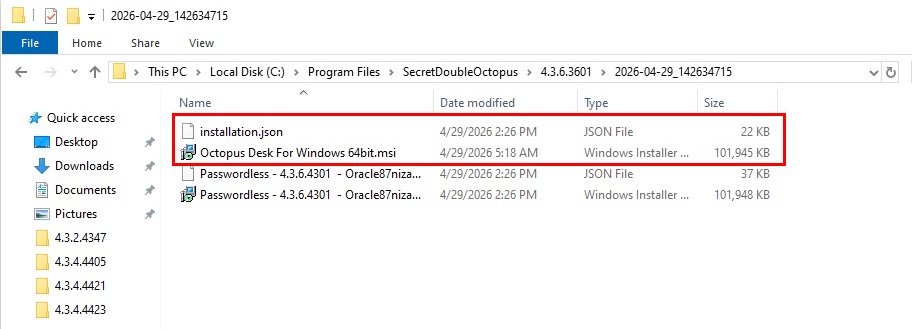
Open the command line as Admin, and run the following command:
msiexec -i "Octopus Desk For Windows 64 bit" RUNFROMFILE=1
Performing Deployment Using the Installation Wizard
This method deploys the MSI package using the Octopus Desk installation wizard. All required components (including the Visual C++ Redistributable)are automatically installed as part of the deployment.
To deploy Octopus Desk using the installation wizard:
To launch the wizard, run the updated Octopus Desk for Windows MSI file.
On the Welcome page, click Next.
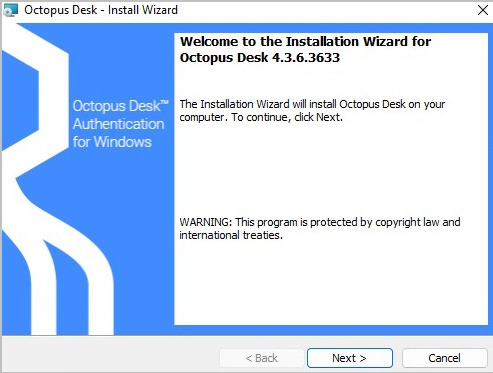
On the page that opens, accept the license agreement, and then click Next.
To begin the installation, click Install.
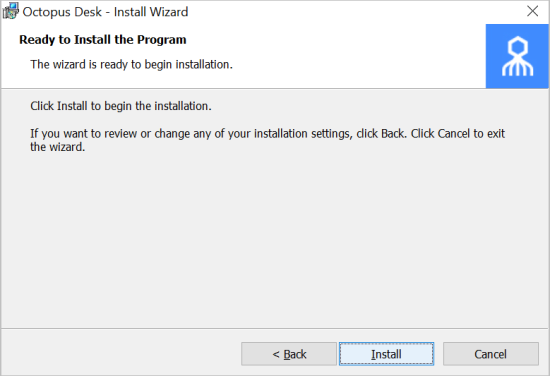
A status bar is displayed during the installation process.
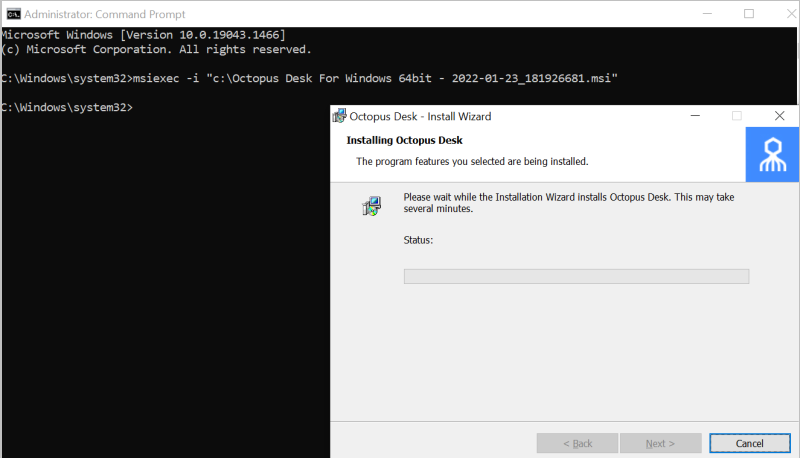
To exit the wizard, click Finish.
Follow the steps below to push the installation through your endpoint management or software distribution tool.
Note: Administrator permissions are required to run the Octopus Desk for Windows MSI.
To push installation through distribution tools:
Open and run your distribution software.
Install Visual C++ 2017 (or later) Redistributable (x64)/(x86) - 14.30.30704.0
Open the command prompt as Admin, and run Octopus Desk For Windows 64bit.msi
Run Octopus Authentication for windowsxx.msi /qn:
C:\> Octopus Desk For Windows 64bit – xx_xxx_xx.msi /qn
IMPORTANT: To successfully perform MSI upgrade, the MSI file must have the same filename as the one used for original installation. The MSI updater creates an MSI file with the update date in the filename. This file needs to be renamed to match the name of the original installation file.
If you try to upgrade using an MSI file that is named differently from the original installation file, the following error message will appear:
Error 1316: The specified account already exists – This message is a notification that you are trying to install an MSI file with a different name from the one that is already installed.
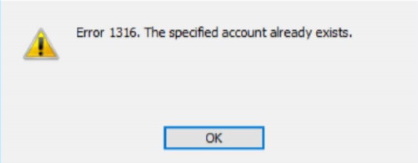 |
If you are not sure of the name of the original installation file, follow these steps:
Navigate to C:\Windows\Installer
Open the following file: SourceHash{F88FAA40-72B9-4CE0-88DA-6592EF361C94}
Search for the name of the file that was used for installation. You will find it at the end of the SourceHash file.
In addition, before performing the upgrade, verify that you have not changed the setting for TPM Support (in the Settings tab of the MSIUpdater). If the TPM setting for the upgrade is different from that set in the original installation, the upgrade will fail due to a public key mismatch error.
To upgrade the MSI, run the following command:
C:\> msiexec /I " Octopus Desk For Windows 64bit.msi" REINSTALL=ALL REINSTALLMODE=vomus IS_MINOR_UPGRADE=1 /norestart /qn
For more information and a list of additional optional installation parameters, click here.
The Password Free Experience enables customers to start deploying the Windows agent while maintaining control over the password, so they can continue to use it for other applications. In the Password Free flow, users will be required to enter the password for the first login. After one successful login, all other authentication will be Passwordless (the user simply selects the authenticator, and does not need to provide an additional identifier).
When the Password Free Experience is enabled, Octopus Desk does not manage the password, and users need to replace the password according to enterprise policy. Once users change the password, they will again be required to enter it for the first login only.
The passwords set by users will be captured on the mobile app, and users will be able to view their passwords on the Octopus Authenticator mobile app.
To enable the Password Free Experience, some configuration needs to be done in the Octopus Management Console and in the MSIUpdater.
Management Console Configuration
To support the Password Free Experience, the Password Settings of the directory need to be configured correctly so the system does NOT rotate the AD password. The configuration required varies depending on whether Compatibility Mode is ON or OFF (as explained in the procedure below). For more information about Compatibility Mode, please refer to the Octopus Management Console Admin Guide.
To configure Password Settings:
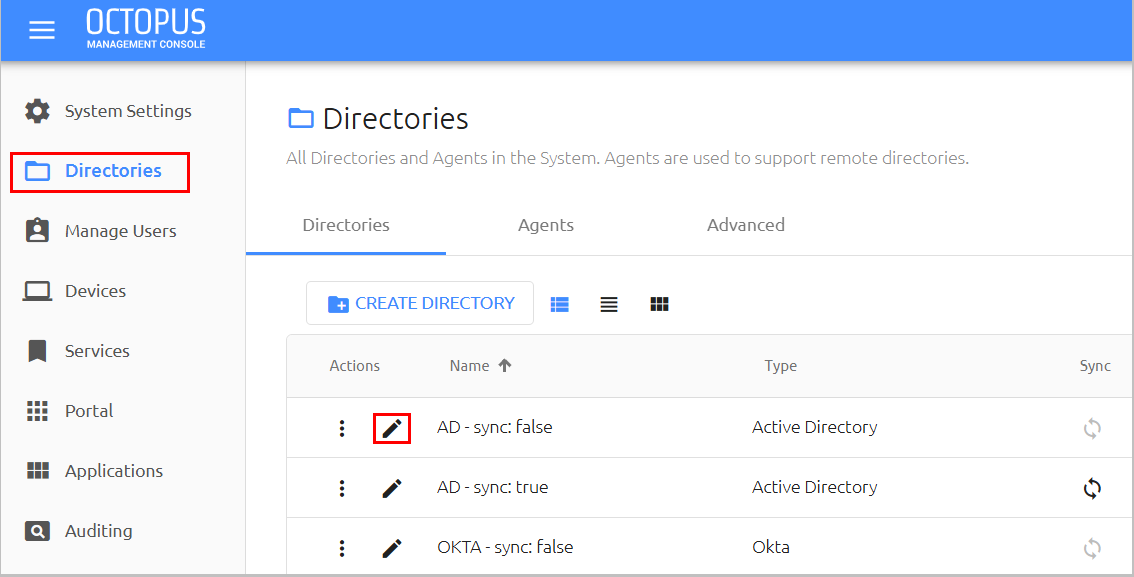
In the Octopus Management Console, select the Directories menu. Then, open the settings of the relevant directory by clicking
 .
.
Select the Policy tab.
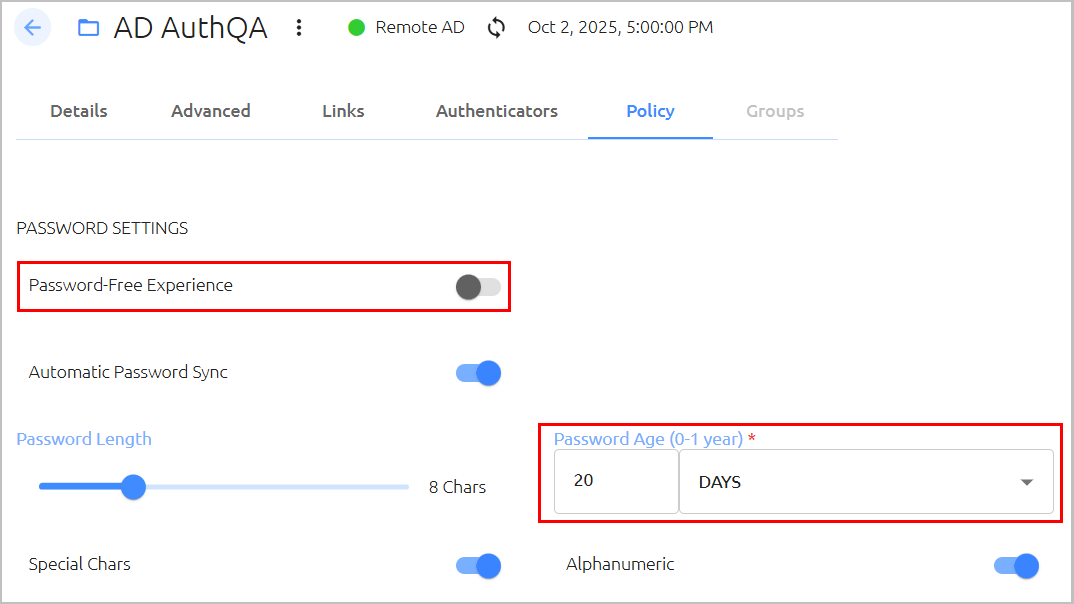
If Compatibility Mode is OFF, make sure that the Password-Free Experience toggle is enabled (blue).
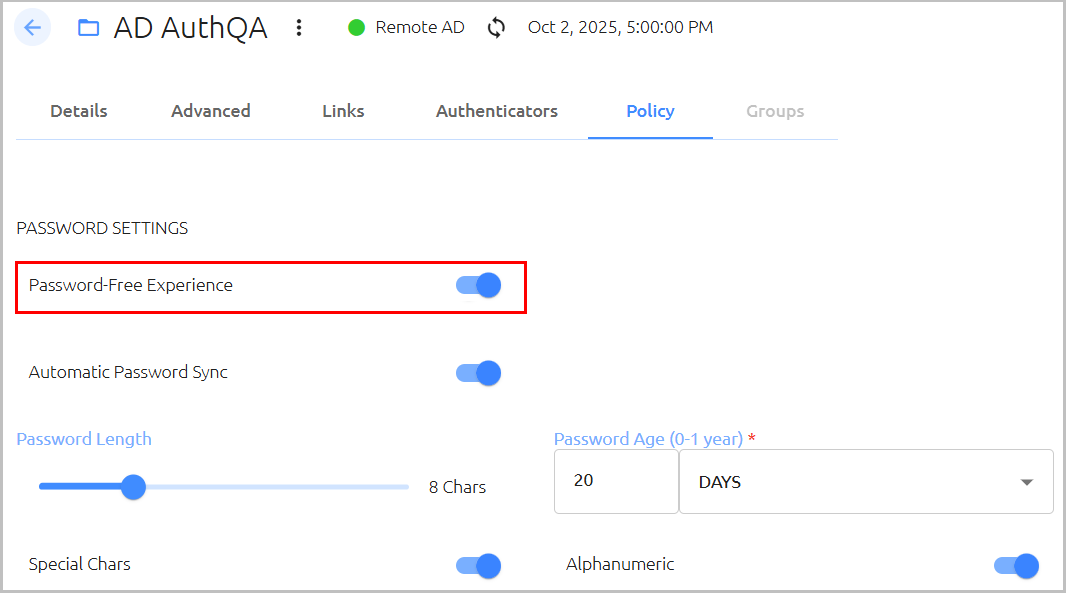
Then, go to Step 5 (below).
If Compatibility Mode is ON, set the Password Age to 0.
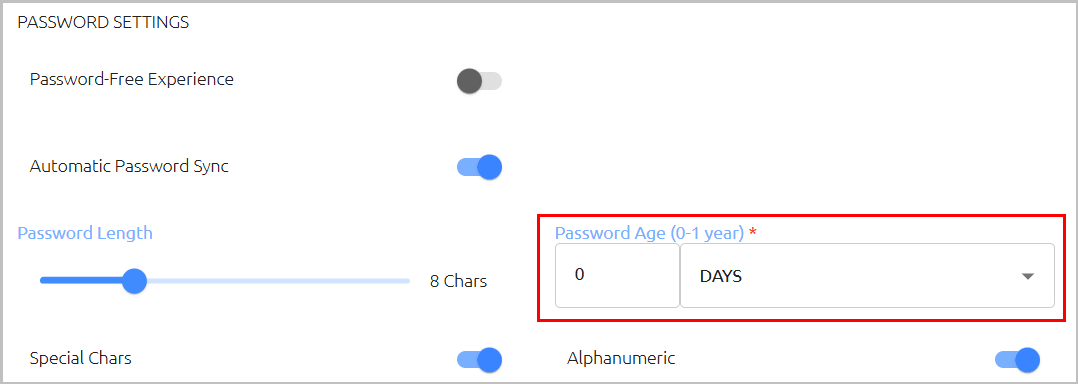
When the value is 0, the system never rotates the password, and the password is managed directly on the directory or the AD.
At the bottom of the Policy tab, click Save and publish your changes.
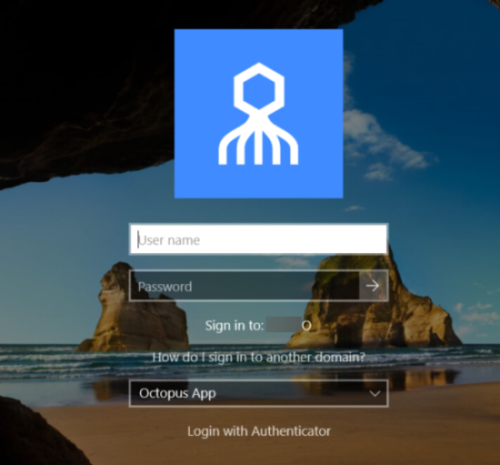
When the Password Free Experience feature is enabled, users need to enter Username + Password for the first login. Users may also select the authentication method (if relevant).
 |
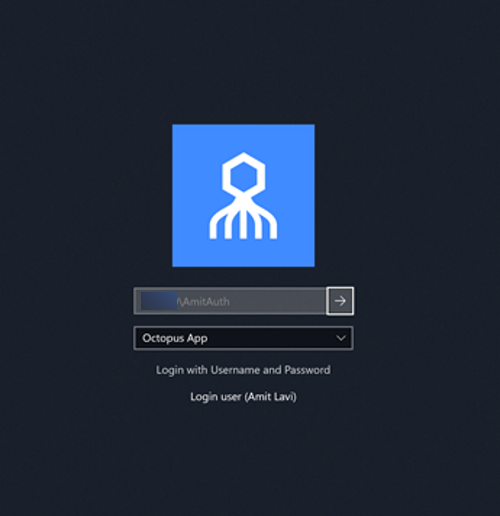
After the first successful login, users can still select the authentication method, but there is no need to enter a password for login or unlock.
 |
Transitioning to Passwordless Authentication
When your organization is ready to go from the Password Free Experience to passwordless authentication, follow these guidelines to ensure a smooth transition:
- MSI configuration: Create a new MSI configuration for deployment. In the Settings tab, make sure that the Enforce MFA and the Password Free Experience checkboxes are NOT selected.
Directory configuration: In the Octopus Management Console, open the settings of the relevant directory, select the Policy tab, and configure the following settings:
Password Free Experience: Verify that the toggle is NOT enabled.
Password Age: Specify the period of time before the password expires. The maximum supported value is one year.
For more information about the password settings, refer to the Octopus Management Console Admin Guide.
Enabling FIDO User Bypass
FIDO User Bypass allows users set to Bypass Mode in the Octopus Management Console to authenticate with Username + Password only. This feature enables uninterrupted remote desktop access to users who are unable to perform MFA (e.g., lost, forgotten or broken FIDO tokens).
The following sections describe the relevant Management Console configurations, the required MSIUpdater settings, and the user authentication experience in runtime.
Users can be bypassed at the individual user level or at the service level. For complete details about the Bypass options, refer to the Octopus Management Console Admin Guide.
To bypass individual users:
In the Octopus Management Console, select the Manage Users menu. Then, navigate to the relevant user and open the user's settings by clicking
.Select the Security tab.
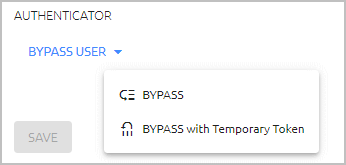
Scroll down to the Authenticators section and select Bypass User > Bypass.
The Bypass state is indicated in the user's information bar, and the time remaining until the bypass expires is displayed. For example: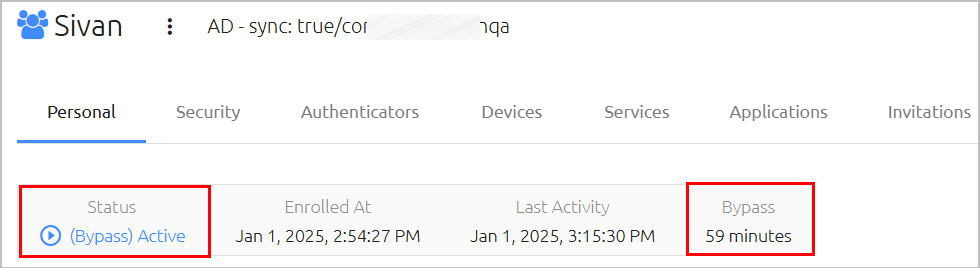
The following Bypass options are available at the service level, in the Sign on tab of the service's settings:
- Bypass Unassigned Users: Allows users who are not assigned to the service to login with username and password.
- Bypass Unenrolled Users: Allows users who are assigned to the system but have not yet enrolled a mobile device or workstation to login with username and password.
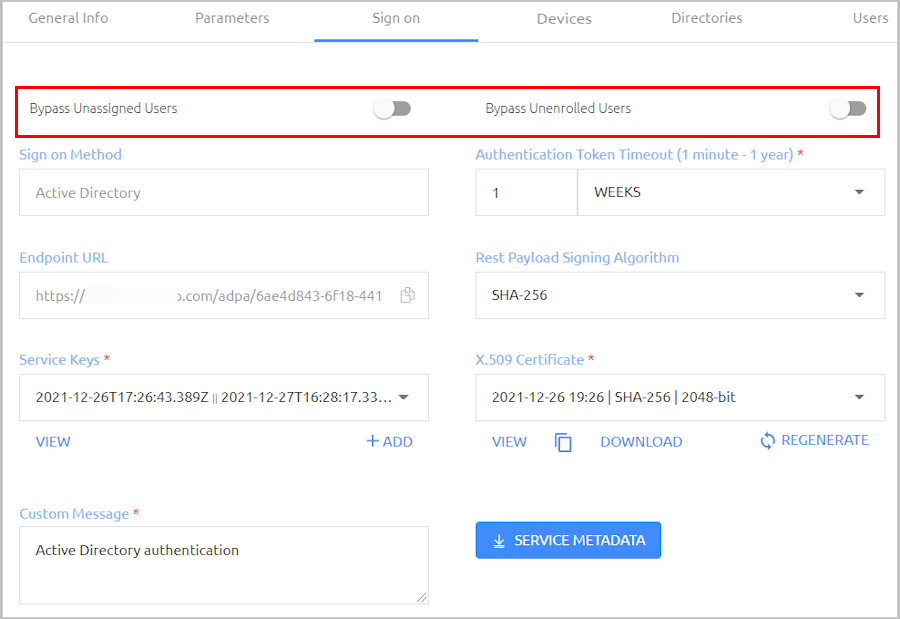
Configuring the MSIUpdater
To enable support for FIDO User Bypass, the following settings need to be configured in the Windows MSIUpdater:
In the Authenticators section of the Parameters tab, select both Octopus App and FIDO2 / FIDO2 (BIO).
In the Settings tab, select Enforce MFA.
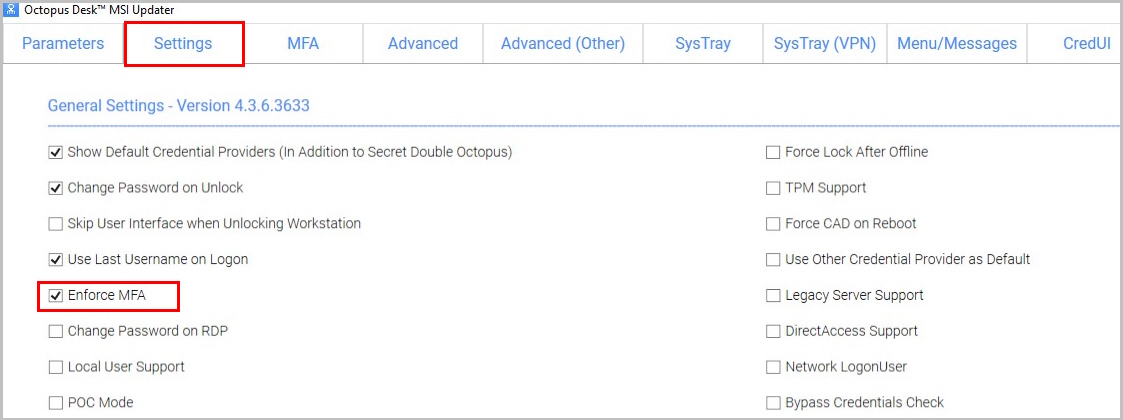
In the Advanced tab, select the Use Monitor Prefix checkbox, and then enter the appropriate prefix in the field to the right. In runtime, when there is a prefix match, users are presented with the Octopus Authenticator login option only. If there is no match, users are presented with the FIDO2 (BIO) and / or FIDO Bypass login options.
You can find the prefix in the Windows Device Manager. Under Monitors, open the properties of the monitor. Then, in the Details tab, select the Hardware Ids property.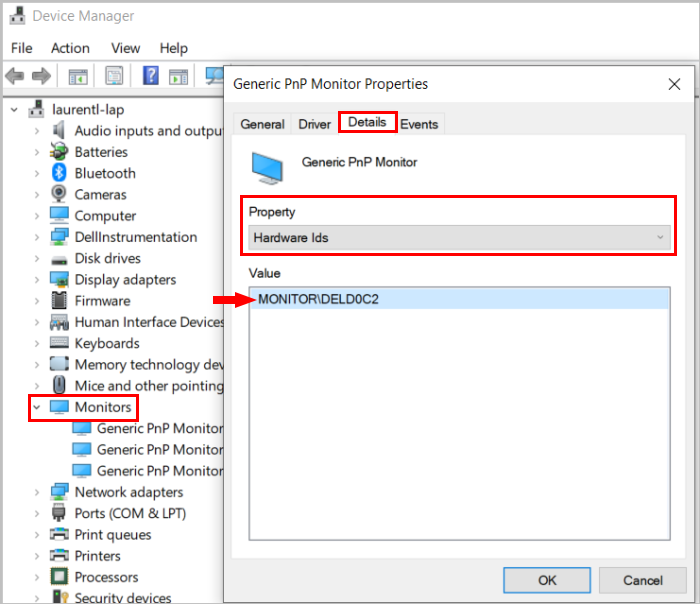
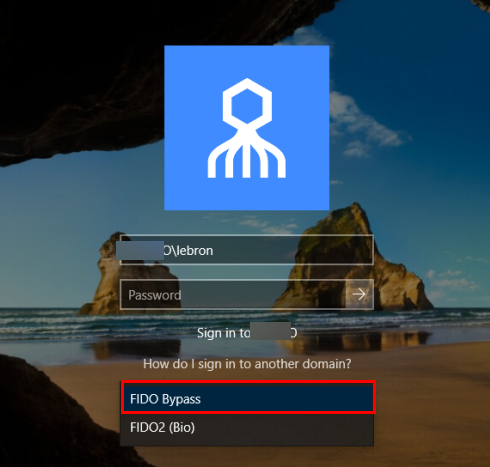
When FIDO User Bypass is enabled, users in Bypass Mode need to click Login with Username and Password.
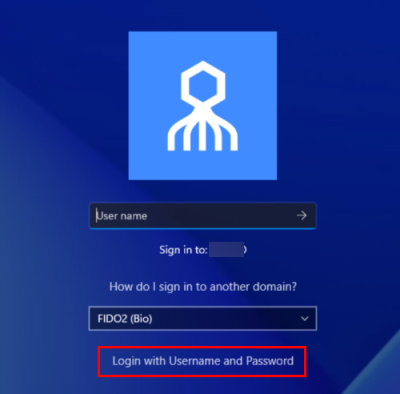
After selecting the FIDO Bypass login option, they enter a username and password to authenticate to
Windows.
Enabling Shared Account Login
The Shared Account feature enables designated users to log into a generic account on a shared workstation using their personal credentials and devices. Account sharing is particularly useful for specific groups of personnel (such as IT, DevOps, manufacturing floor workers, etc.) who use a shared workstation.
When account sharing is activated, users who are authorized to access the account enter two usernames on the Login screen: the name by which the shared account is known (e.g., Machine#14), and their own username. They then complete the login process by authenticating with their personal mobile device, FIDO key, etc.
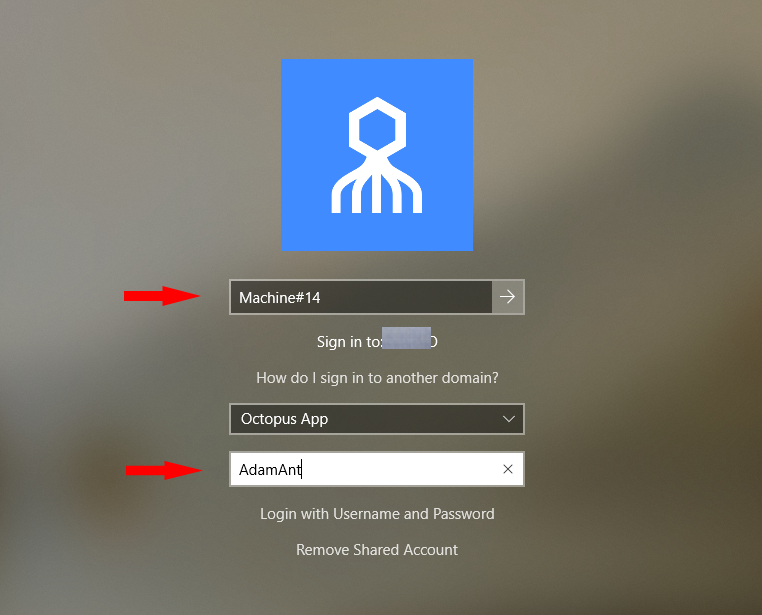
To enable support of shared accounts, some configuration needs to be done in the Windows MSIUpdater and in the Octopus Management Console.
Windows MSIUpdater Configuration
To enable shared account login, in the Settings tab of the MSIUpdater, scroll to Shared Account Settings and select the Shared Account Support checkbox.
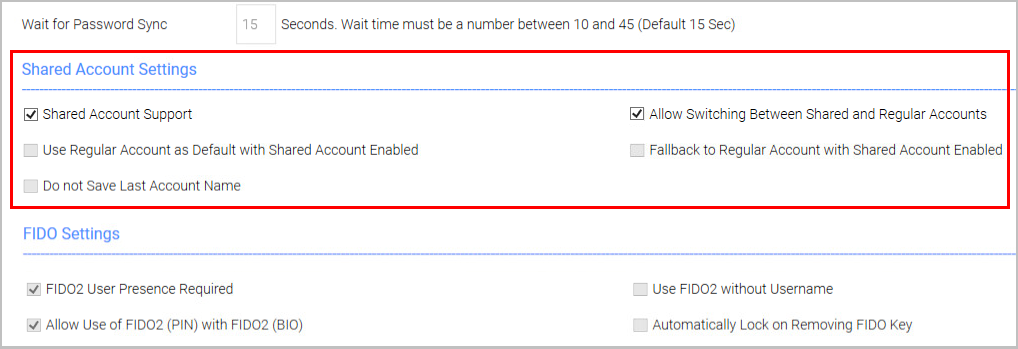
To enable users to choose either a shared account login flow or a standard login flow (to a non-shared account), select the Allow Switching Between Shared and Regular Account checkbox. When this setting is enabled, a link will appear on the Windows Login screen (Remove Shared Account / Use Shared Account) allowing users to switch between the two options.
By default, when switching is allowed, the Windows Login screen presents the shared account login flow. To override this behavior, select the Use Regular Account as Default in Shared Account Enabled checkbox.
When the Fallback to Regular Account with Shared Account Enabled checkbox is also selected, the Windows Login display always returns to the standard (regular account) login flow, even when the last login / unlock was to a shared account.
If you prefer that the usernames of guest users not be displayed on the Login and Unlock screens, select the Do not Save Last Account Name checkbox. When this setting is enabled, guest users need to enter a username every time they access the shared account.
Management Console Configuration
Shared user accounts are designated and managed from the user details of the relevant account.
To activate account sharing:
- From the Manage Users menu of the Octopus Management Console, navigate to the relevant user and click the Edit icon to open the user details.
- From the Account Sharing tab, select the Enable sharing toggle button.
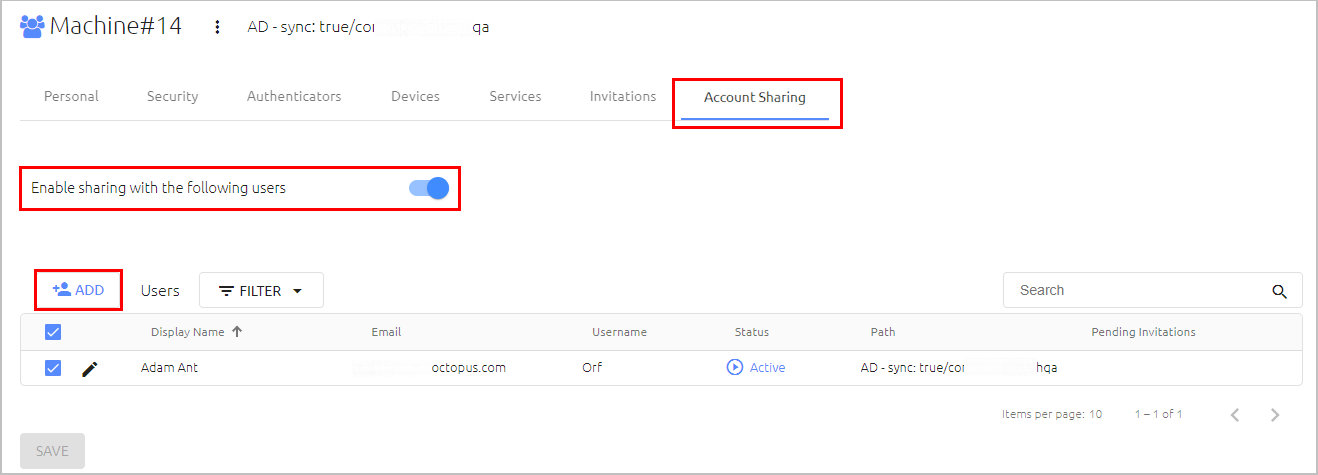
To allow users to log into the shared account, click Add and select the relevant user(s) from the dialog that opens.
Once users are added, you can temporarily block their access to the account when required, by clearing the checkbox in the row of the relevant user(s).
You can also temporarily disable account sharing when necessary by deselecting the Enable sharing toggle. The list of approved users will remain intact while sharing is disabled, so you can quickly and easily reactivate account sharing with those users.
For more details about shared accounts, refer to the Octopus Management Console Admin Guide.
Post-deployment Configuration
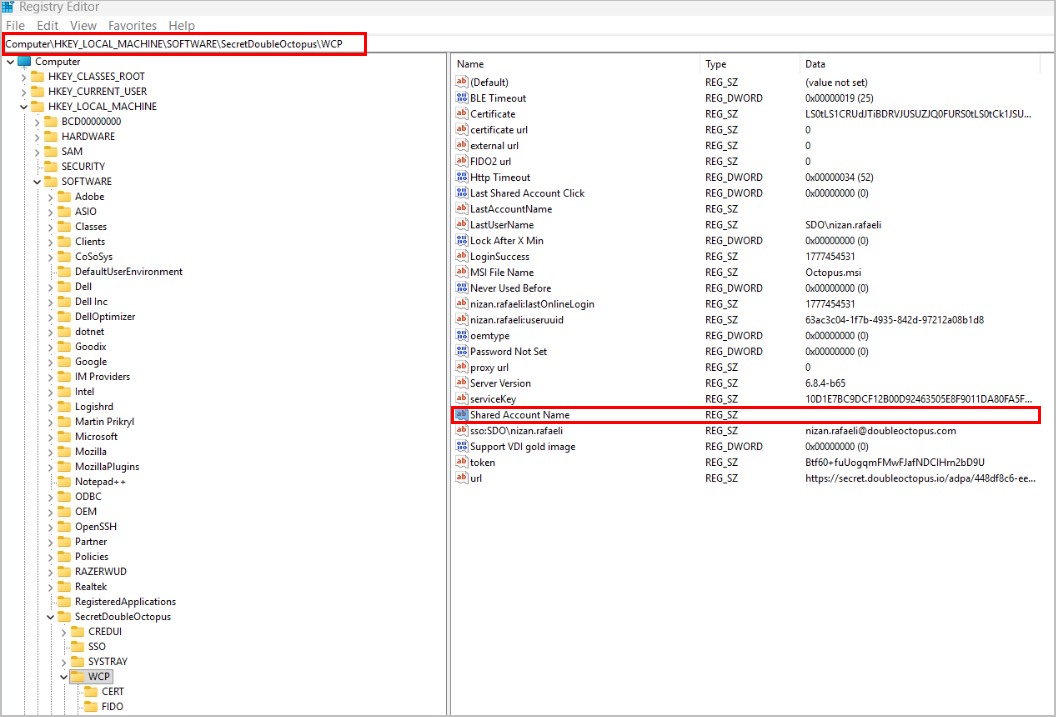
After installing Octopus Desk for Windows, you can ensure that the name of the shared account is prepopulated on the Login screen by editing the WCP registry key.
In the Registry Editor, navigate to Computer\HKEY_LOCAL_MACHINE\SOFTWARE\SecretDoubleOctopus\WCP and enter the relevant value for Shared Account Name.
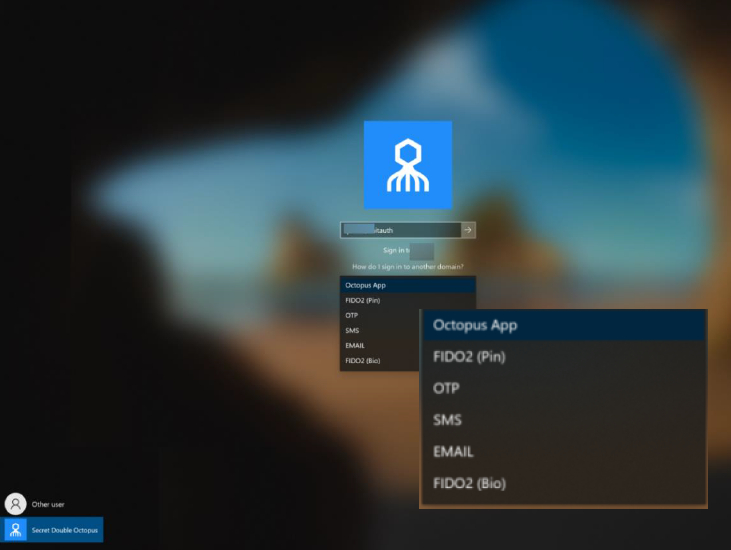
Once installation is completed, users will be able to authenticate to Windows machines using Octopus Authenticator, OKTA Verify, ForgeRock Authenticator, FIDO key authentication or OTP.
For passwordless authentication, users should enter a username and then press <Enter>.
For authentication using MFA, users should enter a username + password and then press <Enter>.
Users can choose from a wide variety of login methods, both online and offline (in the event that a enterprise network is not available). Online login methods are listed and described in the following table.
Authentication Method | User Experience (On mobile) | User Experience (Not on mobile) |
|---|---|---|
Octopus App |
| N/A |
OKTA Verify |
| N/A |
ForgeRock App |
| N/A |
FIDO | N/A |
|
Username + Password | For Bypass users only | For Bypass users only |
Username + Temporary token | For Bypass users only | For Bypass users only |
Octopus online OTP |
| N/A |
Okta online OTP | MFA: Username + Password + OTP | |
ForgeRock online OTP | MFA: Username + Password + OTP | N/A |
Username + Password + SMS | MFA: Username + Password + SMS OTP | |
Username + Password + Email | N/A | MFA: Username + Password + Email OTP |
Octopus app via Bluetooth |
| N/A |
When a enterprise network is unavailable, or mobile is not available, users can login using any of the following offline / off network methods:
Authentication Method | User Experience (On Mobile) | User Experience (Not On Mobile) |
|---|---|---|
Username + Password | For Bypass users only | For Bypass users only |
FIDO | N/A |
|
Octopus offline OTP | MFA: Username + Password + OTP | N/A |
ForgeRock offline OTP | MFA: Username + Password + OTP | N/A |
Octopus app via Bluetooth |
| N/A |
Note: Bluetooth can be used in Windows 10 (and above) systems only.
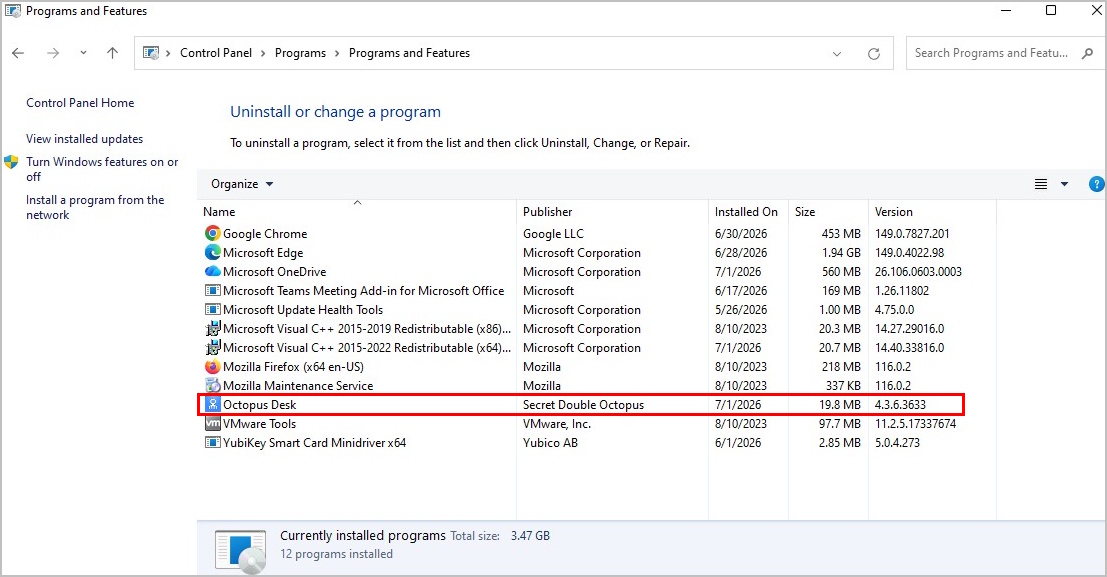
You may uninstall Octopus Desk for Windows via the system Settings or via the command line.
Uninstalling via System Settings
Using Admin permissions, navigate to Settings > Apps. Select Octopus Desk from the list of installed programs and uninstall it.
Uninstalling via the Command Line
Run the following command to uninstall Octopus Desk for Windows:
C:\> msiexec /x {F88FAA40-72B9-4CE0-88DA-6592EF361C94}
To enable remote desktop login, the following additional configurations are required.
The following procedure explains how to make required edits to the RDP script.
To edit the RDP script:
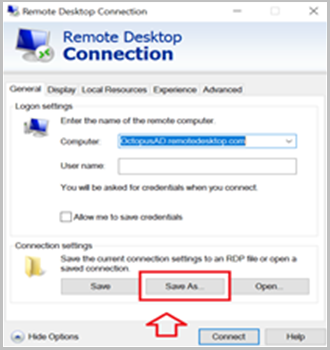
Launch a Remote Desktop Connection.
Select the remote computer and click Show Options.
Under Connection Settings, click Save As and save the RDP script.
Add the following line to the script:
enablecredsspsupport:i:0
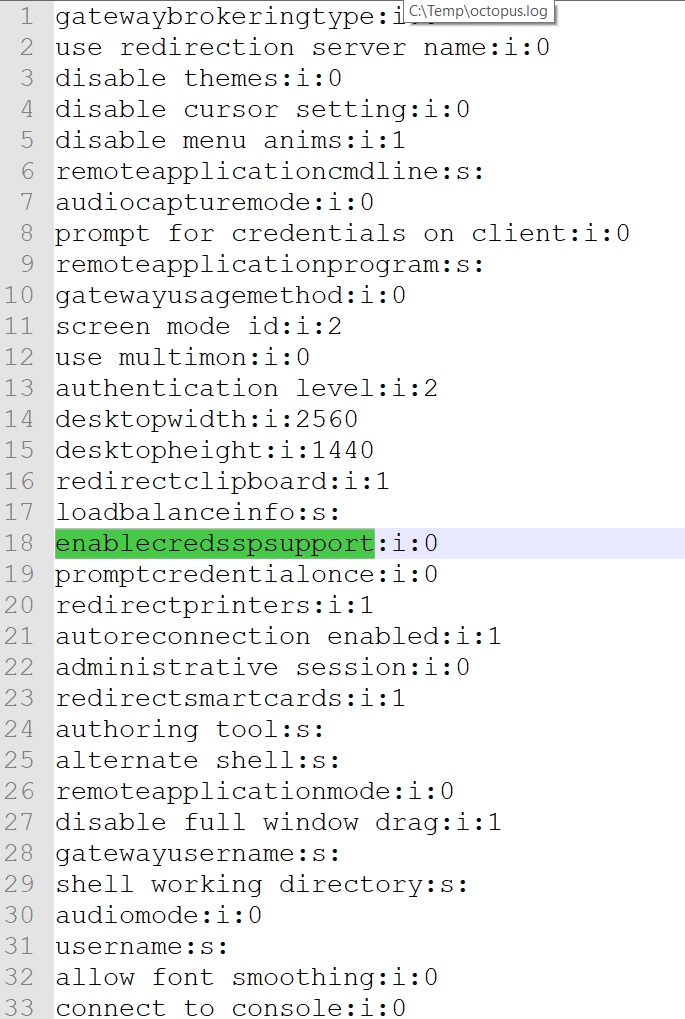
Save the script.
The procedure below explains how configure system protection settings for the remote machine.
To configure system protection settings:
Log into the designated remote desktop Windows machine.
Open the System Properties Settings application and select the Remote tab.
Under Remote Desktop:
Select the Allow remote connections to this computer radio button
Verify that the Allow connections only from computers running Remote Desktop with Network Level Authentication checkbox is NOT selected.
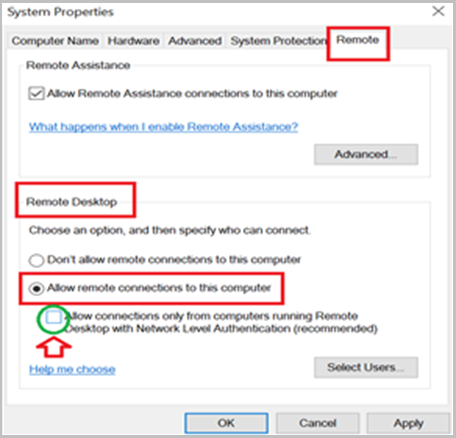
Click Apply.
The self-signed certificated can be found on the Octopus Authentication Server in the following location: /etc/pki/nginx/selfsigned.crt This certificate should be copied to the Windows environment to allow the self-signed certificate to work with Octopus Desk for Windows.
The self-signed certificate should be imported to the root certificate folder on the Windows machine that is using Octopus Desk.
Note: This action should be done for POC purposes and not for the production environment.
To import the self-signed certificate:
Open the Microsoft Management Console (mmc.exe).
From the File menu, select Add/Remove Snap-in.
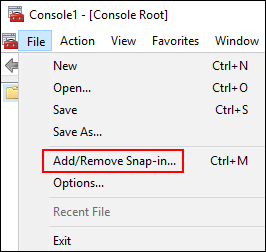
Then, double-click Certificates.
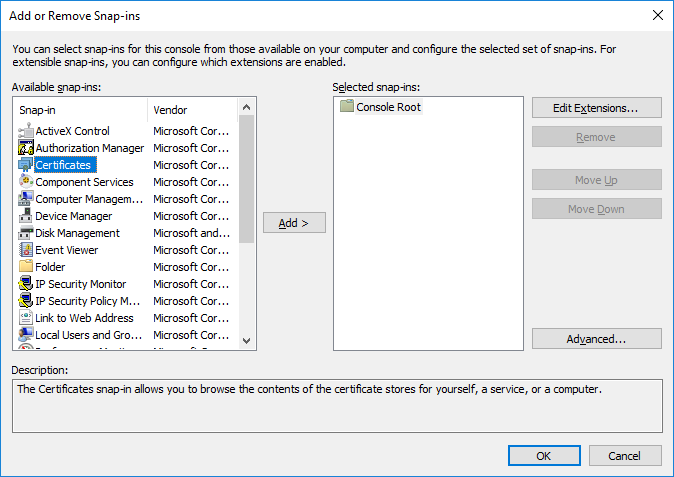
From the Certificates snap-in wizard, select the Computer account radio button. Then, click Next.
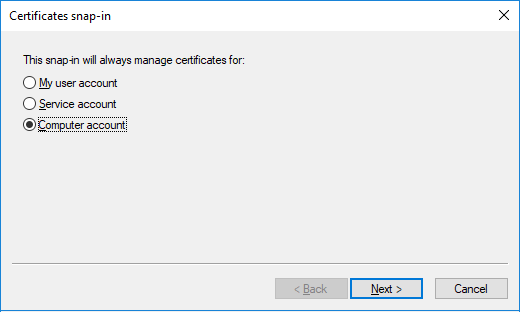
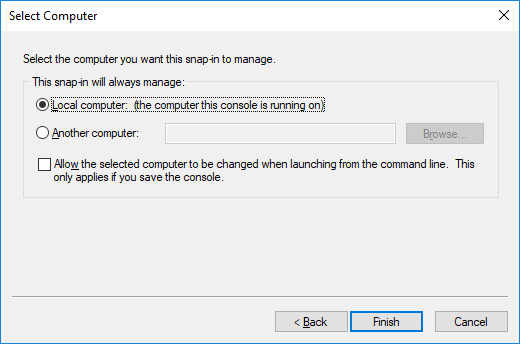
Select the Local computer radio button. Then, click Finish.
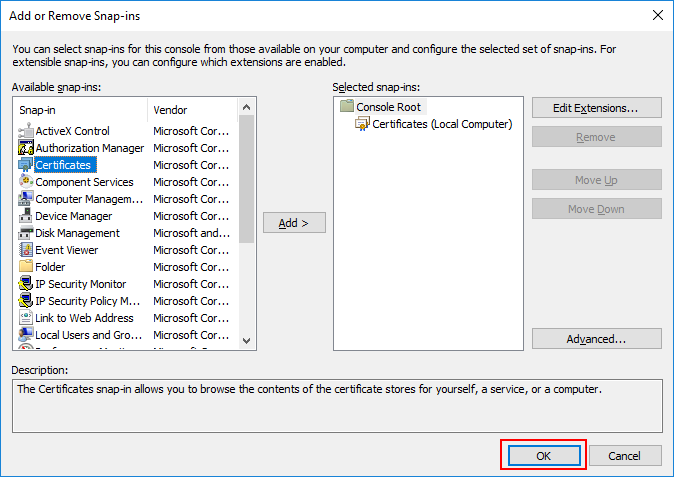
At the bottom of the Add or Remove Snap-ins dialog, click OK to close the dialog.
From the Certificates tree, select Trusted Root Certification Authorities > Certificates.
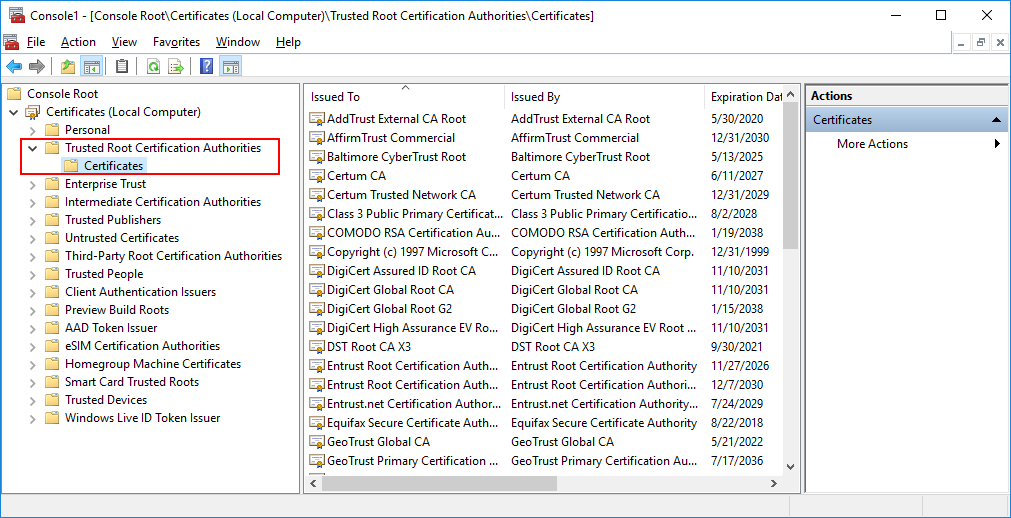
Right-click on Certificates, and select All Tasks > Import.
The Certificate Import Wizard opens.
On the first page of the wizard, click Next.
Click Browse and select the self-signed certificated (copied from the Linux server).
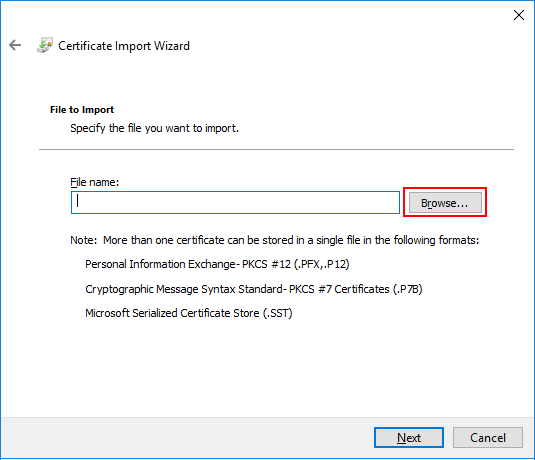
Then, click Next.
Select the Place all certificated in the following store radio button. Then, click Next.
After reviewing the certificate details, click Finish.
A confirmation message is displayed.
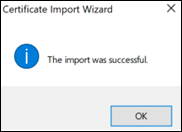
In the Certificates node, verify that the new certificate appears in the list of certificates.
Octopus Desk for Windows supports the ability to control availability of the Octopus Authentication credential provider (CP) on target machines after installation. This feature allows for bulk installation, followed by gradual deployment on group / user workstations.
Workstations on which the Octopus Authentication CP is manually disabled post-installation will not support Octopus Authentication as a means of logging into Windows. The installation of Octopus Desk will be transparent to users, who will not see the Octopus CP on the Login screen and will continue to login as they did prior to installation.
To disable the Octopus Authentication CP post-installation, use the following syntax:
[HKEY_LOCAL_MACHINE\SOFTWARE\Microsoft\Windows\CurrentVersion\Authentication
\Credential Provider Filters\{a95d85be-778f-4ed1-9ded-9f62ecc8a744}]
@="SDOCredentialProvider"
"Disabled"=dword:00000001
[HKEY_LOCAL_MACHINE\SOFTWARE\Microsoft\Windows\CurrentVersion\Authentication
\Credential Providers\{a95d85be-778f-4ed1-9ded-9f62ecc8a744}]
@="SDOCredentialProvider"
"Disabled"=dword:00000001
To enable the Octopus Authentication CP, use the following syntax:
[HKEY_LOCAL_MACHINE\SOFTWARE\Microsoft\Windows\CurrentVersion\Authentication
\Credential Provider Filters\{a95d85be-778f-4ed1-9ded-9f62ecc8a744}]
@="SDOCredentialProvider"
"Disabled"=dword:00000000
[HKEY_LOCAL_MACHINE\SOFTWARE\Microsoft\Windows\CurrentVersion\Authentication
\Credential Providers\{a95d85be-778f-4ed1-9ded-9f62ecc8a744}]
@="SDOCredentialProvider"
"Disabled"=dword:00000000