This document describes the procedures required for integrating the Secret Double Octopus solution with Azure AD directories, enabling passwordless authentication for Azure AD users to all Octopus-protected services, e.g., login to Windows and the User Portal.
 |
The end-to-end integration process involves the following stages:
Before you begin, make sure that you have:
A configured Azure AD Domain Services managed domain
Access to your organization’s certificate for LDAPS connection (.pfx file) and the associated password.
The following sections describe how to configure the Azure Portal to integrate with Secret Double Octopus for passwordless authentication to Windows:
Follow the procedures below to register an app for Secret Double Octopus, assign permissions and create a client secret.
Follow these steps to add an application registration that enables authentication against Azure AD.
To perform app registration:
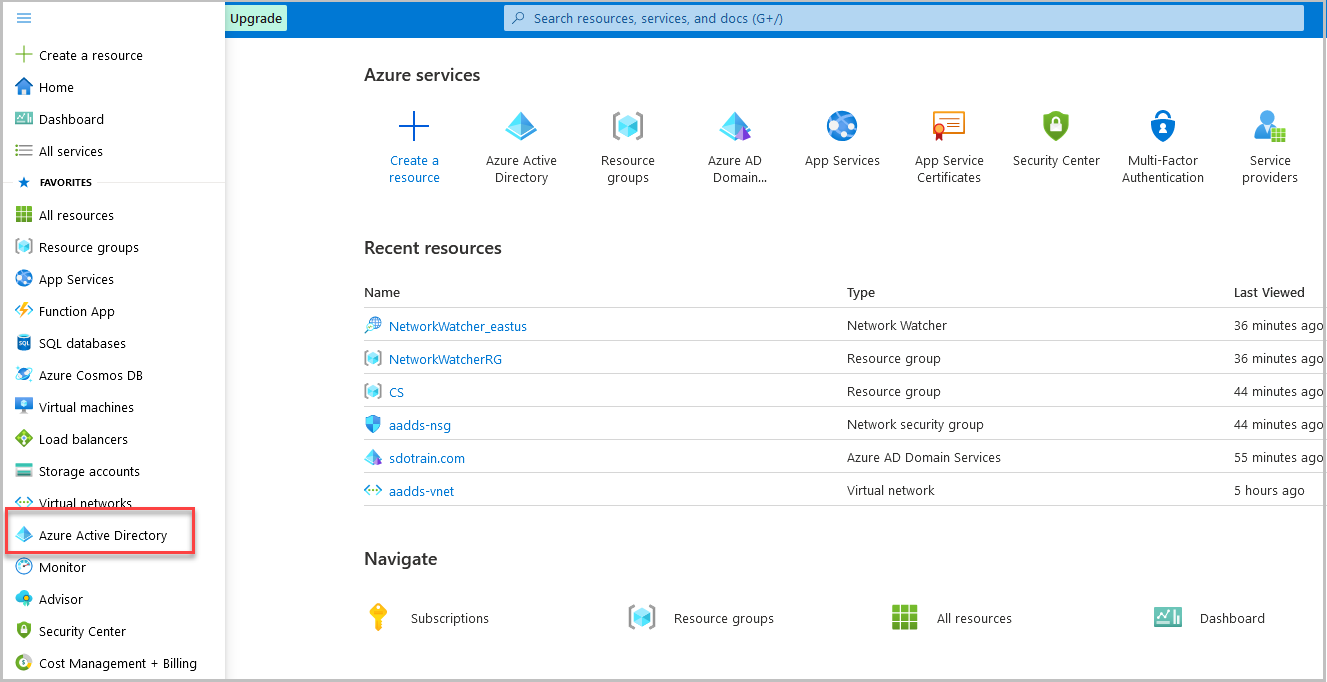
Log into your Azure Admin Portal. From the menu bar, select Azure Active Directory.
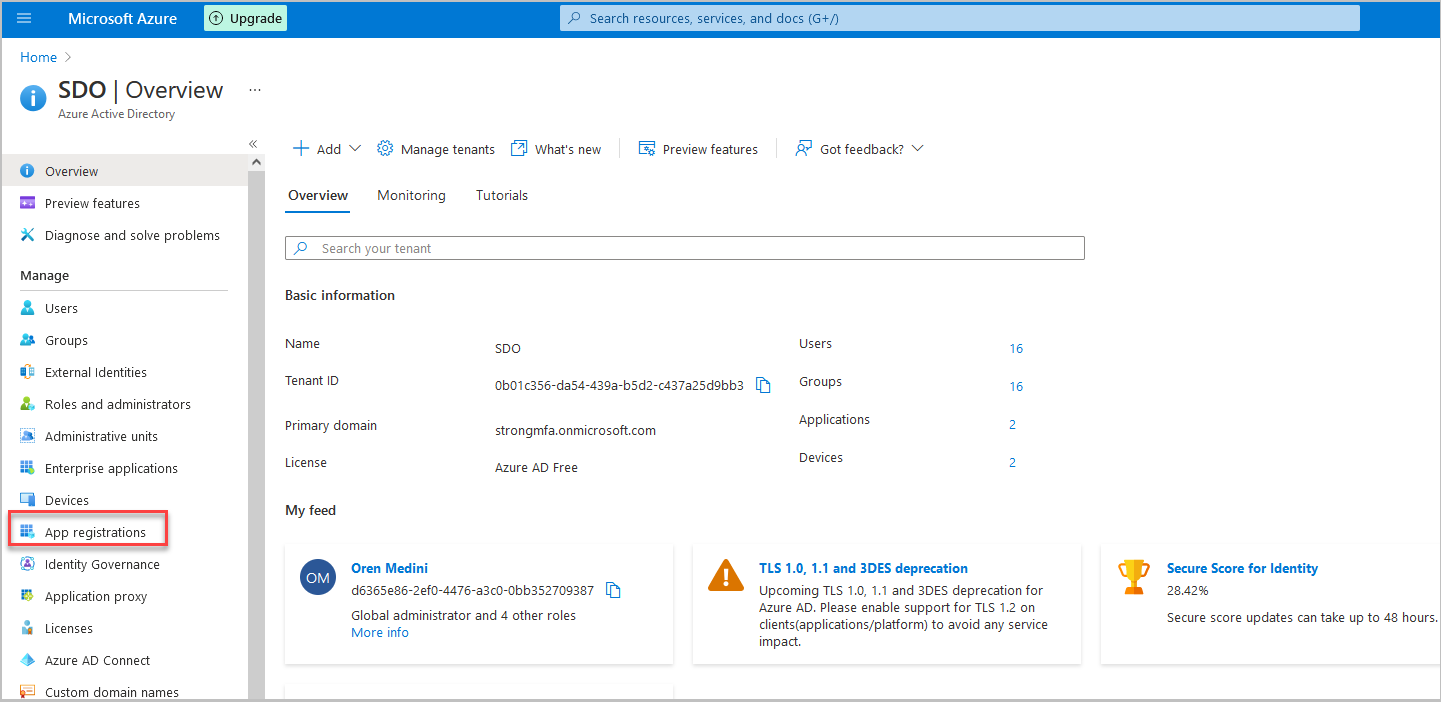
From the menu bar on the page that opens, select App Registrations.
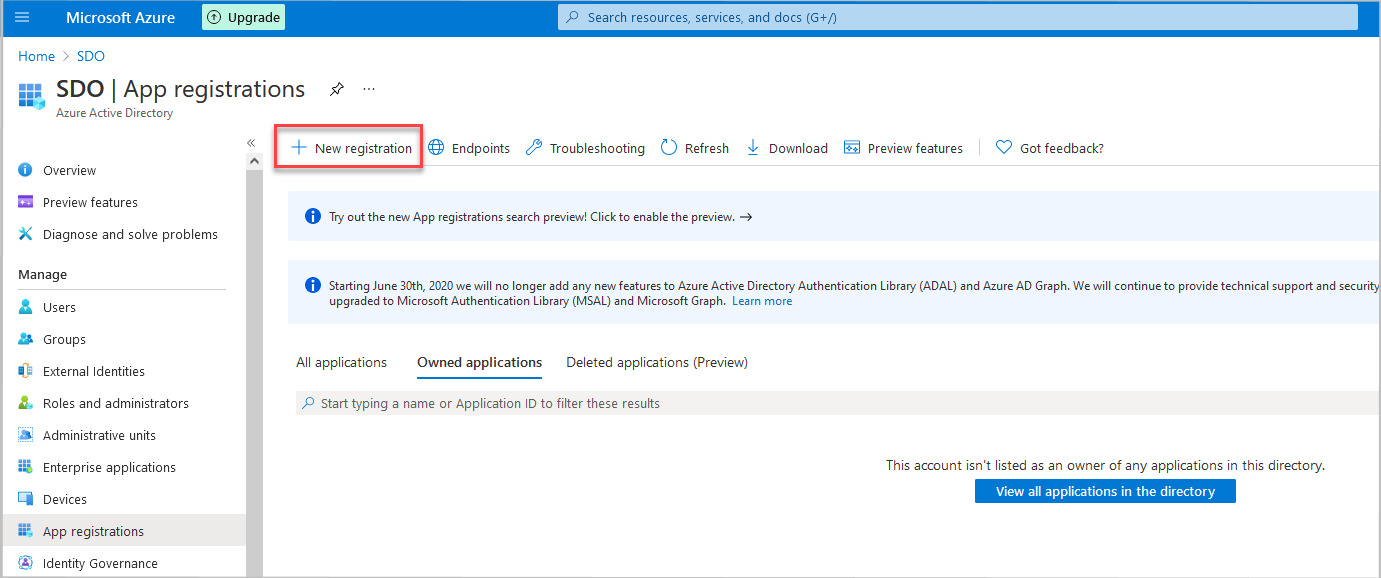
At the top of the App Registrations page, click New Registration.
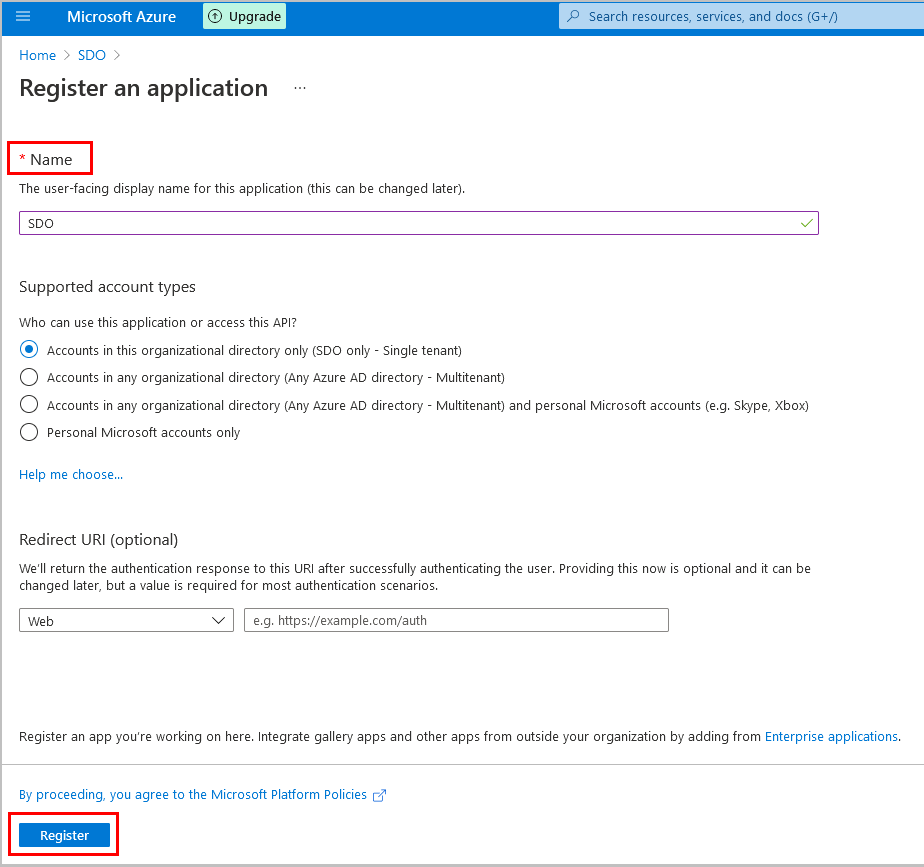
In the window that opens, enter a name for the app (e.g., SDO), and then click Register.
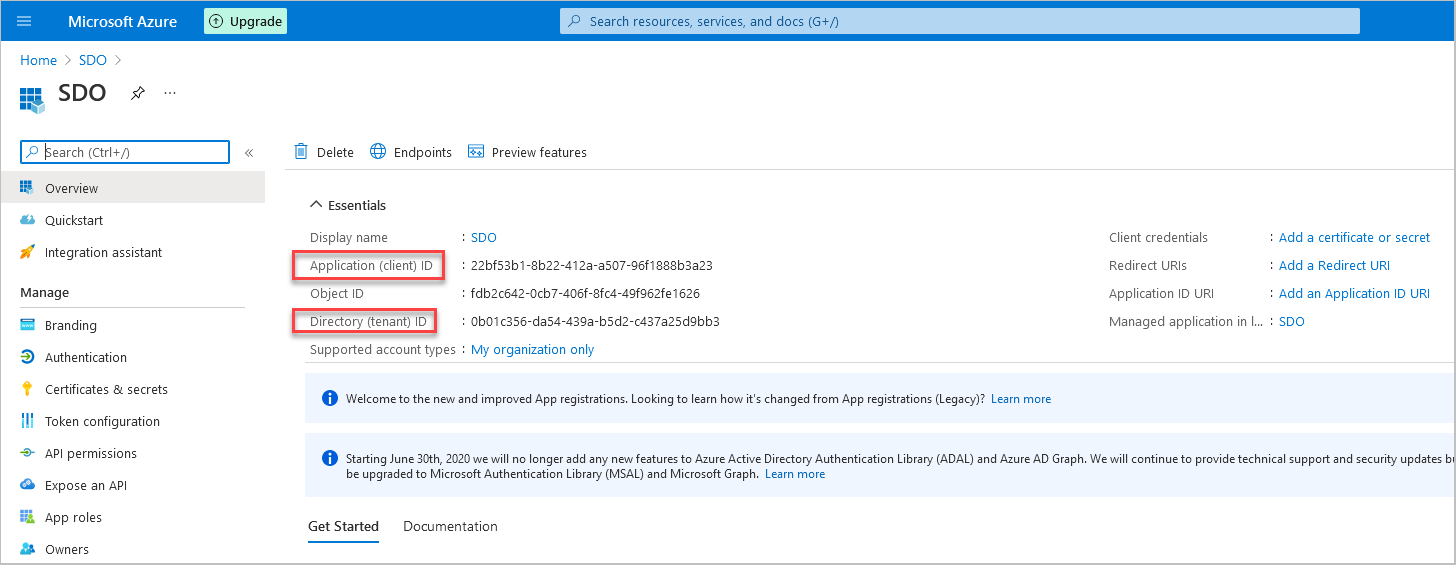
The application is created. On the application’s Overview page, you can view the Application (client) ID and the Directory (tenant) ID. These values will be needed later when configuring Azure AD integration settings in the Octopus Management Console.
The procedure below explains how to add permissions that allow the Secret Double Octopus app to access the Azure AD.
To configure app permissions:
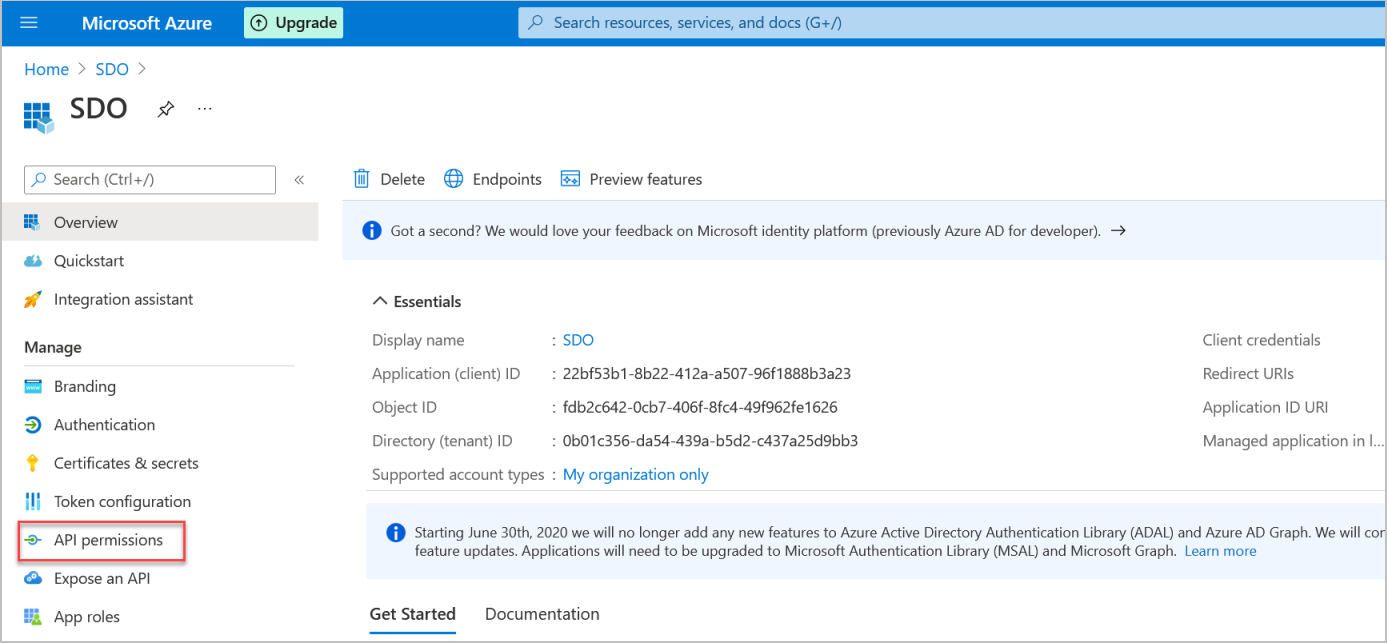
From the menu bar on the application’s Overview page, select API Permissions.
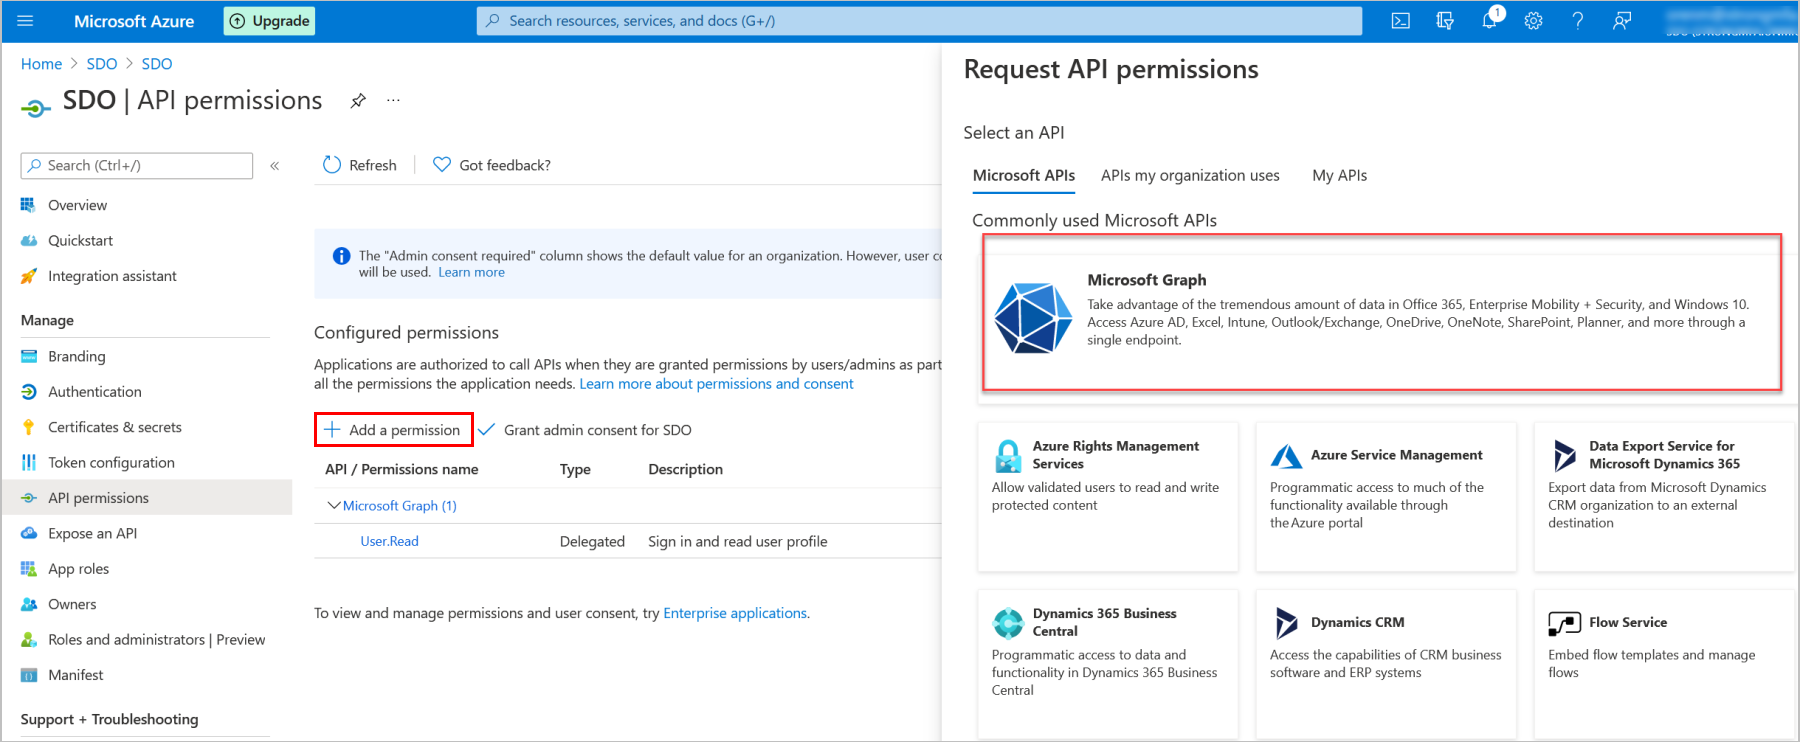
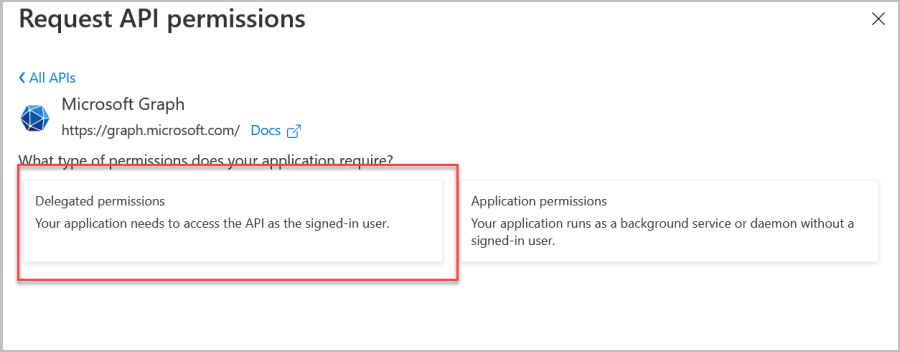
On the API Permissions page, click Add a Permission. Then, from the Request API permissions dialog, select Microsoft Graph.
Select Delegated Permissions.
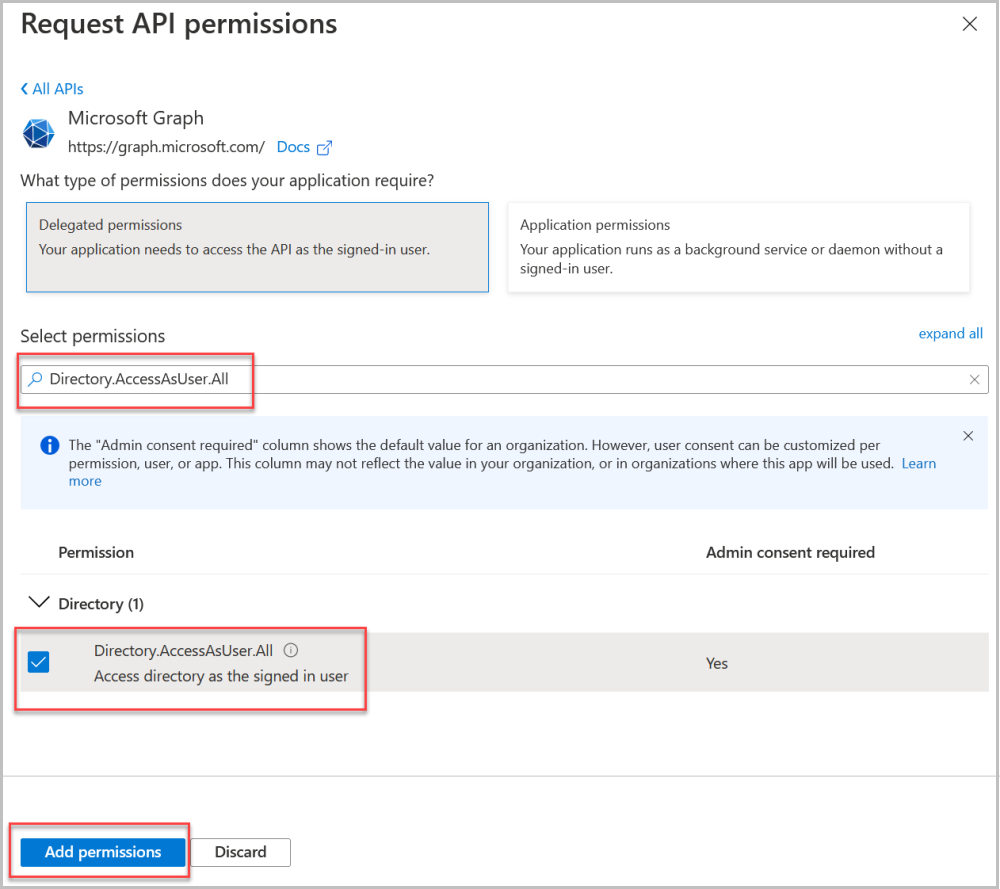
Select the Directory.AccessAsUser.All permissions. Then, click Add permissions.
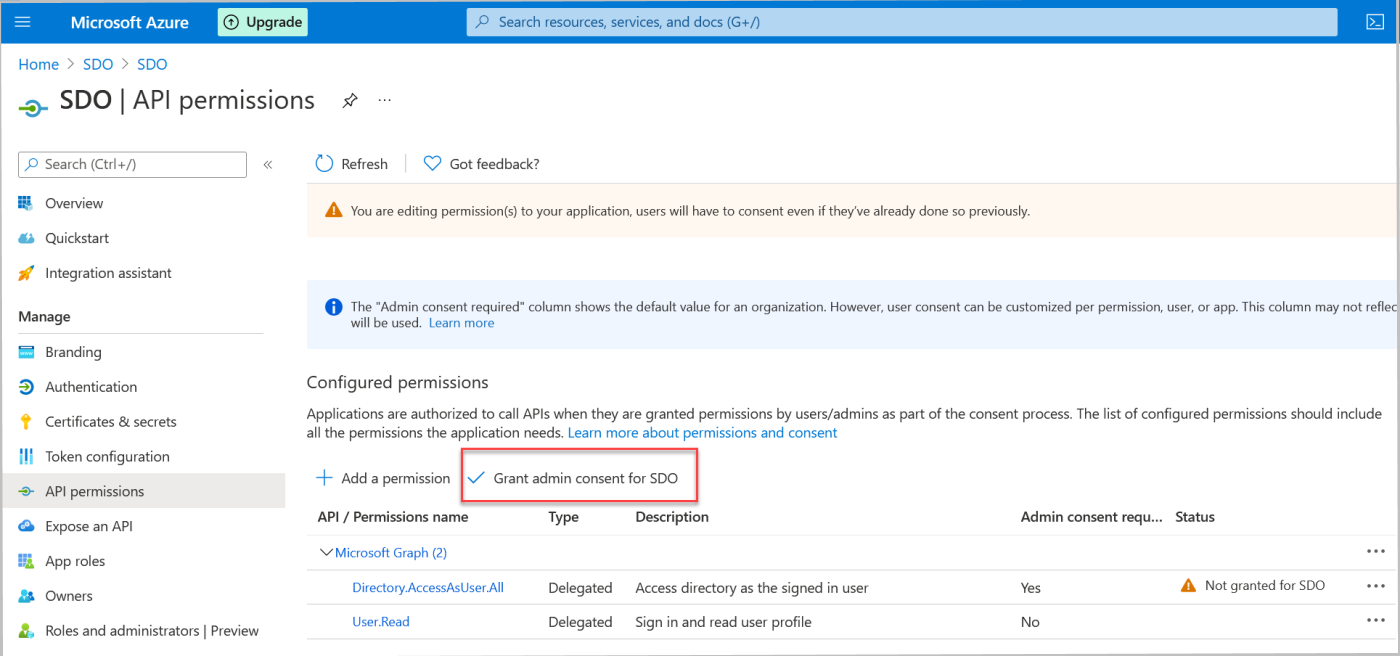
To apply your changes, click Grant admin consent for<name of app>.
Follow these steps to create a client secret for the application. You will use the secret later when configuring Azure AD integration settings in the Octopus Management Console.
To create the client secret:
From the menu bar on the application’s Overview page, select Certificates & secrets. Then, click New client secret.
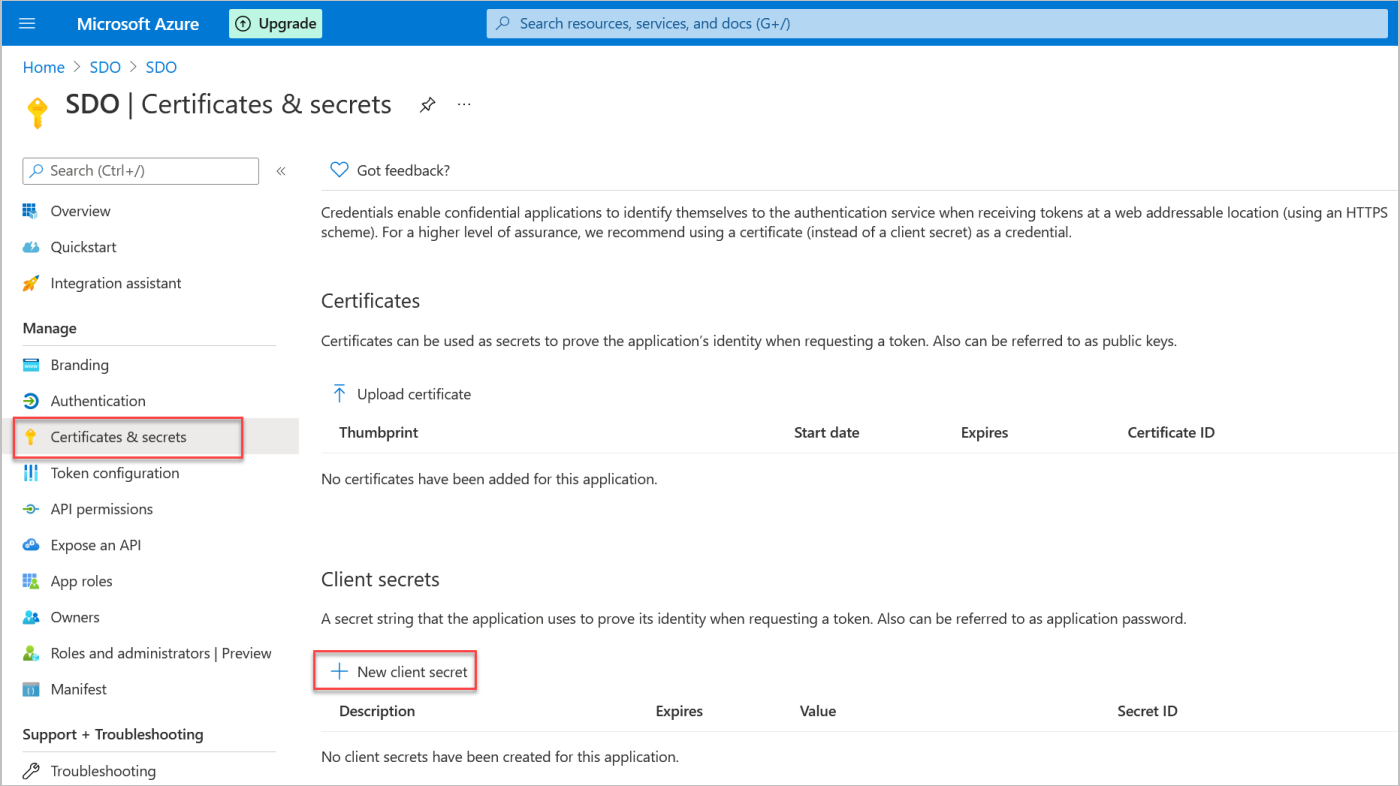
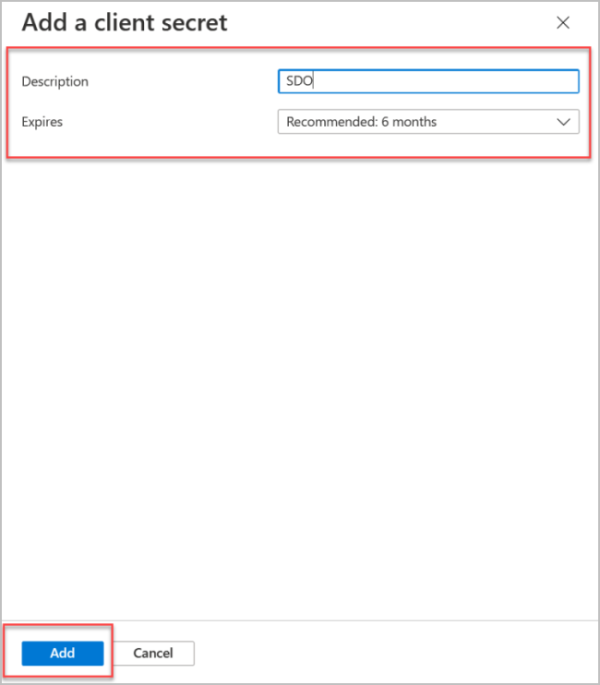
In the dialog that opens, enter a description and select an expiration period. Then, click Add.
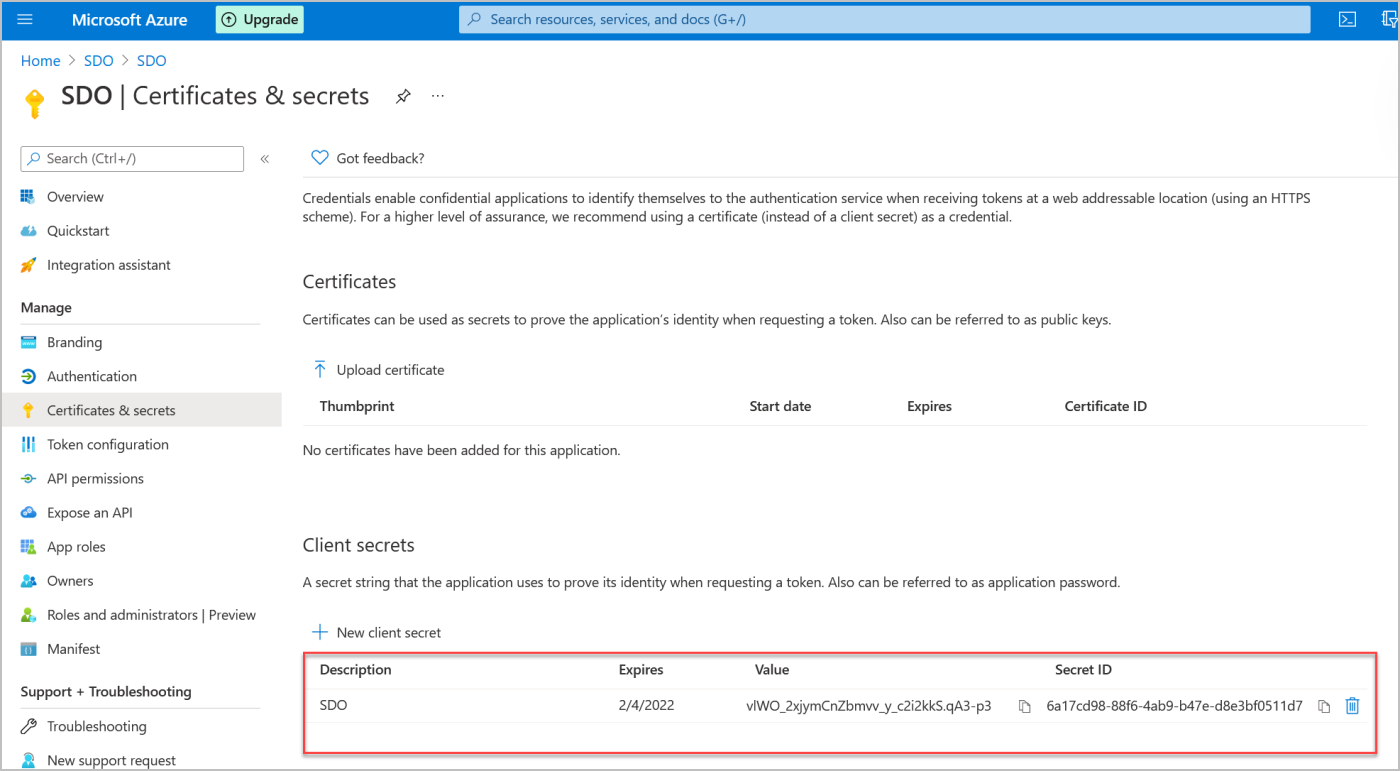
The dialog closes and the new secret is displayed under Client secrets.
Copy the secret value in a secure location, for later use. You will not be able to access the secret again after navigating away from this page.
Follow the procedure below to create a domain controller in the cloud and add a secure LDAP interface, which is required for password rotation.
To create Azure AD Domain Services:
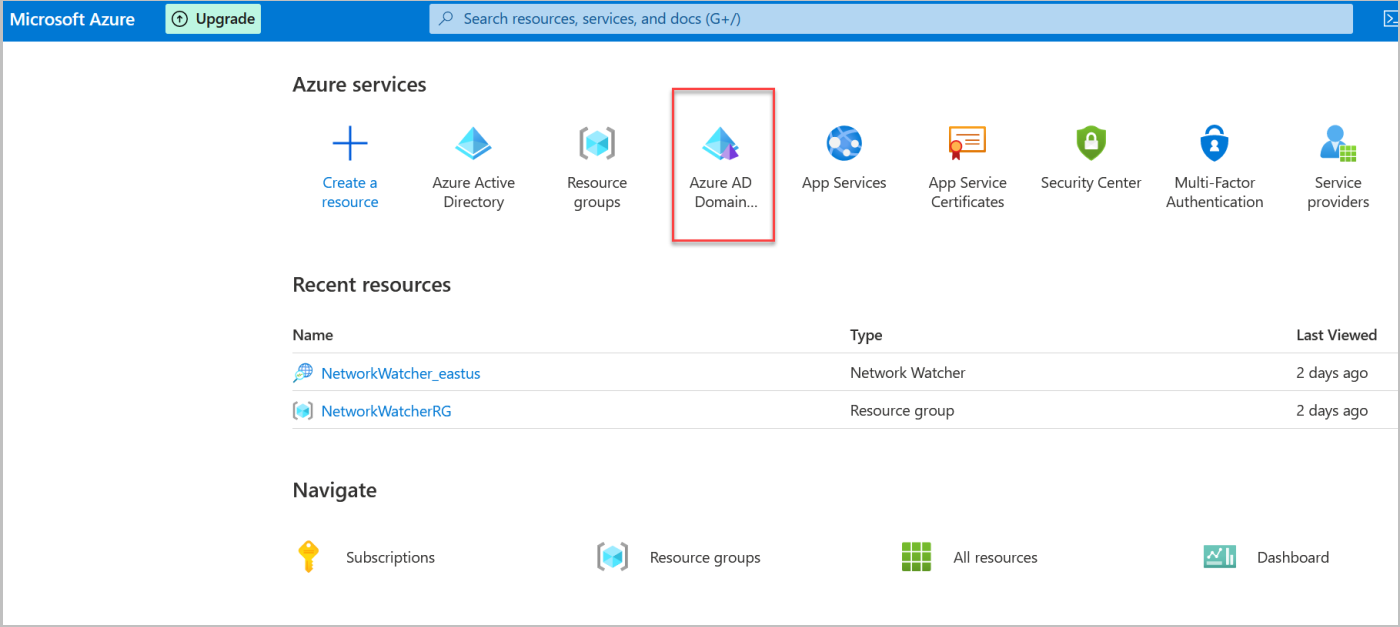
Log into the Azure Admin Portal and select Azure AD Domain Services.
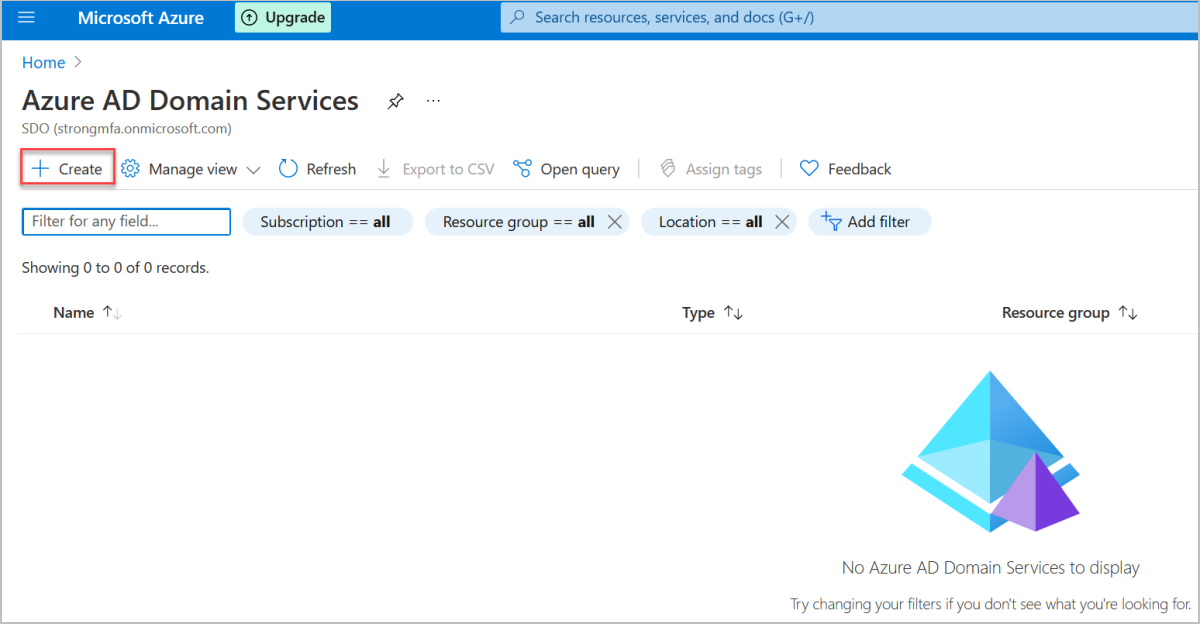
On the Azure AD Domain Services page, click Create.
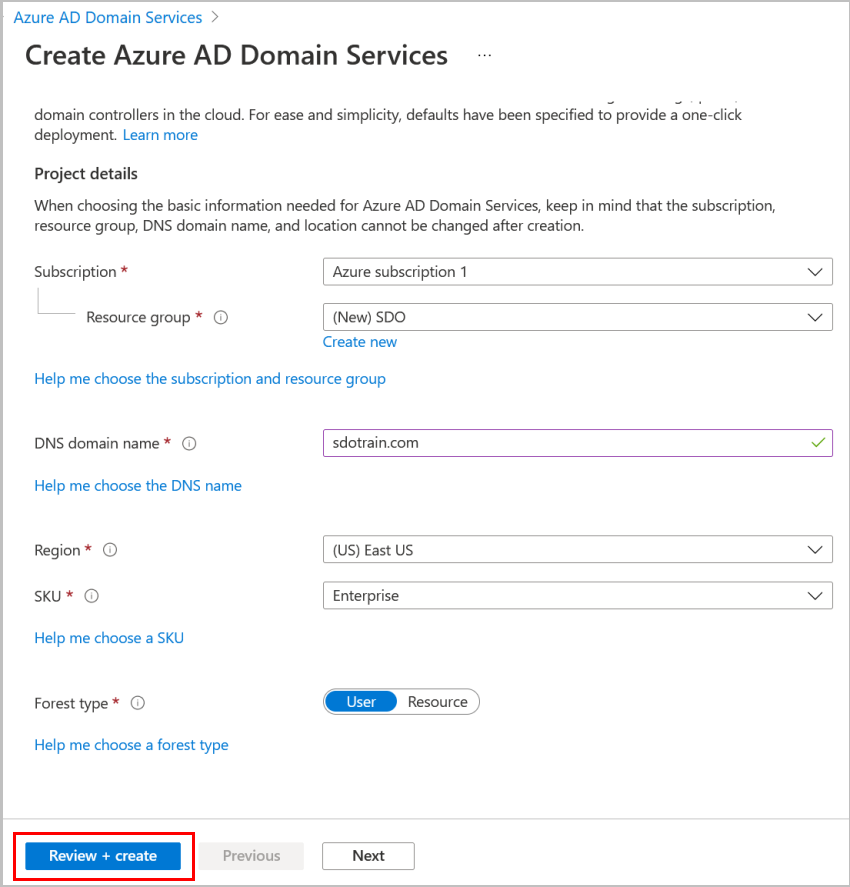
In the window that opens, specify the settings relevant to your environment. (Note that in the example below, the DNS domain name is sdotrain.com.)
To begin deployment, click Review + create.
Note: Deployment of Azure AD Domain Services may take up to one hour.
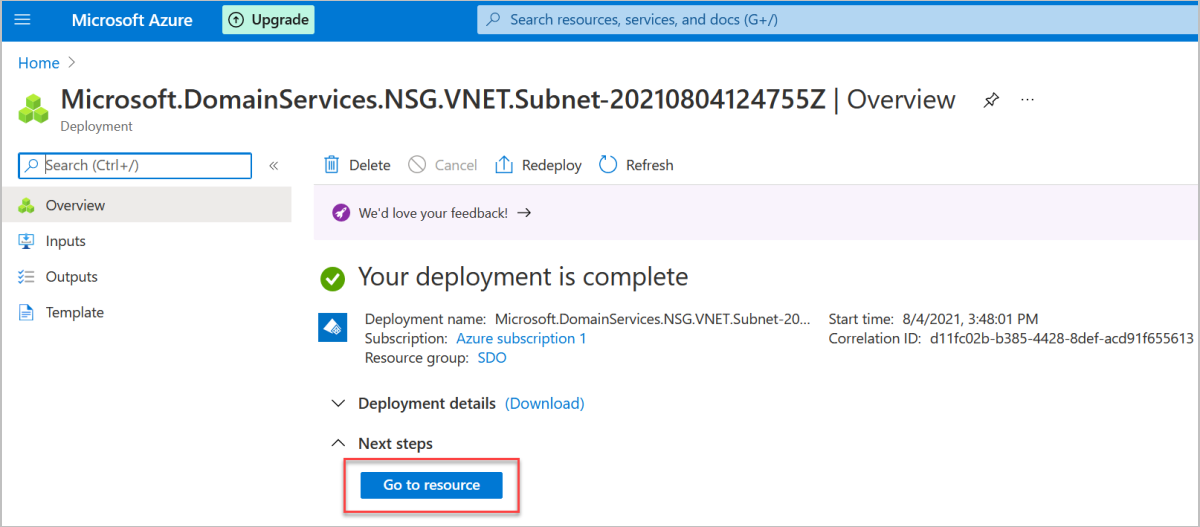
When deployment is complete, click Go to resource.
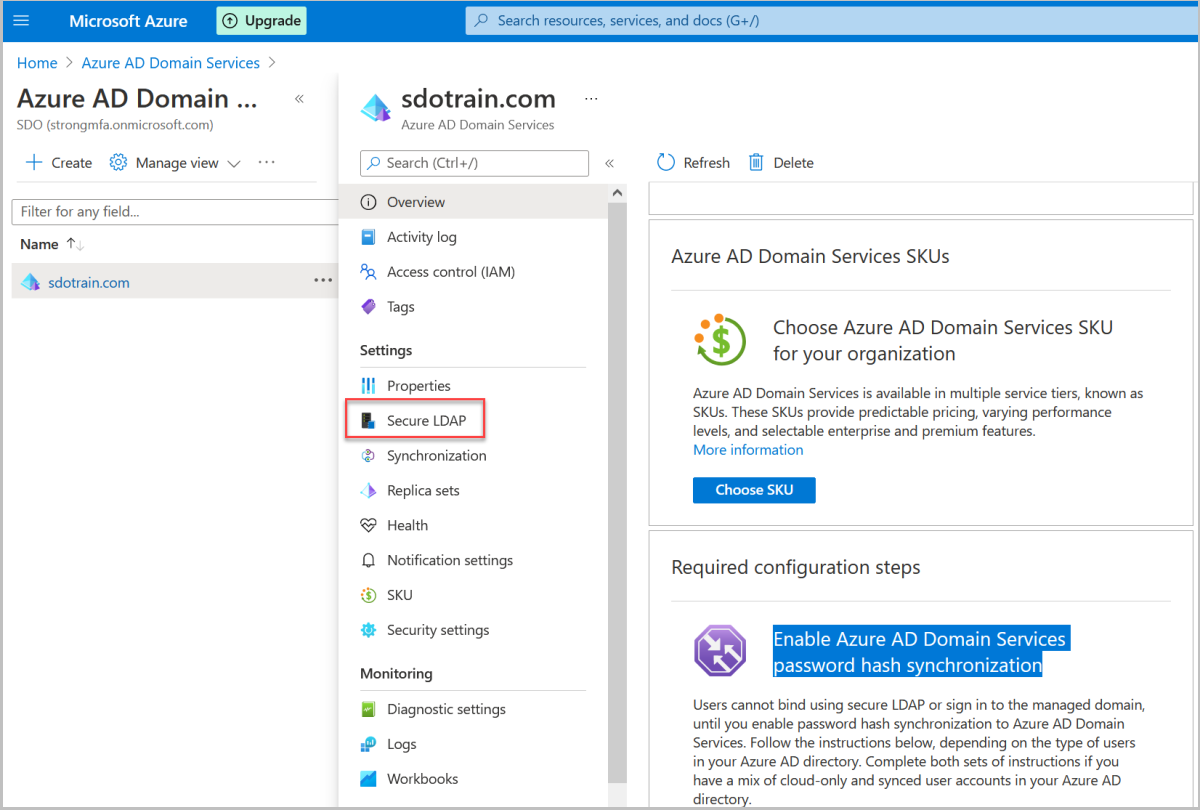
Important: The sequence described in this procedure is for a cloud-only environment. If you are working with AD Sync, some additional steps are required, e.g., Enable Azure AD Domain Services password hash synchronization.
On the page that opens, select Secure LDAP.
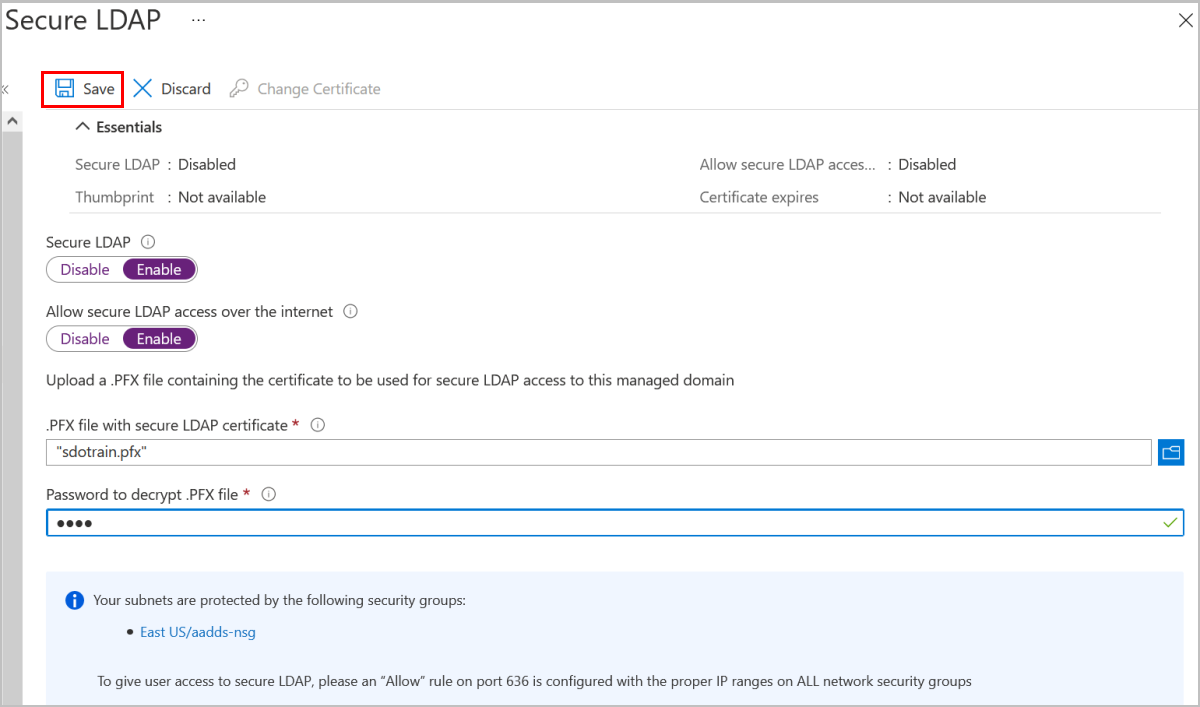
On the Secure LDAP page:
Enable Secure LDAP.
If required, enable Allow secure LDAP access over the internet.
Upload your organization’s secure LDAP certificate and enter the password.
Click Save.
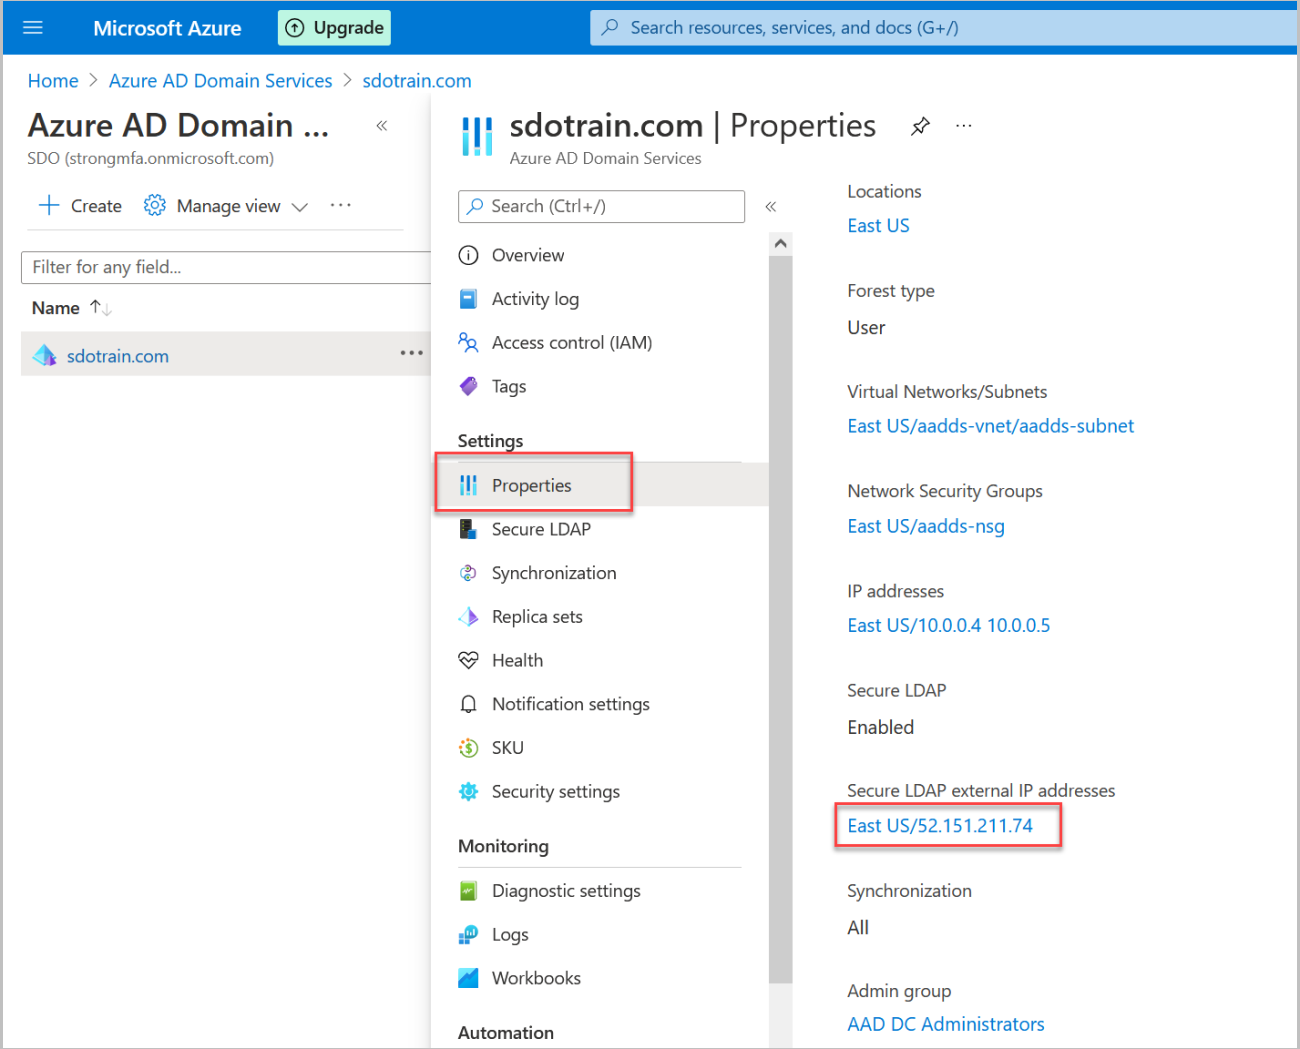
From the menu bar, select Properties.
If SDO is not configured to use DNS, copy the Secure LDAP external IP address and add it to the SDO hosts file. (In this example it would be added as ldap.sdotrain.com.)
The following procedure explains how to set the firewall in Azure AD to open port 636, which will be used for a secure LDAP connection.
To configure the inbound connection port:
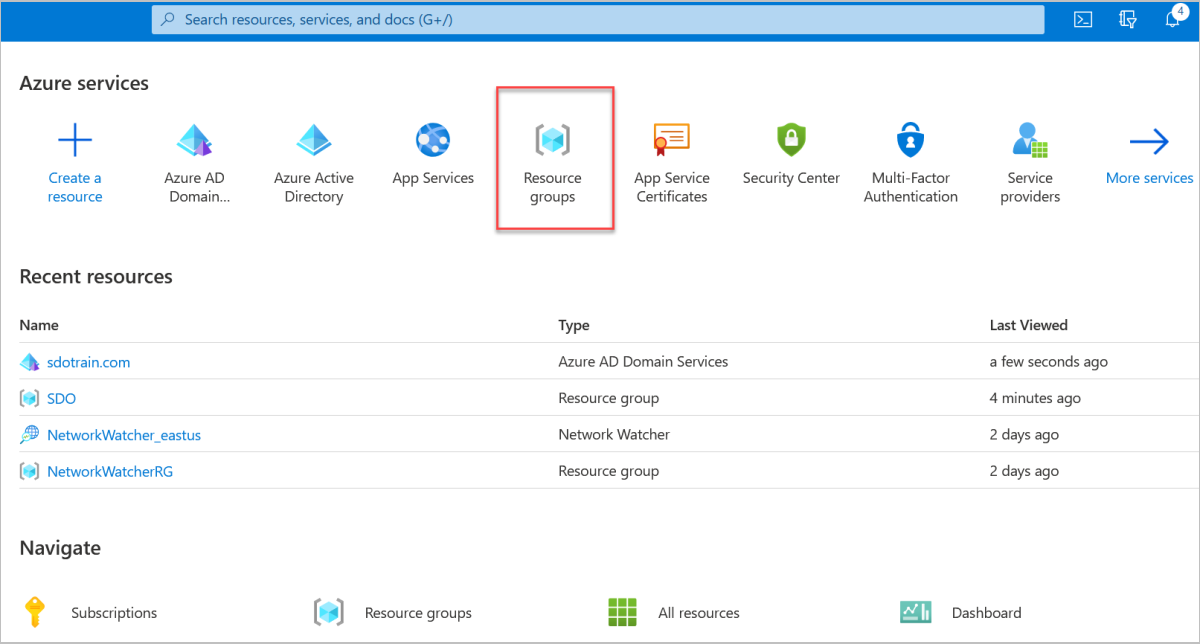
From the Azure Admin Portal, select Resource Groups.
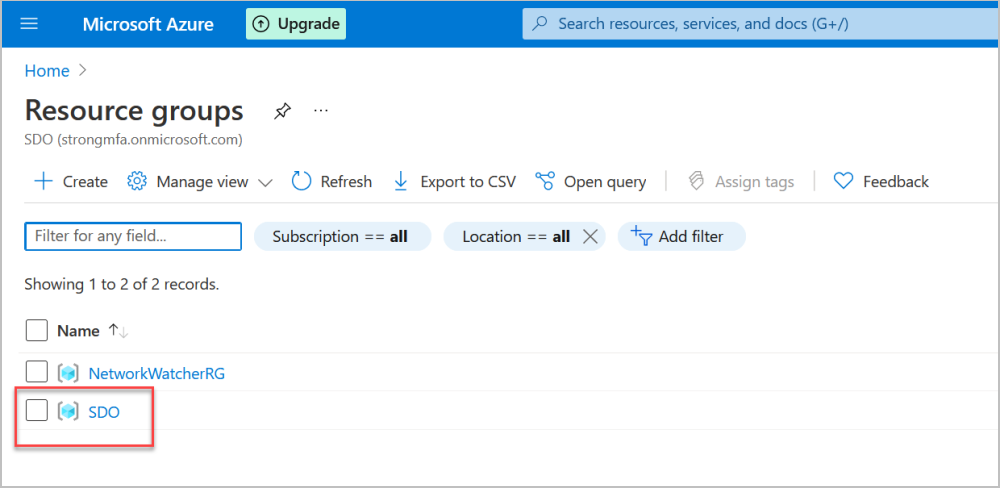
On the Resource groups page, select the resource group you created (in this example, SDO).
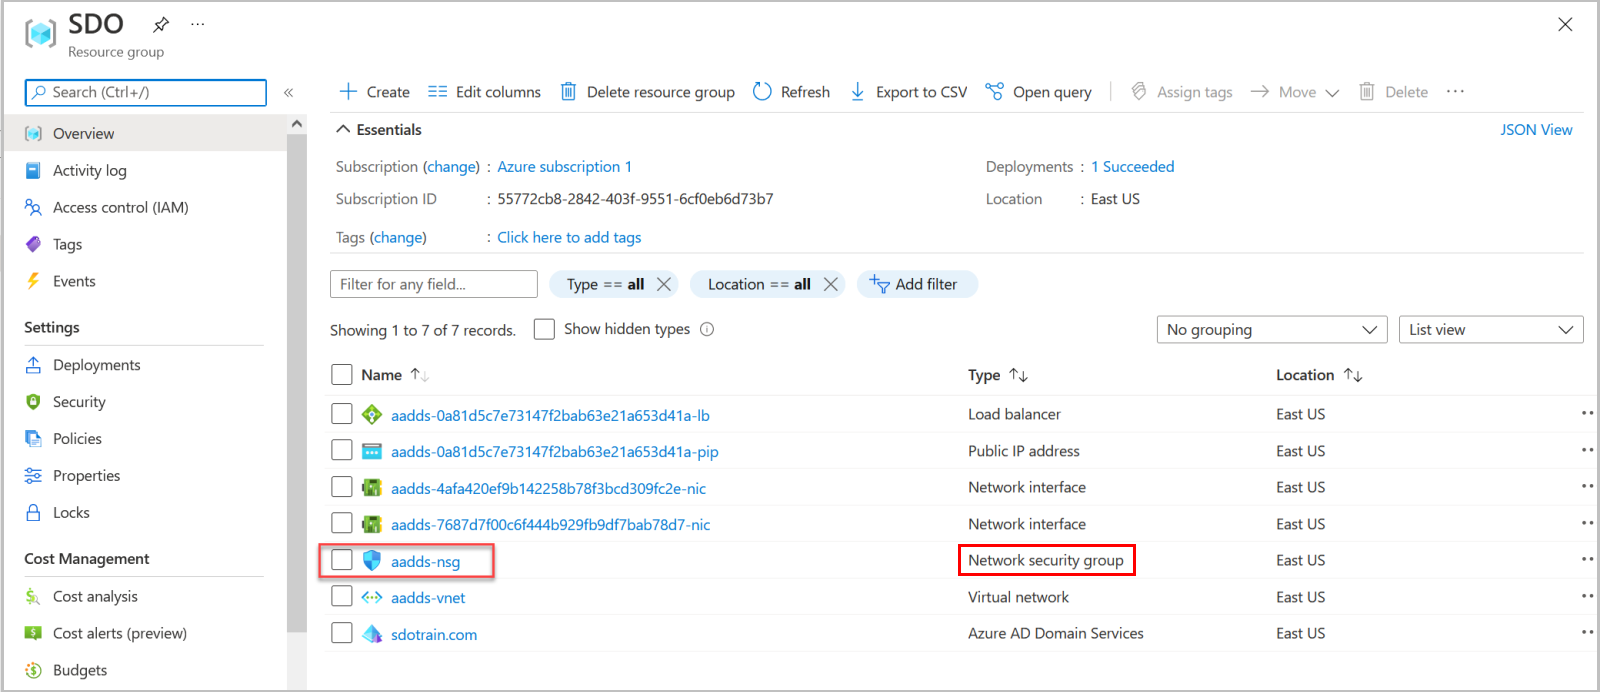
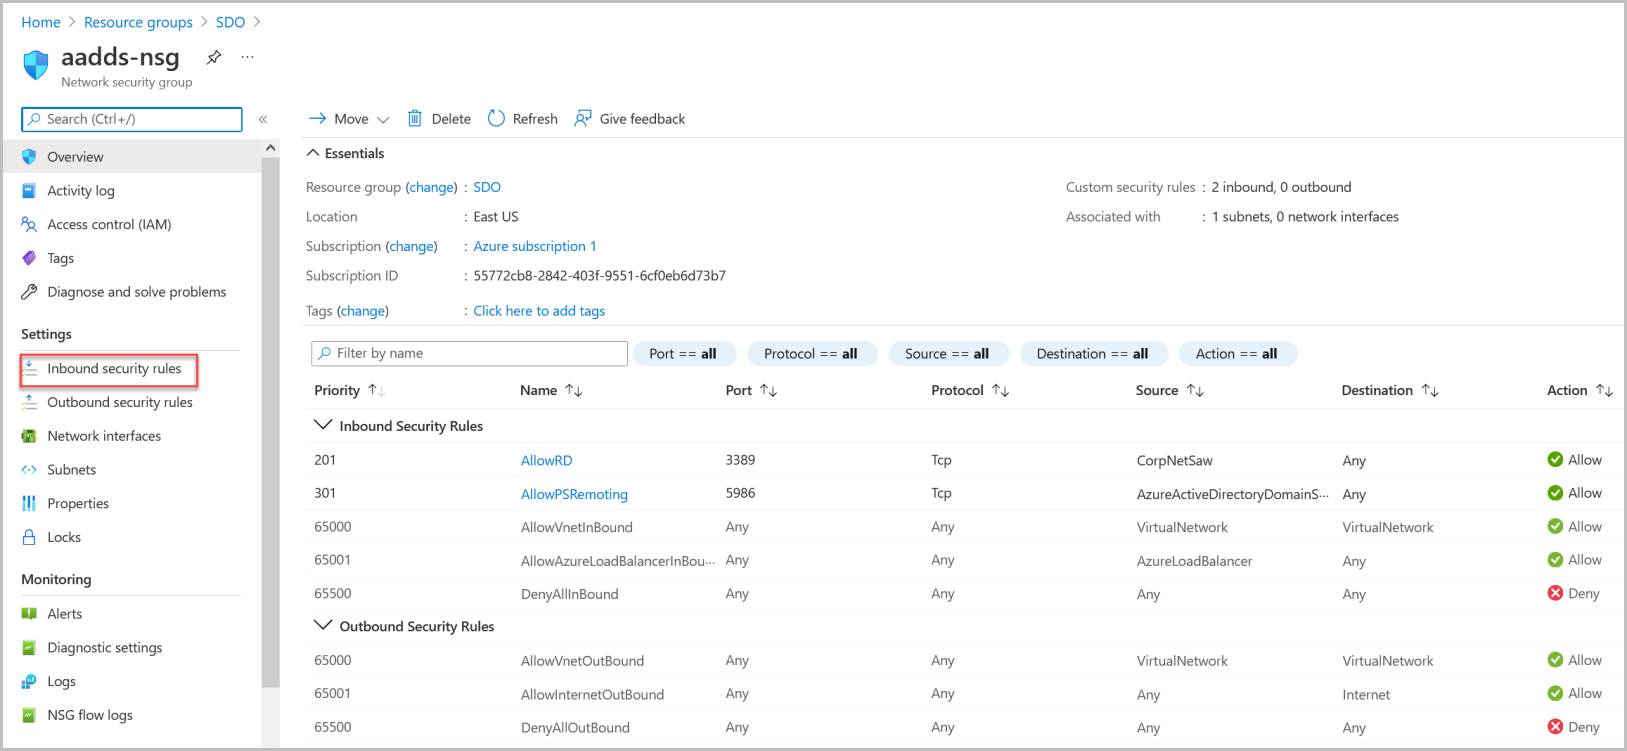
On the page that opens, select the Network Security Group.
From the menu bar, select Inbound security rules.
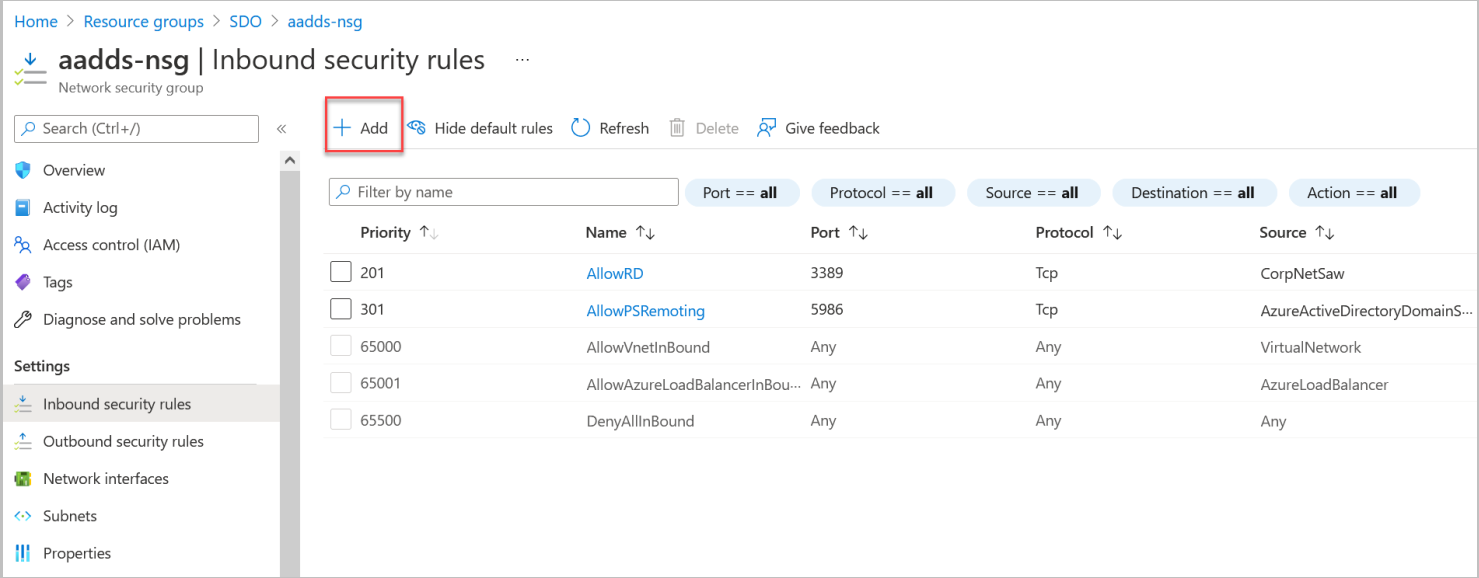
At the top of the Inbound security rules page, click Add.
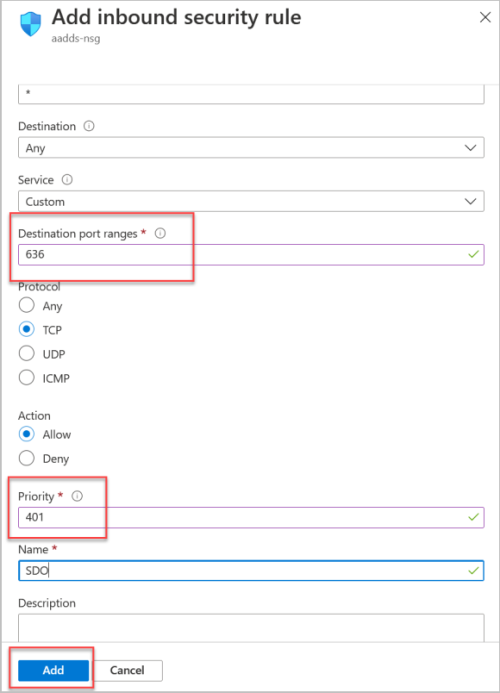
In the window that opens, add the relevant LDAPS port (636). Then, click Add.
The Password Reset option needs to be enabled in order to support password rotation.
To enable password reset:
Log into your Azure Admin Portal. From the menu bar, select Azure Active Directory.
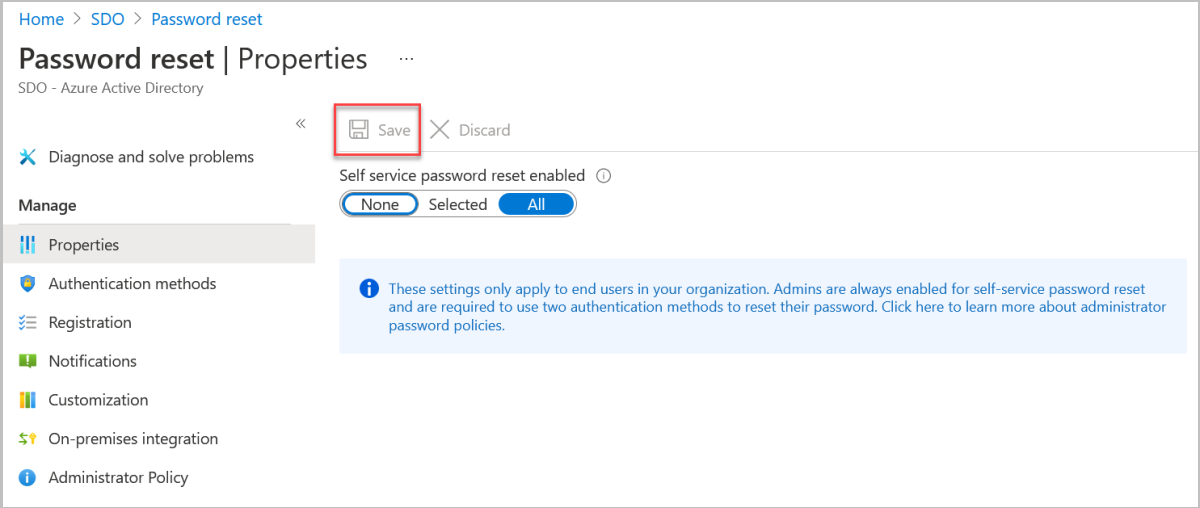
From the menu bar on the page that opens, select Password Reset.
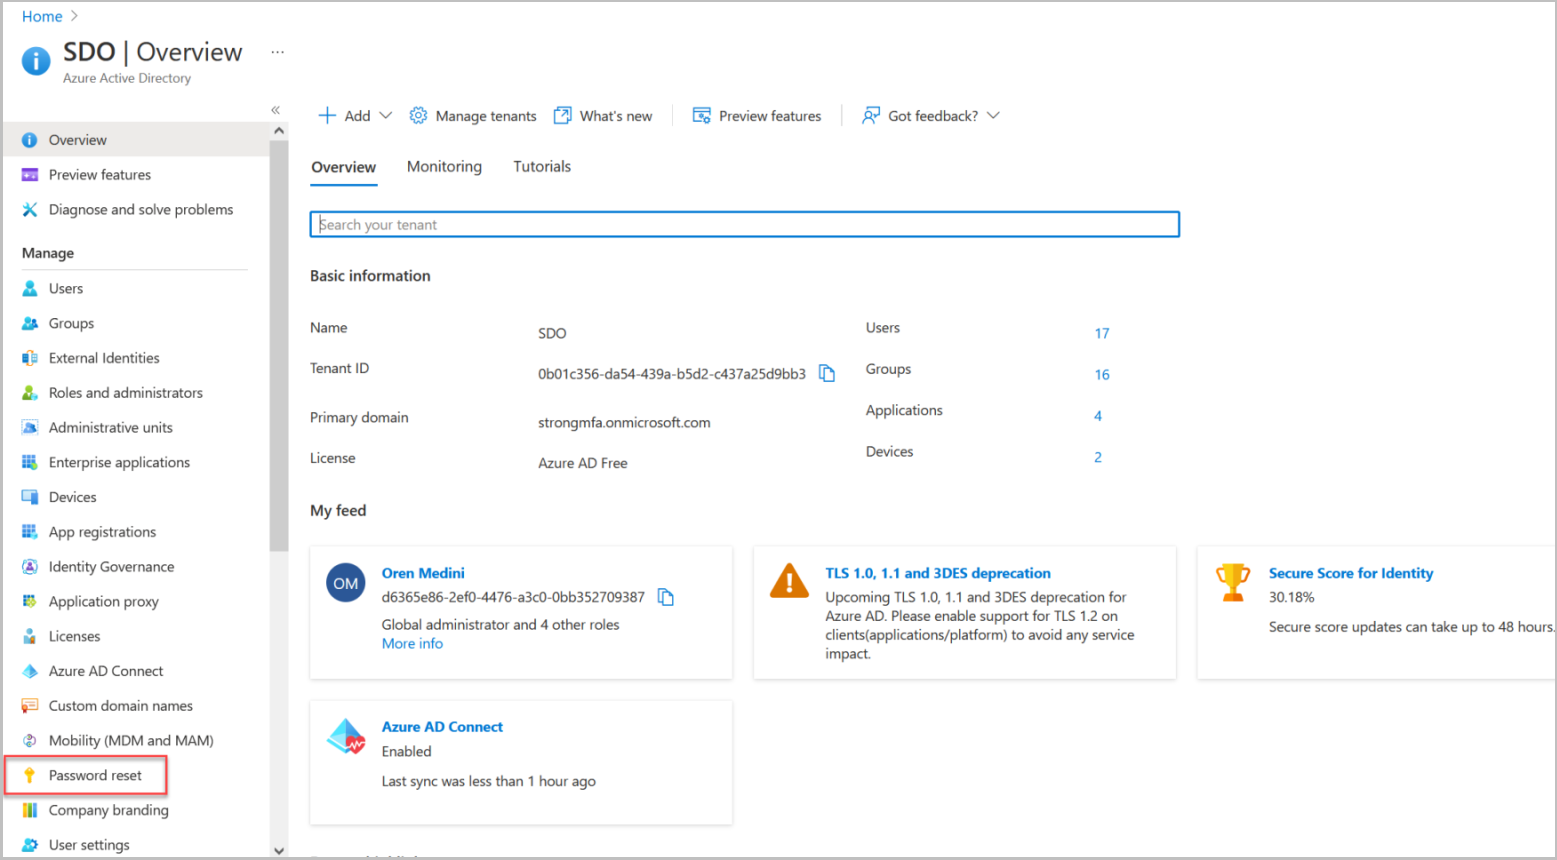
At the top of the Password reset page, select All (in production select Selected).
Then, click Save.
The following sections describe how to set up the Management Console for integration with your Azure AD:
Follow the procedure below to integrate your Azure AD directory with the Octopus Management Console.
To integrate your corporate Directory:
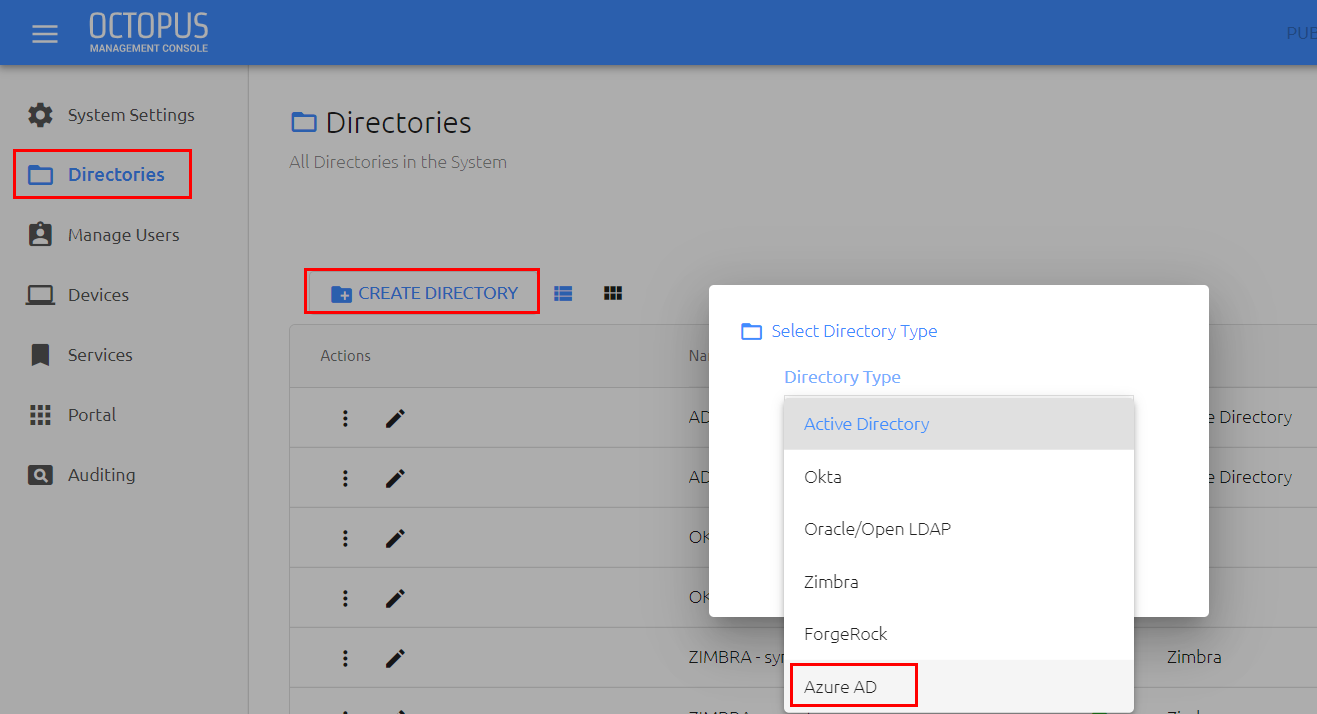
Log into the Octopus Management Console and open the Directories menu.
Click Create Directory to open the Select Directory Type dialog. From the Directory Type dropdown list, select Azure AD.
If you want directory users to be synced automatically, enable the Directory Sync toggle button (as shown below). If Directory Sync is disabled, you will need to import users manually. (For more information, refer to the Octopus Management Console Admin Guide.)
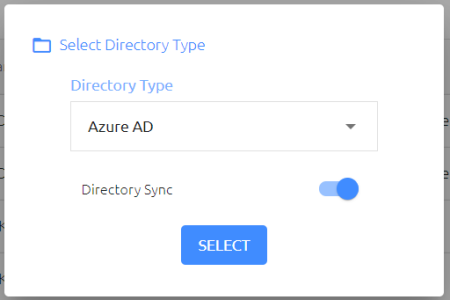
Click Select.
The Create New AZUREAD Directory page opens.
Configure the following parameters, based on your directory settings. Please note that ou=AADDC Users
Parameter
Value / Notes
Name
Corporate Directory Server name.
Base DN
Directory Distinguished Name; Directory top tree level, from where a server will search for users (e.g., dc=<AD name>,dc=com)
User DN
Directory Administrator User DN string (e.g., cn=administrator=users, dc=<AD name>,dc=com)
Password
Directory Administrator Principal’s password.
User Principal Name (UPN)
The user account used for connecting to the directory.
Application (Client) ID
Copy these values from your Azure AD Portal. They are displayed in the Overview tab of your app. For example:
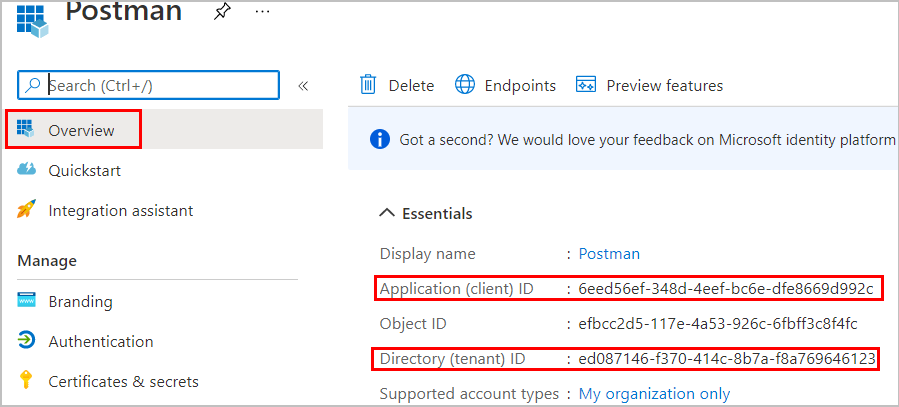
Directory (Tenant) ID
Client Secret
Copy the value from your Azure AD Portal (Creating the Client Secret).
Email Mapping
Select mail.
Domain
AzureAD (value is prepopulated).
Host Name/URL
Corporate Directory URL and port.
Upload Certificate
Click and upload the certificate file.
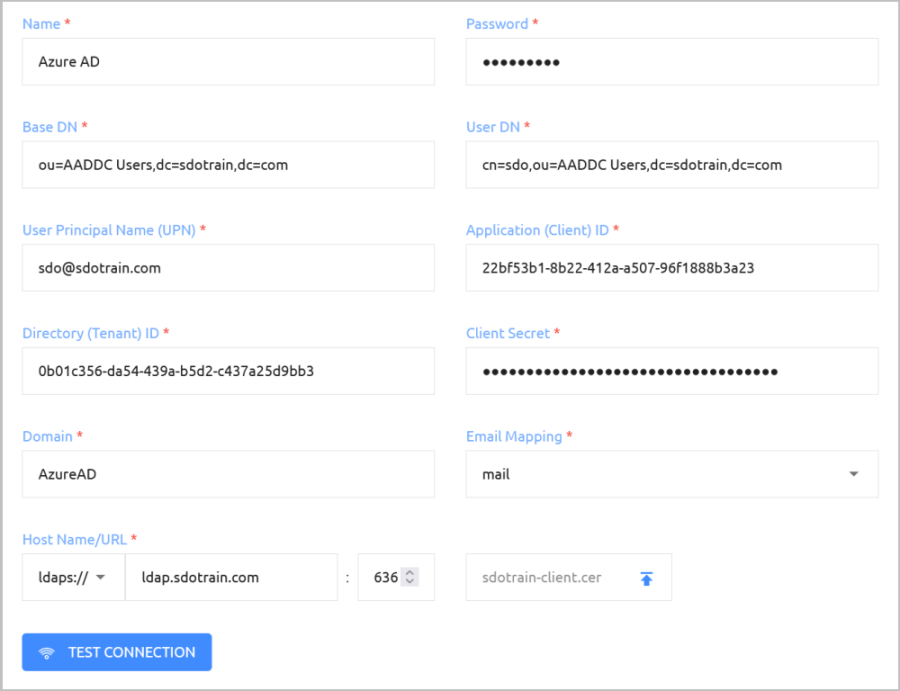
To verify your settings, click Test Connection.
At the bottom of the page, click Create. Then, from the toolbar at the top of the page, click PUBLISH and publish your changes.
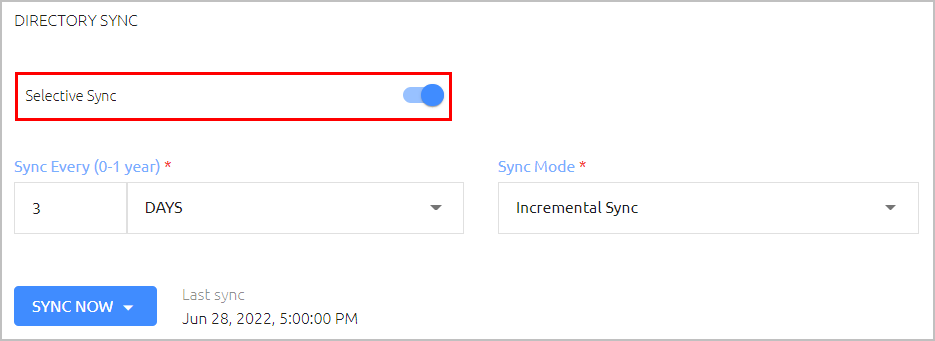
For directories with Automatic Sync, it is recommended to enable Selective Sync in the directory settings:
From the Directories menu, click
 in the row or tile of the relevant directory to open the directory settings.
Scroll to the bottom of the Details tab. Under Directory Sync, enable the Selective Sync toggle button.
To initiate an immediate sync, click Sync Now.
Click Save.
To add users to directories without Automatic Sync:
Select the Manage Users menu.
On the left side of the page, select the new Azure AD directory from the Directories list.
At the top of the page, click Import Users and select your test user. Make sure to send an Octopus enrollment invitation to the user.
For more information, please refer to the Octopus Management Console Admin Guide.
Follow the steps below to create the required AD service, configure its settings and add users.
To add and configure the Active Directory Authentication service:
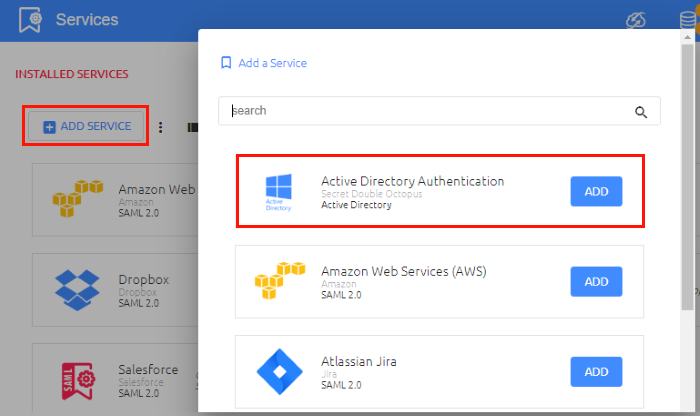
From the Octopus Management Console, open the Services menu and click Add Service.
In the Active Directory Authentication tile, click Add.
Then, in the dialog that opens, click Create.
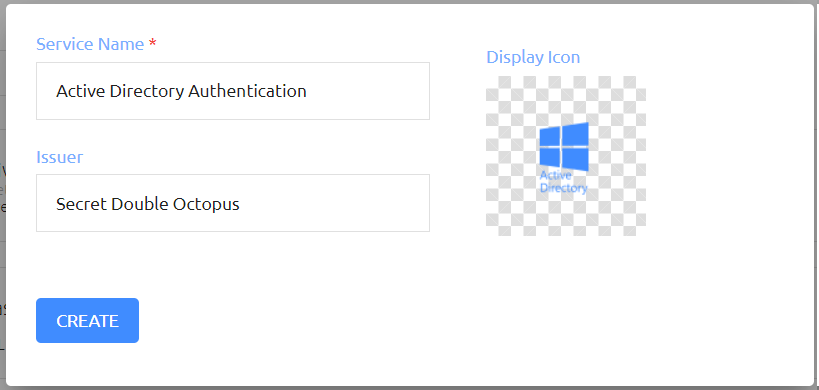
Review and configure the following settings in the General Info tab:
Setting
Value
Service Name
Display name for the service.
Issuer
Secret Double Octopus (default).
Description
Free text field for notes about the service.
Display icon
This icon will be displayed on the Login page for the service. To change the default icon, click and upload a logo of your choice (size 488x488 pixels).
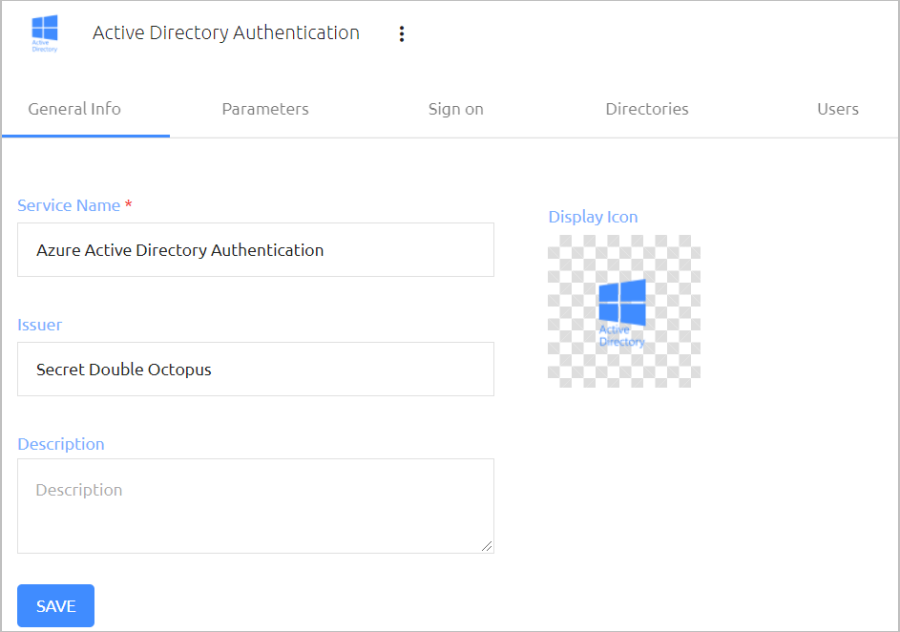
At the bottom of the tab, click Save.
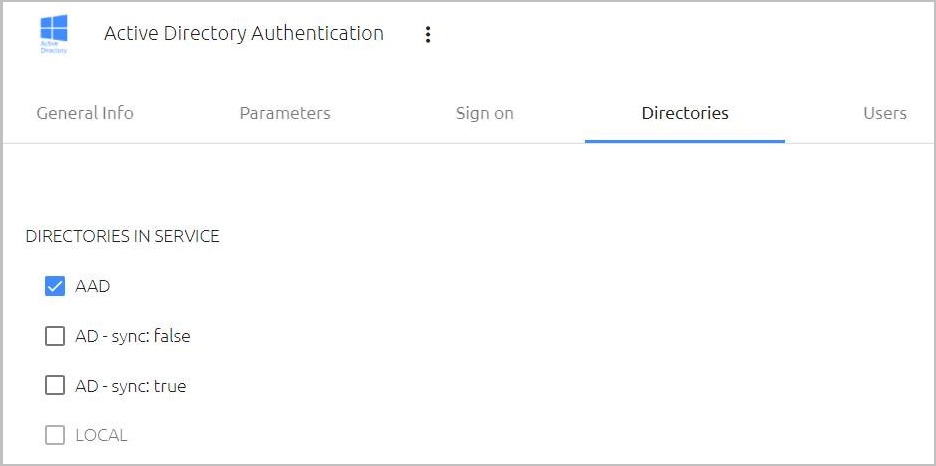
Open the Directories tab and select the checkbox for Azure AD. Then, click Save.
Open the Users tab and click Add.
A popup opens, with a list of directories displayed on the left.
Expand the Azure AD and select the checkbox of the groups and users that you want to add to the service. Make sure to add your test user. Then, click Save to close the popup.
Open the Parameters tab and define an Azure Active Directory specific field (UPN) for the login identifier:
Open the Parameters list and select the Azure AD (AAD).
Select the Octopus Authentication Login checkbox. Then, from the dropdown list, select UserPrincipalName.
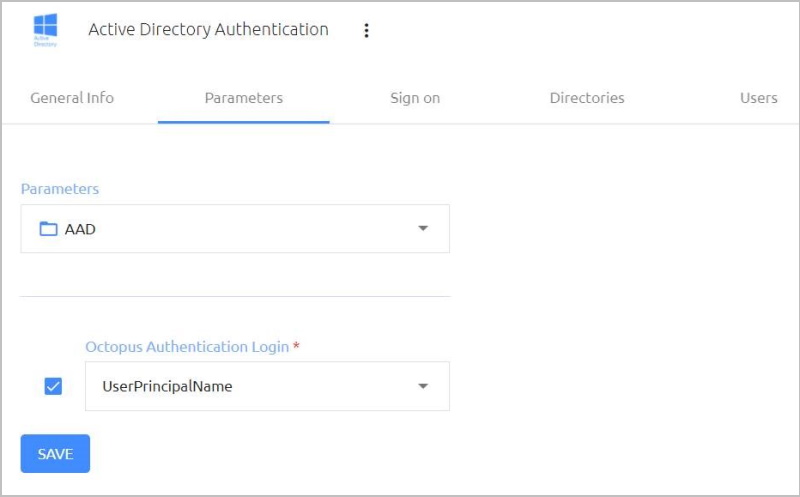
At the bottom of the Parameters tab, click Save.
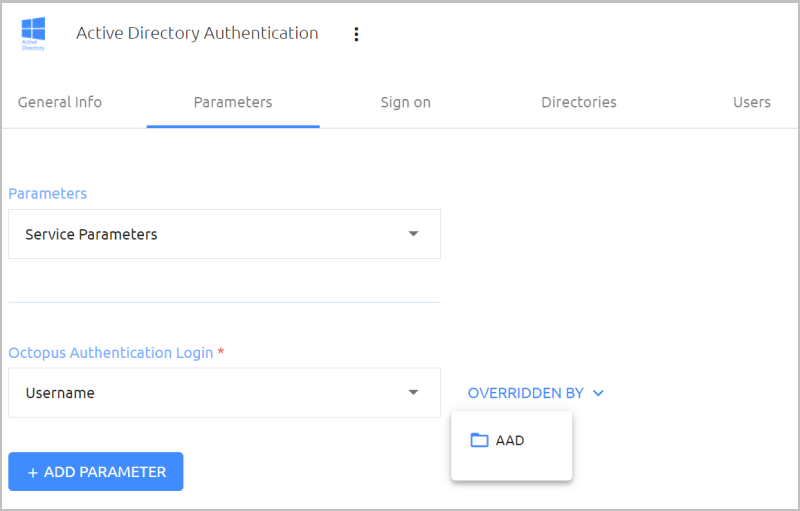
As shown below, the service login identifier for AAD members only will be UPN, instead of the default identifier of Username.
From the toolbar at the top of the page, click PUBLISH and publish your changes.
After adding the service, you need to send enrollment invitations to the users so they can register their devices in the system. For more information about user invitations, refer to the Octopus Management Console Admin Guide.
Follow the steps below to integrate the Azure AD with the User Portal and enable passwordless authentication to the Portal.
To integrate the Azure Active Directory with the User Portal:
From the Octopus Management Console, open the Portal menu.
Open the Directories tab and select the checkbox of the Azure AD. Then, click Save.
Open the Users tab and click Add.
A popup opens, with a list of directories displayed on the left.
Expand the Azure AD and select the checkbox of the groups and users that you want to add to the service. Make sure to add your test user. Then, click Save to close the popup.
Open the Parameters tab and override default Portal parameters for the AAD:
Open the Default Portal Parameters list and select the Azure AD (AAD).
Select the Login Field checkbox. Then, from the dropdown list, select UserPrincipalName.
Verify that the Multi-Factor Authentication parameter is Passwordless, and that the Trust this browser toggle is enabled.
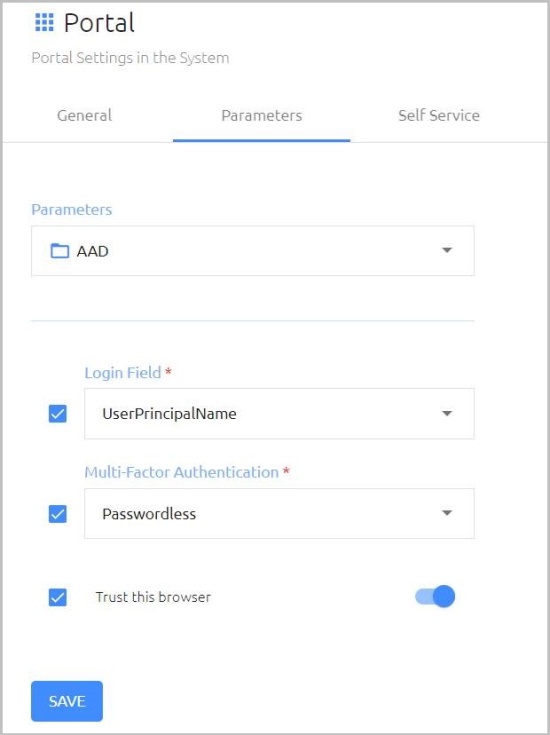
Click Save.
From the toolbar at the top of the page, click PUBLISH and publish your changes.
The following sections explain how to integrate Windows workstations with the Azure AD domain:
Follow the steps below to configure your workstations to connect via the Azure AD domain.
To connect a Windows machine to the Azure directory:
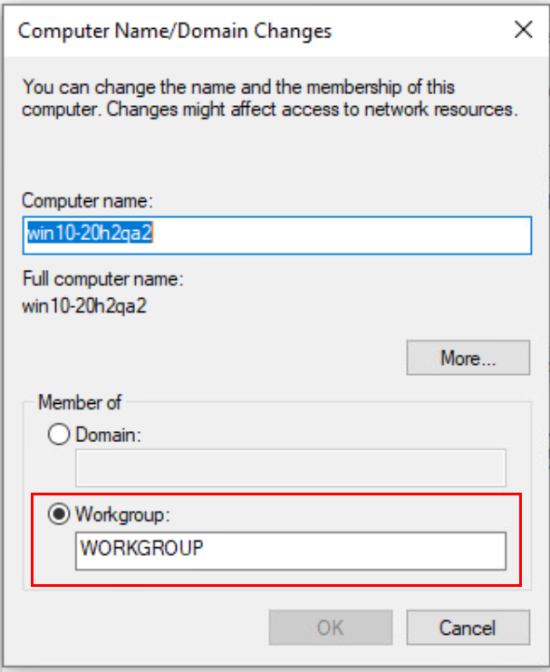
Verify that the machine is disconnected from the domain. Then, select the Workgroup radio button.
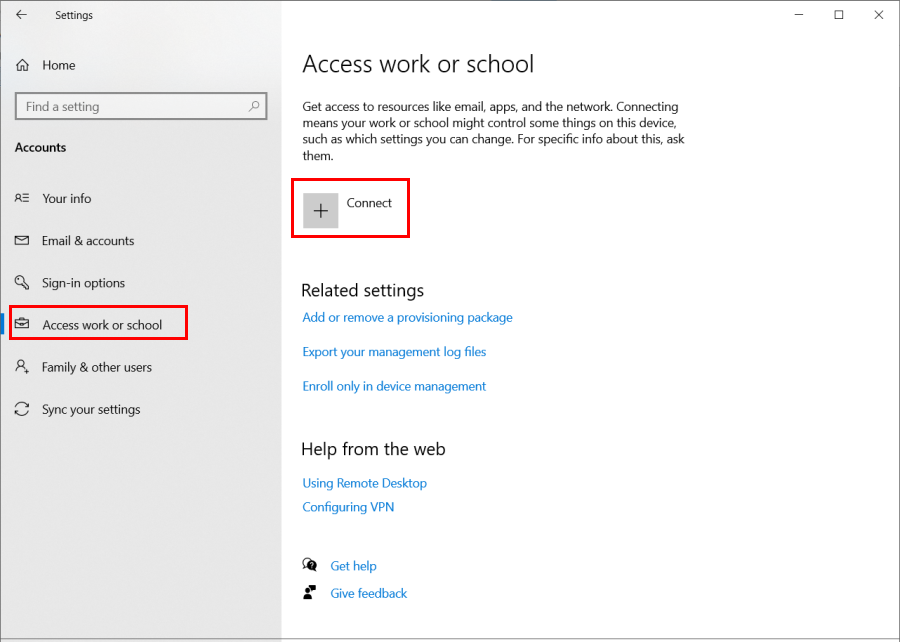
Navigate to Settings > Accounts > Access Work or School. Then, click Connect.
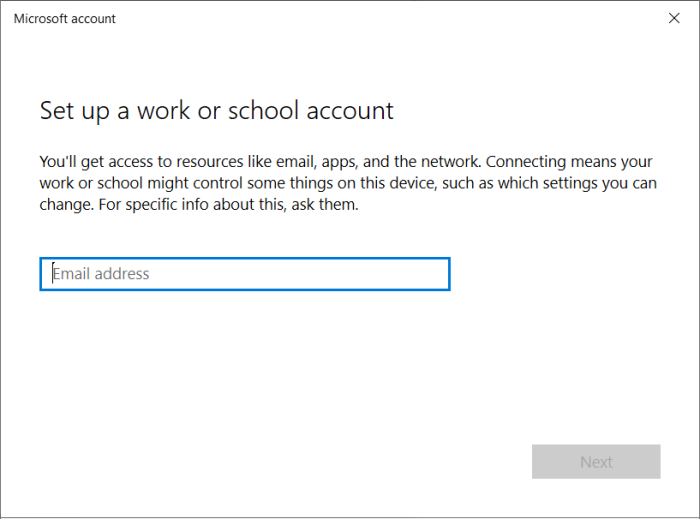
In the popup that opens, enter the user name and password (in UPN format) of an Admin user in AD, e.g., john@passwordfreemfa.com
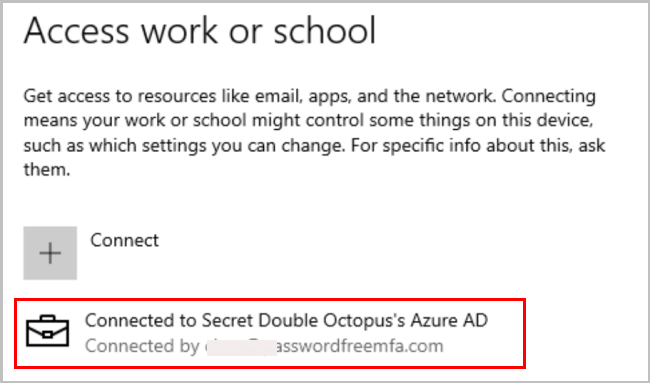
Following a successful connection, a confirmation message is displayed on the Access work or school screen.
To complete the integration, install the Windows client on your workstations by running the Octopus Desk MSI Updater.
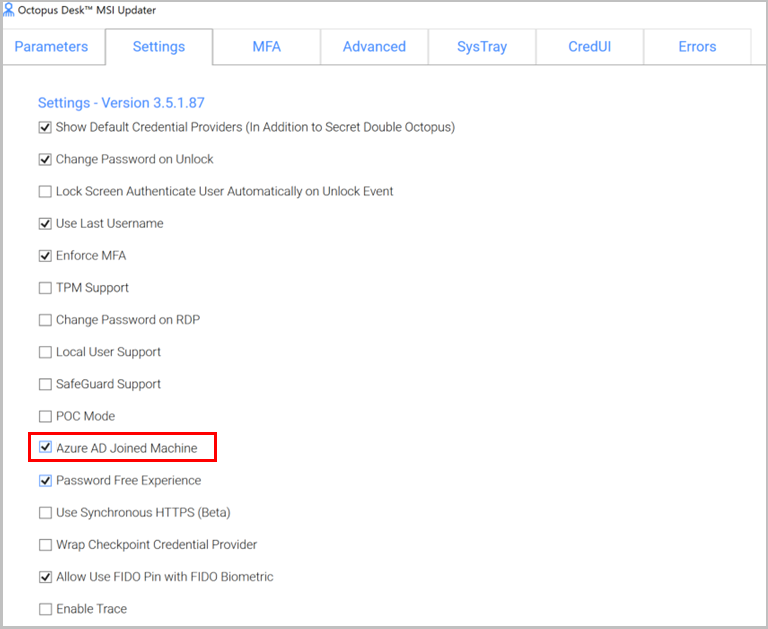
When configuring the MSIUpdater client, in the Settings tab, make sure that the Azure AD Joined Machine checkbox is selected. (This setting prompts users to login with UPN.)
 |
For more details about installing the Windows client, refer to the Octopus Desk for Windows Installation Guide.
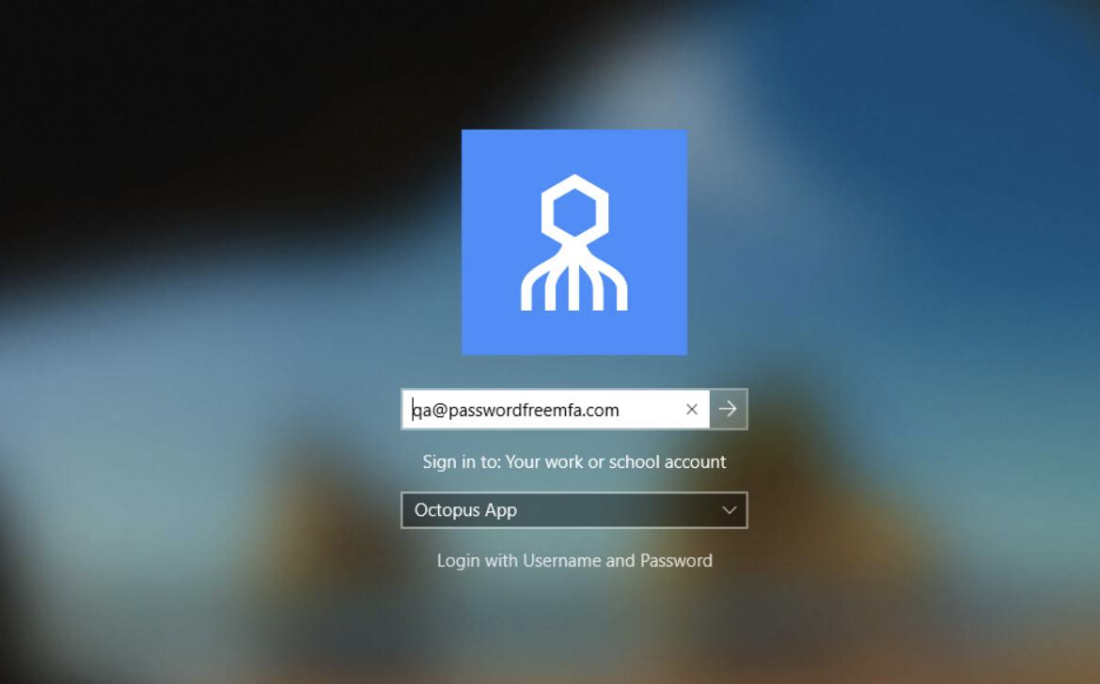
The figure below shows the Windows Login screen when there is successful integration between the Octopus Authenticator and the Azure AD. Note the user identifier in UPN format and the connection to a work or school account.
|
Using a self-signed certificate as described in this Microsoft tutorial can cause instability in the Octopus Management Console.
To avoid this phenomenon, set the KeyUsage flag to 0, as shown below:
New-SelfSignedCertificate -Subject *.$dnsName `
  -NotAfter $lifetime.AddDays(365) -KeyUsage 0
  -Type SSLServerAuthentication -DnsName *.$dnsName, $dnsName
Follow these steps to retrieve the UserDN using the LDP tool:
Open LDP.exe and select Connection > Connect.
Configure the following settings:
Server: Your Azure AD LDAPS Server
Port: 636
SSL: Make sure the checkbox is selected
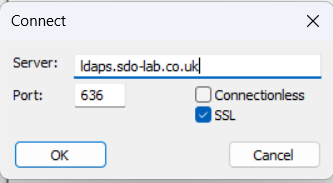
To connect, click OK.
Select Connection > Bind and configure the following settings:
User: Admin User UPN
Password: Password for the User
Bind type: Select Simple bind
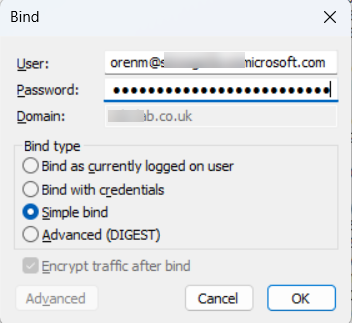
To connect, click OK.
After successfully connecting, select View > Tree.
Then, from the pane on the left, select the user and copy the DN.