Octopus Tenant Manager Admin Guide_v6.8.6.
Manage every tenant in your Managed Service Provider from one console — roles and permissions, tenant lifecycle, manager assignment and audit records.
The Tenant Manager lets system administrators manage multiple tenants within a Managed Service Provider (MSP). Every authorized administrator holds one MSP role — MSP User or MSP Admin — plus a Tenant role (Admin, Helpdesk or Auditor) that sets what they can do inside each assigned tenant's Octopus Management Console.
MSP roles at a glance
The Tenant Manager is a tool that enables system administrators to manage multiple tenants within a Managed Service Provider (MSP). Every administrator authorized to access the Tenant Manager can have ONE of the following MSP roles:
- MSP User: Monitors and manages assigned tenants via the Octopus Management Console (MC) of the relevant tenant. MSP Users have very limited permissions within the Tenant Manager tool, and generally use it only to access the MC of a tenant. MSP User is the default MSP role in the Tenant Manager.
- MSP Admin: In addition to access rights to MCs of assigned tenants, the MSP Admin has expanded permissions in the Tenant Manager tool. These users can update tenant status and details, perform administrative operations on other managers and view Tenant Manager audit records.
In addition, every system administrator added to the Tenant Manager tool (regardless of MSP role) is given a Tenant role that determines the extent of permissions within the Octopus Management Consoles of assigned tenants. Tenant roles (Admin, Helpdesk and Auditor) directly correspond to roles assigned to any user authorized to access the Management Console, and related permissions are the same.
For more information and examples of common role combinations, refer to Understanding Roles and Permissions.
Accessing the Octopus Tenant Manager
The Tenant Manager is accessed using the Octopus Authenticator mobile app, as described in the procedure below. Before attempting to log in, make sure you have downloaded the Octopus mobile app and enrolled your device. (For full instructions, please refer to your enrollment invitation email.)
From your browser, enter the access URL provided for your tenant / enterprise and domain (e.g., https://acme.doubleoctopus.cc/mt).
You are redirected to the Login screen for the relevant tenant.
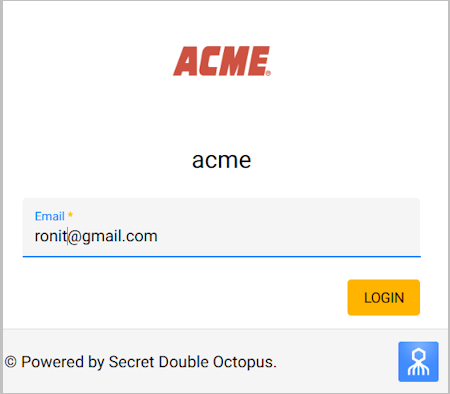
Enter the email address provided in your enrollment email. Then, click Login.
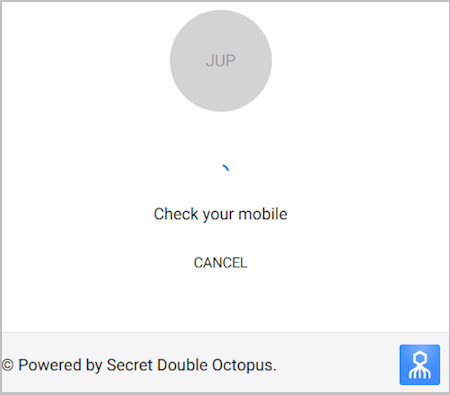
An authentication request is sent to your mobile device.
From your mobile device, tap Approve.
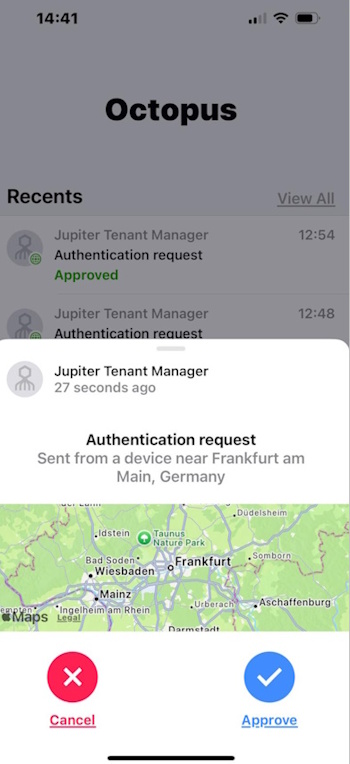
If you are prompted to provide a verification code, enter the digits displayed on your mobile device.
Following successful authentication, the Tenant Manager opens. MSP Users should continue by accessing the Octopus MC of a tenant, as described below.
Accessing the Octopus Management Console
Follow these steps to access the Octopus MC of a tenant:
From the list of tenants in the Tenants menu, select the row of the relevant tenant.
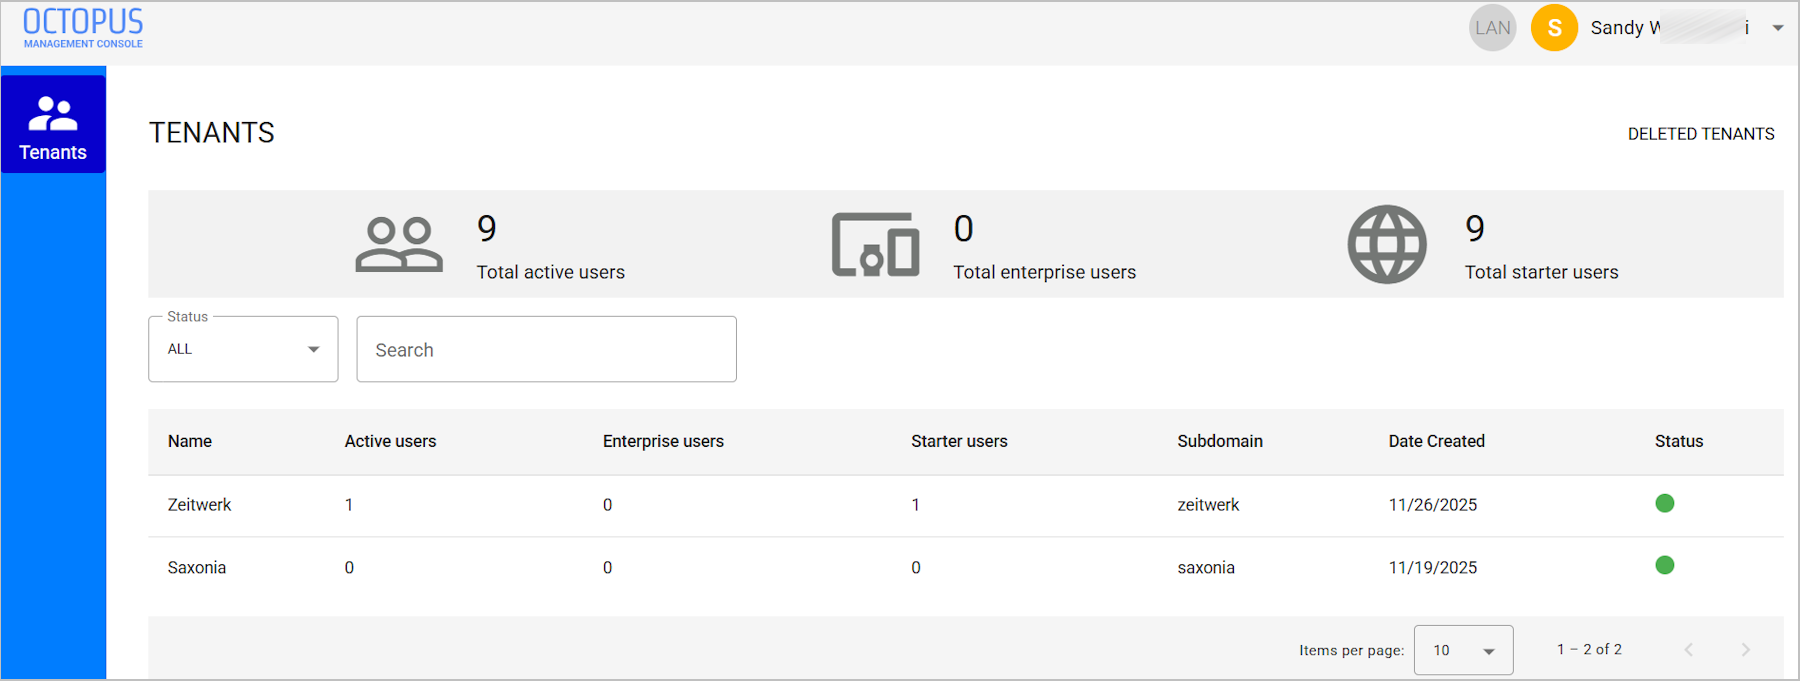
The Tenant details page opens.
At the bottom of the page, click the MC SSO Sign in link.
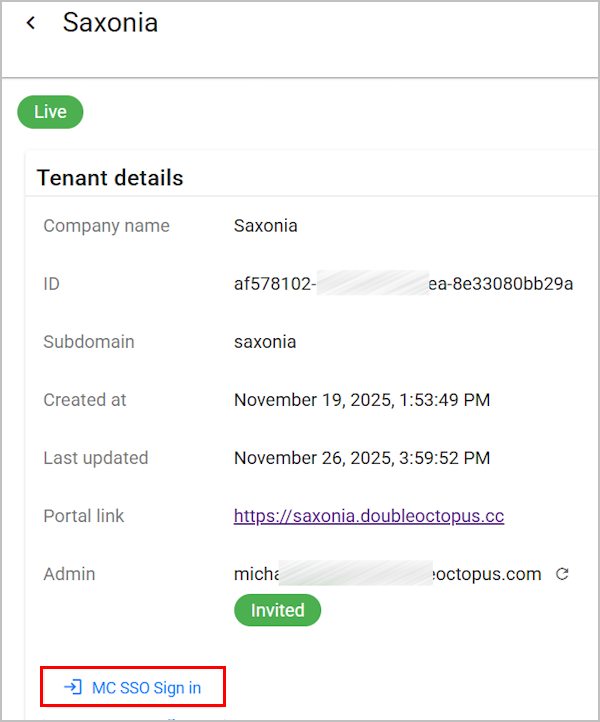
The Management Console of the selected tenant opens in a separate browser tab.
Tenant Manager features overview
The main features and components that appear on most pages of the Tenant Manager tool are described in the table below the diagram.
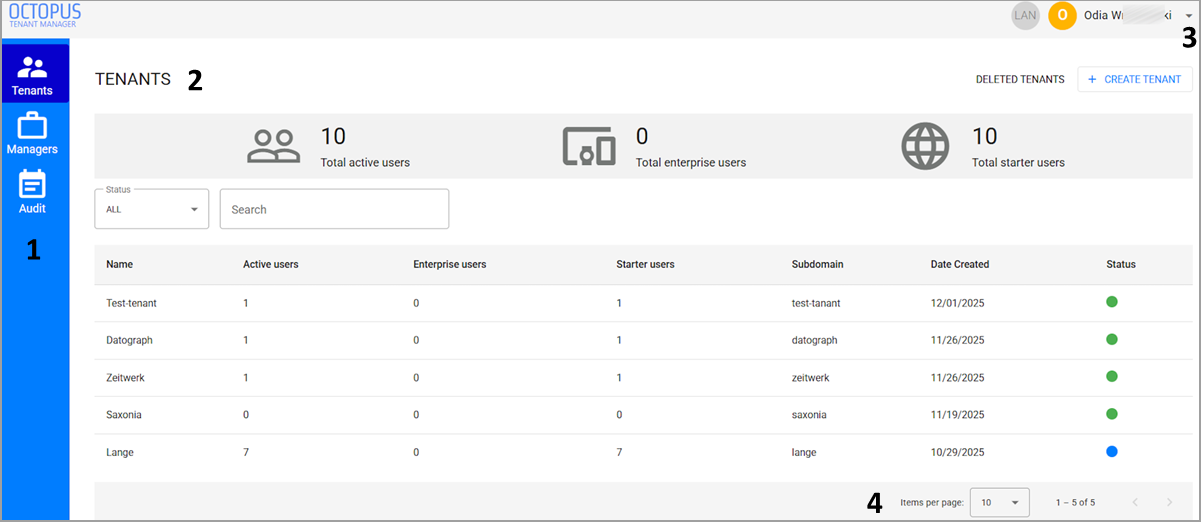
Menu bar
The menu bar enables navigation between the following menus:
- Tenants: Presents global statistics and displays information about all tenants in the MSP (both current and deleted).
- Managers: Lists all users added to the Tenant Manager and provides access to related administrative operations.
- Audit: Displays a log of every action performed by the system or by managers.
Understanding manager roles and permissions
The MSP role-based access control (RBAC) system of the Tenant Manager uses a two-tier role model that separates MSP-level permissions from Tenant-level permissions. In this model, every user is assigned both an MSP role and a Tenant role. These two roles work together to determine user permissions across the MSP platform and within tenant environments.
- The MSP role is related to platform-wide permissions, and determines what a user is authorized to do across the MSP environment. Some MSP-related permissions are tenant creation and cross-tenant access.
- The Tenant role controls what a user can do inside specific tenants. The Tenant role assigned generally correlates to the user's position in the tenant organization (IT technician, compliance reviewer, etc.).
The following sections describe each role type in detail. For some use case examples of role assignments, refer to Role Combination Examples.
MSP roles
The MSP role controls platform and tenant ownership access. A user's MSP role can be either MSP User or MSP Admin.
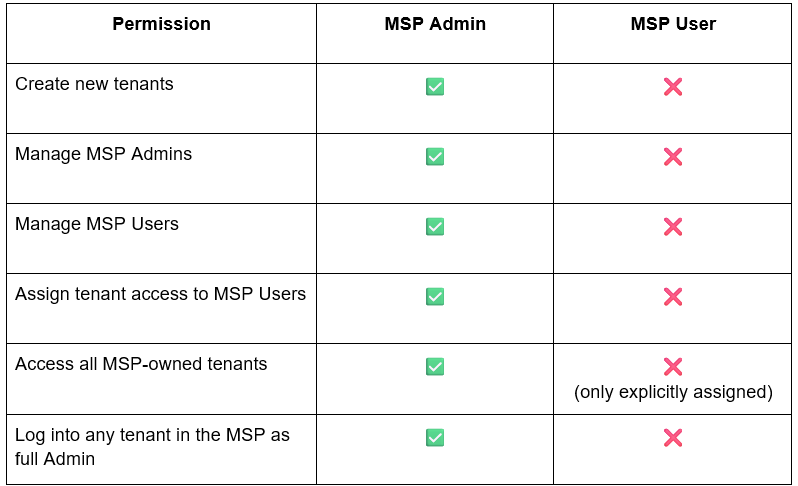
An MSP Admin has full control over the entire MSP environment. This role is usually reserved for MSP owners, directors, or primary administrators responsible for overall MSP operations. Permissions include:
- Creating and managing tenants
- Adding and managing MSP Users and MSP Admins
- Logging into the Octopus Management Console of any tenant owned by the MSP with full administrative privileges
An MSP User does NOT have permissions to manage the MSP itself. MSP Users are not authorized to create new tenants or add / manage other MSP Users.
In order to access the Management Console of a tenant, an MSP User must be explicitly assigned to that tenant. Operational permissions inside the tenant are defined by the Tenant role (as described in the next section).
The chart below lists some common MSP-level permissions and shows the differences between the MSP roles.
Tenant roles
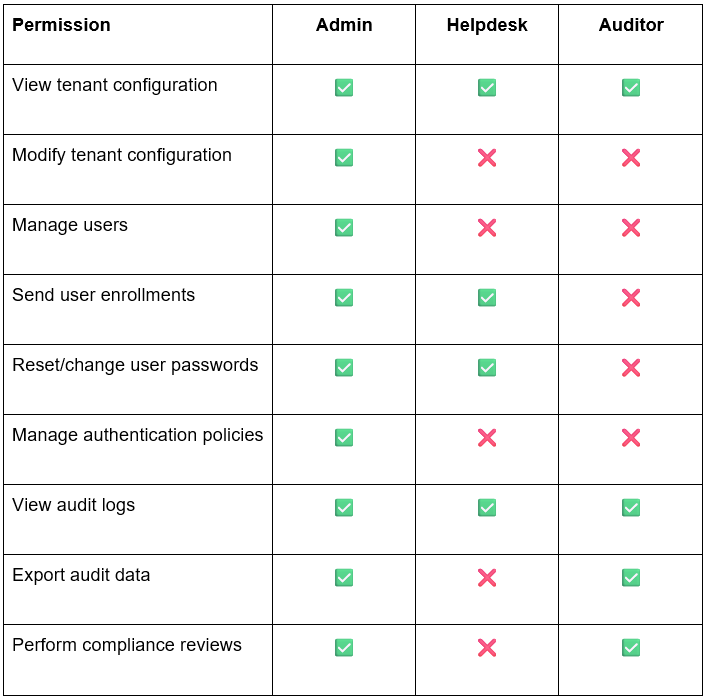
The Tenant role determines a user's permissions within an individual tenant. An MSP User (or MSP Admin acting within a tenant) is assigned one of the following roles per tenant. (A user's Tenant role may differ from one tenant to another.)
The following chart lists some common tenant-level permissions and shows how authorization varies according to Tenant role.
Role combination examples
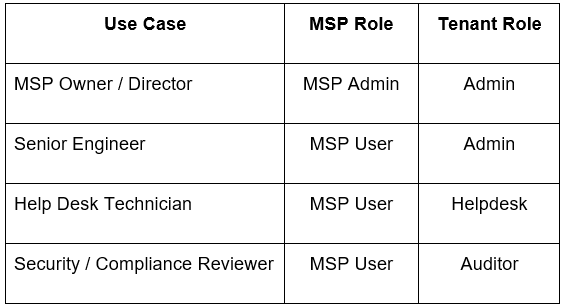
The chart below provides several use cases (according to organizational responsibility) and presents typical role combinations for each.
Viewing and managing tenants
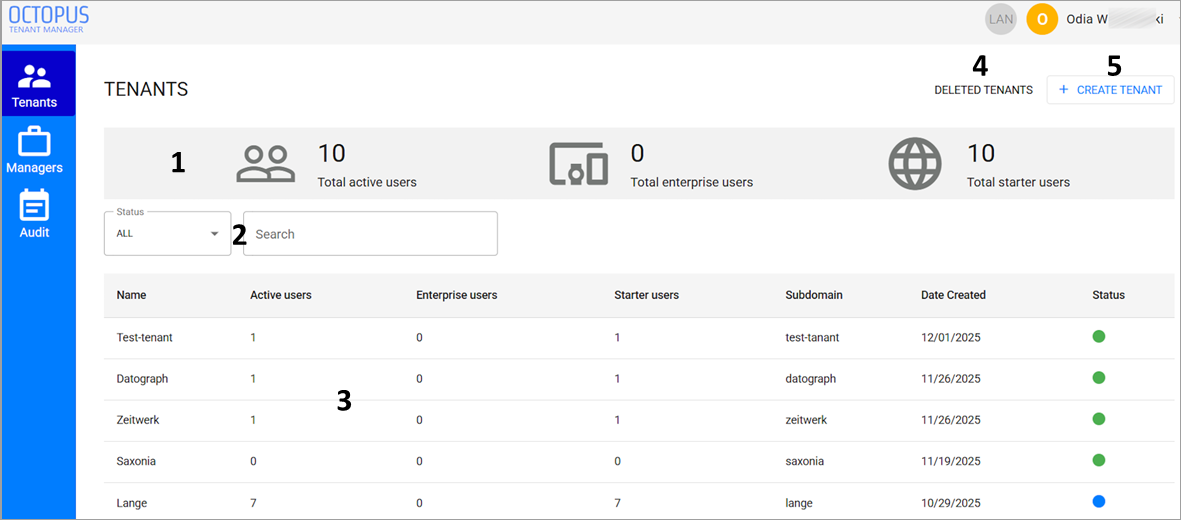
The Tenants menu displays information about tenants in the MSP and enables authorized managers to perform administrative actions related to tenants. The main components of this page are described in the table below the diagram.
Working with the Tenants list
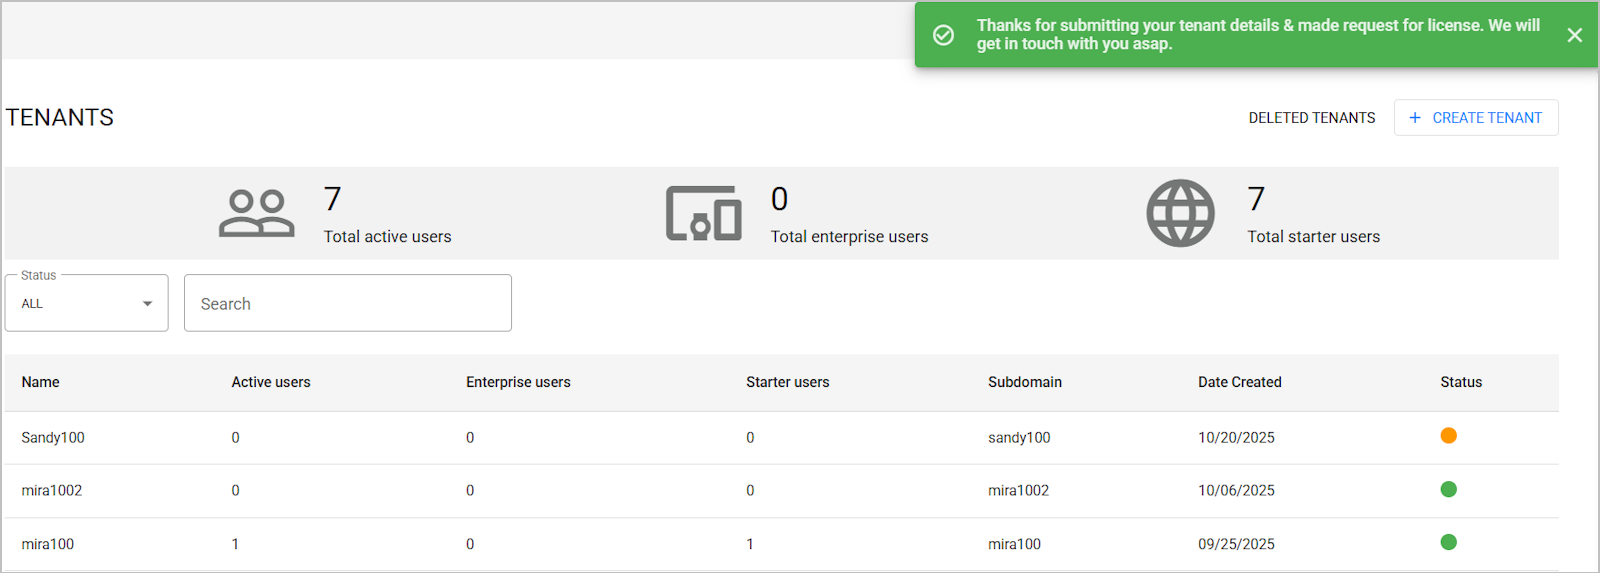
The Tenants list provides general data about every tenant, such as user statistics, subdomain and more. The list can be sorted in ascending or descending order according to tenant name, Active / Starter users, or tenant creation date.
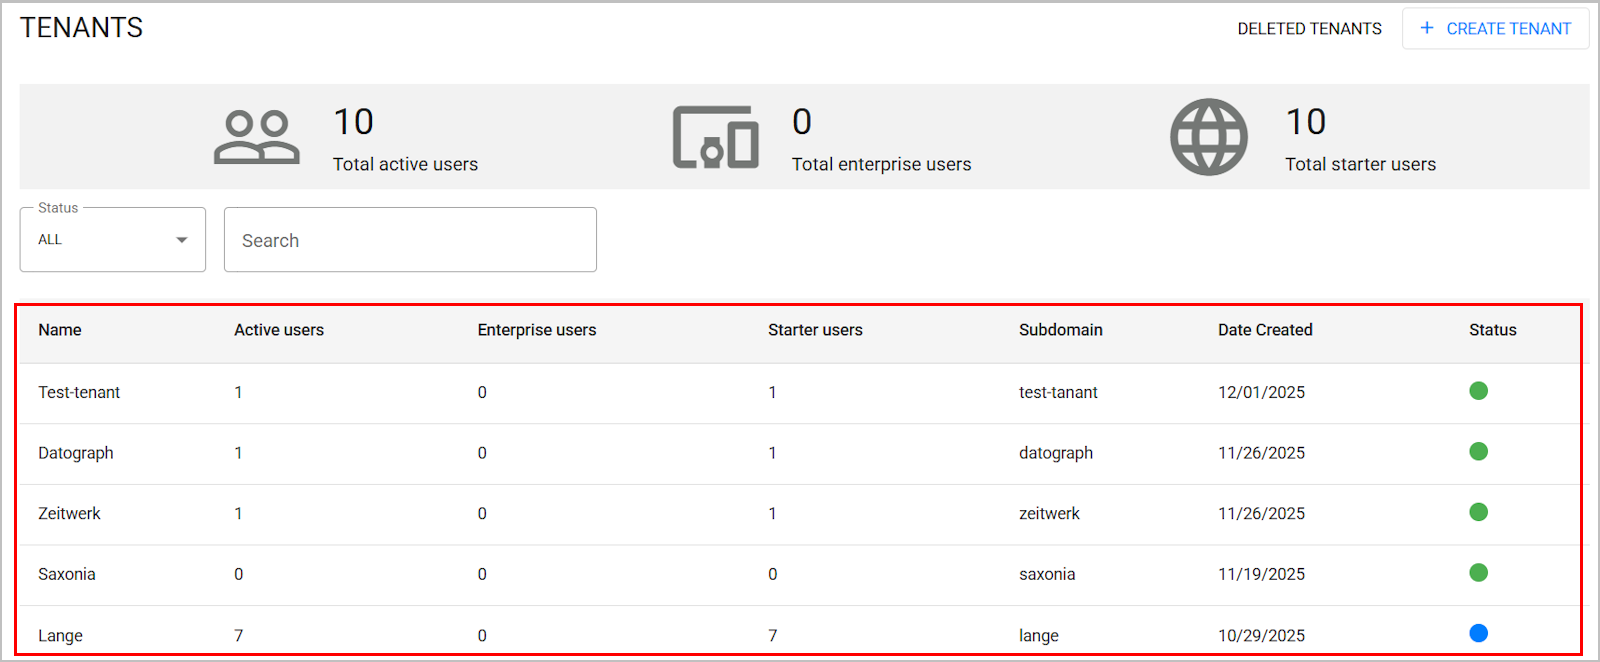
Tenant status can be one of the following:
- Live (green indicator): The tenant is enrolled, connected and enabled.
- Suspended (gray indicator): The tenant is temporarily disabled.
- Error (red indicator): The tenant has invalid parameters or connection failures.
A blue indicator appears in the row of the Primary tenant of the MSP. This tenant, which generally has the same name as the MSP itself, has the unique authority to manage itself as well as all other tenants. Every administrator integrated with the Tenant Manager tool must therefore be a Primary tenant user. (For more details, refer to Adding Managers to the MSP.)
Viewing and updating tenant details
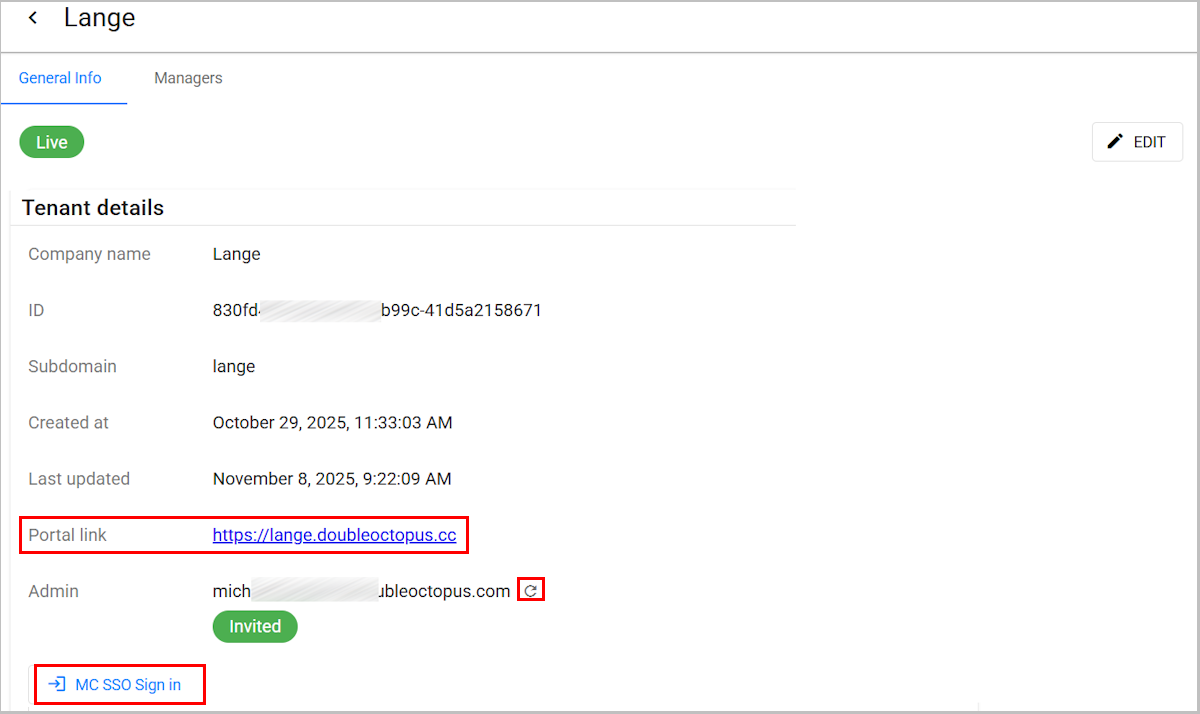
Selecting a row in the Tenants list opens the General Info tab, which displays the tenant details. From this page you can perform the following actions:
- Access the Octopus User Portal by clicking the Portal link
- Resend an enrollment invitation to the tenant Admin
- Access the Octopus Management Console (when the MC SSO Sign in button is available)
To update tenant details, click the Edit button in the upper right corner of the page. The following actions are available in Edit mode:
- Change the company (tenant) name
- Add and remove tenant administrators (managers)
- Enable / disable the SSO Login toggle. When the toggle is disabled, the MC SSO Sign in button does not appear on the Tenant details page.
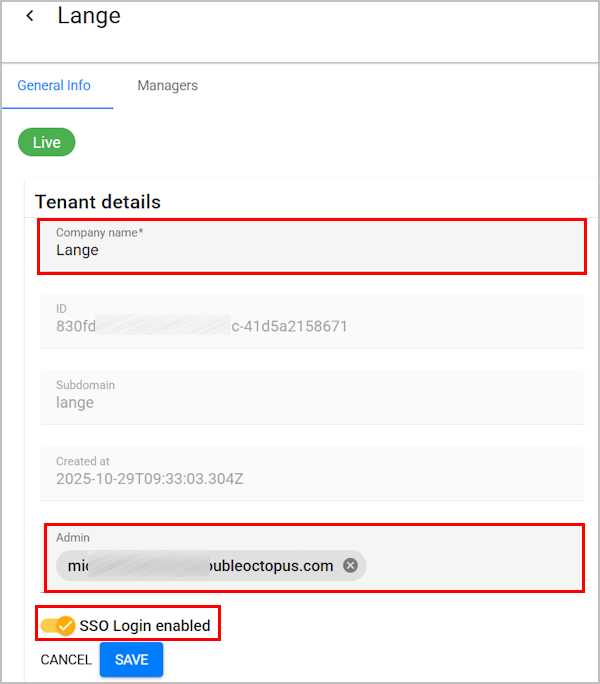
After updating tenant details, click Save.
Suspending and deleting tenants
When required, you can perform the following actions on a tenant:
- Suspend: Temporarily inactivates the tenant
- Delete: Removes the tenant from the Tenants list
To suspend or delete a tenant:
From the Tenants list, open the Tenant details page by selecting the relevant tenant.
At the upper right corner of the page, click Edit to open Editing mode.
The Suspend and Delete buttons appear at the upper right corner of the page.
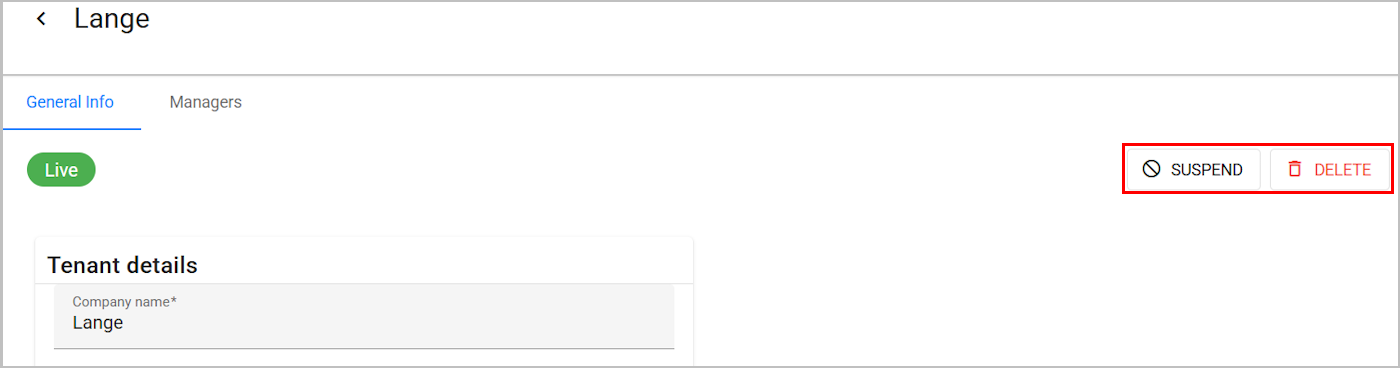
Perform one of the following flows:
- To suspend the tenant, click Suspend. Then, in the confirmation popup, click Yes. The tenant is inactivated. To reactivate the tenant, follow the procedure above and click Restore.
- To delete the tenant, click Delete. Then, in the confirmation popup, type the word DELETE and click Yes. The tenant is removed and added to the Deleted tenants list.
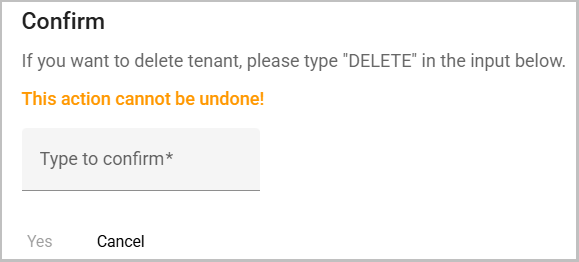
Viewing deleted tenants
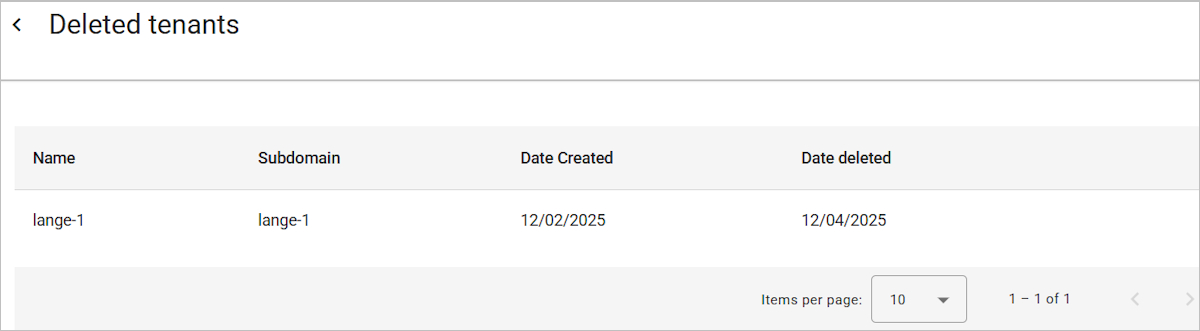
A list of tenants that have been deleted can be viewed by clicking the Deleted Tenants button in the upper right corner of the Tenants menu.
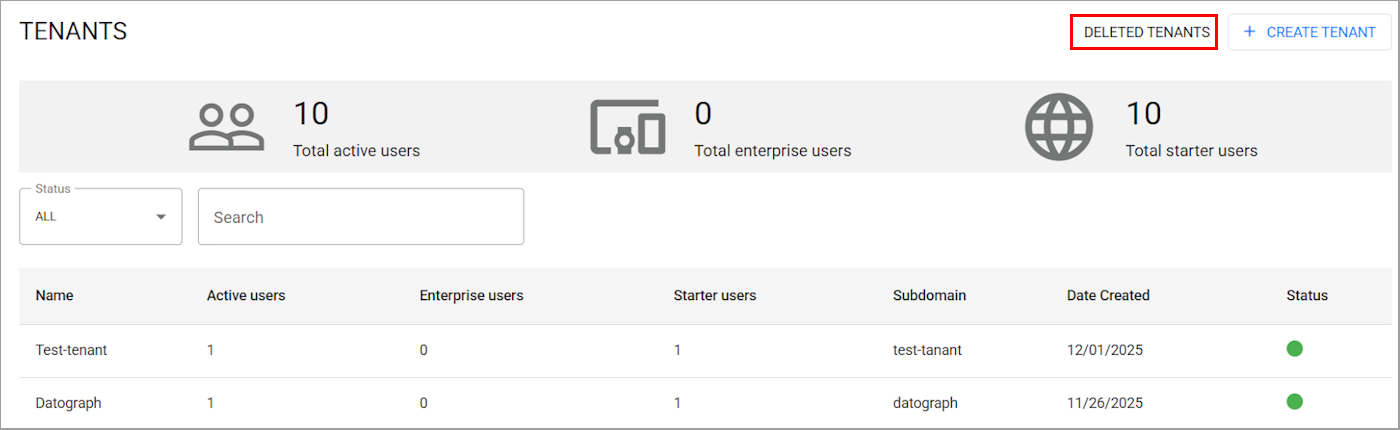
The Deleted tenants list displays each tenant name and some general information, including deletion date. You can sort the list according to tenant name or creation / deletion date.
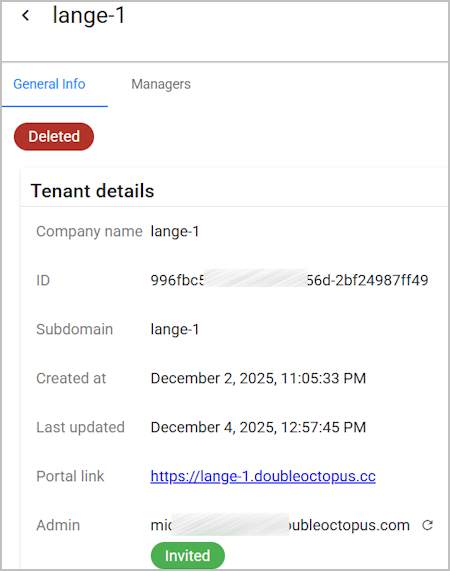
To view additional data about a deleted tenant, select the row of the relevant tenant. The Tenant details page that opens is read-only. The data cannot be edited, and no actions can be performed from this page.
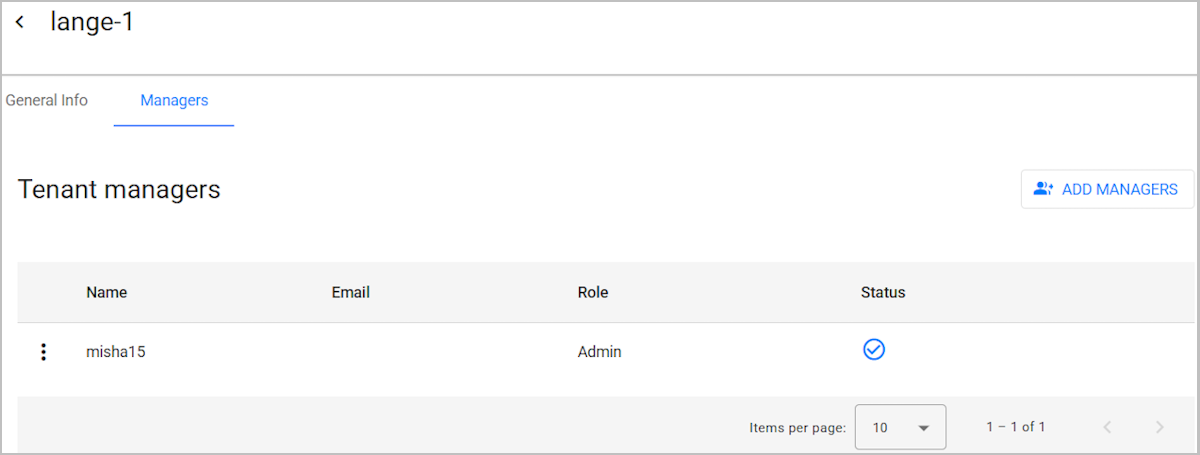
Some functionality is available from the Managers tab of a deleted tenant. For more information about handling managers, refer to Working with Managers.
Adding a new tenant
The Create Tenant button in the upper right corner of the Tenants menu allows administrators to add new tenants to the MSP.

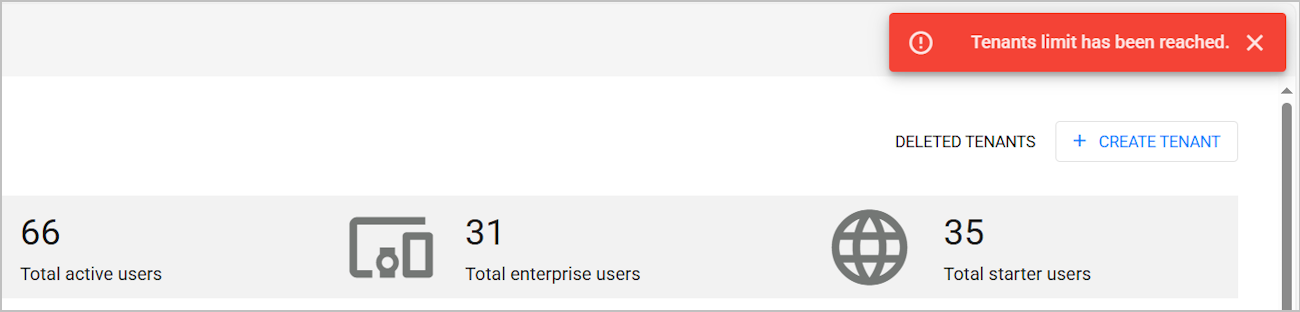
When the MSP contains the maximum allowed number of tenants, an error message is displayed on attempting to add another tenant.
To add a new tenant:
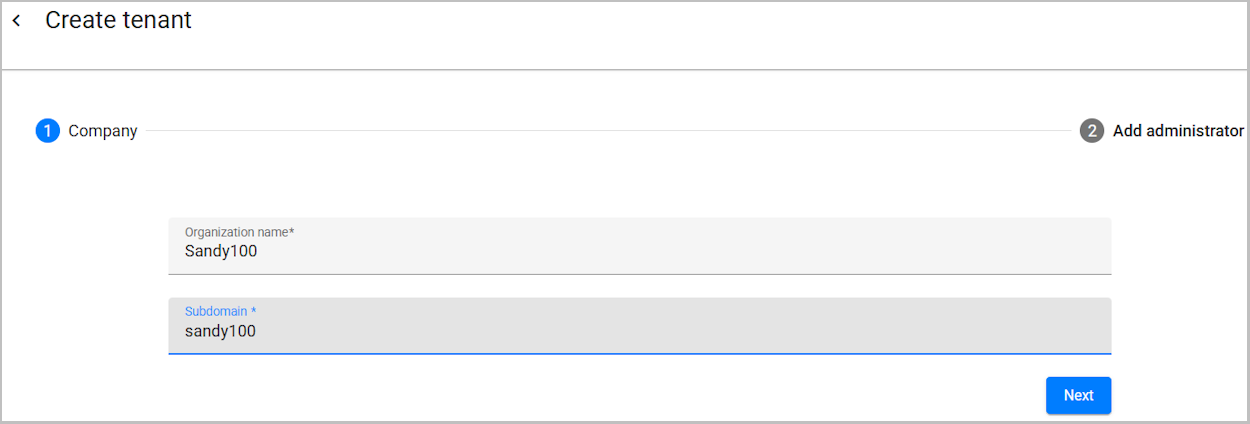
From the Tenants menu, click Create Tenant. The Create tenant page opens.
Enter the organization (tenant) name and subdomain in the appropriate fields. Then, click Next.
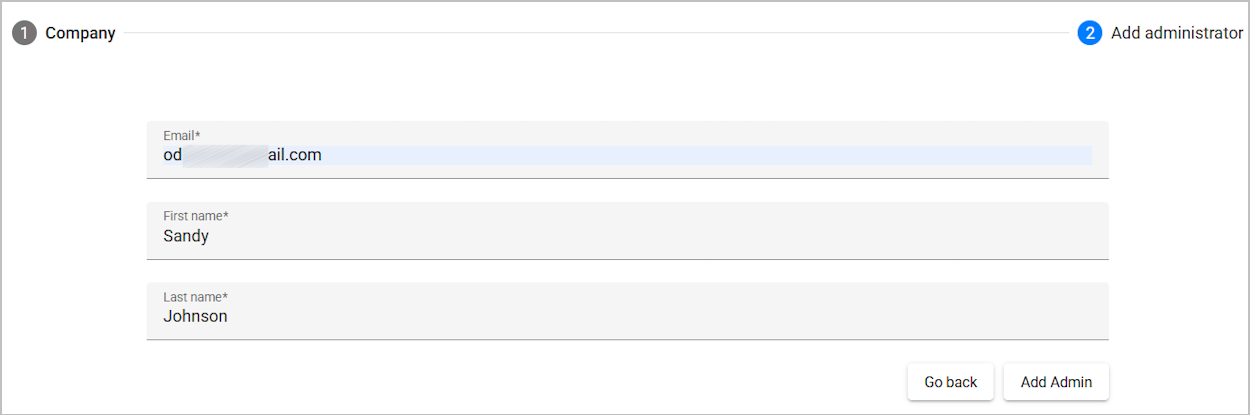
On the Add administrator page, enter the name and email address of the manager to be assigned to the new tenant. Then, click Add Admin.
A confirmation message is displayed. The new tenant is added to the Tenants list, and an enrollment email is sent to the specified administrator.
Handling tenant managers
The Managers tab lists all administrators assigned to work with a selected tenant and displays the name, email address, MC permissions (role) and status of each one. To access this tab from the Tenants menu, select the row of the relevant tenant and then, on the top of the page that opens, click Managers.
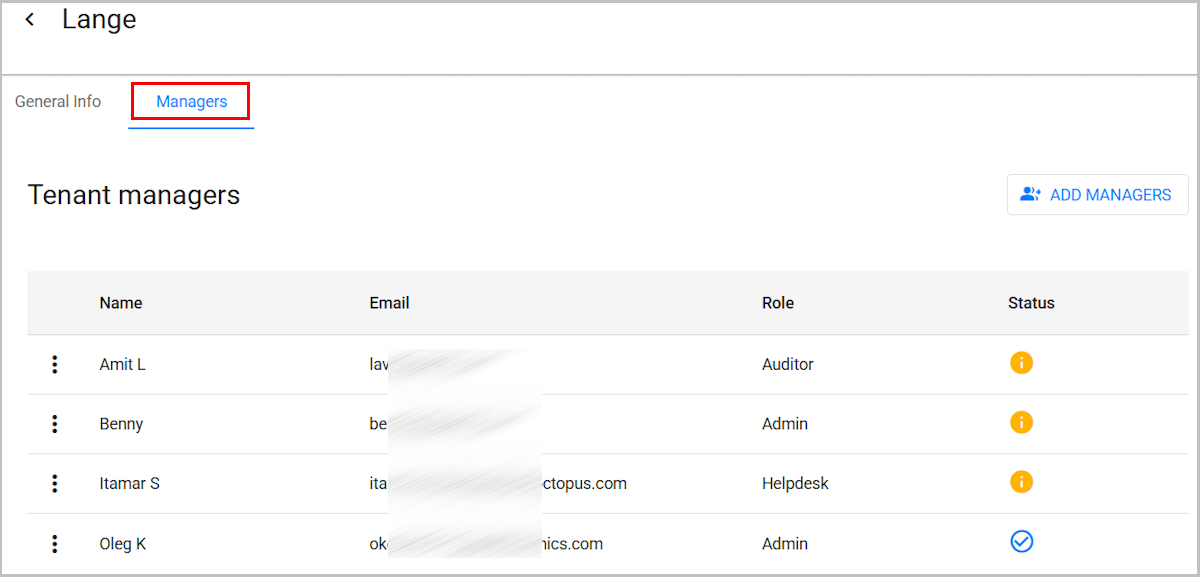
Manager status can be either of the following:
 Active: The manager has successfully performed the enrollment process.
 Inactive: The enrollment process has not begun or is incomplete.
Performing actions on tenant managers
Clicking  in the row of a tenant manager allows you to perform some administrative operations on that manager.
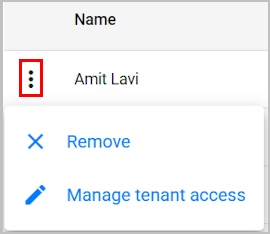
The available actions are:
- Remove: Unassigns the manager from the tenant.
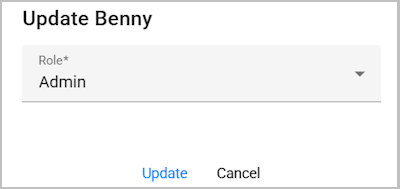
- Manage tenant access: Updates the manager's permissions (role) when working with the Octopus Management Console. To change the manager's role, select the new role from the list in the Update popup and click Update.
Adding tenant managers
The Add Managers button in the upper right corner of the Managers tab allows you to assign additional administrators to work with the tenant.
To add tenant managers:
From the Managers tab, click Add Managers. The Add managers popup opens.
At the left side of the popup, select the checkbox of the relevant manager. Then, from the list in the Tenant Role column, select the appropriate role.
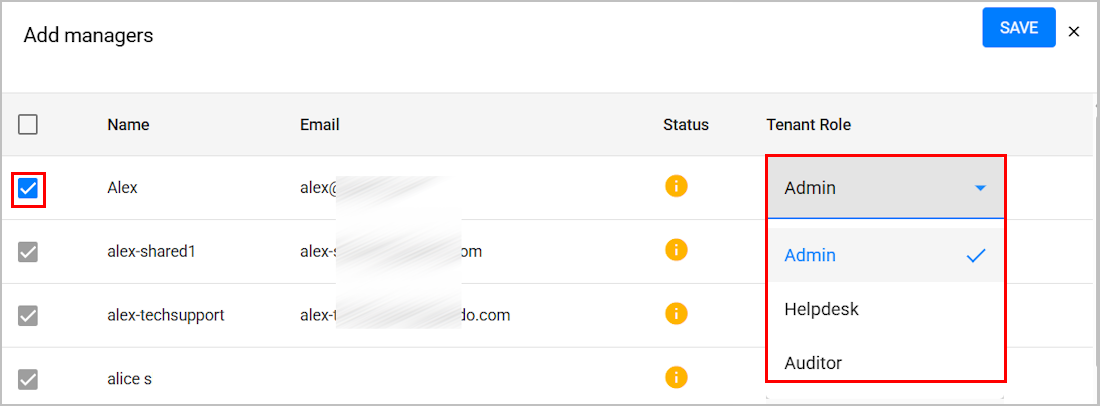
The managers listed in the Add managers popup are users who have been integrated with the Tenant Manager. If users you want to add are missing from the list, refer to Adding MSP Managers for instructions.
Repeat Step 2 to add more managers.
To save your changes and close the popup, click Save. The selected managers are added to the Tenant managers list.
Working with managers
The Managers menu lists all administrators associated with the MSP and displays the name, email address, MSP role and status of each one. The filtering tools above the Managers list enable you to filter the list according to status and/or manager name or email (keyword search). Manager status can be either of the following:
- Active: The manager has successfully performed the enrollment process.
- Inactive: The enrollment process has not begun or is incomplete.
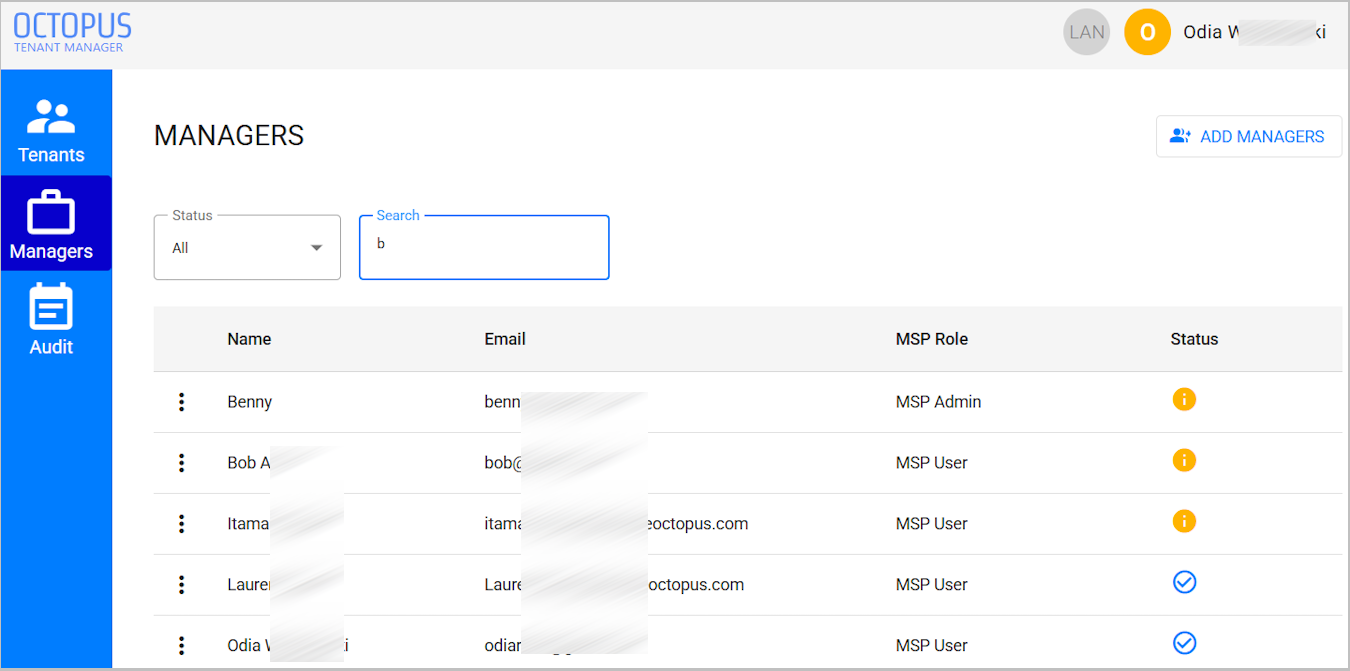
Performing actions on managers
Clicking in the row of a manager allows you to perform some administrative operations on that manager.
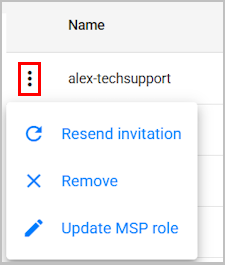
The available actions are:
- Resend invitation: Sends an additional enrollment email to the manager. After selecting this action, click Yes in the Resend email confirmation popup.
- Remove: Removes the manager's integration with the Tenant Manager tool. After selecting this action, click Yes in the confirmation popup.
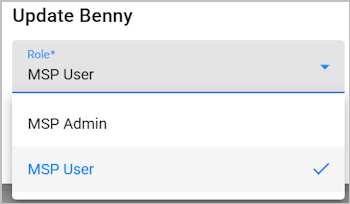
Note: The Remove action is available for MSP Users only. To remove an MSP Admin, first change the MSP role to MSP User. - Update MSP role: Changes the manager's MSP role. To switch the role, select the new role from the list in the Update popup and then click Update.
Viewing and updating tenant assignments
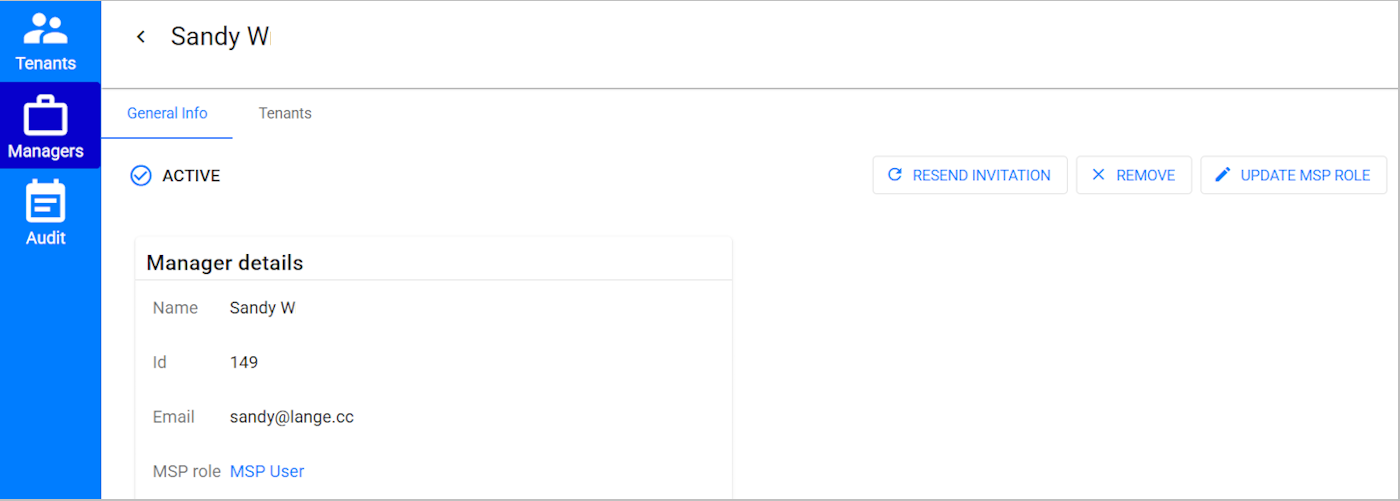
Selecting the row of a manager opens the Manager details page. This page displays general information about the selected manager (including the ID number) and provides quick access to administrative operations (Update MSP role, etc.).
The Tenants tab displays all tenants that the manager is currently authorized to work with and enables you to update the list by adding or removing assigned tenants.
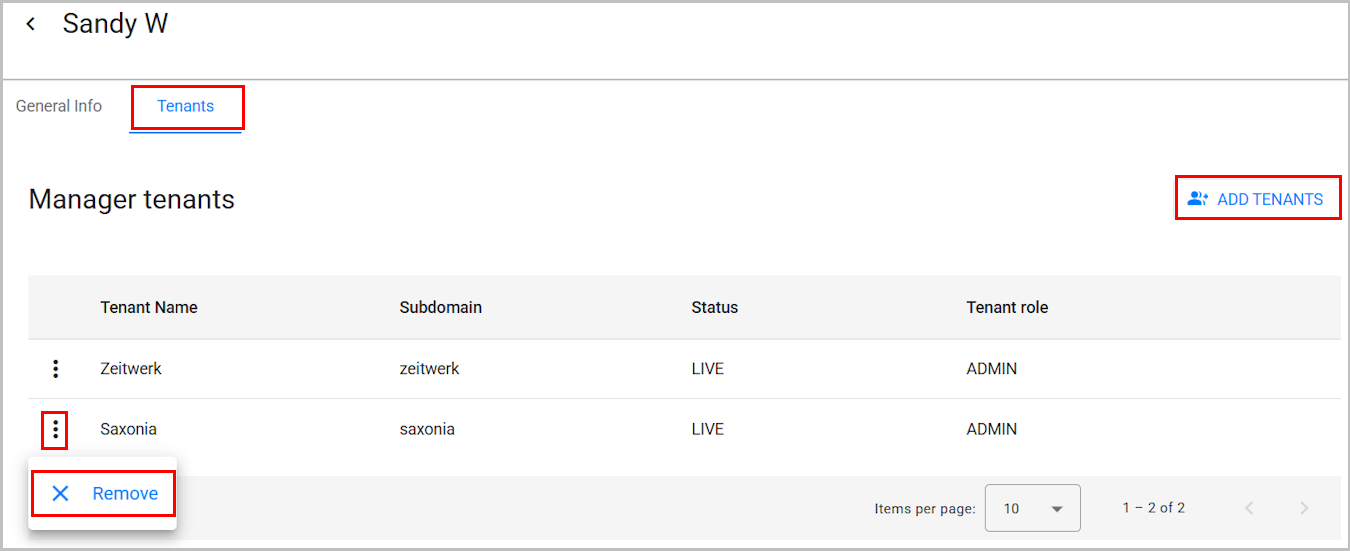
To add tenants to the Manager tenants list:
From the Tenants tab of the relevant manager, click Add Tenants.
In the popup that opens, select the checkbox of the tenant to be added. Then, from the list in the Tenant Role column, select the appropriate role for the manager.
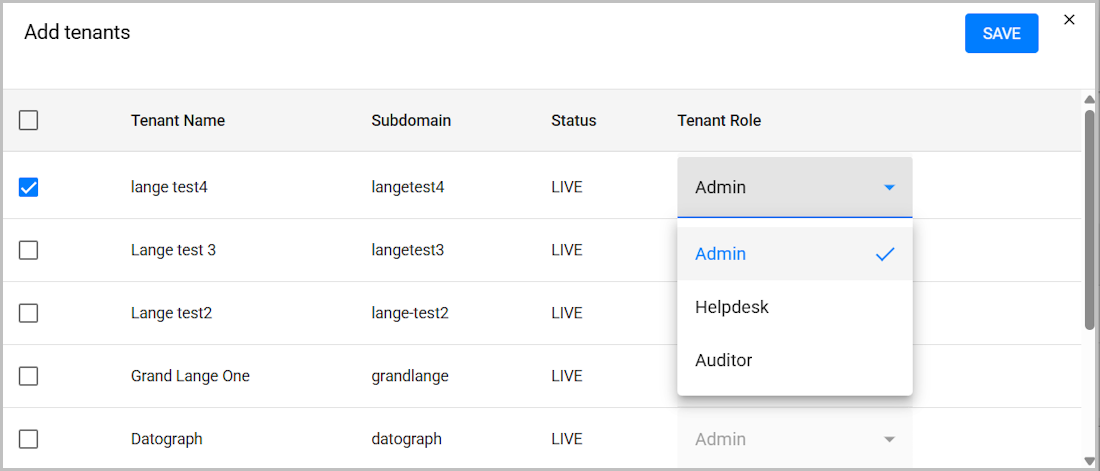
If necessary, repeat Step 2 to add more tenants.
Click Save. The popup closes and the selected tenants are added to the list of assigned tenants.
Adding managers to the MSP
All managers in the Tenant Manager tool are users in the organization of the Primary tenant. Once these users are integrated with the Tenant Manager, they can be assigned to monitor / manage any tenant in the MSP (Handling Tenant Managers). Managers added to the MSP are automatically assigned the role of MSP User.
Preparing for manager integration
Managers can be added from the Local directory, or from any corporate directory that has been integrated with the Octopus Management Console of the Primary tenant. You can include users and groups from different directories in a single Import action.
Before adding users to the Tenant Manager, verify that the following requirements have been fulfilled:
- All relevant directories have been successfully added to the Management Console of the Primary tenant.
- Groups / users to be added to the Tenant Manager have been sent enrollment invitations for the Octopus Authenticator.
The Tenant Manager does not currently support alternate authentication methods (e.g., FIDO).
For more information about integrating directories, adding users and sending enrollment emails, refer to the Octopus Management Console Admin Guide.
Adding users to the Tenant Manager
Follow these steps to add managers:
At the upper right corner of the Managers menu, click Add Managers. The Add users to popup opens.
On the left side of the popup, expand the relevant directory. Then, select the checkboxes of the users / groups to be imported.
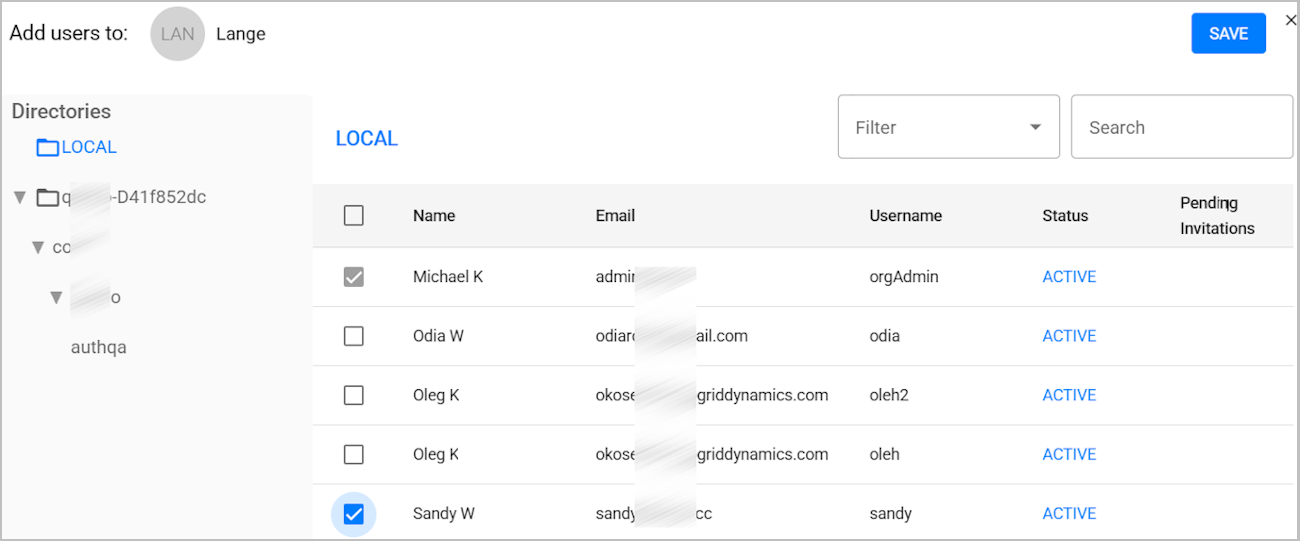
At the upper right corner of the popup, click Save. The popup closes and the selected groups and users are added to the Managers menu.
Viewing the audit records
The Tenant Manager records and logs all actions completed or attempted by users and other system components (e.g., servers). You can use these records for troubleshooting, auditing, and fulfilling regulatory requirements.
To view the list of auditing events, select Audit from the menu bar. By default, all recorded events are listed. You can sort the events in ascending or descending chronological order by clicking the Date column header. In addition, you can filter the list according to event severity, timeframe and other factors, as described below (Filtering the Events List).
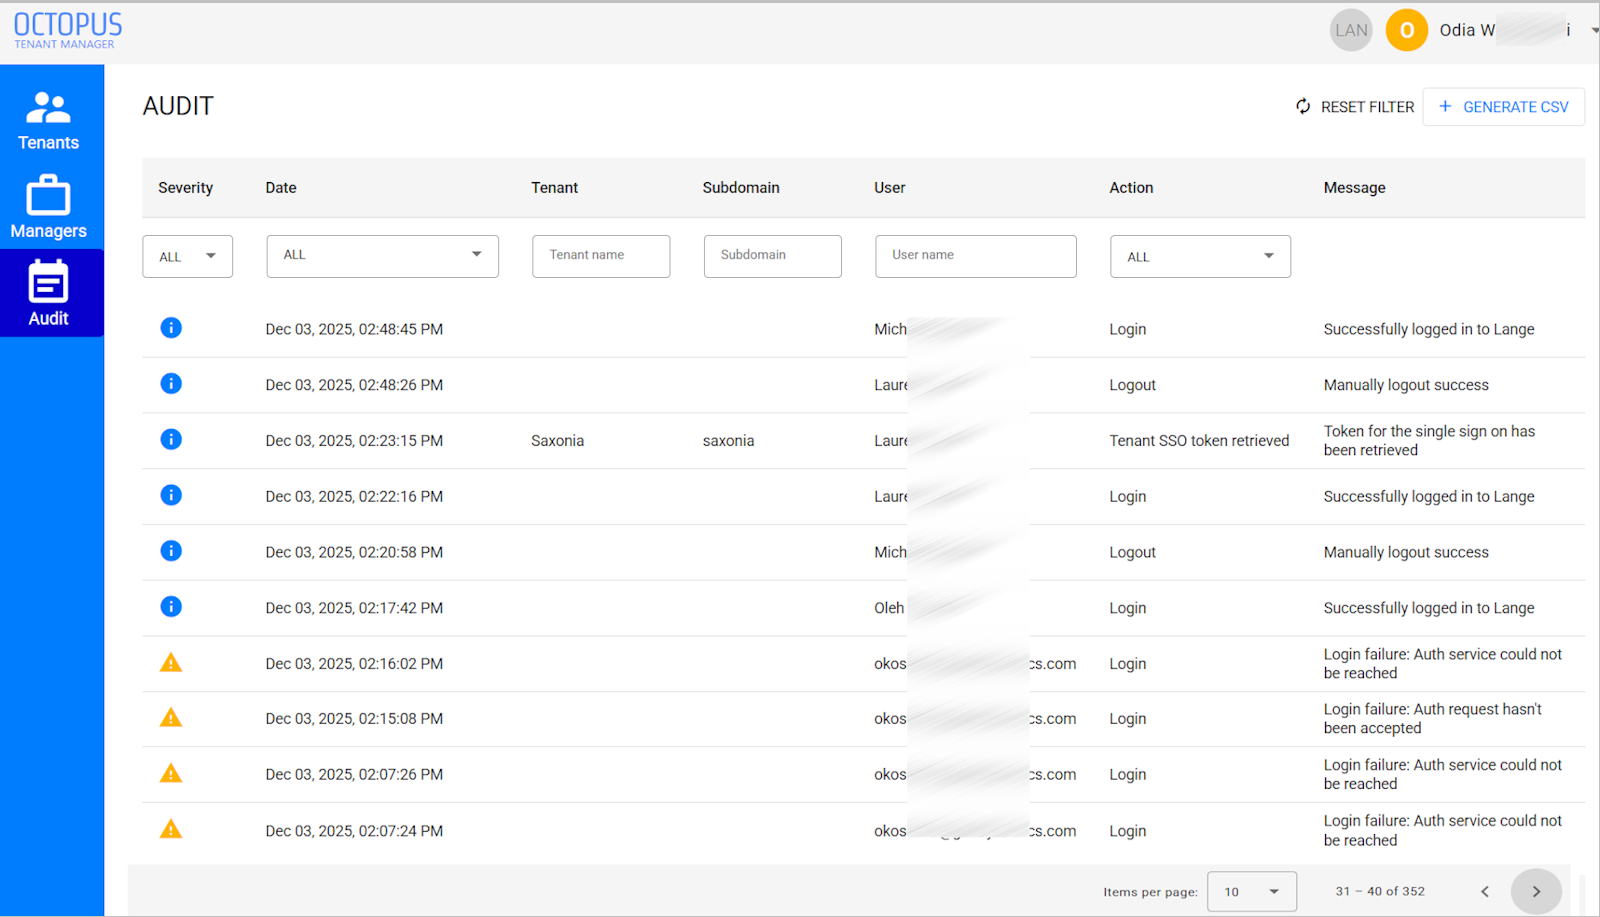
The icons in the Severity column of the events list indicate the degree of impact (or potential impact) of the event on normal system operation and end user experience. The severity levels are:
 Critical: Events that interfere with system functioning, such as failed system setup attempts, invitation enrollment errors, etc.
 Warning: Events that interfere with management and administrative operations (e.g., unsuccessful Admin login to the Management Console).
 Info: Events involving routine flows, actions and operations.
To download auditing events in CSV format, click Generate CSV (at the upper right corner of the page). When auditing filters are selected, the filtered events list is downloaded.
Filtering the events list
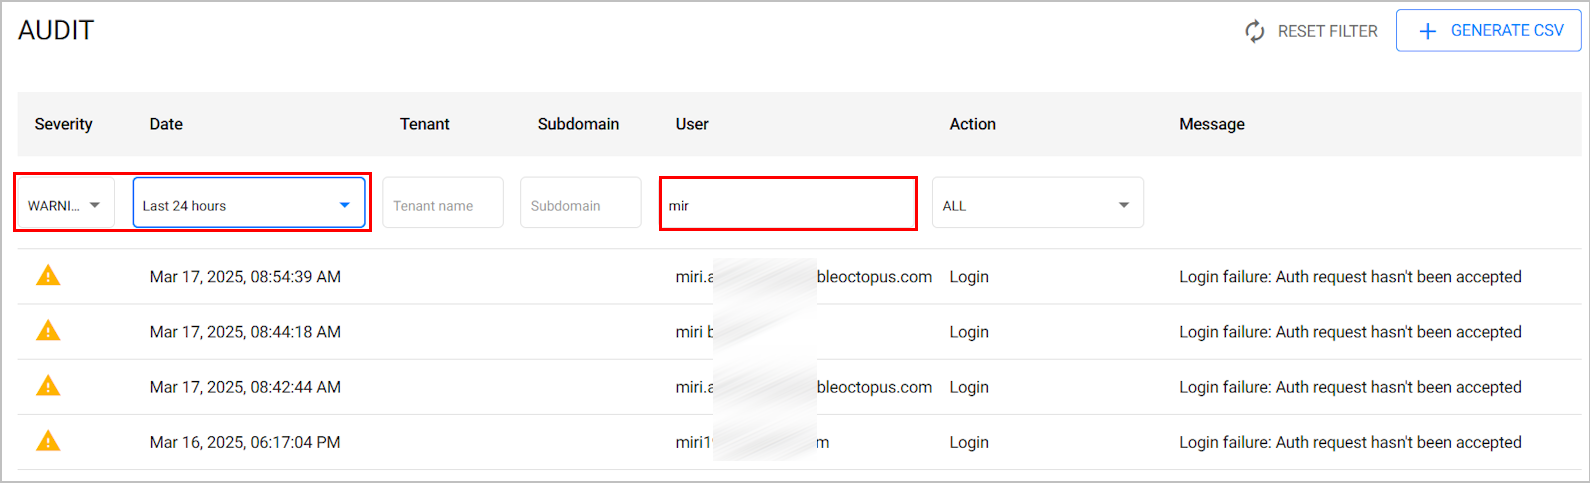
The filtering options above the events list enable you to filter displayed events according to severity, timeframe, action type, and/or a specific search term, such as a subdomain. Multiple filtering methods can be used simultaneously. To return to the default view, click Reset Filter.

The filtering options are:
- Severity: Select the relevant level(s) from the list.
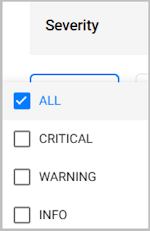
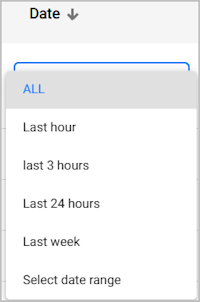
- Date: Select the relevant option, or choose Select date rangeand specify start and end dates in the calendar popup.
- Tenant / Subdomain / User: Enter all or part of the name(s) in the relevant field(s).
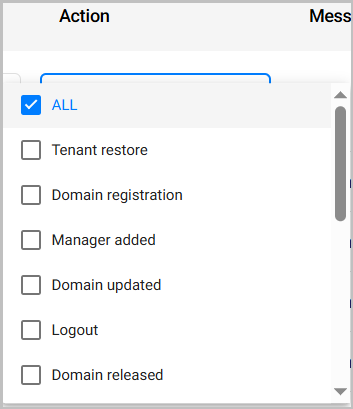
- Action: Select the relevant option(s) from the list.
The following example shows events filtered according to severity, timeframe and username:
Open a ticket with your MSP subdomain and the relevant audit records attached.